
1. Wprowadzenie
Thank you for choosing the Novodesk AZ5130 6-in-1 Automatic Vacuum Sealer Machine. This manual provides essential information for the safe and efficient operation, maintenance, and troubleshooting of your new appliance. Please read these instructions thoroughly before first use and retain them for future reference.

Image 1.1: The Novodesk AZ5130 Vacuum Sealer in operation, sealing food for preservation.
2. Ważne instrukcje bezpieczeństwa
Podczas korzystania z urządzeń elektrycznych należy zawsze przestrzegać podstawowych zasad bezpieczeństwa, aby zminimalizować ryzyko pożaru, porażenia prądem i obrażeń ciała, w tym:
- Przed użyciem urządzenia należy przeczytać wszystkie instrukcje.
- Do not operate the appliance with a damaged power cord or plug. If the cord or plug is damaged, contact customer support for assistance.
- Nie zanurzaj urządzenia, przewodu zasilającego ani wtyczki w wodzie ani innych płynach.
- Urządzenie to nie jest przeznaczone do użytku przez osoby (w tym dzieci) o ograniczonej sprawności fizycznej, sensorycznej lub umysłowej, a także osoby nieposiadające odpowiedniego doświadczenia lub wiedzy, chyba że znajdują się one pod nadzorem osoby odpowiedzialnej za ich bezpieczeństwo lub otrzymały od niej instrukcje dotyczące korzystania z urządzenia.
- Należy zachować ścisły nadzór, jeżeli z urządzenia korzystają dzieci lub w ich pobliżu.
- Odłącz od gniazdka, gdy nie jest używane i przed czyszczeniem. Pozostaw do ostygnięcia przed założeniem lub zdjęciem części oraz przed czyszczeniem urządzenia.
- Nie należy stosować nasadek niezalecanych przez producenta.
- Nie stosować na zewnątrz.
- Nie umieszczać na gorącym palniku gazowym lub elektrycznym ani w jego pobliżu, a także w nagrzanym piekarniku.
- Przed użyciem należy zawsze sprawdzić, czy pokrywa jest prawidłowo zamknięta.
- Use only vacuum sealer bags designed for vacuum sealing.
3. Zawartość opakowania
Carefully unpack your Novodesk AZ5130 Vacuum Sealer and check that all items are present and in good condition. If any items are missing or damaged, please contact customer support.
- 1 x Novodesk AZ5130 Vacuum Sealer Machine
- 1 x Przewód zasilający
- 1 x Vacuum Hose (for external vacuuming)
- 2 x Sealing Foam Gaskets (replacement)
- 6 x Pre-cut Vacuum Bags (3.9" x 7.8")
- 6 x Pre-cut Vacuum Bags (7.8" x 11.8")

Image 3.1: All components included in the Novodesk AZ5130 Vacuum Sealer package.
4. Koniec produktuview
Familiarize yourself with the various parts and functions of your vacuum sealer.

Image 4.1: Control panel and function buttons of the vacuum sealer.
Funkcje panelu sterowania:
- Process Indicator Light: Illuminates to show operating status.
- Tryb suszenia: For vacuum sealing dry foods like nuts and grains.
- Tryb wilgotny: For vacuum sealing foods with a small amount of liquid.
- Funkcja impulsu: Allows manual control of the vacuum process, ideal for fragile foods.
- Seal Function: Seals bags without vacuuming.
- Przycisk stopu: Zatrzymuje bieżącą operację.
Image 4.2: Internal components of the vacuum sealer.
Kluczowe komponenty:
- Komora próżniowa: Miejsce, w którym z torby usuwane jest powietrze.
- Pasek silikonowy: Helps create a tight seal.
- Pasek uszczelniający: Heats to create the bag seal (4mm wide).
- Foam Seal Ring: Ensures proper vacuum.
- Cover Slaps: Prevents the vacuum bag from coming out of the vacuum chamber.
- External Sliding Cutter: Integrated cutter for custom bag sizes.
- External VAC Port: For connecting the vacuum hose to jars and containers.
5. Konfiguracja
Przed pierwszym użyciem upewnij się, że urządzenie jest czyste i suche. Umieść pakowarkę próżniową na płaskiej, stabilnej powierzchni.
Początkowe kroki konfiguracji:
- Connect the power cord to the appliance and then to a suitable electrical outlet.
- Prepare your vacuum bag with food, ensuring the open end is clean and dry. Leave at least 2-3 inches of space between the food and the top of the bag.
6. Instrukcja obsługi
6.1. Basic Vacuum Sealing (Dry & Moist Modes)
Follow these steps for standard vacuum sealing of food bags:
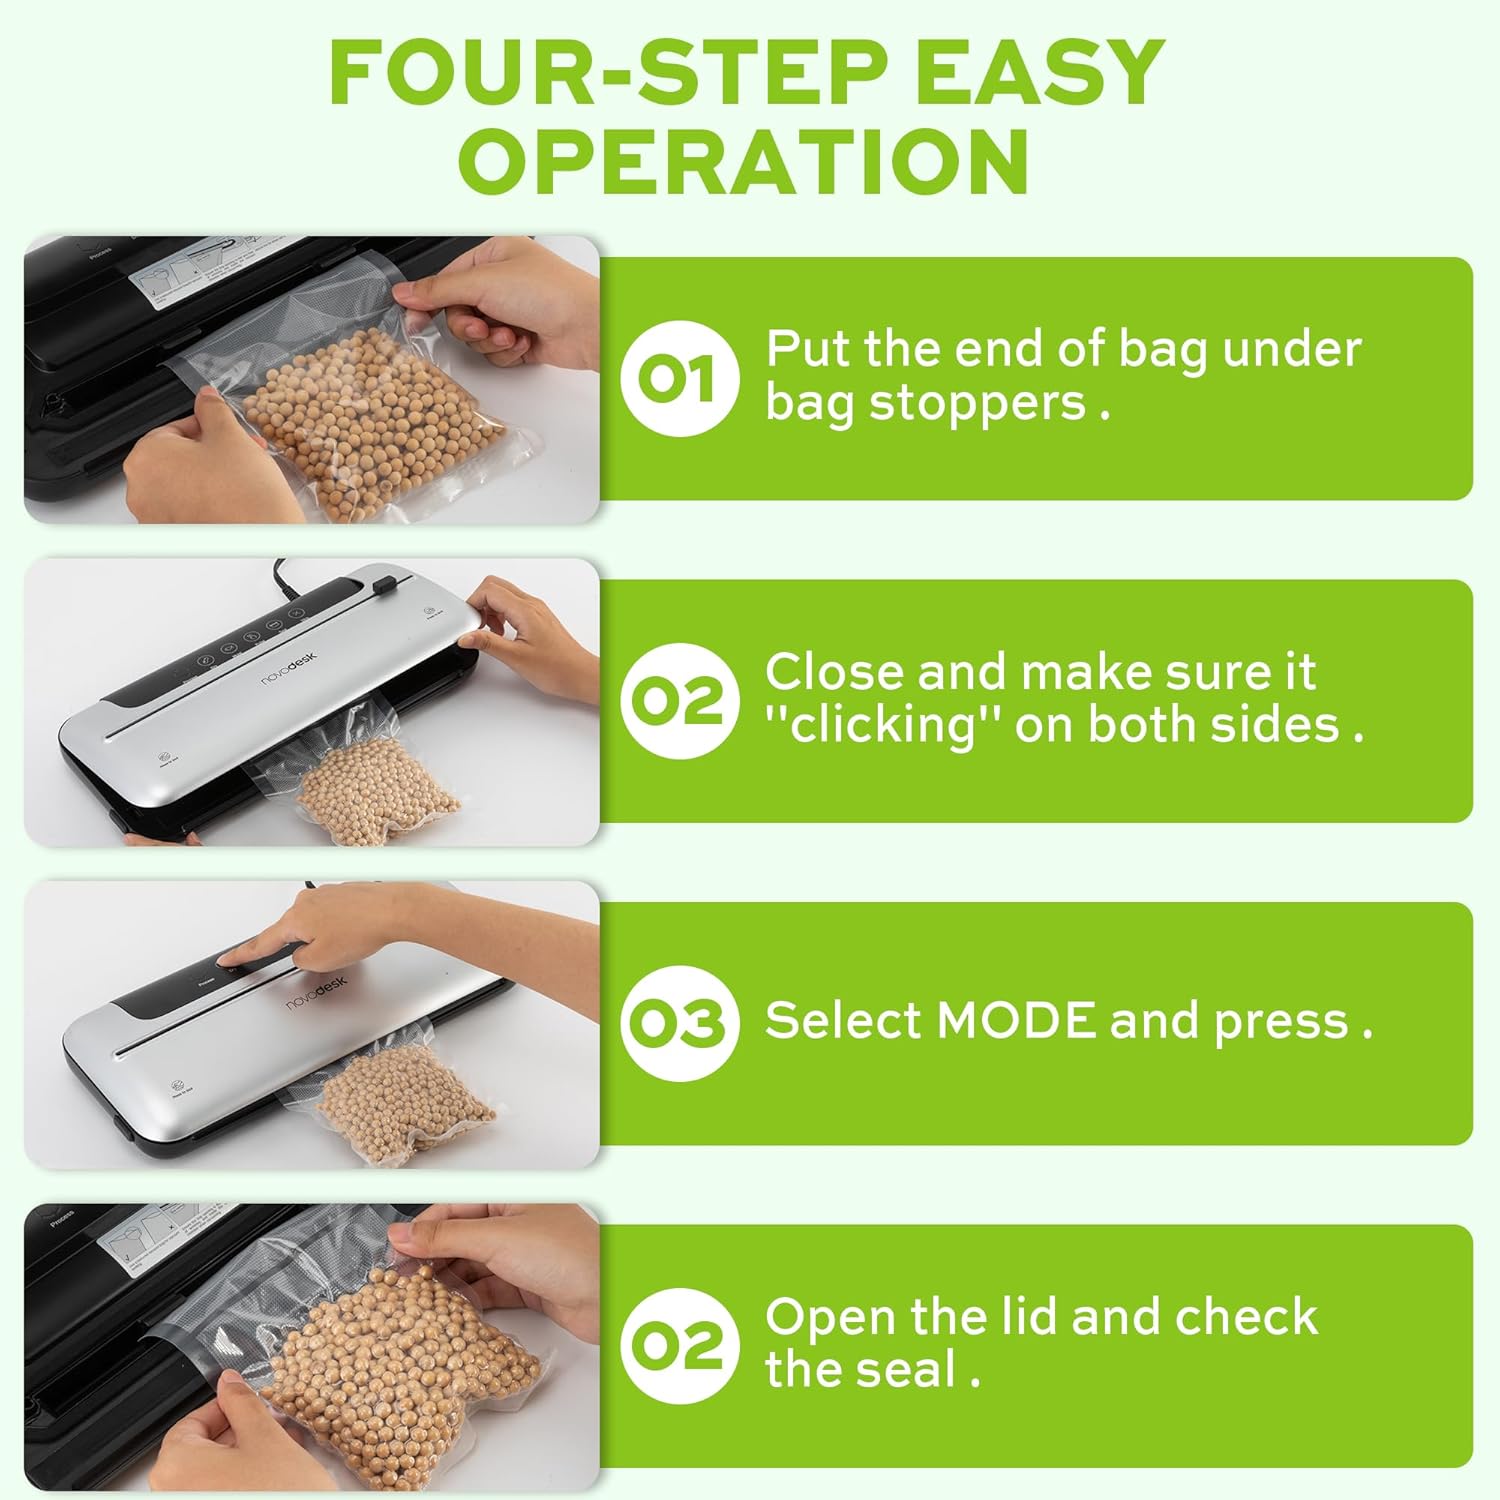
Image 6.1: Four-step easy operation for vacuum sealing.
- Przygotuj torbę: Place the open end of the vacuum bag under the bag stoppers, ensuring it is flat and centered within the vacuum chamber.
- Zamknij pokrywę: Firmly close the lid of the vacuum sealer. Press down on both sides until you hear a "clicking" sound, indicating that the lid is securely latched.
- Wybierz tryb: Choose the appropriate mode for your food:
- Naciśnij Suchy button for dry foods.
- Naciśnij Wilgotny button for moist foods.
- Sprawdź pieczęć: Once the process is complete and the indicator light turns off, open the lid and remove the sealed bag. Inspect the seal to ensure it is airtight.
6.2. Funkcja impulsu
The Pulse function provides manual control over the vacuum process, which is ideal for delicate or fragile foods that could be crushed by full vacuum pressure.
- Follow steps 1 and 2 from "6.1. Basic Vacuum Sealing".
- Naciśnij i przytrzymaj Puls przycisk. Urządzenie rozpocznie odkurzanie.
- Uwolnij Puls button when the desired vacuum level is reached.
- Naciśnij Foka button to seal the bag.
- Otwórz pokrywę i wyjmij szczelnie zamkniętą torebkę.
6.3. Funkcja tylko uszczelnienia
Use the Seal function to create a seal without vacuuming, useful for making custom-sized bags from a roll or resealing snack bags.
- Umieść otwarty koniec torebki na pasku uszczelniającym.
- Zamknij pokrywę dokładnie, aż usłyszysz kliknięcie.
- Naciśnij Foka button. The machine will heat and seal the bag.
- Once the sealing process is complete, open the lid and remove the sealed bag.
6.4. External Vacuum Function (for Jars/Containers)
Your vacuum sealer includes an external vacuum hose for use with compatible vacuum-sealable jars, containers, and wine stoppers.

Image 6.2: Using the external vacuum system with various containers.
- Prepare your vacuum-sealable jar or container with food. Ensure the lid is properly placed.
- Insert one end of the vacuum hose into the external VAC port on the vacuum sealer.
- Insert the other end of the vacuum hose into the port on your vacuum-sealable jar or container.
- Close the lid of the vacuum sealer (no bag needed inside).
- Naciśnij External VAC button (if available, otherwise use Dry/Moist mode to activate vacuum pump). The machine will begin to remove air from the container.
- Once the vacuum process is complete, remove the hose. The container should now be sealed.
6.5. Using the External Sliding Cutter
The integrated sliding cutter allows you to create custom-sized bags from a roll of vacuum sealer material.
- Place the vacuum bag roll across the cutting area.
- Slide the cutter blade across the bag material to achieve the desired length.
7. Konserwacja i czyszczenie
Regularne czyszczenie i konserwacja zapewnią długowieczność i optymalną wydajność pakowarki próżniowej.
Instrukcje czyszczenia:
- Zawsze odłączaj urządzenie od zasilania przed czyszczeniem.
- Wytrzyj obudowę urządzenia miękką, damp ściereczka. Nie należy używać środków czyszczących o właściwościach ściernych ani rozpuszczalników.
- Wyczyść komorę próżniową i obszar paska uszczelniającego za pomocąamp ściereczką. Upewnij się, że nie pozostały na niej żadne resztki jedzenia ani płyny.
- The foam seal rings can be removed for cleaning if necessary. Wash with mild soap and water, rinse thoroughly, and allow to air dry completely before reinserting.
- Przed schowaniem lub ponownym użyciem urządzenia należy upewnić się, że wszystkie części są całkowicie suche.
Składowanie:
Store the vacuum sealer in a clean, dry place. For best results, store with the lid unlatched to prevent compression of the foam seal rings, which can affect sealing performance over time.
8. Rozwiązywanie Problemów
Jeśli masz problemy z pakowarką próżniową, zapoznaj się z poniższymi typowymi problemami i ich rozwiązaniami:
| Problem | Możliwa przyczyna | Rozwiązanie |
|---|---|---|
| Maszyna się nie włącza. | Brak zasilania. | Check if the power cord is securely plugged into the outlet and the machine. Test the outlet with another appliance. |
| Urządzenie odkurza, ale nie uszczelnia. | Sealing strip or foam gasket is dirty/damaged. Bag is not positioned correctly. | Clean the sealing strip and foam gaskets. Ensure the bag is flat and centered over the sealing strip. Replace gaskets if damaged. |
| Maszyna uszczelnia, ale nie wytwarza próżni. | Lid not properly latched. Foam gaskets are dirty or worn. Bag has holes or is not suitable. | Ensure the lid is firmly closed and latched on both sides. Clean or replace foam gaskets. Use proper vacuum sealer bags and check for damage. |
| Próżnia jest słaba i nierównomierna. | Foam gaskets are dirty or worn. Too much liquid in the bag (for Dry mode). | Clean or replace foam gaskets. Use Moist mode for foods with liquid, or pre-freeze liquids. |
| Torba topi się podczas zgrzewania. | Sealing time too long (unlikely for automatic models). | Ensure you are using appropriate vacuum sealer bags. If issue persists, contact customer support. |
If the problem persists after attempting these solutions, please contact Novodesk customer support for further assistance.
9. Specyfikacje
| Marka | Novodesk |
| Numer modelu | AZ5130 |
| Moc / Wattage | 120 watów |
| Tomtage | 120 V |
| Tworzywo | Akrylonitryl-butadien-styren (ABS) |
| Waga przedmiotu | 980 g (2.16 funta) |
| Kolor | Srebrzysty |
| Tryb działania | Automatyczny |
| Maksymalna moc ssania | 75KPa |
| Szerokość paska uszczelniającego | 4mm |
10. Gwarancja i wsparcie
Novodesk products are manufactured to high-quality standards. For information regarding warranty coverage, product support, or to purchase replacement parts, please refer to the warranty card included with your product or visit the official Novodesk website. If you have any questions or require assistance, please contact Novodesk customer service.