1. Wprowadzenie
This manual provides detailed instructions for the installation, operation, and maintenance of your DASAN AT249W-ORB Wall Mount Shower System. Please read this manual thoroughly before installation and retain it for future reference. Proper installation and care will ensure optimal performance and longevity of your shower system.
2. Informacje dotyczące bezpieczeństwa
- Przed rozpoczęciem jakichkolwiek prac hydraulicznych należy zawsze zakręcić główny dopływ wody.
- Nosić odpowiedni sprzęt ochrony osobistej, taki jak okulary i rękawice ochronne.
- Jeśli masz wątpliwości co do jakiegokolwiek etapu instalacji, skonsultuj się z wykwalifikowanym hydraulikiem.
- Upewnij się, że wszystkie połączenia są solidne, aby zapobiec wyciekom.
- Do not overtighten components, as this may cause damage.
3. Zawartość opakowania
Verify that all components are present and undamaged before installation. If any parts are missing or damaged, please contact customer support.

Obraz: Wybuchowy view of the DASAN AT249W-ORB shower system components.
- Głowica prysznicowa
- Płyta czołowa
- Zawór podtynkowy
- Ramię prysznicowe
- Handheld Wand
- Kolanko ścienne
- Body Jets (4 units)
- Shower Handle
- Sprzęt montażowy
- Pokrętło przełączające
- Flange for Handheld
- Shower Hose (59 inches)
- Flange for Shower Arm
4. Specyfikacje
| Funkcja | Specyfikacja |
|---|---|
| Marka | Dasan |
| Numer modelu | AT249W-ORB |
| Kolor | Brąz olejowany |
| Tworzywo | Mosiądz, stal nierdzewna |
| Rodzaj wykończenia | Matowy |
| Liczba uchwytów | 1 |
| Typ montażu | Naścienny |
| Przepływ | 1.8 GPM |
| Rozmiar głowicy prysznicowej | 9 cali |
| Długość węża prysznicowego | 59 cali |
| In-Wall Depth (Min-Max) | 2-3/16" (55 mm) to 3-1/16" (78 mm) |
| Znajomości | 1/2" męski NPT |
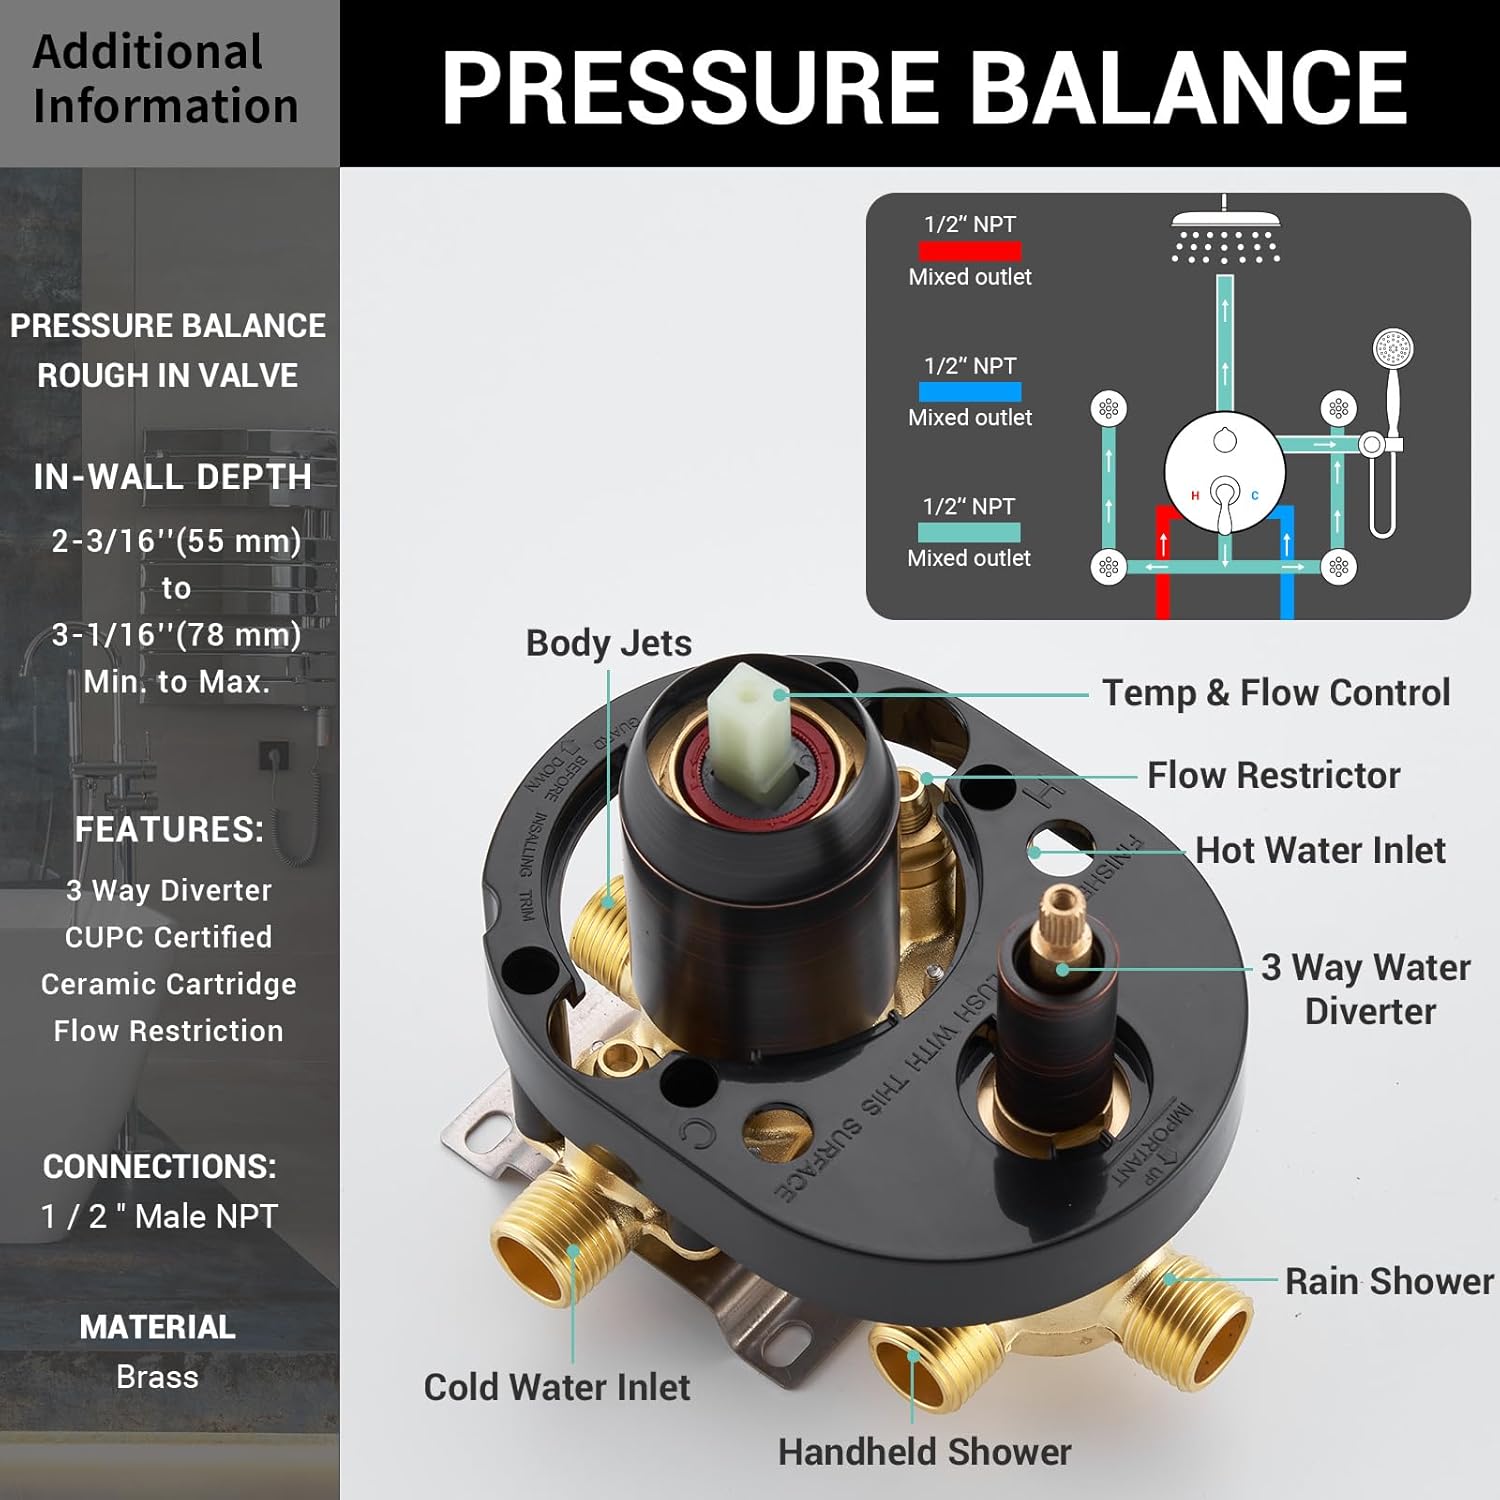
Image: Pressure balance rough-in valve details, including in-wall depth and connections.
5. Instrukcje instalacji
It is recommended to have this product installed by a professional plumber. Ensure the main water supply is turned off before proceeding.
5.1 Czynności przed instalacją
- Sprawdź, czy cała zawartość paczki jest obecna i nieuszkodzona.
- Prepare the wall opening according to the rough-in valve dimensions, ensuring the in-wall depth is between 2-3/16" (55 mm) and 3-1/16" (78 mm).
- Flush the water lines to remove any debris before connecting the valve.
5.2 Montaż wstępny zaworu
- Mount the rough-in valve (3) securely within the wall, ensuring it is level and at the correct depth.
- Connect the hot and cold water supply lines to the designated inlets on the valve (1/2" NPT connections).
- Connect the mixed outlets from the valve to the rain shower, handheld shower, and body jet supply lines.
- Perform a leak test by turning on the main water supply and checking all connections.
5.3 Instalacja komponentów
- Shower Arm and Head: Install the shower arm (4) into the wall outlet, ensuring it is securely tightened. Attach the shower head (1) to the shower arm.
- Prysznic ręczny: Install the wall supply elbow (6) for the handheld shower. Connect the shower hose (12) to the wall supply elbow and the handheld wand (5). Mount the flange (11) for the handheld.
- Dysze do ciała: Install the body jets (7) into their respective wall outlets. Ensure they are securely tightened and oriented as desired.
- Face Plate and Handle: Install the face plate (2) over the rough-in valve. Attach the shower handle (8) and diverter knob (10) according to the valve's instructions, securing them with the provided mounting hardware (9).

Obraz: Ponadview of the assembled DASAN AT249W-ORB shower system.
6. Instrukcje obsługi
Your DASAN shower system offers multiple functions for a customized showering experience.

Image: Control functions for the shower system.
6.1 Temperature and Flow Control
- The main handle controls both water temperature and flow.
- Rotate the handle to adjust the temperature from cold to hot.
- Pull the handle outwards to increase water flow and push inwards to decrease it.
6.2 Function Selection (Diverter Knob)
The diverter knob allows you to switch between the rain shower, handheld shower, and body jets.
- Deszcz: Rotate the diverter knob to activate the overhead rain shower. The 9-inch shower head provides broad coverage.
- Prysznic ręczny: Rotate the diverter knob to activate the handheld shower. The 59-inch hose allows for flexible use.
- Dysze do ciała: Rotate the diverter knob to activate the body spray jets. These jets feature a 360-degree adjustable angle for targeted water flow.

Image: Rain shower head with adjustable angle feature.
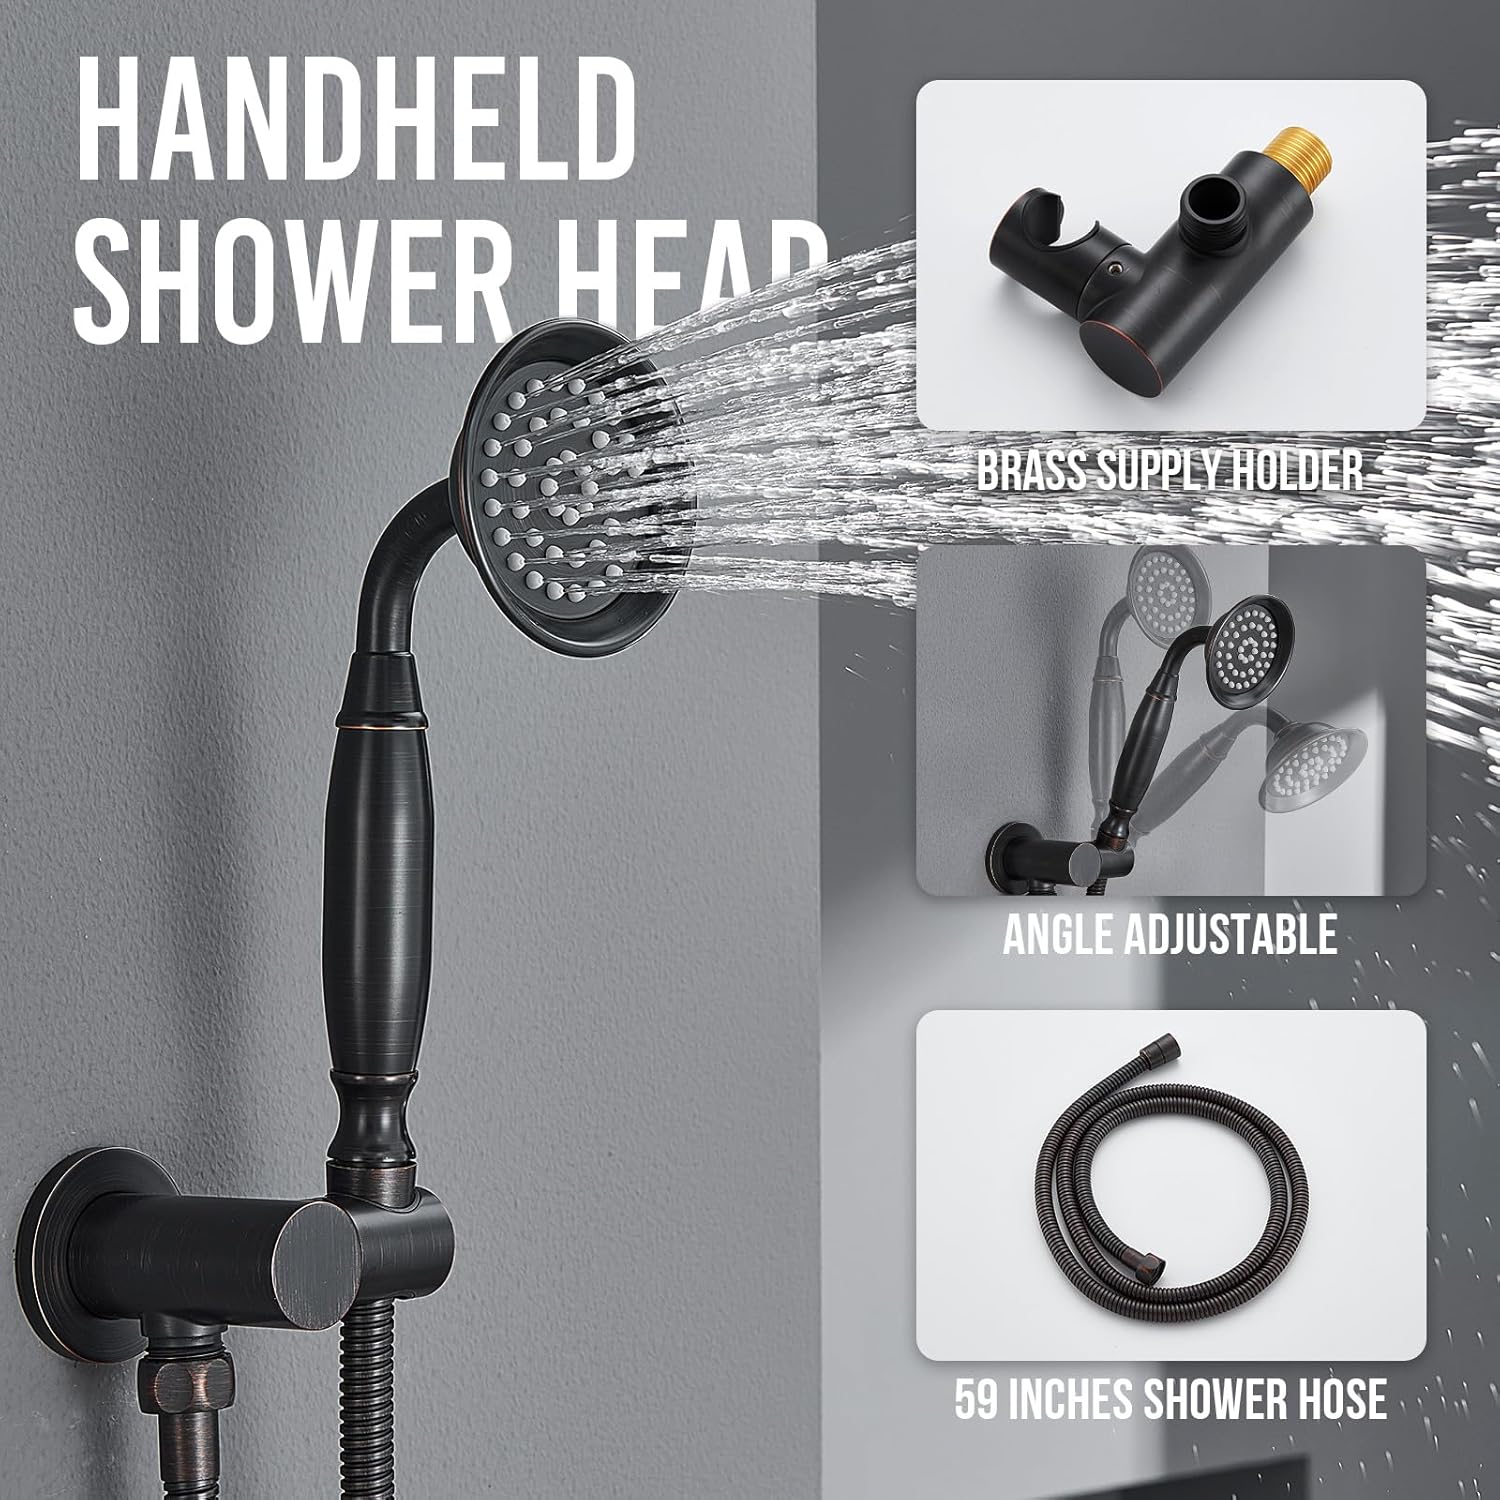
Image: Handheld shower head with 59-inch hose and brass supply holder.

Image: Body jets with easy-clean nozzles and 360-degree adjustable angle.
7. Konserwacja
Regularne czyszczenie i konserwacja pomogą zachować wykończenie i funkcjonalność Twojego systemu prysznicowego.
- Czyszczenie wykończenia: Clean the oil rubbed bronze finish with a soft, damp ściereczką. Unikaj środków czyszczących o działaniu ściernym, silnych środków chemicznych i gąbek szorujących, ponieważ mogą one uszkodzić wykończenie.
- Czyszczenie dysz: The rain shower head, handheld shower, and body jets feature silicone nozzles. To remove mineral buildup (limescale), gently rub the nozzles with your finger or a soft brush. This helps maintain consistent water flow.
- Kontrole okresowe: Periodically check all connections for tightness and signs of leaks.
8. Rozwiązywanie Problemów
Jeśli masz problemy z systemem prysznicowym, zapoznaj się z poniższymi typowymi problemami i rozwiązaniami:
| Problem | Możliwa przyczyna | Rozwiązanie |
|---|---|---|
| Niski przepływ wody | Clogged nozzles, partially closed shut-off valves, debris in lines. | Clean silicone nozzles. Ensure shut-off valves are fully open. Flush water lines if debris is suspected. |
| Wycieki wody | Luźne połączenia, uszkodzone pierścienie uszczelniające/podkładki. | Tighten all connections. Inspect and replace any damaged O-rings or washers. Do not overtighten. |
| Niezmienna temperatura wody | Pressure balance valve issue, hot/cold water supply imbalance. | Ensure hot and cold water supplies are balanced. If the problem persists, consult a plumber to inspect the pressure balance valve. |
| Funkcje przełączania przełącznika nie są przełączane | Debris in diverter mechanism, worn diverter cartridge. | Flush the system. If the issue continues, the diverter cartridge may need inspection or replacement by a professional. |
If these solutions do not resolve the issue, please contact Dasan customer support.
9. Informacje o gwarancji
The DASAN AT249W-ORB Wall Mount Shower System comes with the following warranty:
- Użytkowanie mieszkaniowe: 10-roczna ograniczona gwarancja
- Zastosowanie komercyjne: 5-roczna ograniczona gwarancja
Please retain your proof of purchase for warranty claims. The warranty covers manufacturing defects under normal use and service. For full warranty terms and conditions, please refer to the official Dasan webodwiedź witrynę lub skontaktuj się z działem obsługi klienta.
10. Wsparcie
For further assistance, technical support, or to inquire about replacement parts, please visit the official Dasan store or contact their customer service department.
Visit the Dasan Store: Dasan Official Store