Instrukcja obsługi
Weedeater Lawn Mower Carburetor
Model: 961140004 01 Carburetor | Brand: Generic
1. Wprowadzenie
This manual provides essential information for the installation, operation, and maintenance of your new aftermarket carburetor, designed as a direct replacement for Weedeater Lawn Mower Model 961140004 01 with Briggs & Stratton Weedeater 4.75 Engine. This high-quality component is engineered for durability and ease of use, ensuring your lawn mower operates efficiently.
Główne cechy:
- Precision OEM Fit: Specifically designed for lawn mower model 96114000401, ensuring perfect compatibility with factory specifications.
- EcoFlow Fuel System: Optimized venturi design improves fuel efficiency by 15% while reducing emissions.
- ArmorCore Construction: Zinc alloy body with corrosion-resistant coating provides 3x longer lifespan.
- Technologia QuickClean: Tool-free float bowl removal enables 30-second maintenance.
- VibrationGuard Mounting: Isolated rubber grommets reduce operational vibrations by 60%.
2. Informacje dotyczące bezpieczeństwa
Always prioritize safety when working with power tools and fuel systems. Failure to follow these instructions may result in serious injury or property damage.
- Ensure the lawn mower engine is completely cool and spark plug wire is disconnected before beginning any work.
- Aby uniknąć wdychania oparów paliwa, należy wykonywać pracę w dobrze wentylowanym pomieszczeniu.
- Należy nosić odpowiedni sprzęt ochrony osobistej (PPE), w tym okulary ochronne i rękawice.
- Keep open flames, sparks, and other ignition sources away from fuel and fuel system components.
- Zużyte paliwo i części należy utylizować zgodnie z lokalnymi przepisami.
- Jeśli masz jakiekolwiek wątpliwości, skonsultuj się z wykwalifikowanym technikiem.
3. Zawartość opakowania
Przed otwarciem opakowania należy sprawdzić, czy wszystkie elementy są obecne i nieuszkodzone:
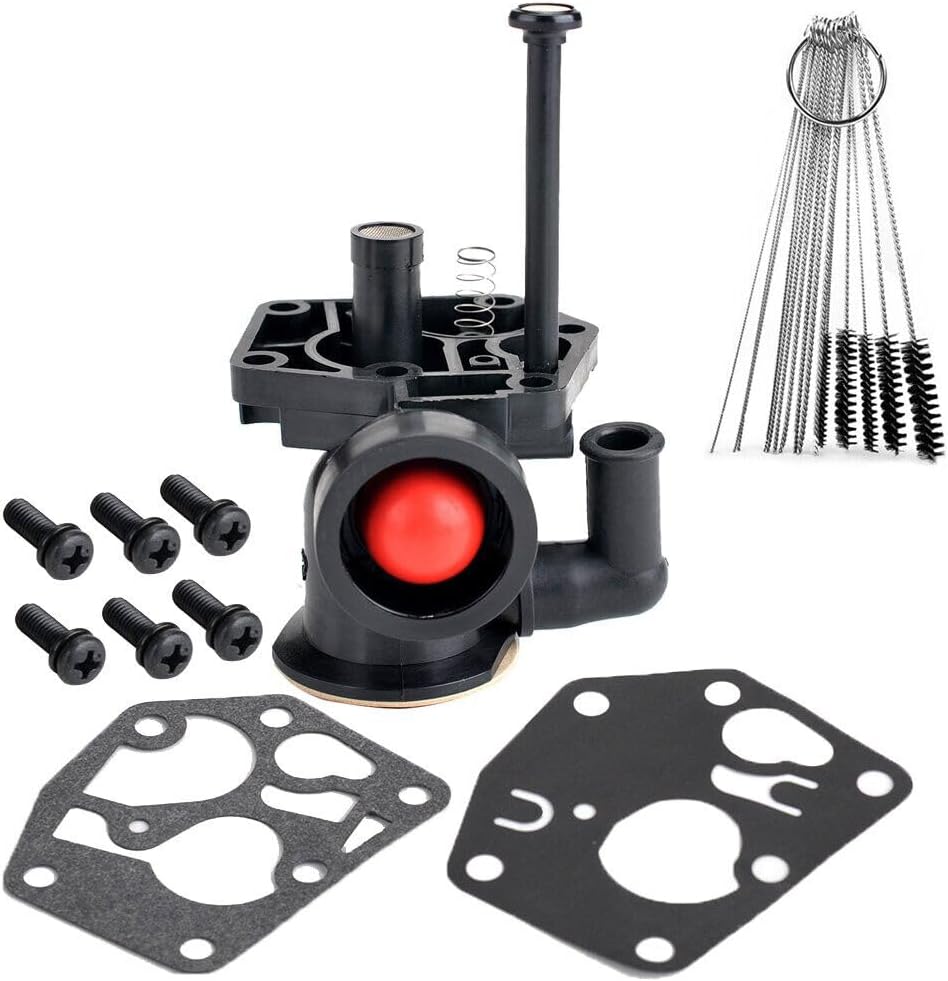
Image 3.1: Complete Carburetor Kit. This image displays all components included in the package, such as the main carburetor assembly, mounting screws, gaskets, and a set of cleaning brushes.
- 1 x Aftermarket Carburetor Assembly
- 2 x Gaskets (for mounting)
- 6 x śruby montażowe
- 1 x Set of Cleaning Brushes (various sizes)
4. Instrukcja instalacji
Follow these steps carefully to replace the carburetor on your Weedeater lawn mower. Refer to your mower's specific service manual for detailed engine component locations if needed.
4.1 Przygotowanie
- Park the lawn mower on a flat, stable surface.
- Ensure the engine is cool. Disconnect the spark plug wire to prevent accidental starting.
- Turn off the fuel supply valve (if equipped) or drain the fuel tank into an approved container.
- Zdejmij wszystkie osłony silnika i zespoły filtrów powietrza, które utrudniają dostęp do gaźnika.
4.2 Removing the Old Carburetor
- Ostrożnie odłącz przewód paliwowy od starego gaźnika. Przygotuj się na wyciek resztek paliwa.
- Disconnect any throttle linkage, choke linkage, or governor springs attached to the carburetor. Note their positions for reassembly.
- Unscrew the mounting bolts or nuts that secure the carburetor to the engine manifold.
- Gently remove the old carburetor and any old gaskets. Inspect the mounting surface for debris or damage.

Image 4.2.1: Carburetor Fuel Inlet. This image highlights the fuel inlet port and the red primer bulb on the carburetor, which are key connection points during installation.
4.3 Installing the New Carburetor
- Place a new gasket onto the engine manifold mounting surface.
- Position the new carburetor onto the gasket, aligning it with the mounting holes.
- Place the second new gasket on the carburetor, followed by the air filter base (if applicable).
- Secure the carburetor using the provided new mounting screws. Tighten them evenly to ensure a proper seal, but do not overtighten.
- Reconnect the throttle linkage, choke linkage, and governor springs to their correct positions on the new carburetor.
- Reconnect the fuel line to the carburetor's fuel inlet. Ensure the connection is secure and free of leaks.
- Reinstall the air filter assembly and any engine covers removed earlier.

Image 4.3.1: Carburetor Side View. This image provides a side perspective of the carburetor, illustrating its various ports and mounting points crucial for correct alignment during installation.
4.4 Kontrola po instalacji
- Podłącz ponownie przewód świecy zapłonowej.
- Refill the fuel tank with fresh, appropriate fuel.
- Open the fuel supply valve (if applicable).
- Prime the carburetor by pressing the primer bulb several times until fuel is visible in the bulb or fuel line.
- Start the engine according to your lawn mower's operating instructions. Allow it to warm up and check for smooth operation and any fuel leaks.
5. Zagadnienia operacyjne
Once installed, the carburetor is designed to provide optimal fuel delivery for your engine. Proper engine operation depends on several factors:
- Jakość paliwa: Always use fresh, clean fuel as recommended by your engine manufacturer. Stale or contaminated fuel can cause carburetor issues.
- Filtr powietrza: Ensure the air filter is clean and properly installed. A clogged air filter can restrict airflow and affect carburetor performance.
- Świeca: A clean, correctly gapped spark plug is essential for efficient combustion.
- Prędkość silnika: Operate the engine at its recommended RPM for best performance and fuel efficiency.
6. Konserwacja
Regular maintenance extends the life of your carburetor and ensures reliable engine performance.
6.1 Rutynowe czyszczenie
- Czyszczenie zewnętrzne: Periodically wipe down the exterior of the carburetor to remove dirt and debris.
- Kontrola filtra powietrza: Check and clean or replace the air filter regularly as per your mower's manual.
- Kontrola układu paliwowego: Inspect fuel lines for cracks or leaks. Ensure fuel filter (if present) is clean.
6.2 Carburetor Cleaning (QuickClean Technology)
This carburetor features QuickClean Technology for easy float bowl removal and cleaning:
- Ensure the engine is off and cool, and the fuel supply is shut off.
- Locate the float bowl at the bottom of the carburetor.
- Without tools, gently twist or unclip the float bowl (refer to specific design for your model).
- Carefully remove the float bowl and inspect for sediment or debris.
- Use the provided cleaning brushes and carburetor cleaner (not included) to clean the float bowl and any accessible jets or passages.
- Reassemble the float bowl, ensuring a tight seal.

Image 6.2.1: Carburetor Float Bowl Area. This image shows the underside of the carburetor, indicating the location of the float bowl for maintenance and cleaning.
6.3 Przechowywanie długoterminowe
If storing the lawn mower for an extended period (over 30 days), it is recommended to:
- Add a fuel stabilizer to the fuel tank and run the engine for a few minutes to circulate it.
- Alternatively, drain all fuel from the tank and run the engine until it stops from lack of fuel. This prevents fuel degradation and gumming in the carburetor.
7. Rozwiązywanie Problemów
This section addresses common issues you might encounter after carburetor installation.
| Problem | Możliwa przyczyna | Rozwiązanie |
|---|---|---|
| Silnik nie chce się uruchomić | No fuel reaching carburetor; Clogged fuel filter; Incorrect primer bulb use; Spark plug issue. | Check fuel level and fuel line for kinks. Replace fuel filter. Ensure primer bulb is pressed correctly. Check/replace spark plug. |
| Silnik pracuje nierówno lub gaśnie | Dirty carburetor; Air leak at gasket; Stale fuel; Clogged air filter. | Clean carburetor (float bowl, jets). Check carburetor mounting gaskets for proper seal. Use fresh fuel. Clean/replace air filter. |
| Wycieki paliwa z gaźnika | Improperly seated float bowl; Damaged gasket; Loose fuel line connection. | Ensure float bowl is securely attached. Replace gaskets if damaged. Tighten fuel line connections. |
| Silnikowi brakuje mocy | Restricted fuel flow; Clogged air filter; Incorrect engine speed. | Clean carburetor. Check fuel filter. Clean/replace air filter. Ensure engine is running at proper RPM. |
8. Specyfikacje
| Nazwa produktu | Aftermarket Carburetor for Weedeater Lawn Mowers |
| Zgodność modelu | Weedeater Lawn Mower Model 961140004 01 with Briggs & Stratton Weedeater 4.75 Engine |
| Marka | Ogólny |
| Waga przedmiotu | 1 funt |
| Wymiary produktu | 1 x 1 x 1 cala |
| Kraj pochodzenia | Chiny |
| Numer części producenta | 1 |
| ASIN | B0F2YNDLCY |
9. Gwarancja i wsparcie
This aftermarket carburetor is designed to meet or exceed OEM specifications. For specific warranty information, please refer to the seller's policy at the time of purchase. For technical support or further assistance, please contact the seller directly through the platform where the product was purchased.
Proszę zachować dowód zakupu na wypadek ewentualnych roszczeń gwarancyjnych.


