
We Technology R03YDFP
We Technology Smart Gate Lock R03YDFP User Manual
Model: R03YDFP
1. Wprowadzenie
This manual provides comprehensive instructions for the installation, operation, and maintenance of your We Technology Smart Gate Lock R03YDFP. This 5-in-1 keyless entry system offers multiple access methods including fingerprint, PIN, IC card, Tuya smart app, and mechanical key. Designed for outdoor use, it features a waterproof, heavy-duty build suitable for various gate types.
2. Informacje dotyczące bezpieczeństwa
- Przed instalacją i użytkowaniem przeczytaj uważnie wszystkie instrukcje.
- Nie próbuj samodzielnie demontować ani naprawiać zamka. W celu uzyskania pomocy skontaktuj się z wykwalifikowanym personelem.
- Use only specified batteries (4 AA batteries). Do not mix old and new batteries or different types of batteries.
- Keep mechanical keys in a secure location away from the lock.
- Ensure the gate structure is sturdy enough to support the lock's weight and operation.
- Protect the lock from extreme temperatures and direct prolonged exposure to harsh weather conditions beyond its waterproof rating.
3. Zawartość opakowania
Przed rozpoczęciem instalacji sprawdź, czy wszystkie komponenty są obecne:
- 1 x Smart Gate Lock (Front Panel and Rear Lock Body)
- 1 x Instrukcja obsługi (ten dokument)
- 2 x IC Cards
- 2 x Klawisze mechaniczne
- Installation Hardware (screws, mounting plates, cylinder)
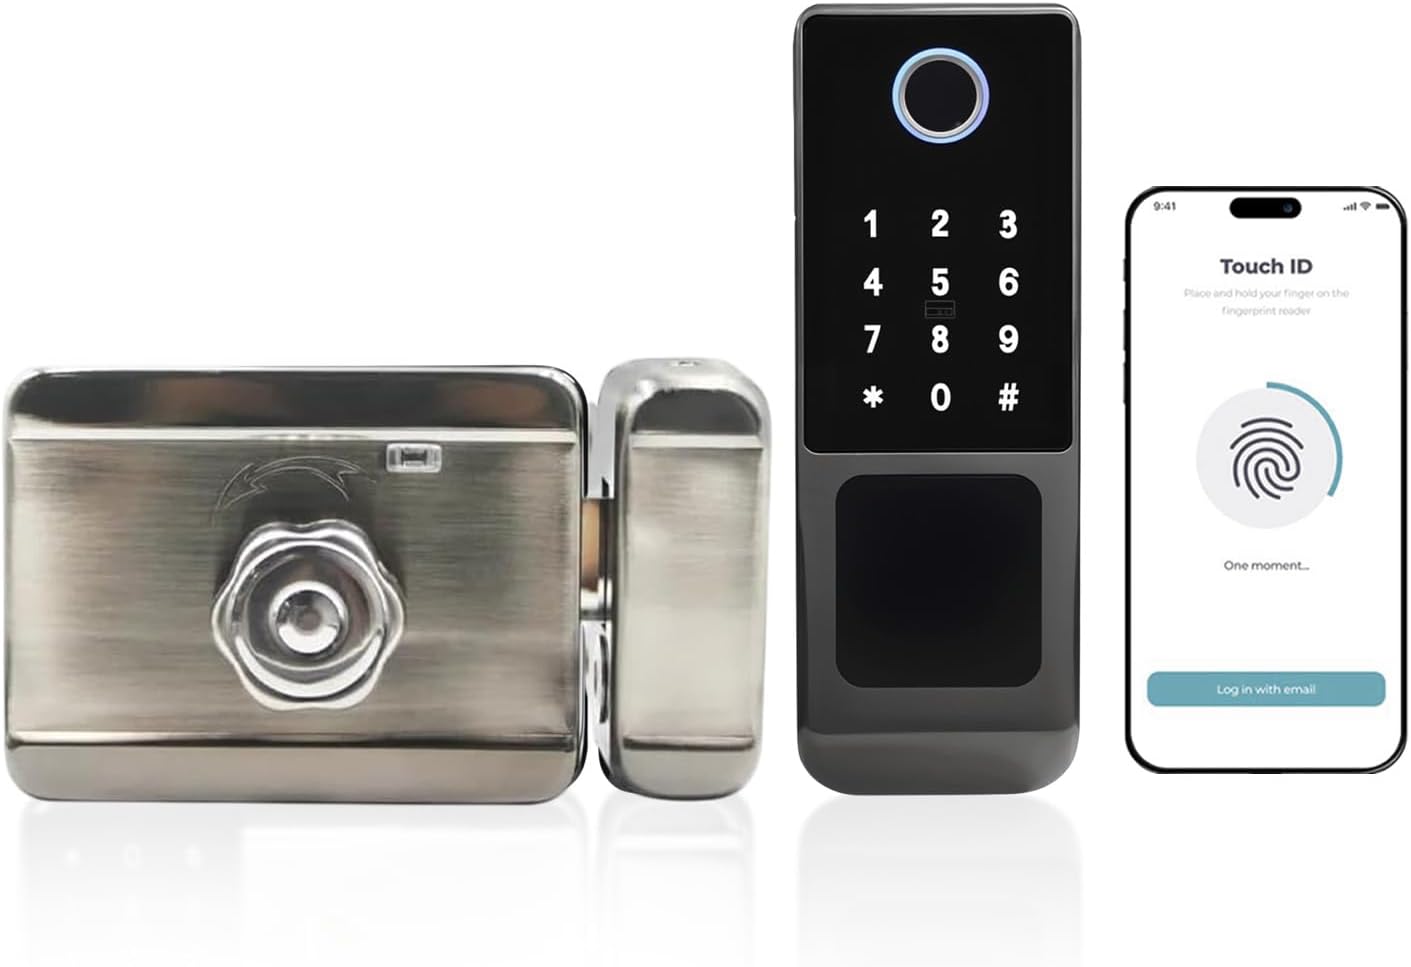
Obraz: Ponadview of the We Technology Smart Gate Lock components, showing the front keypad panel, the rear lock mechanism, two IC cards, and two mechanical keys.
4. Koniec produktuview i wymiary
Familiarize yourself with the lock's components and ensure compatibility with your gate dimensions.
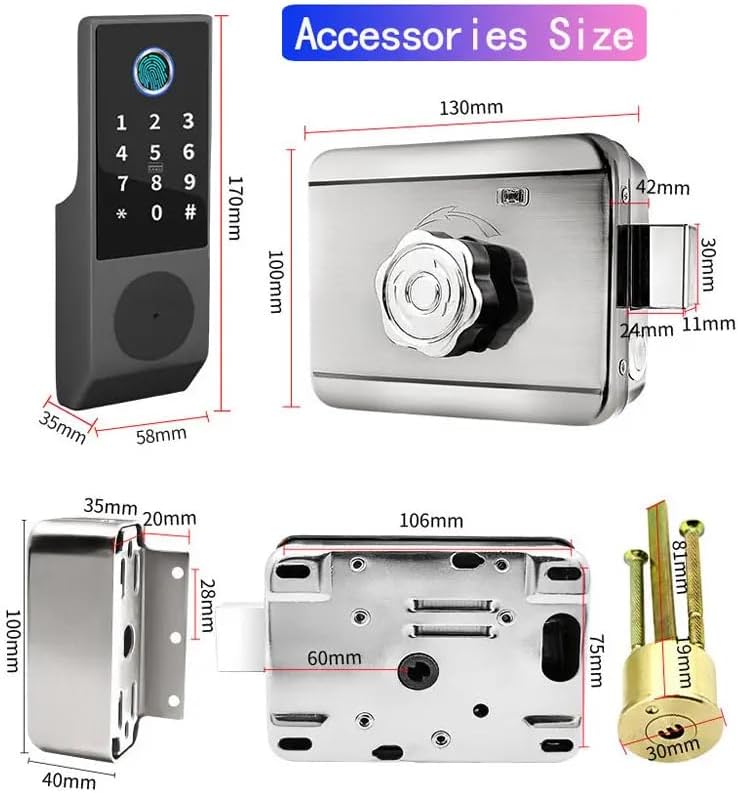
Image: Technical drawing displaying the dimensions of the smart lock's front panel, rear lock body, and mounting accessories in millimeters.
The lock is designed for gates with a thickness between 35mm and 55mm. Refer to the detailed dimension diagram for precise measurements of each component.
5. Konfiguracja i instalacja
5.1 Kontrole przed instalacją
- Confirm your gate thickness is within the 35-55mm range.
- Ensure the gate frame is stable and can support the lock's weight.
- Gather necessary tools: screwdriver, drill (if needed for new holes), measuring tape.
5.2 Fizyczna instalacja
- Prepare the Gate: If replacing an existing lock, remove it. For new installations, mark and drill holes according to the provided template (if applicable). The lock is designed for DIY installation without extensive drilling for standard setups.
- Install the Lock Cylinder: Insert the lock cylinder into the designated hole.
- Mount the Front Panel: Position the front keypad panel on the exterior side of the gate.
- Mount the Rear Lock Body: Attach the rear lock body to the interior side of the gate, aligning it with the front panel and cylinder. Secure with screws.
- Podłącz okablowanie: Carefully connect the wiring between the front panel and the rear lock body.
- Zainstaluj baterie: Open the battery compartment on the rear lock body and insert 4 AA batteries, ensuring correct polarity.
- Operacja testowa: After installation, manually test the lock and unlock mechanism using the mechanical key and the interior knob.

Image: Installation diagram illustrating the steps to mount the smart lock, including drilling positions and component attachment.
6. Instrukcja obsługi
6.1 Initial Setup and Admin User Creation
Upon first use, it is crucial to create an Administrator user. Until an Admin is set, the lock may operate in a test mode where any input could unlock it.
- Enter Command Mode: Naciskać *# na klawiaturze.
- Log In (Default Admin): Enter the default administrator password (usually 123456) po którym następuje #. The lock will provide voice prompts.
- Enter Admin Command Section: Naciskać 1.
- Add Admin: Naciskać 1 again to add a new administrator.
- Zarejestruj odcisk palca: Place your finger on the fingerprint sensor four times, lifting between each scan, until confirmed by a voice prompt.
- Set New Admin Password: Enter your desired new administrator password (6-8 digits) followed by #. Repeat to confirm.
- Register IC Card (Optional): Hold an IC card against the designated sensor until confirmed.
- Exit Admin Mode: Wait for approximately one minute for the system to automatically exit admin mode, or press * repeatedly until the menu exits.
Once a new administrator is set, the default password (123456) will no longer function, and only registered methods will unlock the gate.
6.2 Adding and Managing Users
Users can be added via fingerprint, PIN, or IC card. All user management is performed through the administrator menu or the Tuya Smart app.
- To Add a User (Keypad):
- Naciskać *#, then enter Admin Password #.
- Naciskać 2 to enter the User Command section.
- Follow voice prompts to add a fingerprint, PIN, or IC card.
- To Delete a User (Keypad):
- Naciskać *#, then enter Admin Password #.
- Naciskać 3 to enter the Delete User section.
- Follow voice prompts to delete by user ID, fingerprint, PIN, or IC card.

Image: Visual representation of the five access methods: mobile app, fingerprint, numeric password, IC card, and mechanical key.
6.3 Tuya Smart App Integration
The lock connects via 2.4GHz Wi-Fi and Bluetooth for remote management through the Tuya Smart app.
- Pobierz aplikację: Download the "Tuya Smart" app from your device's app store (iOS or Android).
- Zarejestruj się/Zaloguj: Załóż konto lub zaloguj się na istniejące konto Tuya Smart.
- Dodaj urządzenie: Follow the in-app instructions to add your smart gate lock. This typically involves putting the lock into pairing mode (refer to the lock's voice prompts or specific app instructions for pairing).
- Zarządzanie zdalne: Once connected, you can remotely unlock the gate, generate temporary PINs, view access logs, and manage users from anywhere with an internet connection.

Image: A mobile phone displaying the Tuya Smart app interface, showing options to unlock the gate and manage settings.

Image: A delivery person receiving a one-time access code on their phone, generated via the Tuya app, to open the smart gate lock.
6.4 Metody odblokowywania
- Odcisk palca: Place a registered finger on the sensor. The lock will unlock in approximately 0.3 seconds.
- Kod PIN: Enter your registered PIN code followed by #. The keypad supports anti-peeping functionality, allowing you to enter random digits before or after your actual PIN.
- Karta elektroniczna: Przynieś zarejestrowaną kartę IC do stanowiska czytnika kart.
- Klucz mechaniczny: Insert the mechanical key into the keyhole and turn to unlock. This is for emergency access or when batteries are depleted.
- Aplikacja Tuya: Use the unlock function within the Tuya Smart app.

Image: A user entering a password on the smart lock keypad, with an illustration of the anti-peeping password feature.

Image: A person using the fingerprint sensor on the smart lock, highlighting the 0.3-second biometric identification speed.

Image: A person using a traditional mechanical key to unlock the smart gate lock, showing the keyhole location.

Image: A person holding an IC card near the smart lock to gain entry.
6.5 Funkcja automatycznej blokady
The lock is equipped with an auto-lock function that engages automatically when the gate is closed. If the gate is unlocked but not opened within a short period, it will also re-lock automatically.

Image: Diagram illustrating the automatic locking mechanism of the gate lock.
7. Konserwacja
- Wymiana baterii: Replace all 4 AA batteries when the low battery warning is indicated. Do not wait for complete battery depletion to avoid being locked out.
- Czyszczenie: Przetrzyj zewnętrzną część zamka miękką szmatką.amp ściereczką. Unikaj środków czyszczących o działaniu ściernym i rozpuszczalników, które mogą uszkodzić wykończenie lub elementy elektroniczne.
- Ochrona przed warunkami atmosferycznymi: While the lock is weatherproof, regular inspection for any signs of wear or damage from prolonged exposure to harsh elements is recommended. Ensure all seals are intact.
- Klucz mechaniczny: Periodically check the mechanical keyhole for obstructions and ensure smooth operation.
8. Rozwiązywanie Problemów
- Zamek nie odpowiada:
- Sprawdź poziom naładowania baterii. Wymień baterie, jeśli są niskie.
- Upewnij się, że klawiatura jest czysta i wolna od zanieczyszczeń.
- If completely unresponsive, use the mechanical key for access.
- Odcisk palca nie został rozpoznany:
- Upewnij się, że twój palec jest czysty i suchy.
- Try different angles or re-register your fingerprint if issues persist.
- Ensure you are using a registered fingerprint.
- Kod PIN nie działa:
- Verify the PIN code is correct.
- Ensure you are pressing # after entering the PIN.
- If using anti-peeping, ensure the correct PIN is embedded within the random digits.
- Tuya App Connectivity Issues:
- Upewnij się, że Twoja sieć Wi-Fi obsługuje częstotliwość 2.4 GHz.
- Check if the lock is within range of your Wi-Fi router.
- Restart the lock (remove and reinsert batteries) and attempt to re-pair with the app.
- Verify your phone's Bluetooth is enabled during pairing.
- Trudności z instalacją:
- Double-check all measurements and ensure proper alignment of components.
- Ensure the gate thickness is compatible.
- Refer to the installation diagram carefully. If issues persist, consider professional installation.
9. Specyfikacje
| Marka | We Technology |
| Nazwa modelu | R03YDFP Smart Waterproof Door Lock |
| Typ zamka | Biometric, Keypad, Rim Lock |
| Tworzywo | Aluminium |
| Kolor | Czarny |
| Pozycja Wymiary (dł. x szer. x wys.) | 6.6 x 6.5 x 2.5 cala (16.76 x 16.51 x 6.35 cm) |
| Waga przedmiotu | 1.44 uncji (około 40.8 gramów) |
| Źródło zasilania | 4 baterie AA (brak w zestawie) |
| Łączność | Bluetooth, Wi-Fi (2.4 GHz) |
| Metoda kontroli | Aplikacja, pilot, dotyk |
| Cechy specjalne | Alarm, Anti-Peeping Password, Auto-Lock, One-Touch Lock, Weather Resistant |
| Compatible Gate Thickness | 35-55 mm |
| Zawarte komponenty | User Manual, 2 IC Cards, 2 Lock Sides, 2 Mechanical Keys |
10. Gwarancja i wsparcie
For warranty information, technical support, or assistance with your We Technology Smart Gate Lock R03YDFP, please refer to the contact information provided with your purchase documentation or visit the official We Technology website. Ensure you have your product model number (R03YDFP) and purchase details available when contacting support.
Ask a question about this manual
Ask about setup, troubleshooting, compatibility, parts, safety, or missing instructions. Manuals+ will review the question and use this page’s manual context to help answer it.