1. Wprowadzenie
This manual provides detailed instructions for the assembly, operation, and maintenance of your AECOJOY 20' x 8' White Outdoor Gazebo. Please read all instructions carefully before beginning assembly and retain this manual for future reference. This gazebo is designed to provide a sheltered outdoor space, featuring a hardtop roof for protection against various weather conditions.
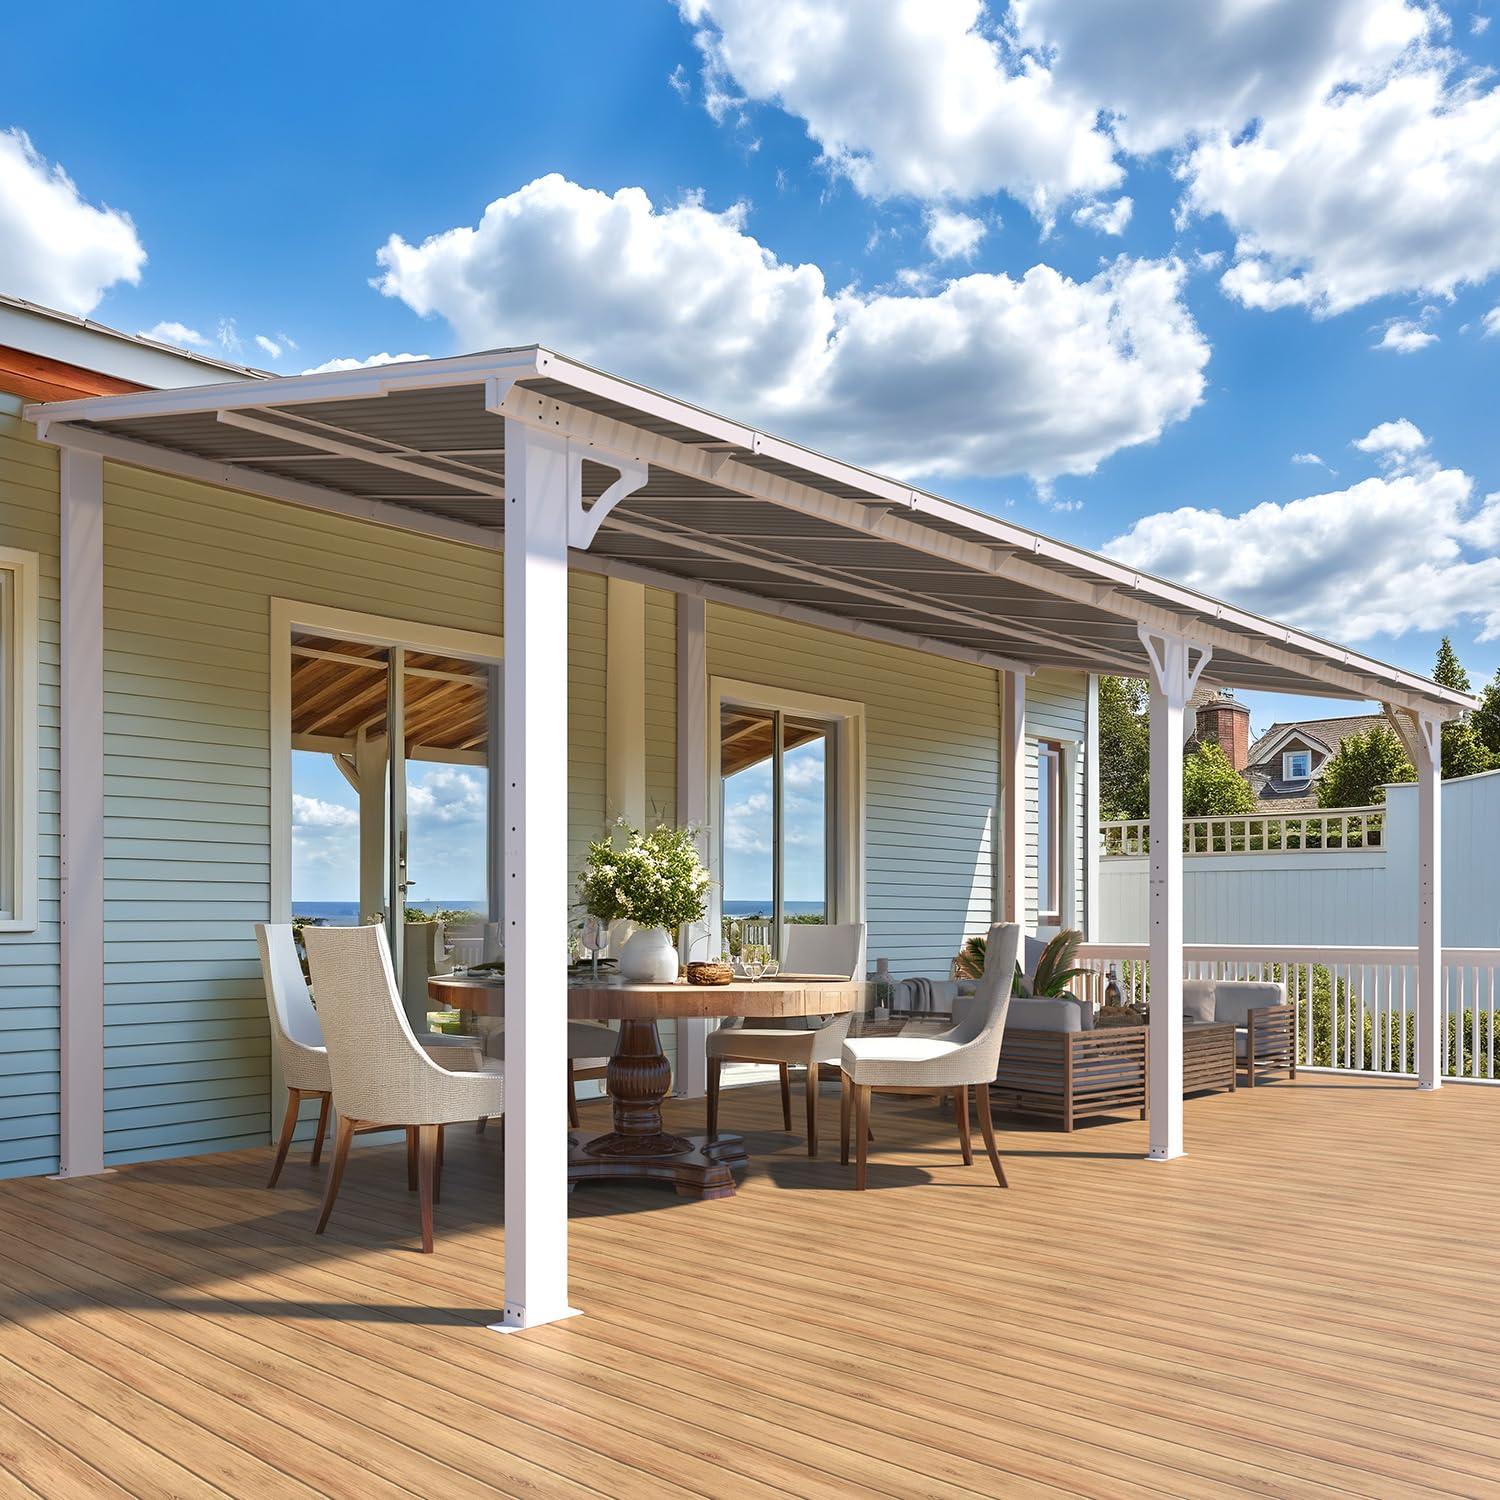
Image: The AECOJOY 20' x 8' White Outdoor Gazebo, showcasing its design and integration with a patio area.
2. Informacje dotyczące bezpieczeństwa
- Always follow the provided manual and video tutorials for safe assembly.
- Secure the gazebo to a stable foundation to prevent tipping in high winds. All necessary wall attachment accessories are provided.
- Be cautious when handling the product in heavy snow or harsh weather conditions. While designed for durability, extreme conditions may require additional precautions.
- Podczas montażu należy upewnić się, że wszystkie śruby i elementy mocujące są mocno dokręcone i regularnie sprawdzane.
- Nie należy wieszać ciężkich przedmiotów na konstrukcji altany.
3. Zawartość opakowania
Your AECOJOY Gazebo will be shipped in multiple parcels, which may arrive at different times. Please ensure all packages have been received before beginning assembly. The packages contain all necessary components, including metal and aluminum frame parts, sun panels, and hardware for assembly and wall attachment.

Image: An illustration detailing the structural components such as the triangular support, stable frame legs, multi-frame support, and wall attachment points.
4. Konfiguracja i instalacja
The AECOJOY Gazebo is designed for wall-mounted installation, providing enhanced stability compared to freestanding models. Detailed manuals and step-by-step video tutorials are available to guide you through the process.
4.1 Kontrole przed montażem
- Sprawdź, czy wszystkie części są obecne i nieuszkodzone.
- Ensure you have the necessary tools, including a drill and a rubber mallet, which are highly recommended for efficient assembly.
- Choose a suitable, stable location for installation, preferably a flat, level surface adjacent to a sturdy wall.
4.2 Etapy montażu
- Montaż ramy: Begin by assembling the main metal and aluminum frame components. Pay close attention to the orientation of screw holes as indicated in the manual.
- Mocowanie do ściany: Securely attach the gazebo frame to your wall using the provided accessories. The design includes multiple keyholes and fixed metope points for robust connection.
- Montaż paneli dachowych: This step requires careful attention. It is recommended to assemble the back and front roof panel sections with the middle bracket on the ground first, then slide the entire unit into place. A rubber mallet can assist in gently tapping panels into brackets. Avoid forcing panels to prevent splitting.
- Stabilizacja: Once the frame and roof are in place, fasten the stable frame legs to the ground using the 4 pre-drilled holes on each leg. This ensures the gazebo can withstand winds up to 70 mph.
Notatka: Assembly is typically easier with two or three people. Technical assistance is available remotely if needed.

Image: Detail of a stable frame leg, showing pre-drilled holes for secure ground mounting.

Obraz: Zbliżenie view of the heavily tinted sun panels and crisscrossing aluminum tubes that form the gazebo roof, highlighting the multi-frame support structure.
5. Instrukcja obsługi
Your AECOJOY Gazebo is designed for year-round outdoor use, offering protection and comfort.
5.1 Odporność na warunki atmosferyczne
- Snow Capacity: The hardtop roof is engineered to withstand up to 7 inches of heavy snow (6 lbs/sq.ft), providing confidence in winter conditions.
- Odporność na wiatr: When properly installed and secured to both the wall and ground, the gazebo can confidently withstand winds of approximately 70 mph.
- Wodoodporność: The inclined roof design and meticulous detailing ensure complete water resistance, directing rainwater away efficiently.
5.2 Ochrona przed promieniowaniem UV
The heavily tinted roof panels offer comprehensive protection against harmful UV rays, blocking UPF 50+ and 99% of UV radiation, allowing for comfortable use during sunny periods.

Image: A visual representation of the gazebo's performance in different seasons, highlighting its UV protection in summer and snow load capacity in winter.
6. Konserwacja
- Czyszczenie: Clean the frame and roof panels periodically with mild soap and water. Avoid abrasive cleaners or harsh chemicals that could damage the finish or panels.
- Kontrola elementów złącznych: Regularly inspect all bolts and screws to ensure they remain tight. Re-tighten as necessary to maintain structural integrity.
- Odśnieżanie: While the roof is designed for snow load, it is advisable to remove excessive snow accumulation to prolong the life of the gazebo, especially during prolonged heavy snowfall.
- Kontrola panelowa: Periodically check roof panels for any signs of damage or wear.
7. Rozwiązywanie Problemów
- Difficulty Sliding Roof Panels: If panels are difficult to slide, ensure all brackets are properly aligned. A flathead screwdriver can be used to gently widen brackets if needed, and a rubber mallet can assist with gentle tapping. Do not force panels.
- Sagging Roof (Longer Models): For longer gazebo models, if sagging occurs in the middle, additional support may be required. Consider adding a center post or reinforcing the attachment points to the house wall.
- Brakujące lub uszkodzone części: If you receive missing or bent parts, contact AECOJOY customer support immediately for replacements.
- General Assembly Issues: Refer to the detailed instruction manual and video tutorials. If problems persist, contact our technical support team for remote assistance.
8. Specyfikacje
| Funkcja | Szczegół |
|---|---|
| Marka | AECOJOY |
| Model | 20' x 8' Hard Top Lean to Pergola |
| Wymiary produktu | 240" dł. x 96" szer. x 96" wys. (20' dł. x 8' szer. x 8' wys.) |
| Waga przedmiotu | 206 funtów |
| Materiał ramy | Metal & Aluminum |
| Materiał dachu | Sun Panels (Heavily tinted) |
| Kolor | Biały |
| Poziom wodoodporności | Wodoodporny |
| Ochrona przed światłem ultrafioletowym | UPF 50++, 99% UV Block |
| Nośność śniegu | 6 lbs/sq.ft (approx. 7" thick snow) |
| Odporność na wiatr | Up to 70 mph (when properly secured) |
| Wymagany montaż | Tak |
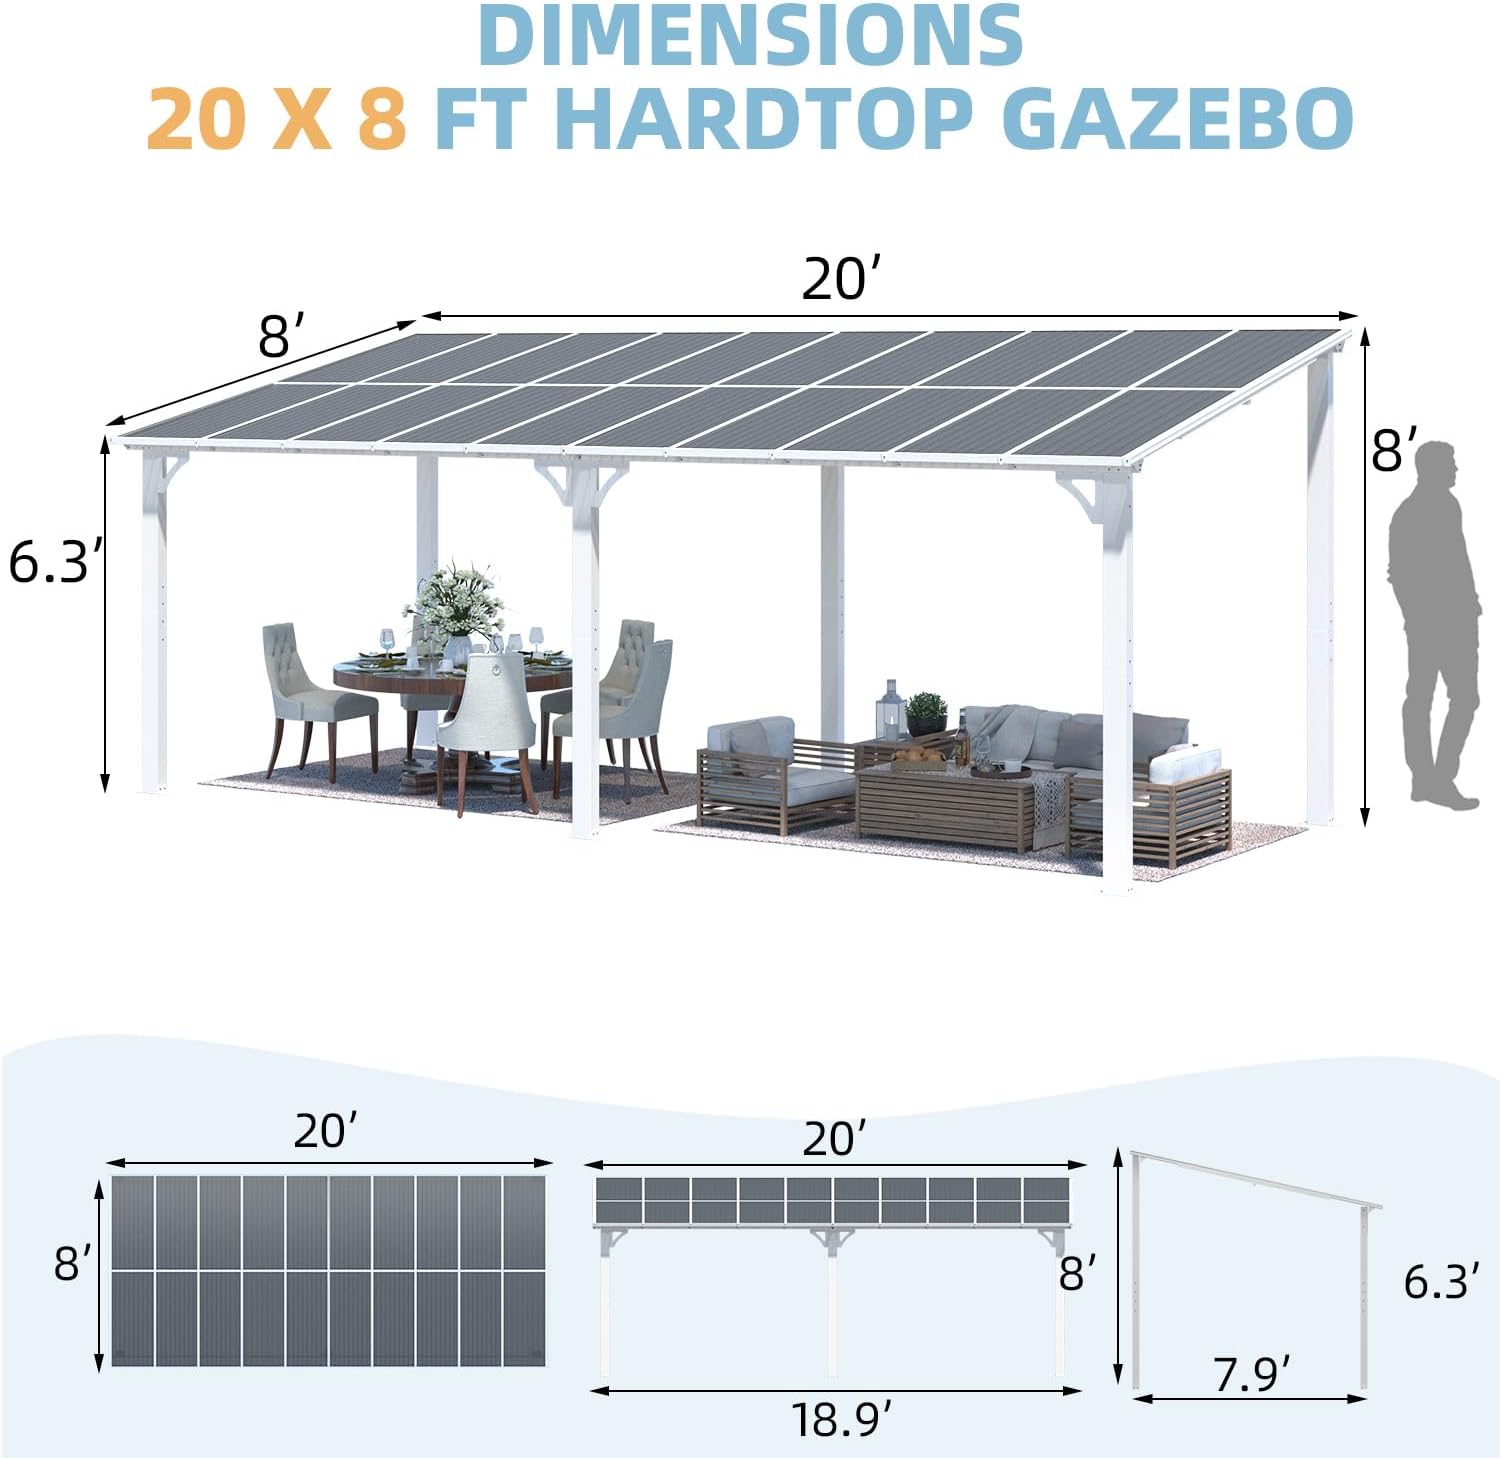
Image: A detailed diagram illustrating the overall dimensions and key measurements of the 20' x 8' hardtop gazebo.
9. Gwarancja i wsparcie
AECOJOY stands behind its products, offering a worry-free experience. We provide maintenance and replacements for the product itself, along with professional customer support.
- Gwarancja: Ten produkt objęty jest roczną gwarancją.
- Wsparcie dożywotnie: AECOJOY offers lifetime support for its products.
- Obsługa klienta: A professional team is available 24/7 to address any concerns related to installation, usage, or other product-related inquiries. Please contact AECOJOY-US for assistance.


