
1. Wprowadzenie
This manual provides detailed instructions for the assembly, operation, and maintenance of your AutoFull G7 Ergonomic Office Chair. Please read this manual thoroughly before assembly and use to ensure proper function and safety.
2. Koniec produktuview
The AutoFull G7 Ergonomic Office Chair is designed for optimal comfort and support during long periods of sitting. It features a 3-Zone Dynamic Lumbar system, 720° Dual-Axis Armrests, a T-Lock Support System with 4D Headrest, CloudTech Mesh for breathability, and a 140° Zero-Gravity Recline with a retractable footrest.

Figure 2.1: AutoFull G7 Ergonomic Office Chair (White variant).
3. Instrukcja montażu
For a visual guide, please refer to the official installation video below. It is recommended to have two people for assembly.
Video 3.1: AutoFull G7 Installation Guide. This video demonstrates the step-by-step assembly process for the AutoFull G7 chair, including attaching the base, armrests, and backrest.
3.1. Koniec komponentówview
Ensure all components are present before beginning assembly. Refer to the accessories diagram in the installation video for a complete list.
- Oparcie
- Poduszka siedziska
- Backrest Decorative Cover
- Zagłówek
- Podłokietniki (lewy i prawy)
- Armrest Brackets
- Podnośnik gazowy
- Kółka (x5)
- Baza 5-gwiazdkowa
- Chair Legs (x5)
- Screws (Type-1, Type-2, Type-3, Type-4)
- L-shaped Hexagon Wrench
- Śrubokręt
3.2. Montaż krok po kroku
- Assemble the 5-Star Base:
- Insert each chair leg into the 5-star base.
- Flip the 5-star base upside down.
- Secure chair legs to the 5-star base using five Type-4 screws.
- Insert each caster into the mounting hole of the chair legs.
- Flip the 5-star base upright (casters touching the ground).
- Align and insert the gas lift into the central hole of the 5-star base.
- Dołącz podłokietniki:
- Place the backrest flat on the floor.
- Identify left/right armrests and align with backrest mounting holes.
- Secure one armrest bracket to the backrest using two Type-1 screws.
- Repeat the same process for the other armrest bracket.
- Position armrests with side buttons facing outward.
- Secure one armrest to the bracket with one Type-2 screw.
- Repeat the same process for the other armrest.
- Install Wire Controller:
- Remove pre-installed wire controller screws located on the side of the seat cushion.
- Align and position the wire controller over the mounting holes.
- Secure the wire controller using the screws removed earlier.
- Attach Backrest to Chassis:
- Align the backrest with the chassis mounting holes.
- Secure the backrest to the chassis using three Type-2 screws.
- Insert the assembled 5-star base and gas lift into the chassis mounting holes.
- Set the chair upright.
- Montaż zagłówka:
- Align the headrest with the top backrest mounting holes.
- Secure the headrest to the backrest using two Type-3 screws.
- Attach Back Armor:
- Align the bottom buckle of the back armor with the corresponding buckle slot on the backrest.
- Engage two mounting posts on the split part of the back armor into the upper backrest holes.
4. Instrukcja obsługi i regulacji
Your AutoFull G7 chair offers multiple adjustment points for personalized comfort. Refer to the user guide video and instructions below.
Video 4.1: AutoFull G7 User Guide. This video demonstrates how to use the various adjustment features of the AutoFull G7 chair.
4.1. Regulacja wysokości siedziska
- To raise the seat height: Stand up from the chair and lift the control lever on the right side of the seat cushion. The seat will rise automatically.
- To lower the seat height: Sit on the chair and lift the control lever on the right side of the seat cushion. The seat will lower.
- Zwolnij dźwignię, aby zablokować siedzisko na żądanej wysokości.
4.2. Regulacja podłokietnika
The 720° Dual-Axis Armrests offer extensive customization:
- Regulacja wysokości: Flip the outer armrest paddle upward to lift, or press the armrest for height adjustment.
- Position Adjustment (Forward/Backward): Press and hold the armrest while pushing it forward or backward.
- Regulacja kąta: Lift the front edge of the armrest surface.
- Rotation (360° Swivel): Rotate the armrest handle for 360° rotation. Rotate the armrest surface for 360° swivel.
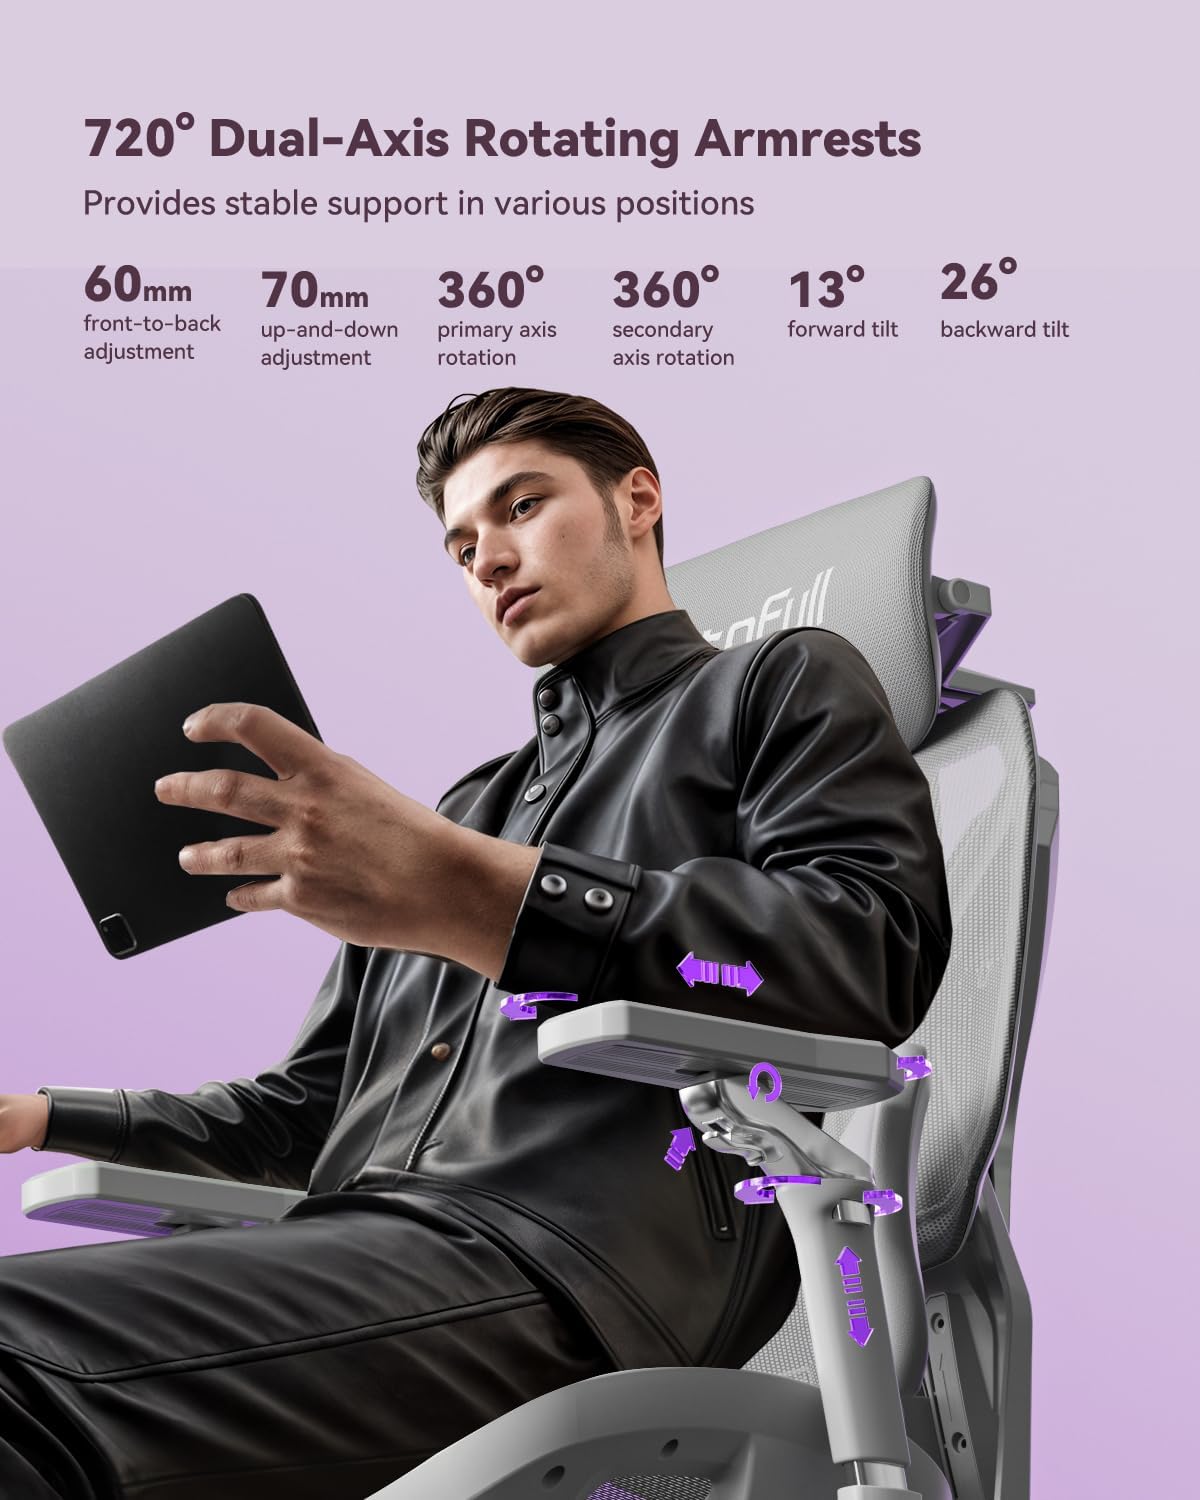
Figure 4.2: Illustration of 720° Dual-Axis Rotating Armrests.
4.3. Headrest Adjustments
The 4D Dual-Axis Headrest provides comprehensive neck support:
- Regulacja wysokości: Pull the headrest up/down.
- Front-Back Position Control: Pull the headrest forward for front-back position control.
- Regulacja nachylenia: Rotate the primary axis at the headrest base.
- Regulacja kąta obrotu: Grip the upper part of the headrest mesh on both sides and move it up/down.
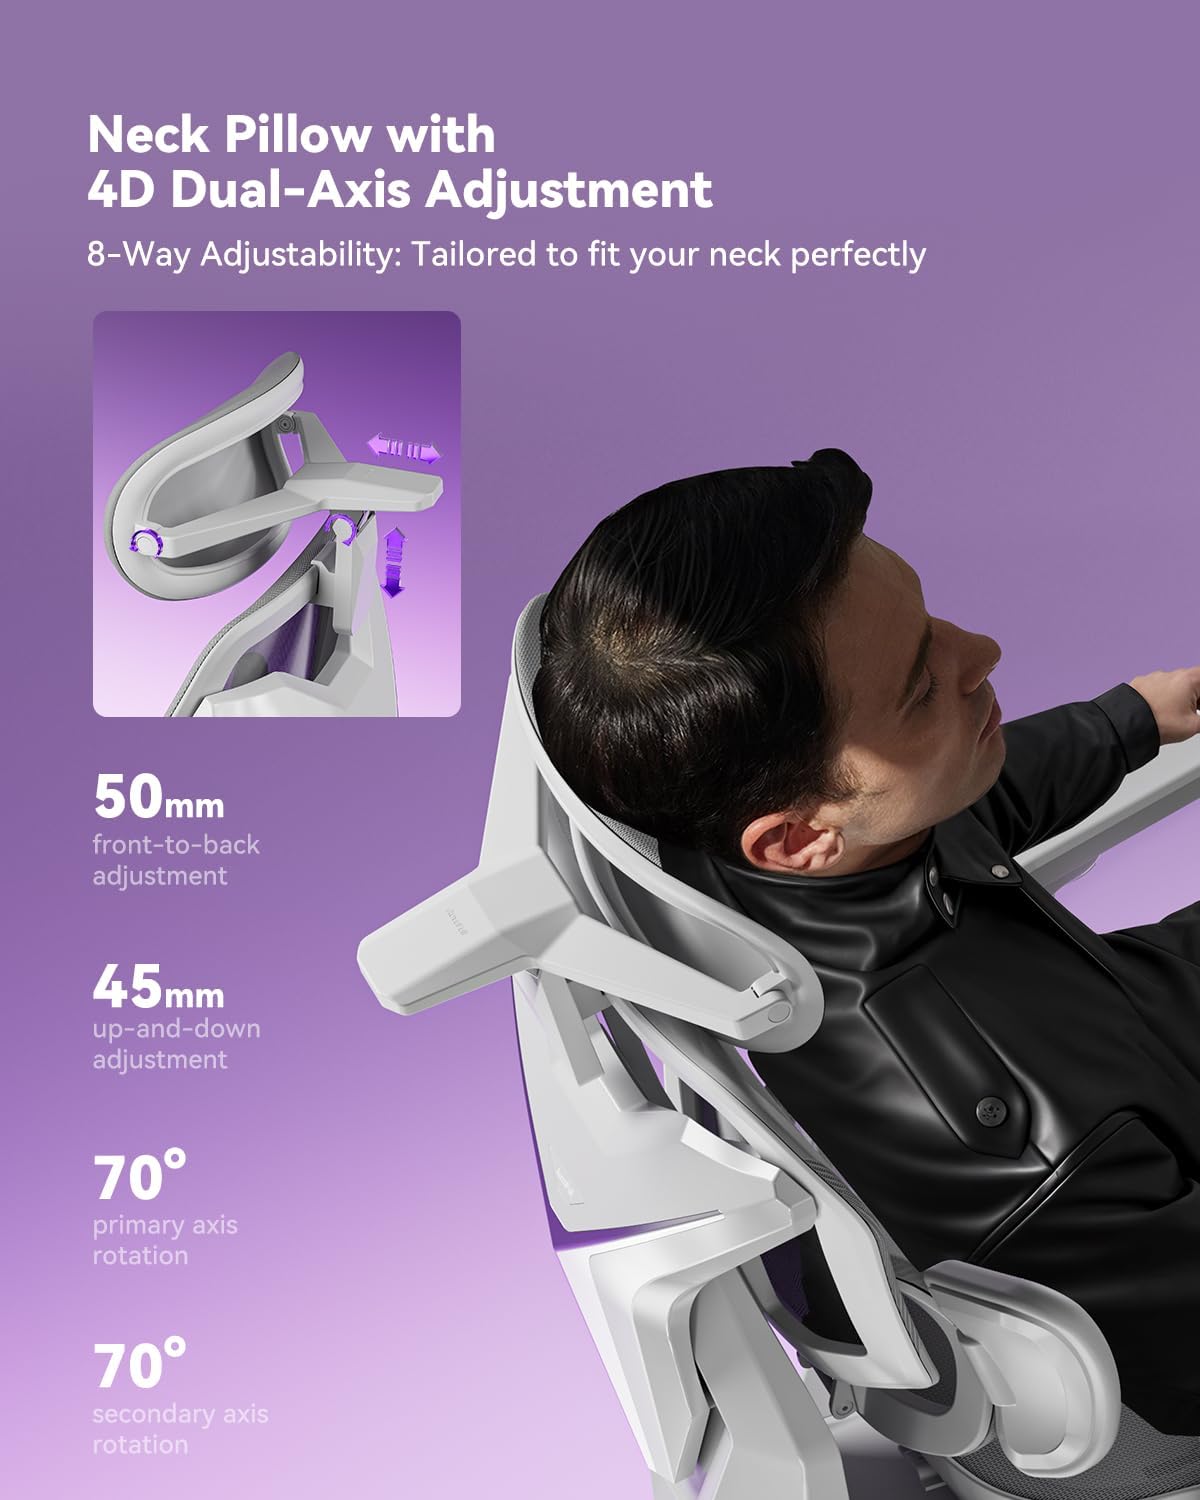
Figure 4.3: Illustration of 4D Dual-Axis Headrest Adjustment.
4.4. Lumbar Support Adjustments
The 3-Zone Dynamic Lumbar support adapts to your body:
- Vertical Positioning: Grip both sides of the lumbar support bracket and press to adjust its vertical position.
- Side Wing Tilt: The side cushioning offers 40° side wing tilt.
- Side Cushioning: The side cushioning provides 14° side cushioning that actively wraps around your lower back.
- Lumbar Rotation: The lumbar support allows for 12° rotation.
- Recline Tracking: Features stepless 0.8" recline tracking.
- Locking Lumbar Support: Lift the control lever to lock the lumbar support in place. When the control lever is in the lower position, the lumbar support will automatically adjust forward/backward to follow your waist.

Figure 4.4: Illustration of Auto Dynamic Lumbar Support.
4.5. Regulacja głębokości siedziska
- Push the adjustment lever forward to adjust the seat depth. The seat can be adjusted by 2 inches.

Figure 4.5: Illustration of 50mm Seat Depth Adjustment.
4.6. Funkcja odchylania i podnóżek
- Układać: Pull the adjustment lever backward and lean back to activate the recline function. The chair reclines up to 140°.
- Lock Recline: Return the adjustment lever to its original position to lock the reclining angle.
- Podnóżek: Pull out the footrest and flip it outward to activate the footrest function. Retract the footrest when not in use.
5. Konserwacja
To ensure the longevity and optimal performance of your AutoFull G7 chair, follow these maintenance guidelines:
- Czyszczenie: Wyczyść za pomocą reklamyamp szmatką. Unikaj silnych środków chemicznych, które mogą uszkodzić siatkę lub ramę.
- Regularne kontrole: Okresowo sprawdzaj dokręcenie wszystkich śrub i nakrętek. W razie potrzeby dokręć je ponownie.
- Pielęgnacja siatki: The CloudTech mesh is designed for durability and breathability. Avoid sharp objects that could tear the mesh.
- Winda gazowa: The TUV/SGS Class-4 gas lift is designed for long-term use. Do not attempt to disassemble or repair it yourself.
6. Rozwiązywanie Problemów
If you encounter any issues with your AutoFull G7 chair, please refer to the following common solutions:
| Problem | Możliwa przyczyna | Rozwiązanie |
|---|---|---|
| Krzesło nie ma regulacji wysokości | Podnośnik gazowy nie jest włączony lub jest uszkodzony. | Ensure the control lever is fully lifted. If the issue persists, contact customer support. |
| Krzesło jest chwiejne | Luźne śruby lub nieprawidłowy montaż. | Check and tighten all assembly screws, especially those connecting the base, chassis, and backrest. |
| Armrests are loose or difficult to adjust | Locking mechanism not engaged or debris. | Ensure adjustment paddles/buttons are fully engaged. Clean any debris from the mechanism. |
| Oparcie nie odchyla się ani nie blokuje | Recline lever not properly engaged. | Ensure the recline adjustment lever is pulled backward to recline and returned to its original position to lock. |
If these solutions do not resolve the issue, please contact AutoFull customer support.
7. Specyfikacje
| Funkcja | Szczegół |
|---|---|
| Marka | AutoFull |
| Nazwa modelu | AFG701 |
| Kolor | Biały |
| Tworzywo | Metal, poliester |
| Wymiary produktu (Gł. x Szer. x Wys.) | 28" gł. x 25" szer. x 43" wys. |
| Waga przedmiotu | 66 funtów |
| Maksymalna zalecana waga | 330 funty (150 kg) |
| Klasa podnośnika gazowego | TUV/SGS Class-4 |
| Kąt odchylenia | Do 140° |
| Zalecana wysokość | 155-195 cm (61-76.8 cala) |
| Certyfikaty | IGR ergonomic certified, Bifma certified (120,000+ cycle tested) |
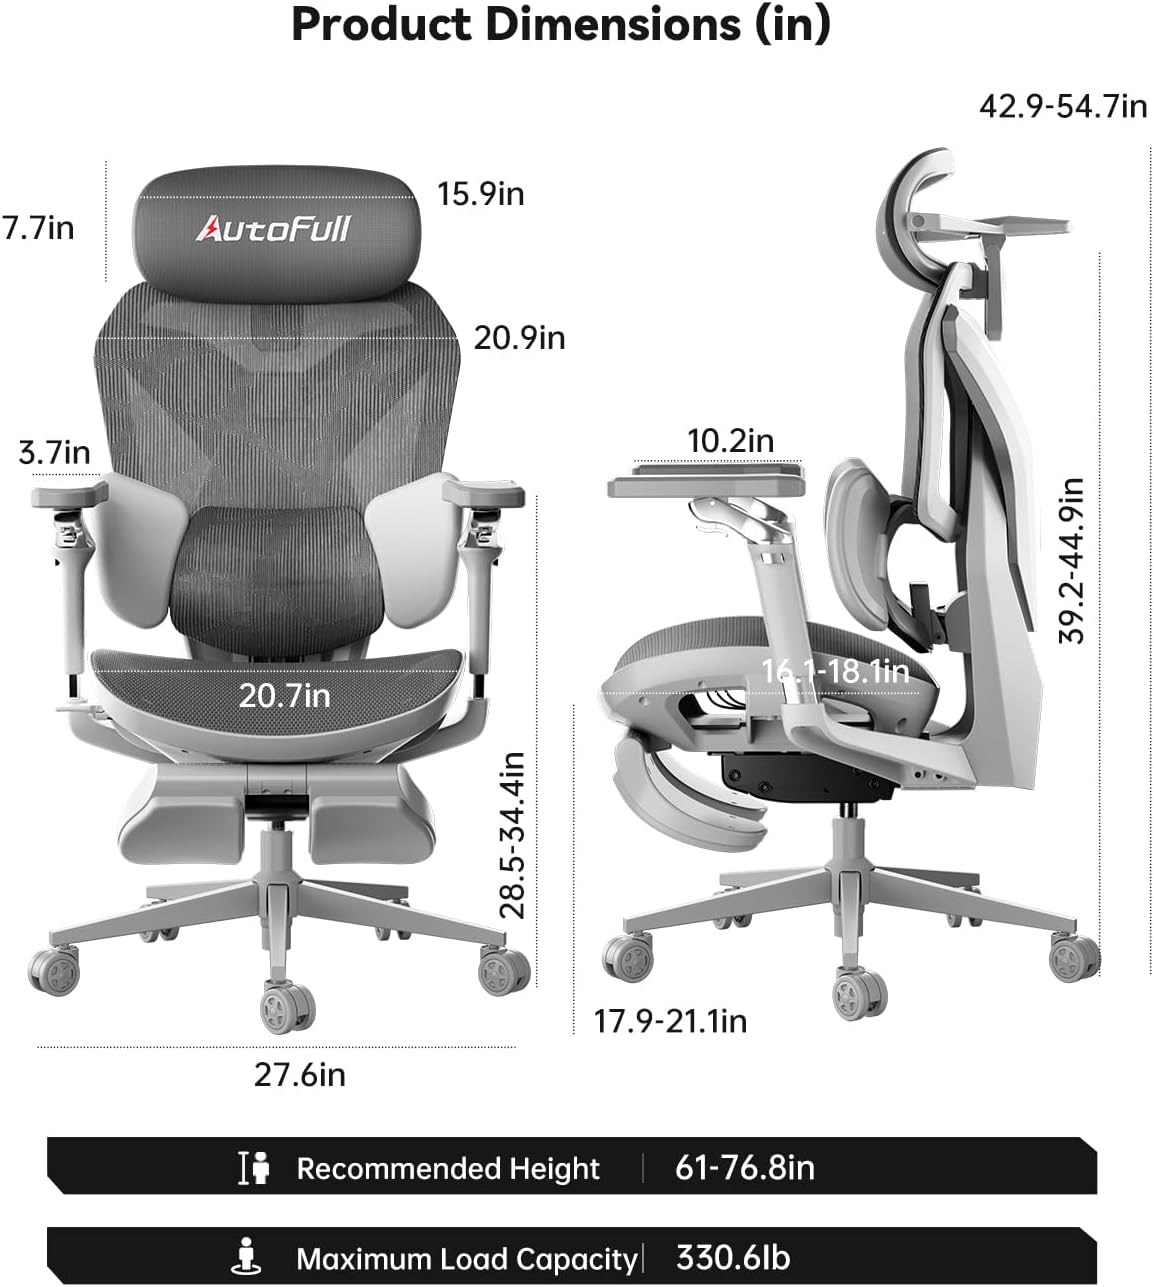
Figure 7.1: Product Dimensions (in inches) and Recommended Height/Load Capacity.

Figure 7.2: AutoFull G7 Certifications.
8. Gwarancja i wsparcie
- Gwarancja: The AutoFull G7 chair comes with a 3-year warranty and a lifetime warranty on the frame.
- Zwroty: Skorzystaj z 30-dniowej możliwości łatwego zwrotu.
- Obsługa klienta: 24/7 support is available. For assistance, please visit the AutoFull Store on Amazon lub skontaktuj się bezpośrednio z ich obsługą klienta.

Figure 8.1: AutoFull After-Sales Service Information.