
1. Wprowadzenie
This manual provides essential information for the safe and efficient operation of your Machenike Machcreator N17A laptop. Please read this manual thoroughly before using the device and retain it for future reference.
2. Zawartość opakowania
Sprawdź, czy w opakowaniu znajdują się wszystkie elementy:
- Laptop Machenike Machcreator N17A
- Zasilacz
- Instrukcja obsługi (ten dokument)
3. Koniec produktuview
The Machenike Machcreator N17A is a 17.3-inch laptop designed for daily computing tasks. It features an Intel N100 Processor, 8GB DDR5 RAM, and a 256GB PCIe SSD for responsive performance. The 17.3" Full HD 120Hz display provides clear visuals, and the laptop runs on Windows 11 Home.
3.1. Komponenty laptopa

Rycina 3.1: Przód view of the Machenike Machcreator N17A laptop.
This image shows the overall design of the Machenike Machcreator N17A laptop, highlighting its large 17.3-inch display and sleek chassis.

Figure 3.2: The 17.3-inch Full HD 120Hz display.
Szczegółowy view of the laptop's 17.3-inch Full HD display, emphasizing its narrow bezels and 120Hz refresh rate for smooth visuals.

Figure 3.3: Backlit keyboard and touchpad.
This image highlights the backlit keyboard and the spacious touchpad, designed for comfortable typing and navigation.
3.2. Porty i złącza
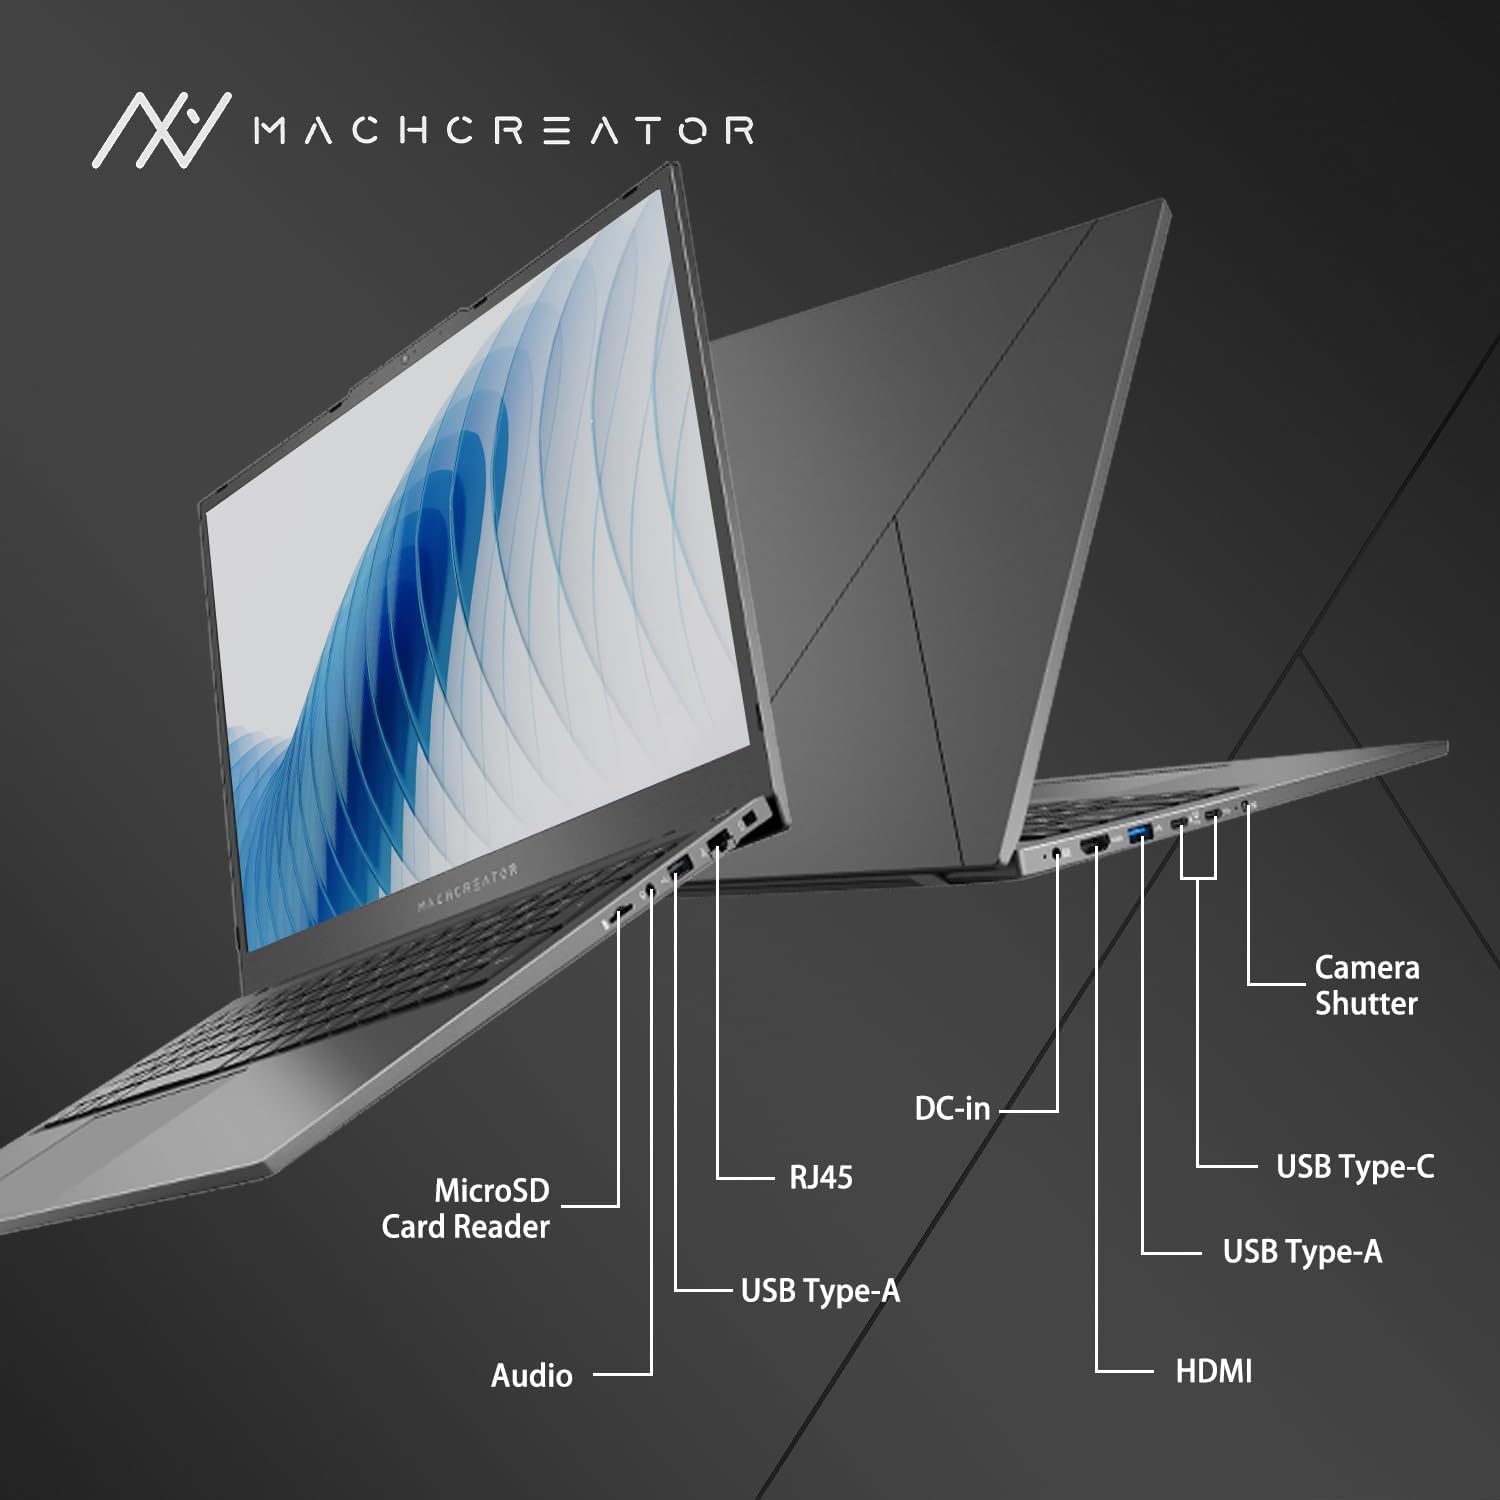
Rysunek 3.4: Strona view z etykietami portowymi.
An illustration detailing the various input/output ports available on the laptop, including USB, HDMI, and the SD card reader.
- Czytnik kart MicroSD: For reading and writing data to MicroSD cards.
- Wejście DC: Connect the power adapter for charging and power supply.
- Thunderbolt 4 (x2): High-speed data transfer, video output, and power delivery.
- USB 2.0 Type-A (x2): Podłącz urządzenia USB.
- HDMI: Podłącz do zewnętrznych wyświetlaczy lub projektorów.
- RJ45: Port Ethernet do przewodowego połączenia sieciowego.
- Wtyczka dźwiękowa: Podłącz słuchawki lub głośniki zewnętrzne.
4. Konfiguracja
4.1. Pierwsze włączenie zasilania
- Wypakuj laptopa i wszystkie akcesoria z pudełka.
- Podłącz zasilacz do portu DC-in w laptopie, a następnie do gniazdka elektrycznego.
- Otwórz pokrywę laptopa.
- Aby włączyć laptopa, naciśnij przycisk zasilania znajdujący się na klawiaturze.
- Postępuj zgodnie z instrukcjami wyświetlanymi na ekranie, aby ukończyć proces konfiguracji systemu Windows 11 Home. Obejmuje to wybór regionu, języka i skonfigurowanie konta użytkownika.
4.2. Łączenie z Wi-Fi
- During the Windows setup, you will be prompted to connect to a Wi-Fi network. Select your desired network from the list.
- Enter the Wi-Fi password if prompted and click "Connect".
- If you skip this step, you can connect later via Windows Settings: Go to Start > Ustawienia > Sieć i internet > Wi-Fi.
5. Instrukcja obsługi
5.1. Korzystanie z klawiatury i touchpada
The laptop features a full-size keyboard with a numeric keypad and a large touchpad. The keyboard is backlit, which can be activated or adjusted using the function keys (e.g., Fn + F5).
Rysunek 5.1: Układ klawiatury i touchpada.
This image illustrates the keyboard and touchpad, showing the key layout and the size of the touchpad for user interaction.
5.2. Podłączanie urządzeń zewnętrznych
Wykorzystaj dostępne porty do podłączenia urządzeń zewnętrznych:
- Urządzenia USB: Plug USB drives, mice, or keyboards into the USB Type-A or Thunderbolt 4 (USB-C) ports.
- Wyświetlacz zewnętrzny: Connect an external monitor or TV using the HDMI port or one of the Thunderbolt 4 ports (with an appropriate adapter, if needed).
- Karty SD: Insert a MicroSD card into the MicroSD Card Reader slot to access its contents.
- Sieci przewodowej: Podłącz kabel Ethernet do portu RJ45, aby uzyskać stabilne przewodowe połączenie internetowe.
5.3. Adjusting the Display Angle
The laptop screen can be adjusted up to a 170-degree angle, providing flexibility for various viewing positions, presentations, or collaborative work.
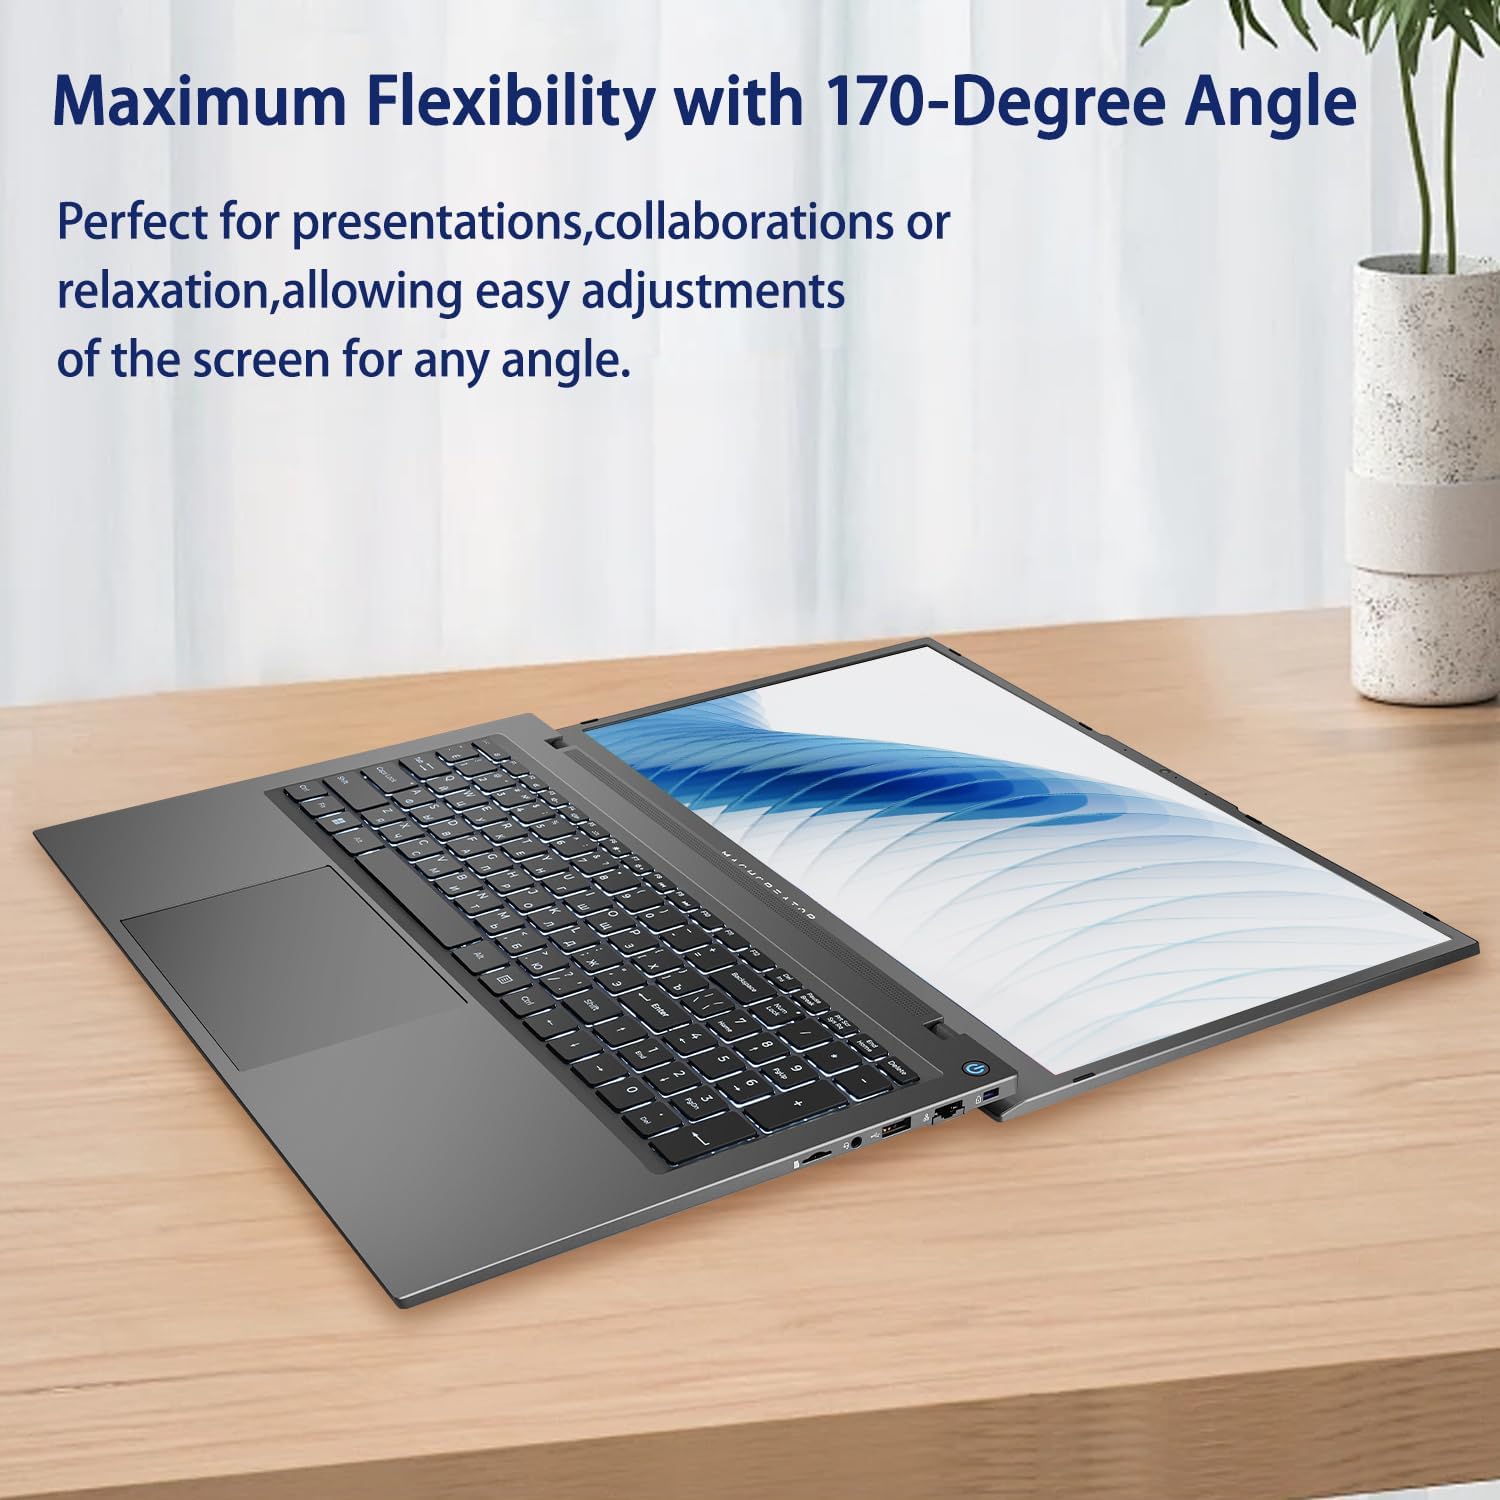
Figure 5.2: Laptop display at 170-degree angle.
This image demonstrates the laptop's ability to open its screen to a wide 170-degree angle, useful for various viewscenariusze.
5.4. Charging the Laptop
Connect the provided power adapter to the DC-in port. The laptop also supports fast charging via its USB-C (Thunderbolt 4) ports with a compatible USB-C Power Delivery charger.
6. Konserwacja
6.1. Czyszczenie
- Do czyszczenia ekranu użyj miękkiej, niepozostawiającej włókien ściereczki. W przypadku uporczywych zabrudzeń delikatnie przetrzyjampWyczyść ściereczkę wodą lub płynem do czyszczenia ekranów.
- Wipe the keyboard and chassis with a soft, dry cloth. Avoid using harsh chemicals or abrasive materials.
- Przed czyszczeniem upewnij się, że laptop jest wyłączony i odłączony od zasilania.
6.2. Pielęgnacja baterii
- Unikaj częstego całkowitego rozładowywania akumulatora.
- Nie wystawiaj laptopa na działanie ekstremalnych temperatur.
- If storing the laptop for an extended period, charge the battery to approximately 50-70% before turning it off.
6.3. Aktualizacje oprogramowania
Regularnie aktualizuj system operacyjny Windows i sterowniki, aby zapewnić optymalną wydajność i bezpieczeństwo. Przejdź do Start > Ustawienia > Aktualizacja systemu Windows aby sprawdzić dostępność aktualizacji.
7. Rozwiązywanie Problemów
| Problem | Możliwe rozwiązanie |
|---|---|
| Laptop się nie włącza. |
|
| Brak połączenia Wi-Fi. |
|
| Ekran jest pusty lub migocze. |
|
| Podświetlenie klawiatury nie działa. |
|
8. Specyfikacje
| Funkcja | Szczegół |
|---|---|
| Nazwa modelu | Machenike Machcreator N17A |
| Edytor | Intel N100 (4 Cores, up to 3.4 GHz) |
| BARAN | 8 GB DDR5 (4800 MHz) |
| Składowanie | Dysk SSD PCIe 256 GB |
| Grafika | Karta graficzna Intel UHD (zintegrowana) |
| Wyświetlacz | 17.3" FHD (1920x1080) IPS, 120Hz |
| System operacyjny | Windows 11 Home |
| Porty | 2x Thunderbolt 4, 2x USB 2.0 Type-A, 1x HDMI, 1x RJ45, 1x MicroSD Card Reader, 1x Audio Jack, 1x DC-in |
| Łączność bezprzewodowa | Wi-Fi (802.11n) |
| Cechy specjalne | Podświetlana klawiatura, klawiatura numeryczna |
| Wymiary (dł. x szer. x wys.) | 15.6 x 10.32 x 1.02 cala |
| Waga | 5.78 funtów |
| Kolor | Szary |
9. Gwarancja i wsparcie
For warranty information and technical support, please refer to the documentation provided with your purchase or visit the official Machenike webZachowaj dowód zakupu na wypadek roszczeń gwarancyjnych.
Zasoby internetowe:
- Urzędnik Machenike Webstrona: www.machenike.com (Uwaga: To jest symbol zastępczy URL, please refer to your product's specific warranty card for the correct support contact.)
10. Film demonstracyjny produktu
Video 10.1: Machcreator N17A Laptop Overview.
Ten film przedstawia wizualny przeglądview of the Machenike Machcreator N17A laptop, showcasing its design, key features, and various ports. It demonstrates the unboxing experience, the backlit keyboard, and the available connectivity options.