1. Wprowadzenie
The CUQI 7 Inch IPS Portable Monitor is a compact display designed for versatility and ease of use. Featuring a 1024 x 600 resolution IPS screen, it offers wide viewing angles and accurate color reproduction. This monitor is compatible with a variety of devices, including Raspberry Pi, laptops, PCs, and gaming consoles, making it suitable for various applications such as dual monitor setups, embedded systems, or portable entertainment.
2. Zawartość opakowania
Sprawdź, czy wszystkie wymienione poniżej elementy znajdują się w Twojej paczce. Jeśli brakuje któregokolwiek z nich lub jest on uszkodzony, skontaktuj się z obsługą klienta.
- Ekran 7 cala
- Leather stand
- Kabel HDMI do Mini HDMI
- Przejściówka Micro HDMI na HDMI
- Dual Type-A to Type-C Cable
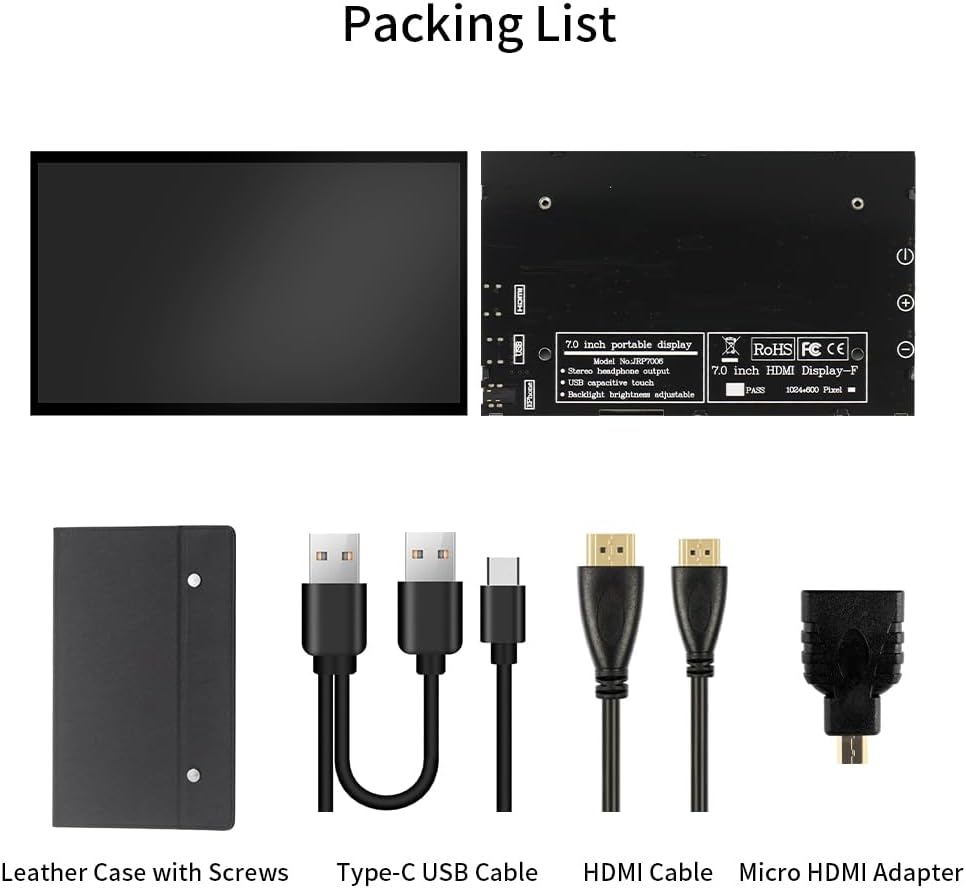
Figure 2.1: Included accessories with the CUQI 7 Inch Portable Monitor.
3. Funkcje
The CUQI 7 Inch IPS Portable Monitor offers a range of features designed for optimal performance and user convenience:
- Ekran IPS: Provides a clear and high-quality display with 178-degree full viewing angles, 1024 x 600 resolution, and accurate color reproduction.
- Podłącz i graj: Connects via HDMI and USB ports without requiring driver or software installation.
- Regulowana jasność: Screen brightness can be adjusted, and a backlight off button allows the screen to be switched off when not in use.
- Portable Leather Stand: Includes a lightweight leather protective case that doubles as a stand with two adjustable angles. The case is removable via two screws.
- Szeroka kompatybilność: Supports Raspberry Pi 5/4/4B/3B+/3B, Banana Pi, Windows 7/8/10 PC, Mac, Microsoft, and systems like Retro Pi, NOOBS, Raspbian, Ubuntu, and Kodi.

Figure 3.1: IPS 178-degree wide viewkąt.

Figure 3.2: Portable adjustable leather case features.
4. Instrukcje konfiguracji
Follow these steps to set up your CUQI 7 Inch IPS Portable Monitor:
- Attach the Leather Stand: If not already attached, secure the leather stand to the monitor using the two removable screws on the back. The stand allows for two adjustable viewkąty.
- Podłącz źródło wideo: Use the provided HDMI to Mini HDMI Cable (and Micro HDMI to HDMI Adapter if needed) to connect the monitor's Mini HDMI interface to your device (e.g., Raspberry Pi, laptop, PC, gaming console).
- Podłącz zasilanie: Use the provided Dual Type-A to Type-C Cable to connect the monitor's Type-C Power port to a 5V/3A power source (e.g., a USB port on your device or a USB power adapter).
- Włączanie: Press the power button on the side of the monitor to turn it on. The monitor should automatically detect the video input.

Figure 4.1: Connecting the monitor to a Raspberry Pi.

Figure 4.2: Monitor ports and control buttons.
5. Instrukcja obsługi
Once connected, the monitor operates as a secondary display for your device.
- Włączanie/wyłączanie: Use the dedicated power button on the side of the monitor to turn it on or off.
- Regulacja jasności: Use the '+' and '-' buttons on the side of the monitor to adjust the screen brightness.
- Podświetlenie wyłączone: The backlight off button allows you to turn off the screen display while keeping the monitor powered, useful for power saving or when the display is not needed temporarily.
- Wyjście audio: If your source device transmits audio via HDMI, you can connect headphones or external speakers to the 3.5mm Audio Interface for sound output.

Figure 5.1: Monitor in use as a gaming display.
6. Konserwacja
Aby zapewnić długowieczność i optymalną wydajność monitora, należy przestrzegać poniższych wskazówek dotyczących konserwacji:
- Czyszczenie: Delikatnie przetrzyj ekran miękką, niepozostawiającą włókien ściereczką. W przypadku uporczywych zabrudzeń delikatnie przetrzyjampPrzetrzyj ściereczkę wodą lub środkiem czyszczącym do ekranów. Unikaj silnych środków chemicznych i materiałów ściernych.
- Składowanie: When not in use, store the monitor in a cool, dry place, preferably in its protective leather case, to prevent dust accumulation and physical damage.
- Obsługiwanie: Avoid dropping the monitor or subjecting it to strong impacts. Handle it by the edges to prevent fingerprints on the screen.
- Temperatura: Nie wystawiaj monitora na działanie ekstremalnych temperatur ani bezpośredniego światła słonecznego przez dłuższy czas.
7. Rozwiązywanie Problemów
Jeśli masz problemy z monitorem, zapoznaj się z poniższymi typowymi problemami i ich rozwiązaniami:
- Brak obrazu/czarny ekran:
- Ensure both the HDMI (or equivalent video) cable and the USB-C power cable are securely connected.
- Verify that the power source provides sufficient power (5V/3A).
- Check if the monitor is powered on using the power button.
- Confirm your source device is outputting video correctly.
- Flickering/Unstable Image:
- Sprawdź, czy kabel wideo nie jest uszkodzony lub czy połączenia nie są luźne.
- Upewnij się, że zasilanie jest stabilne.
- Try a different video cable or port on your source device.
- Retencja obrazu/efekt ducha:
- If static images are displayed for very long periods, temporary image retention may occur. This is common with some display technologies.
- To mitigate, display a dynamic image or turn off the monitor for a period. Avoid displaying static images for extended durations.
- Monitor Disconnecting/Reconnecting:
- Ensure the power cable and video cable connections are firm.
- Test with a different USB power source or cable to rule out power supply issues.
- Check for updated drivers for your source device's graphics card.
If these steps do not resolve the issue, please contact CUQI technical support.
8. Specyfikacje
| Funkcja | Specyfikacja |
|---|---|
| Wymiary produktu | 6.58 x 0.39 x 4.06 cala |
| Waga przedmiotu | 14.9 uncji |
| Producent | CUQI |
| Numer modelu przedmiotu | 7 inch leather |
| Rozmiar ekranu stojącego | 7 cali |
| Proporcje obrazu | 1.60:1 |
| Rezolucja | 1024 x 600 pikseli |
| Jasność obrazu | 500 XNUMX kandeli |
| Łączna liczba portów USB | 1 (Type-C for power) |
| Opis powierzchni ekranu | Matowy |
9. Gwarancja i wsparcie
CUQI provides professional technical support for this product. If you have any questions, require assistance with setup, operation, or troubleshooting that is not covered in this manual, please contact us via email. Refer to your purchase documentation for specific warranty details and contact information.