1. Wprowadzenie
This manual provides detailed instructions for the safe and efficient operation of your PREXISO PLC10GLIT Rechargeable Green Cross Line Laser Level. Please read all instructions carefully before use to ensure optimal performance and safety.
Informacje dotyczące bezpieczeństwa
- OSTRZEŻENIE: Do not look directly into the laser beam. Direct exposure can cause eye injury.
- To urządzenie emituje promieniowanie laserowe klasy 2.
- Przechowywać urządzenie w miejscu niedostępnym dla dzieci.
- Nie należy podejmować prób modyfikacji ani demontażu poziomnicy laserowej.
- Należy używać wyłącznie określonych baterii i akcesoriów do ładowania.
2. Zawartość opakowania
Sprawdź, czy w przesyłce znajdują się wszystkie elementy wymienione poniżej:
- PREXISO Green Cross Line Laser Level (Model: PLC10GLIT)
- Rechargeable Li-ion Battery (pre-installed or included separately)
- Kabel ładujący USB-C
- Magnetic L-Bracket
- 1.2m Aluminum Tripod with 1/4″-20 mount
- Carry Case / Storage Bag
- Instrukcja obsługi

3. Konfiguracja
3.1 Instalacja i ładowanie akumulatora
The device uses a built-in rechargeable Li-ion battery. Ensure the battery is charged before first use.
- Locate the battery compartment on the bottom of the laser level.
- Włóż akumulator litowo-jonowy, zwracając uwagę na prawidłową biegunowość.
- Dokładnie zamknij komorę baterii.
- Connect the USB-C charging cable to the Type-C port on the device and to a suitable USB power source.
- The LED indicator will show red during charging and turn green when fully charged.

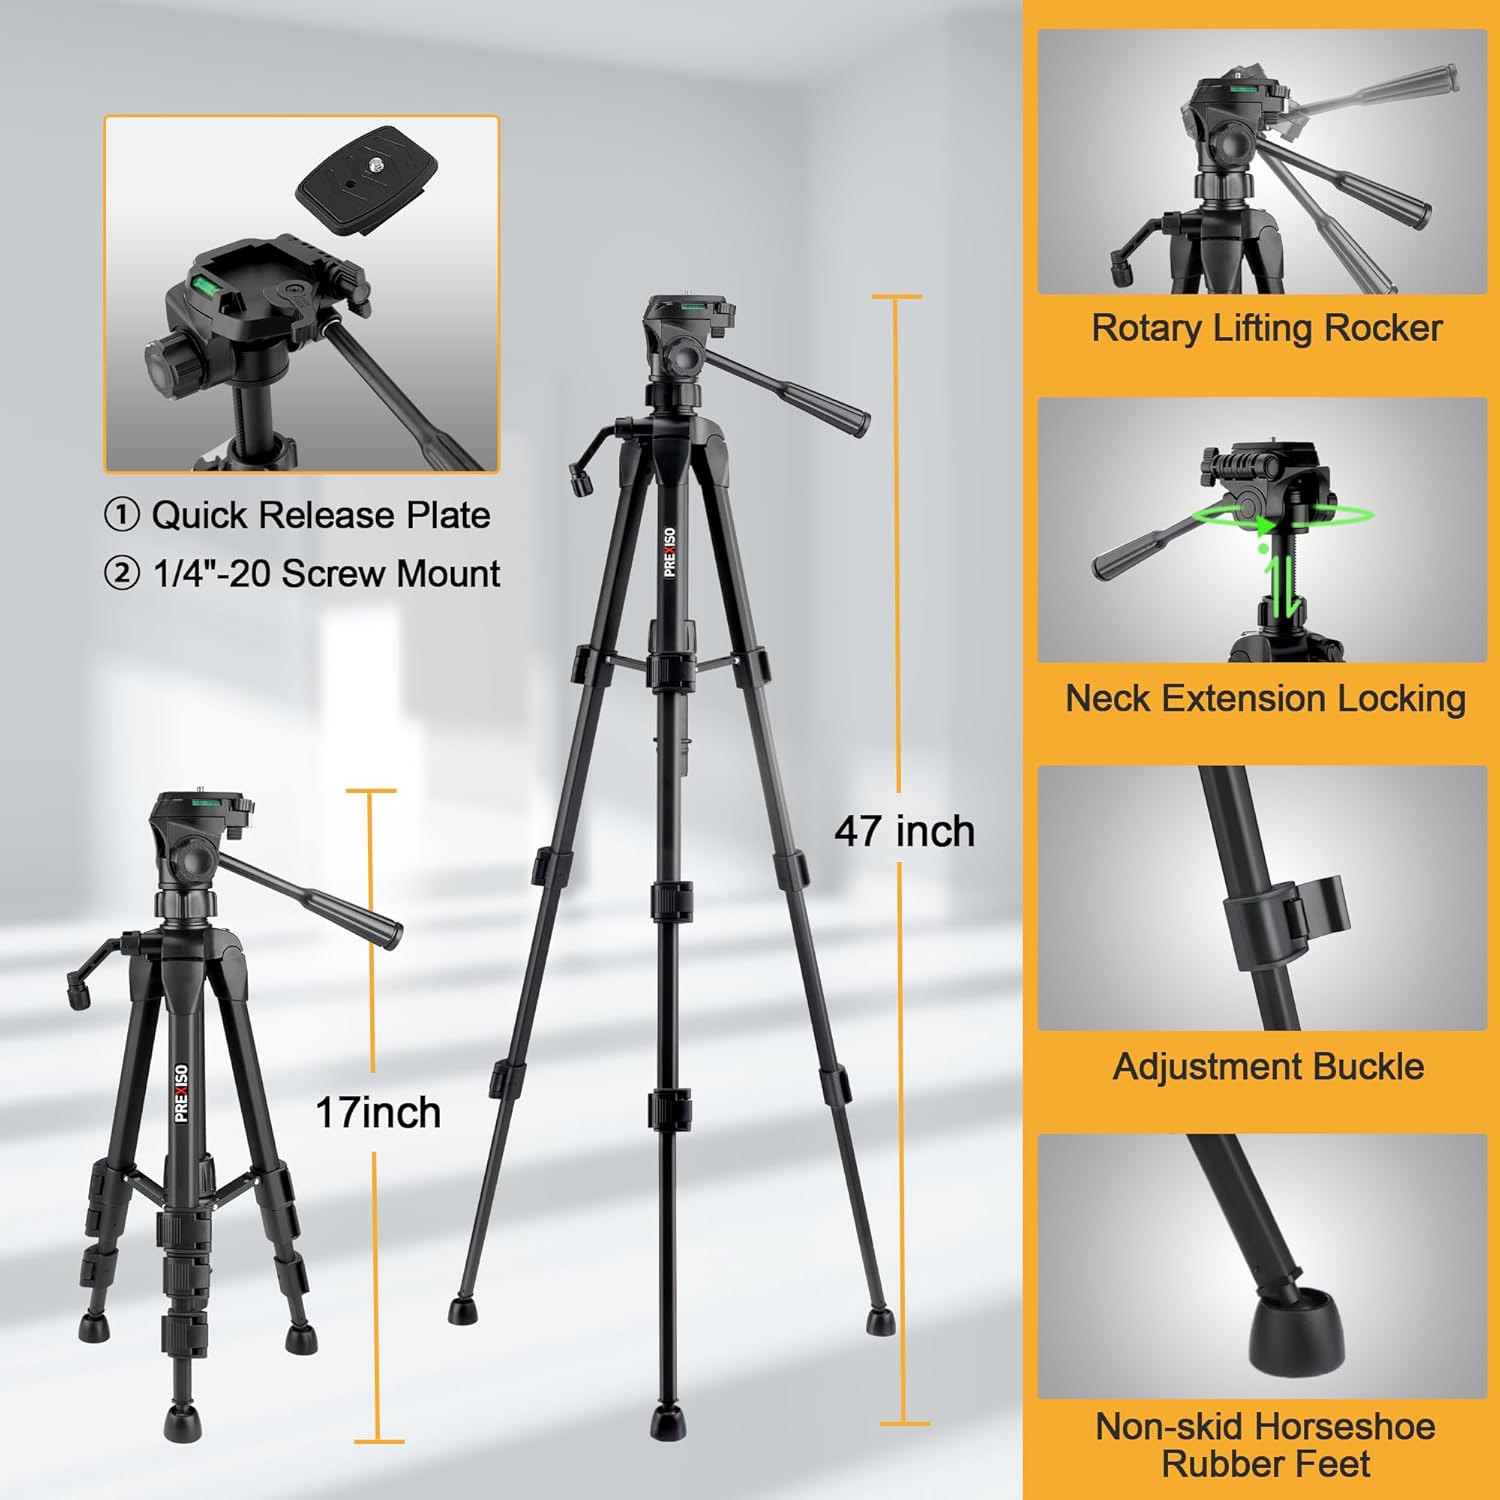
3.2 Rozstawianie statywu
The included 1.2m aluminum tripod provides a stable platform for precise leveling.
- Extend the tripod legs to the desired height and secure them using the adjustment buckles.
- Attach the laser level to the tripod's 1/4″-20 screw mount.
- Adjust the tripod head using the rotary lifting rocker and neck extension locking mechanism for fine positioning.
3.3 Magnetic L-Bracket Attachment
The integrated magnetic L-bracket allows for versatile mounting on metal surfaces.
- Attach the laser level to the L-bracket via the 1/4″-20 screw.
- The strong magnets on the L-bracket can securely hold the device to metal studs, beams, or other ferrous materials.
- The bracket also features anti-slip rubber pads for added stability.
4. Tryby pracy
4.1 Tryb samopoziomowania
This mode automatically levels the laser lines for accurate horizontal and vertical projections.
- Slide the pendulum lock switch to the "Auto" (unlocked) position. The LED will turn green.
- Place the laser level on a stable surface. The device will self-level within a 5° range.
- If the device is outside the 5° self-leveling range, the laser lines will flash, and a red LED alert will activate. Adjust the device's position until the lines are steady and the LED is green.

4.2 Tryb ręczny (tryb blokady)
Use this mode to project laser lines at any desired angle, useful for diagonal applications.
- Slide the pendulum lock switch to the "Manual" (locked) position.
- Press and hold the power button for 2 seconds to activate the laser lines.
- The laser lines will now be locked and can be projected at any angle without flashing.
4.3 Regulacja jasności
The laser level features three adjustable brightness settings for optimal visibility in various lighting conditions.
- Short press the brightness button (usually indicated by a sun icon) on the top of the device to cycle through the three brightness modes (100%, 70%, 40%).

5. Wszechstronne zastosowania
The PREXISO PLC10GLIT is designed for a wide range of professional and DIY tasks, including:
- Tile layout and installation
- Instalacja backsplashowa
- Cabinet fitting
- Hanging pictures and artwork
- Kalibracja drzwi i okien
- Framing and general home renovation projects

6. Specyfikacje
| Numer modelu | PLC10GLIT |
| Typ lasera | Green Cross Line Laser (520 nm) |
| Zakres samopoziomowania | ± 5° |
| Dokładność | ± 1/4″ at 30 ft |
| Indoor Working Range | Do 20 m (65 stóp) |
| Tryby jasności | 3 (100%, 70%, 40%) |
| Źródło zasilania | Rechargeable Li-ion Battery (included) |
| Port ładowania | USB typu C |
| Ciągły czas użytkowania | Do 6 godzin |
| Stopień ochrony IP | IP54 (odporność na kurz i zachlapanie) |
| Tripod Mount Thread | 1/4″-20 |
| Wysokość statywu | 1.2 m (47 cali) |
| Waga przedmiotu | 1.83 kilogramów |
| Producent | HANGZHOU GREAT STAR INDUSTRIAL CO.,LTD |

7. Konserwacja
- Utrzymuj poziomicę laserową w czystości, bez kurzu i zanieczyszczeń. Do czyszczenia używaj miękkiej, suchej ściereczki.
- Store the device in its carry case when not in use to protect it from damage.
- Unikaj wystawiania urządzenia na działanie ekstremalnych temperatur lub bezpośredniego światła słonecznego przez dłuższy czas.
- Regularnie sprawdzaj akumulator pod kątem uszkodzeń lub wycieków.
8. Rozwiązywanie Problemów
8.1 Laser Lines are Flashing
If the laser lines are flashing in self-leveling mode, it indicates the device is outside its 5° self-leveling range. Adjust the position of the laser level until the lines become steady and the LED indicator turns green.
8.2 Laser Not Turning On
- Upewnij się, że bateria jest w pełni naładowana.
- Check if the pendulum lock switch is in the correct position (Auto for self-leveling, Manual for locked lines).
- If in Manual mode, ensure the power button is pressed and held for 2 seconds to activate.
9. Gwarancja i wsparcie
Your PREXISO PLC10GLIT Rechargeable Green Cross Line Laser Level comes with a 2-letnia gwarancja producenta. For warranty claims, technical support, or any inquiries, please contact the manufacturer or your retailer with your purchase details.
10. Oficjalne filmy o produktach
PREXISO Laser Level with Tripod - Rechargeable Dual Modules
Ten film zapewnia ponadview of the PREXISO Laser Level, highlighting its features, including the rechargeable dual modules and tripod compatibility. It demonstrates the product in various usage scenarios.
PREXISO Rechargeable Laser Level Self Leveling
This video showcases the self-leveling capabilities of the PREXISO Rechargeable Laser Level, demonstrating how it automatically adjusts to provide accurate lines for your projects.