1. Wprowadzenie
The Master Flow ERV6 Power Roof Vent is designed to provide superior attic ventilation, enhancing home efficiency and comfort. This unit efficiently removes hot and humid air, offering optimal airflow of up to 1,500 cubic feet per minute for attic spaces up to 2,800 square feet. Equipped with an adjustable thermostat and humidistat, it helps regulate attic temperature and humidity, contributing to reduced heating and cooling costs and extending the lifespan of your roof. Its durable construction ensures reliable performance.
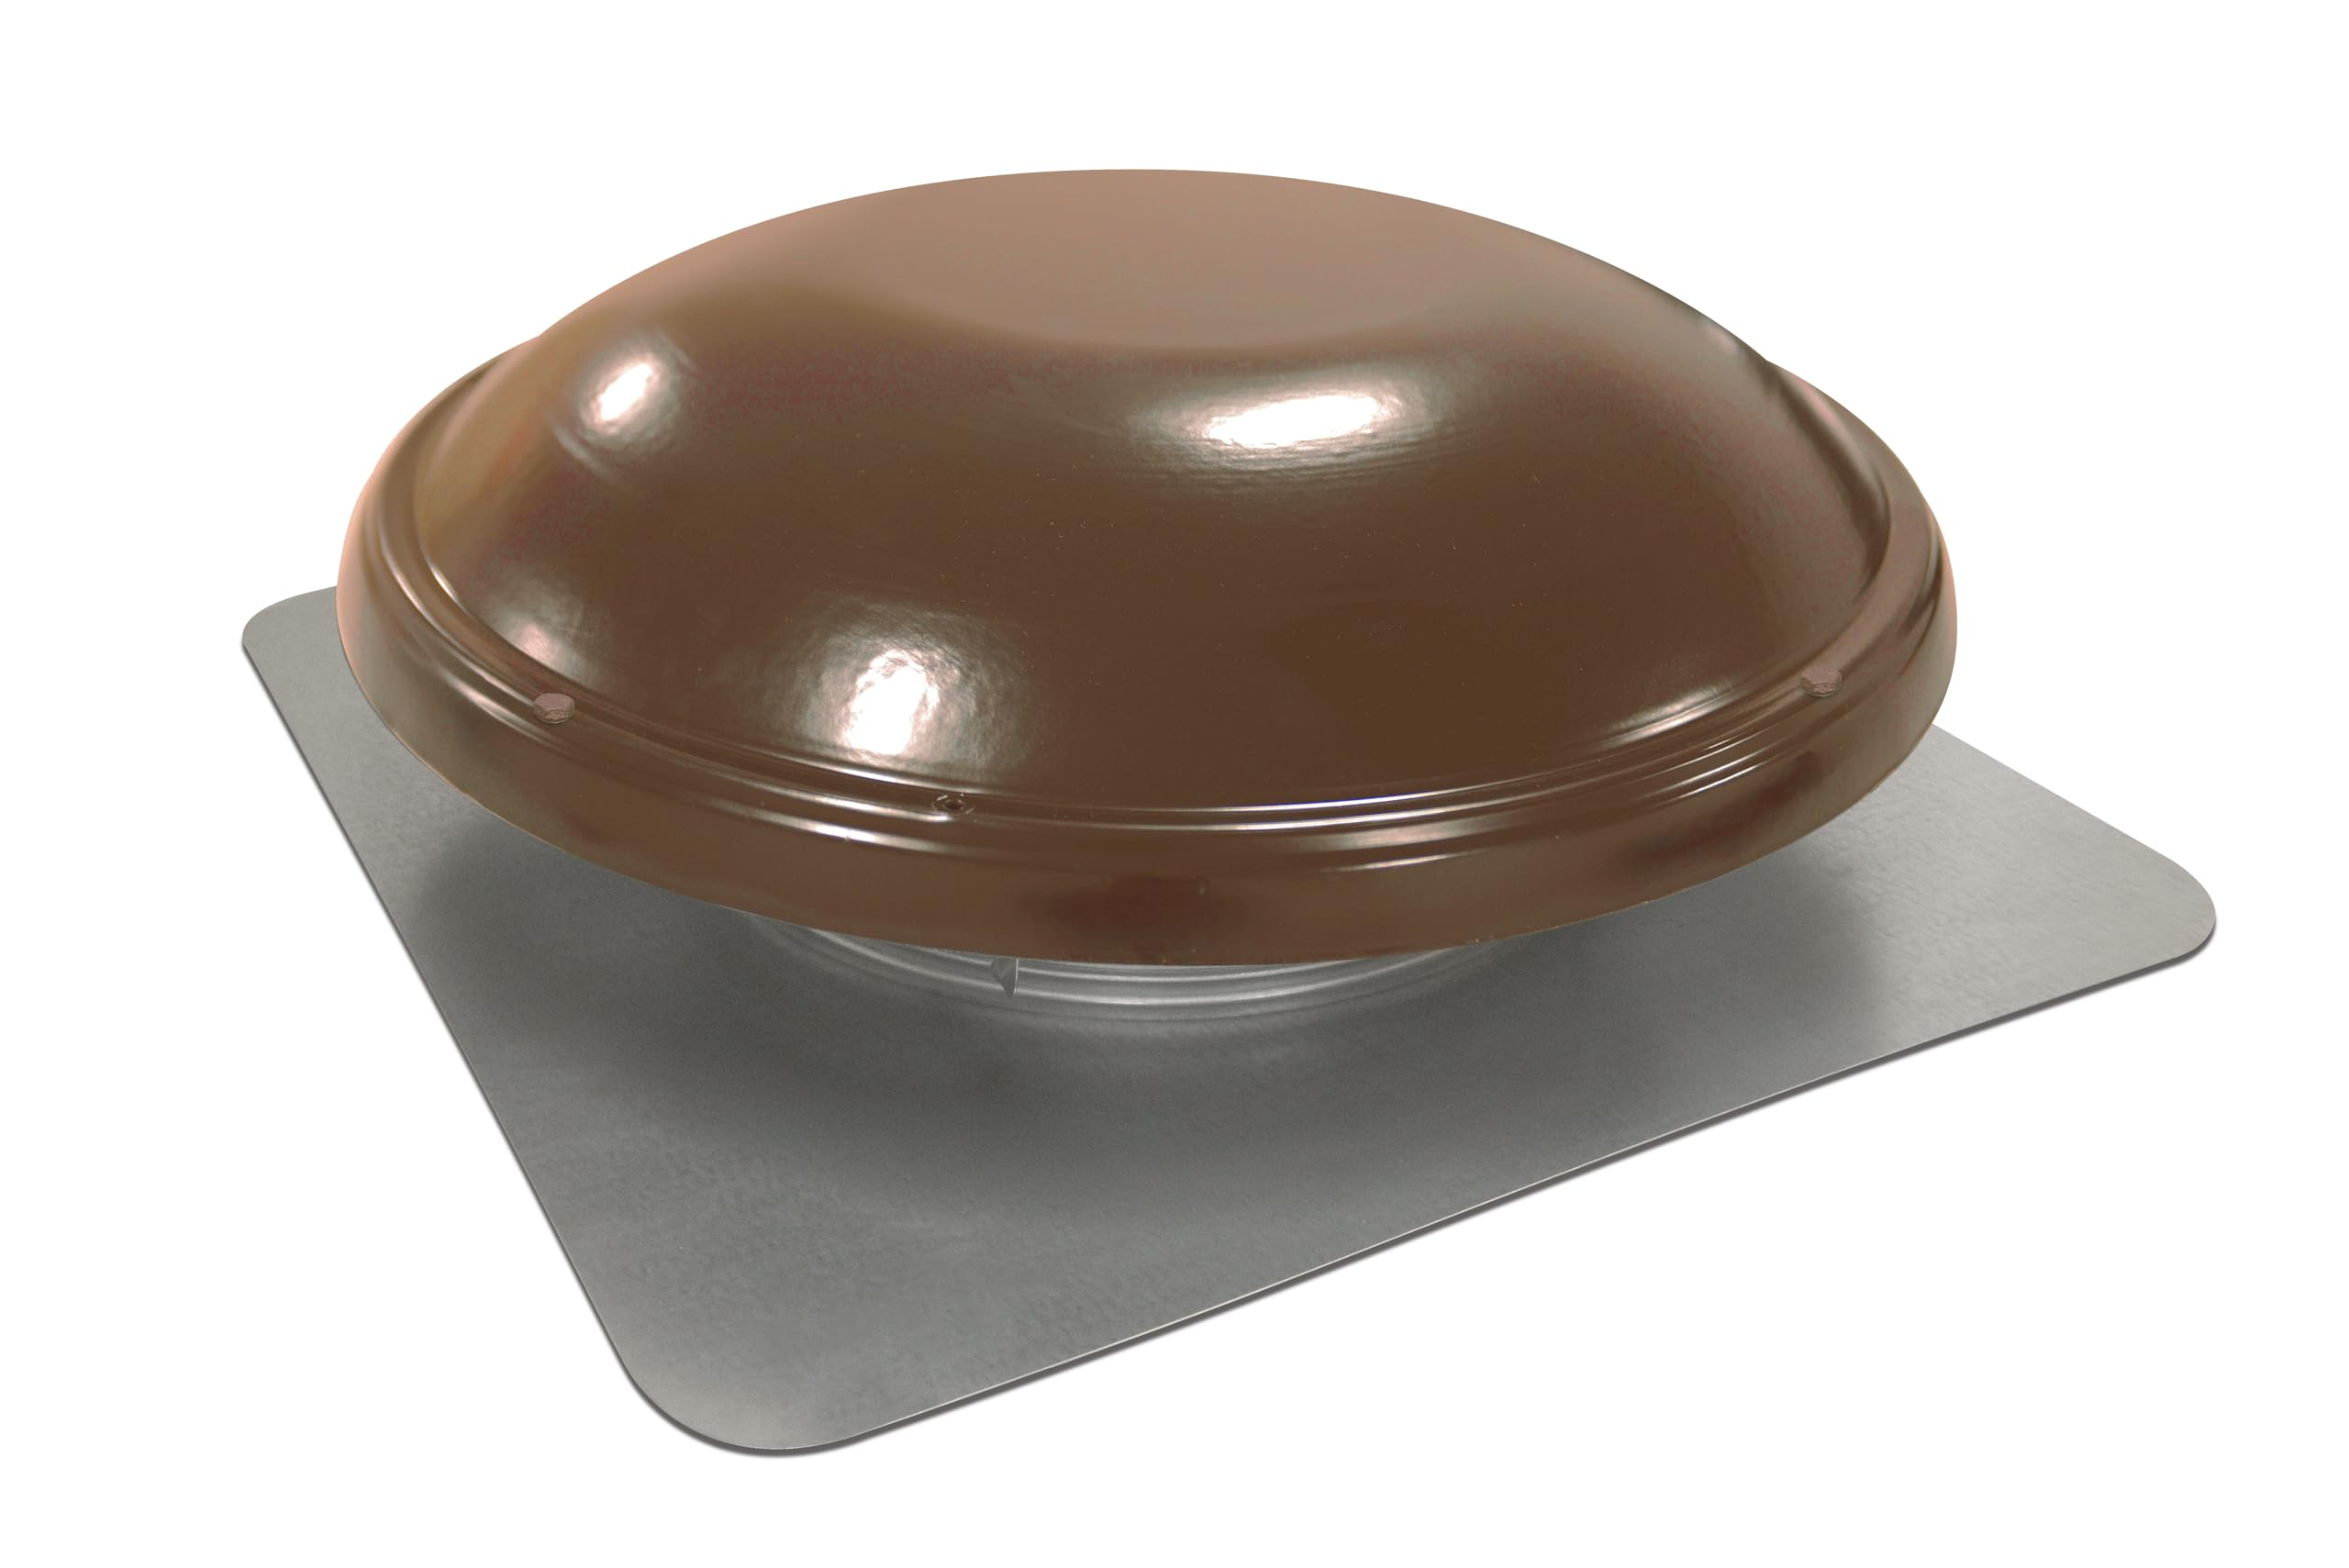
Figure 1: GAF Master Flow 1500 CFM Power Roof Mount Attic Fan with Thermostat & Humidistat.
2. Informacje dotyczące bezpieczeństwa
Always wear proper personal safety equipment including safety eyewear, work gloves, and fall-restraint (if working on a roof). Always follow all building codes and the National Electrical Code (U.S. only). Electrical work must always be done by a qualified person. Contact a qualified electrician if you are not familiar with electrical codes and/or installations. Ensure all power to the circuit is turned off at the breaker before beginning any electrical work. Verify power is off using a voltage metr.
3. Konfiguracja i instalacja
Proper installation of the Master Flow Power Attic Vent is crucial for optimal performance and safety. Ensure a balanced ventilation system with a 50/50 intake versus exhaust ratio. Intake ventilation is typically installed within the bottom eve of the roof system or underneath the soffit.
3.1. Przygotowanie terenu
- Ensure all personal protective equipment (PPE) is worn, including safety glasses, gloves, and appropriate footwear.
- Secure yourself to the roof using proper fall protection equipment.
- From inside the attic, center the fan's base between the rafters at the desired installation location.
3.2. Marking and Cutting the Opening
- Once the base is centered, mark the hole from the attic side.
- On the roof, use a template (often provided with the unit) to mark the circular opening on the shingles.
- Carefully cut out the shingles along the marked line.
- Use a paddle bit and drill to create a pilot hole through the decking.
- Using a jigsaw, cut out the decking along the marked line. Ostrożność: Ensure you do not cut into any rafters, as this can compromise the roof's structural integrity. Be mindful of sawdust creating a slippery surface.
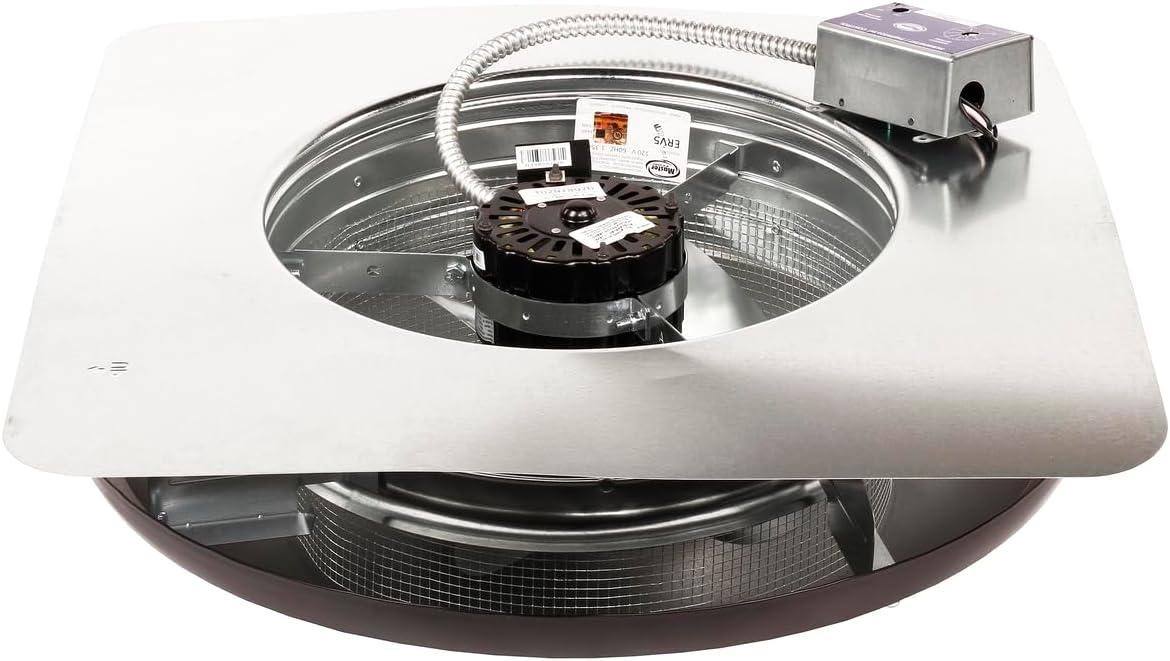
Rysunek 2: Wewnętrzne view of the Master Flow attic fan, showing the motor, blades, and protective screening.
3.3. Preparing for Unit Placement
- Use a pry bar to carefully lift and remove nails from the shingles around the opening where the fan base will sit. This allows the base to slide underneath the shingles.
3.4. Placing and Securing the Unit
- Slide the Master Flow Power Attic Vent unit into the prepared opening, ensuring the electrical box passes through the hole without obstruction.
- For added protection against wind, rain, snow, and ice, apply a bead of sealant around the base of the flashing before fastening it into place. Ostrożność: Do not use excessive sealant, as it may streak down the roof system when hot.
- Nail the base of the unit approximately every 4 inches along the bottom edge.
- Reattach any lifted shingles over the flashing to ensure a weather-tight seal.

Figure 3: Master Flow Power Roof Mount Attic Fan installed on a residential roof.
3.5. Electrical Wiring (Thermostat & Humidistat)
- Ensure all power to the circuit is turned off at the breaker. Verify power is off using a voltage metr.
- Remove the cover from the thermostat/humidistat box by prying the tabs on either side with a flat-bladed screwdriver.
- Mount the box securely to a frame member in the attic. Ensure the thermostat element opening on the back of the box is not covered.
- Feed the Romex wiring through the pre-existing opening in the box.
- Connect the black wire from the fan to the black wire from the power source using a wire nut.
- Connect the white wire from the fan to the white wire from the power source using a wire nut.
- Tuck all wiring securely back into the box, ensuring it does not interfere with the thermostat's function or prevent the cover from being reattached.
- Replace the cover on the thermostat/humidistat box.
- Restore power to the circuit and test the fan's operation.

Figure 4: Adjustable Thermostat and Humidistat Control Box.
3.6. Film instalacyjny
Video 1: GAF Master Flow Roof Vent Installation Guide. This video provides a visual walkthrough of the installation process for the Master Flow Power Attic Vent, covering roof preparation, cutting, and electrical connections.
4. Instrukcja obsługi
The Master Flow ERV6 Power Roof Vent operates automatically based on the settings of its integrated thermostat and humidistat. These controls allow you to customize the fan's operation to maintain optimal attic conditions.
- Regulacja termostatu: The thermostat activates the fan when the attic temperature exceeds the set point. Adjust the dial to your desired maximum attic temperature (e.g., 90°F to 120°F). The fan will run until the attic temperature drops below this setting.
- Humidistat Adjustment: The humidistat activates the fan when attic humidity rises above the set point. Adjust the dial to your desired maximum attic humidity level (e.g., 20% to 80%). This helps prevent moisture buildup, which can lead to mold and wood rot.
- Obsługa ręczna: The unit features a manual override switch (if applicable to your model) to run the fan continuously, regardless of temperature or humidity settings. Refer to the specific controls on your unit for this feature.
For energy efficiency, it is recommended to set the thermostat to a temperature slightly above your desired indoor temperature during warmer months, and the humidistat to a level that prevents condensation without over-ventilating.
5. Konserwacja
Regular maintenance ensures the longevity and efficient operation of your Master Flow Power Roof Mount Attic Fan.
- Roczna inspekcja: Annually, inspect the fan from both the attic and the roof exterior. Check for any debris (leaves, nests, etc.) that may obstruct the fan blades or vent opening.
- Czyszczenie: Carefully remove any accumulated dust or debris from the fan blades and motor housing. Ensure the protective screening is clear. Always disconnect power before cleaning.
- Połączenia elektryczne: Periodically check electrical connections for tightness and signs of wear or corrosion. This should be done by a qualified person.
- Uszczelnienie dachu: Inspect the sealant around the base of the flashing for cracks or deterioration. Reapply roofing sealant as needed to maintain a watertight seal.
- Hałas silnika: Listen for unusual noises during operation. Excessive noise may indicate a need for professional inspection or lubrication (if applicable to the motor type).
6. Rozwiązywanie Problemów
If your Master Flow Power Roof Mount Attic Fan is not operating as expected, refer to the following common troubleshooting steps:
| Problem | Możliwa przyczyna | Rozwiązanie |
|---|---|---|
| Wentylator się nie włącza. | Brak zasilania urządzenia. Thermostat/Humidistat setting too low. Awaria silnika. | Sprawdź wyłącznik automatyczny. Adjust thermostat/humidistat to a higher setting. Contact a qualified technician for motor replacement. |
| Wentylator pracuje w sposób ciągły. | Thermostat/Humidistat setting too high. Awaria czujnika. | Adjust thermostat/humidistat to a lower setting. Contact a qualified technician for sensor inspection. |
| Nadmierny hałas podczas pracy. | Zanieczyszczenia w łopatkach wentylatora. Luźne mocowanie. Zużyte łożyska silnika. | Odłącz zasilanie i usuń zanieczyszczenia. Sprawdź i dokręć śruby mocujące. Skontaktuj się z wykwalifikowanym technikiem. |
| Water leakage around the unit. | Improper flashing installation. Deteriorated sealant. | Inspect flashing and re-seal or re-install as necessary. Apply fresh roofing sealant around the base. |
7. Specyfikacje
| Funkcja | Szczegół |
|---|---|
| Marka | Główny przepływ |
| Numer modelu | ERV6 |
| Kolor | Brązowy |
| Styl | w/Thermostat & Humidistat (HT1) |
| Przepływ powietrza | 1500 stóp sześciennych na minutę (CFM) |
| Obszar zasięgu | Do 2,800 stóp kwadratowych |
| Źródło zasilania | Elektryczny przewodowy |
| Cotage | 250 watów |
| Tworzywo | Alloy Steel (Galvanized Finish) |
| Wymiary produktu (Gł. x Szer. x Wys.) | 10" gł. x 28" szer. x 28" wys. |
| Waga przedmiotu | 19 funtów |
| Typ montażu | Montaż na dachu |
| Metoda kontroli | Push Button (for manual override, if applicable) |
8. Gwarancja i wsparcie
For specific warranty details and terms, please refer to the warranty documentation included with your product packaging or visit the official Master Flow website. If you encounter any issues or require technical assistance, please contact Master Flow customer support through their official channels.