1. Wprowadzenie
This manual provides detailed instructions for the assembly, operation, and maintenance of your MELLCOM 40'x12'x7.5' Portable Greenhouse. Please read all instructions carefully before beginning assembly and retain this manual for future reference. This greenhouse is designed to provide a protected environment for plant growth, featuring a durable PE cover, roll-up zippered doors, and multiple screen windows for ventilation.
2. Informacje dotyczące bezpieczeństwa
- Szklarnię należy zawsze montować na równym i stabilnym podłożu.
- Ensure all connections are secure and tightened according to instructions.
- Warunki wietrzne: Secure your greenhouse with extra ropes and ground anchors when wind speeds exceed 24 miles/hour. Install the greenhouse away from direct wind exposure.
- Snow Conditions: Keep the greenhouse clear of snow. Snow coverage should not exceed 2 inches to prevent structural damage.
- Do not use the greenhouse during severe weather conditions such as heavy storms, strong winds, or blizzards.
- Trzymaj dzieci i zwierzęta domowe z dala od miejsca montażu.
- Podczas montażu należy nosić odpowiedni sprzęt ochronny, np. rękawice.
3. Instalacja i montaż
Assembly typically requires two or more adults. Follow the steps below for proper installation.
3.1. Rozpakowanie i identyfikacja komponentów
Carefully unpack all components and verify against the parts list (not provided in this manual, refer to your product packaging). Ensure all frame pieces, connectors, the PE cover, doors, windows, and anchoring hardware are present.
3.2. Montaż ramy
Begin by assembling the base frame on your chosen level site. Connect the galvanized steel rods using the provided optimized screws and solid connectors. Ensure all connections are firm to establish a stable foundation.

Rysunek 3.2.1: Frame components showing optimized screws, heavy-duty galvanized steel rods, strong connectors, and reinforcement poles.
Construct the arched frame sections, paying close attention to the orientation of each piece. The frame includes diagonal rods at the four corners and additional cross bars for reinforcement. These elements are crucial for the greenhouse's structural integrity and wind resistance.

Rysunek 3.2.2: Interior frame structure highlighting cross bars and short bars for reinforcement.
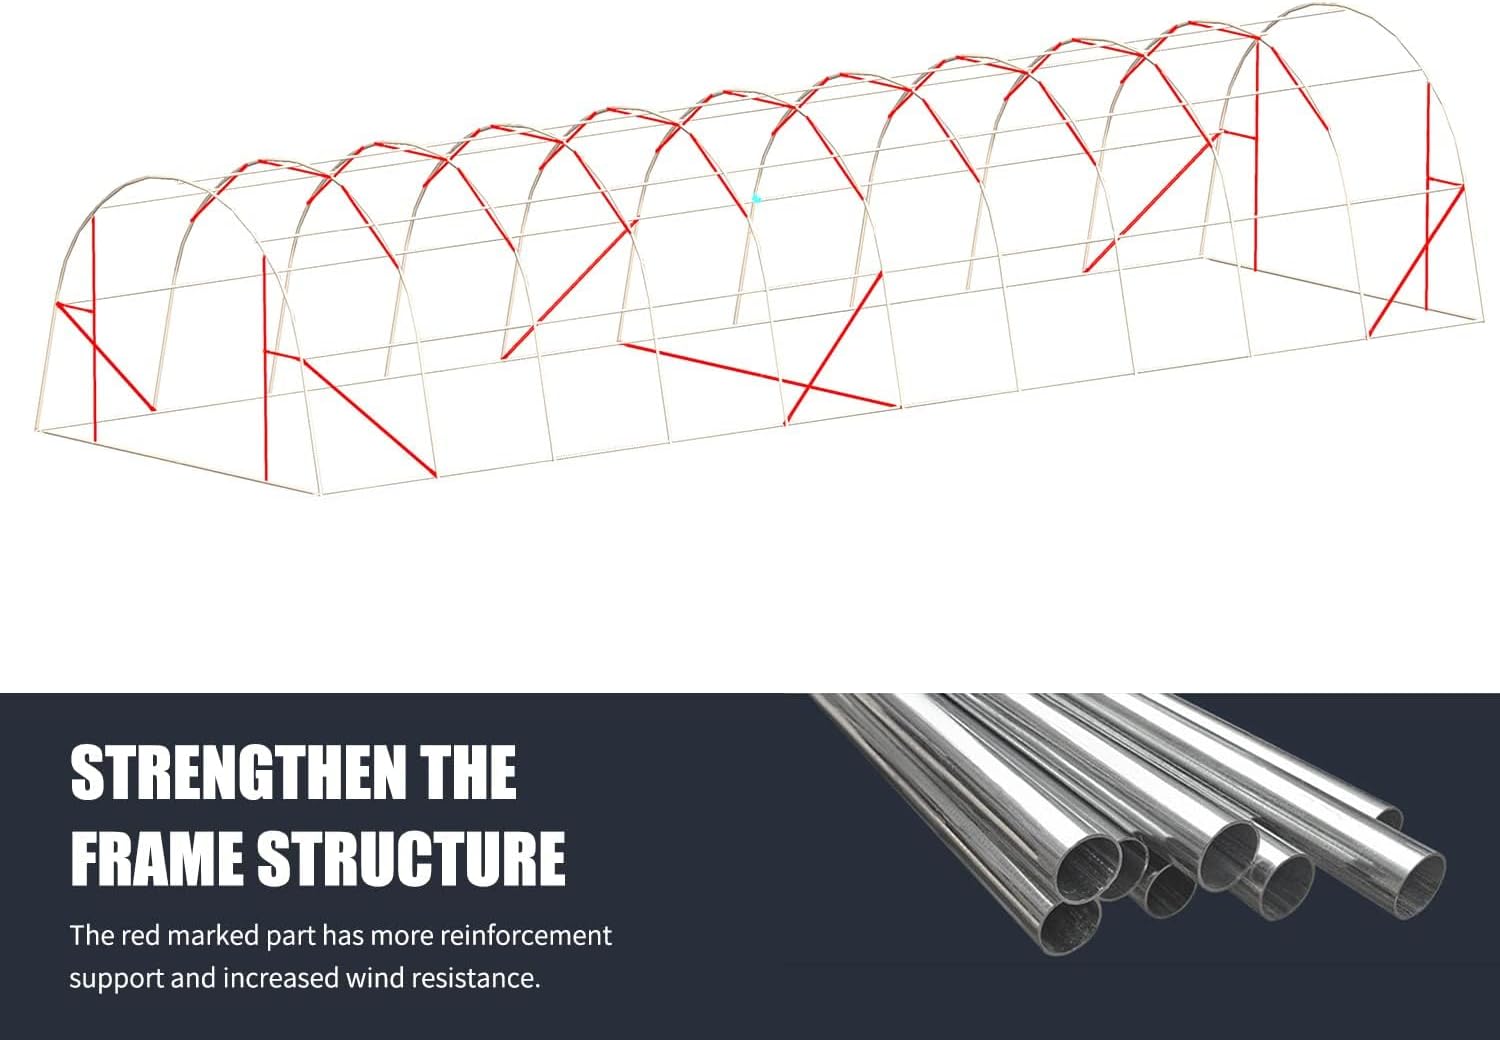
Rysunek 3.2.3: Frame structure diagram showing reinforced areas for enhanced stability and wind resistance.
3.3. Instalacja pokrywy
Once the frame is fully assembled and stable, carefully drape the PE material plastic cover over the structure. Ensure the cover is centered and evenly distributed. The cover is designed to be tough, durable, and 100% waterproof, transmitting 85% of sunlight while blocking harmful UV rays.

Rysunek 3.3.1: Key features for cover installation and securing.
Secure the cover to the frame using the provided buckles and fixed drawstrings with ground nails. The overlong PE cover should be used for soil coverage to enhance sealing and wind resistance. Ensure the zippered doors are properly aligned and functional.
3.4. Kotwiczenie
The ground frame adopts U-shaped piles to effectively grasp the ground and reduce wind resistance. Utilize all provided anchoring hardware to firmly secure the greenhouse to the ground. Proper anchoring is critical for stability, especially in windy conditions.

Rysunek 3.4.1: Assembled greenhouse with doors closed.

Rysunek 3.4.2: Assembled greenhouse with a door open.
4. Instrukcja obsługi
4.1. Drzwi
The greenhouse features two roll-up zippered doors. To open, unzip the door completely and roll it upwards, securing it with the ties provided. To close, unroll the door and zip it securely. This allows for easy access and controlled ventilation.
4.2. Okna
There are 20 screen windows with Velcro closures. These windows are designed for exhaust and cross-ventilation. Open them to allow airflow and regulate temperature and humidity inside the greenhouse. Close them to retain warmth and prevent insect entry.
5. Konserwacja
- Czyszczenie pokrywy: Okresowo czyść osłonę z polietylenu łagodnym mydłem i wodą, aby usunąć brud i zanieczyszczenia, zapewniając maksymalną transmisję światła. Unikaj środków czyszczących o działaniu ściernym.
- Kontrola ramy: Regularly inspect the metal frame for any signs of rust, damage, or loose connections. Tighten screws and reinforce as needed.
- Kontrola zakotwiczenia: Verify that all ground anchors and ropes are securely in place, especially after strong winds or heavy rain.
- Pielęgnacja zamków błyskawicznych: Keep zippers clean and lubricated if necessary to ensure smooth operation.
- Przygotowania do zimy: In areas with heavy snowfall, consider removing the cover or regularly clearing snow to prevent collapse.
6. Rozwiązywanie Problemów
6.1. Greenhouse Instability in Wind
If the greenhouse shows signs of instability in windy conditions:
- Ensure all frame connections are fully tightened.
- Verify that all U-shaped piles and ground nails are firmly embedded in the soil.
- Add additional external ropes and heavy-duty ground anchors for extra security.
- Consider relocating the greenhouse to a more sheltered area if possible.
6.2. Cover Tearing or Damage
If the PE cover tears:
- Small tears can often be repaired with specialized greenhouse repair tape.
- For larger damage, consider replacing the cover to maintain optimal protection and insulation.
- Ensure the cover is not excessively stretched during installation, which can lead to premature tearing.
7. Specyfikacje

Rysunek 7.1: Greenhouse dimensions.
| Funkcja | Szczegół |
|---|---|
| Marka | MELLCOM |
| Wymiary produktu (dł. x szer. x wys.) | 40' x 12' x 7.5' (480" dł. x 144" szer. x 90" wys.) |
| Materiał ramy | Alloy Steel (Powder-coated metal frame) |
| Materiał na okładkę | PE Material Plastic Cover |
| Liczba drzwi | 2 |
| Styl drzwi | Roll-up Zippered Doors |
| Liczba otworów wentylacyjnych | 20 (Screen Windows with Velcro) |
| Typ zamknięcia | Zamek błyskawiczny |
| Kolor | Zielony |
8. Gwarancja i wsparcie
For warranty information or technical support, please refer to the documentation included with your purchase or contact MELLCOM customer service directly. Keep your purchase receipt for warranty claims.