1. Wprowadzenie
This manual provides essential instructions for the safe and efficient operation, installation, and maintenance of your G21 Osmo 2200 W Reverse Osmosis System. Please read this manual thoroughly before using the appliance and retain it for future reference. This system is designed to provide purified and remineralized water with adjustable temperature settings.
2. Instrukcje bezpieczeństwa
- Upewnij się, że urządzenie jest umieszczone na stabilnej, równej powierzchni, z dala od bezpośredniego światła słonecznego i źródeł ciepła.
- Nie zanurzaj urządzenia, przewodu zasilającego ani wtyczki w wodzie ani innych płynach.
- Keep out of reach of children. The appliance features a child safety lock, but supervision is always recommended.
- Use only potable water with this system.
- Przed czyszczeniem lub jakąkolwiek konserwacją należy odłączyć urządzenie od zasilania.
- Nie używaj urządzenia, jeśli przewód zasilający lub wtyczka są uszkodzone. W celu naprawy skontaktuj się z wykwalifikowanym serwisantem.
- Zapewnij odpowiednią wentylację wokół urządzenia.
3. Koniec produktuview
The G21 Osmo 2200 W Reverse Osmosis System is a countertop water purification unit featuring advanced filtration and instant heating capabilities.
Główne cechy:
- Removes up to 99% of impurities from water.
- Provides clean, healthy, and great-tasting water.
- Filtration capacity of 7.8 liters per hour (LPH).
- Rapid 3-second heating function.
- Six adjustable temperature levels from 25°C to 95°C.
- Łatwy w obsłudze wyświetlacz dotykowy.
- Integrated child safety lock.
- Automatic filter change indicator.
- Reduces limescale, extending the lifespan of other appliances.
Składniki:


4. Konfiguracja
4.1 Rozpakowanie i rozmieszczenie:
- Ostrożnie wyjąć wszystkie elementy z opakowania.
- Place the main unit on a clean, dry, and stable countertop. Ensure there is adequate space around the unit for ventilation.
- Insert the drip tray into its designated slot at the front base of the unit.
4.2 Instalacja filtra:
- Open the filter compartment cover, usually located on the side or back of the unit.
- Identify the PAC, RO, and CF filters. Each filter is typically labeled.
- Insert each filter into its corresponding slot, twisting gently until securely locked. Refer to the markings on the unit for correct filter placement.
- Zamknij pokrywę komory filtra.
4.3 Initial Water Filling and Flushing:
- Wyjmij zbiornik na wodę z urządzenia.
- Fill the water tank with clean, potable tap water up to the 'MAX' line.
- Place the filled water tank back into the unit.
- Podłącz przewód zasilający do uziemionego gniazdka elektrycznego.
- The system will automatically begin an initial flushing cycle to prepare the filters. This process may take several minutes. Follow any on-screen prompts.
- Discard the water from the first few cycles as recommended by the system's display or until the water quality indicator shows optimal levels.
5. Instrukcja obsługi
5.1 Włączanie/wyłączanie:
Press the 'Power' button on the touchscreen to turn the unit on or off.
5.2 Using the Touchscreen:
The intuitive touchscreen allows you to select desired water temperatures and dispense water.
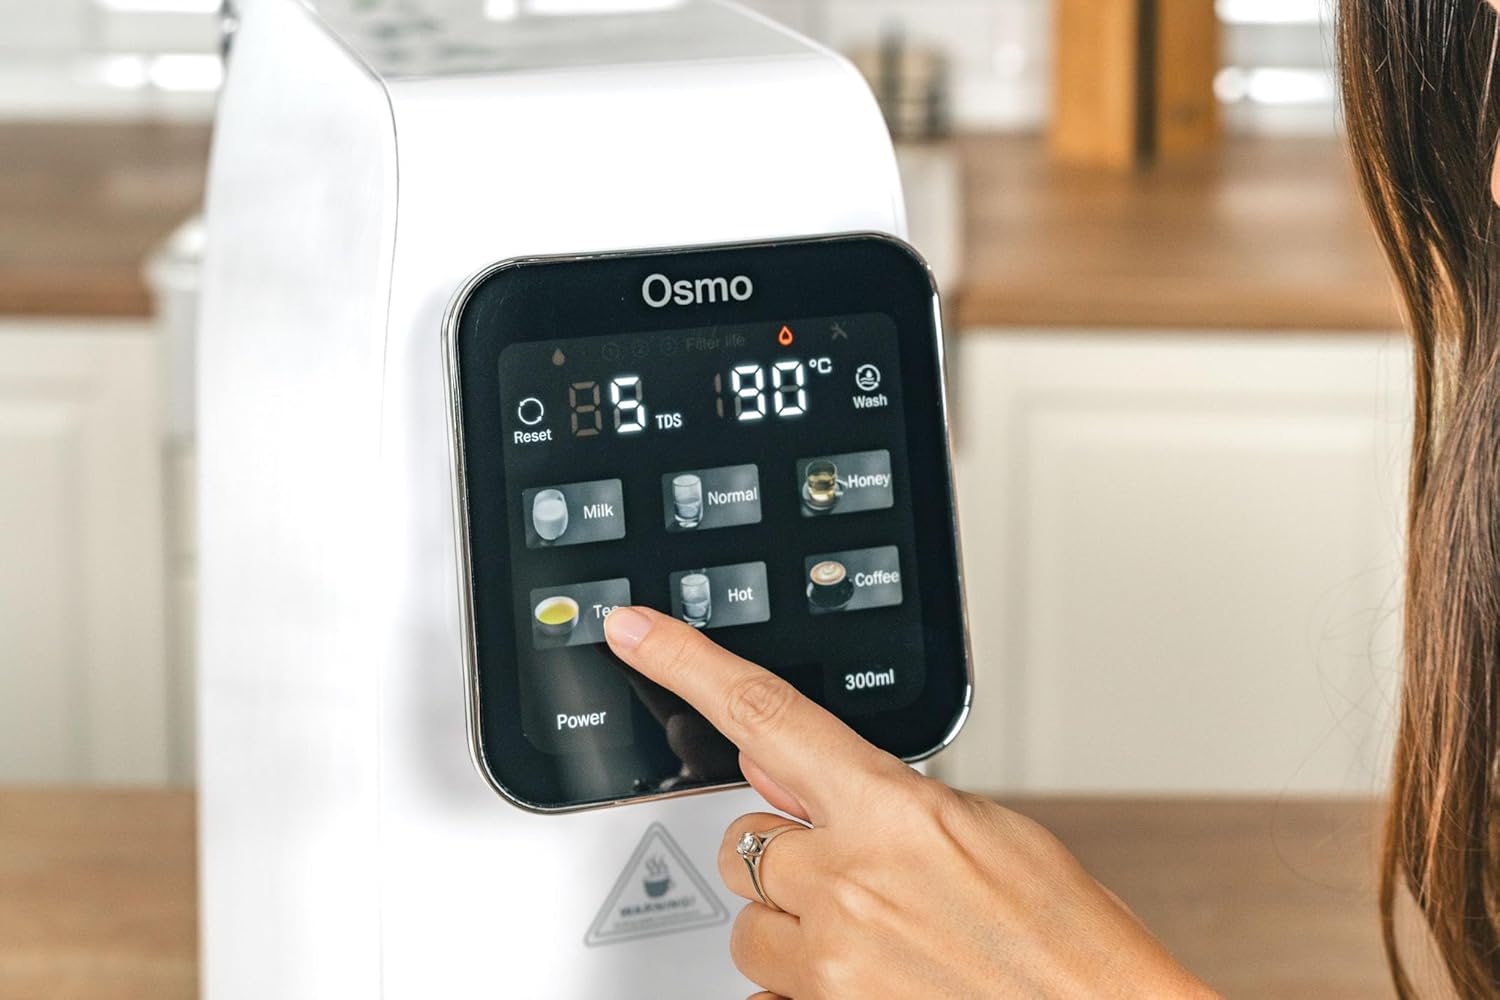
5.3 Selecting Temperature Levels:
The system offers six temperature presets:
- Normalna: Room temperature purified water.
- 25°C: Ideal for specific beverages or cooling.
- 45°C: Suitable for baby formula or warm drinks.
- 60°C: For certain teas or warm water needs.
- 80°C: Optimal for green tea.
- 95°C: Perfect for black tea, coffee, or instant noodles.
Tap the desired temperature icon on the touchscreen. The system will rapidly heat the water to the selected temperature.
5.4 Dispensing Water:
After selecting the temperature, place your cup or container under the dispenser nozzle. Press the dispense button (often labeled with a water drop icon or a volume, e.g., '300ml') to start dispensing. Press again to stop, or it will stop automatically after dispensing the preset volume.
5.5 Blokada bezpieczeństwa dla dzieci:
To activate or deactivate the child safety lock, press and hold the designated lock icon on the touchscreen for a few seconds. This prevents accidental dispensing of hot water.
5.6 Filter Change Indicator:
The touchscreen display will show an indicator when a filter needs replacement. Refer to the maintenance section for filter replacement procedures.
6. Konserwacja
6.1 Cleaning the Unit:
- Odłącz urządzenie od gniazdka elektrycznego.
- Wytrzyj obudowę urządzenia miękką, damp ściereczka. Nie należy używać środków czyszczących o właściwościach ściernych ani rozpuszczalników.
- Remove and empty the drip tray regularly. Clean it with mild soap and water, then rinse thoroughly and dry before reinserting.
- Clean the water tank with mild soap and water. Rinse thoroughly to remove all soap residue before refilling.
6.2 Wymiana filtra:
The system will indicate when filters need replacement. Typically, PAC and CF filters require more frequent replacement than the RO filter. Always use genuine G21 replacement filters.
- Odłącz urządzenie od zasilania.
- Otwórz pokrywę komory filtra.
- Przekręć stary filtr w kierunku przeciwnym do ruchu wskazówek zegara, aby go odblokować i wyjąć.
- Insert the new filter into the slot, aligning the markings, and twist clockwise to lock it in place.
- Zamknij pokrywę komory filtra.
- Plug in the appliance and perform a flushing cycle as per initial setup instructions to prime the new filter.
7. Rozwiązywanie Problemów
- Brak zasilania: Upewnij się, że przewód zasilający jest prawidłowo podłączony do sprawnego gniazdka. Sprawdź wyłącznik automatyczny.
- Brak dozowania wody: Check if the water tank is properly installed and filled. Ensure the child safety lock is not activated.
- Powolny przepływ wody: This may indicate clogged filters. Check the filter change indicator and replace filters if necessary.
- Niezwykły smak/zapach: Perform a flushing cycle. If the issue persists, replace the filters.
- Kody błędów: Refer to the specific error code displayed on the touchscreen and consult the G21 support webwitryny lub skontaktuj się z obsługą klienta w celu uzyskania pomocy.
8. Specyfikacje
| Funkcja | Specyfikacja |
|---|---|
| Nazwa modelu | CISV-G21-RO |
| Marka | G21 |
| Wymiary (dł. x szer. x wys.) | Wymiary 39 x 20 x 45 cm |
| Waga | 9.5 kilograma |
| Tworzywo | Polimer |
| Metoda oczyszczania | Odwrócona osmoza |
| Pojemność | 7.8 LPH (litrów na godzinę) |
| Poziomy temperatury | 25°C, 45°C, 60°C, 80°C, 95°C, Normal |
| Źródło zasilania | Kabel elektryczny |
| Typ instalacji | Blat |
| Cechy specjalne | Remineralization, Touchscreen, Child Safety, PAC/RO/CF Filters |
9. Gwarancja i wsparcie
For warranty information, technical support, or to purchase replacement parts and filters, please refer to the documentation included with your product or visit the official G21 webZachowaj paragon jako dowód zakupu na wypadek reklamacji.