1. Wprowadzenie
Thank you for choosing the conecto Monitor TV Wall Mount. This manual provides essential information for the safe and correct installation, operation, and maintenance of your wall mount. Please read these instructions carefully before installation and retain them for future reference.
Informacje dotyczące bezpieczeństwa
- Ensure the mounting surface can safely support the combined weight of the mount and your display.
- Nie przekraczać maksymalnego udźwigu 20 kg (44 funtów).
- This mount is designed for displays between 13 and 32 inches.
- Podczas instalacji należy zawsze używać odpowiedniego sprzętu ochronnego.
- Jeśli masz wątpliwości co do jakiejkolwiek części instalacji, skonsultuj się z wykwalifikowanym specjalistą.
2. Zawartość opakowania
Please verify that all components listed below are present and undamaged before beginning installation. If any parts are missing or damaged, please contact conecto customer support.
- Montaż naścienny
- Wall Plate Screws and Anchors
- Śruby montażowe wyświetlacza (różne rozmiary, zgodne ze standardem VESA)
- Podkładki i dystanse
- Poziomica
- Klucz
- Instrukcja instalacji

Rysunek 2.1: All components included in the package. Ensure all parts are present before proceeding with installation.
3. Specyfikacje
| Numer modelu | SA-FM13-100 |
| Kompatybilne rozmiary ekranu | 13 - 32 cali |
| Maksymalna nośność | 20 kg (44 funta) |
| Zgodność ze standardem VESA | 75x75 mm, 100x100 mm |
| Zakres pochylenia | +5° do -15° |
| Zakres obrotu | Do 90° w lewo/prawo |
| Oczyszczenie ściany | 62 mm - 194 mm |
| Tworzywo | Stal nierdzewna |
| Wymiary produktu (po złożeniu) | 5.12 x 9.06 x 2.36 cala |
| Waga przedmiotu | 1.56 funta |

Rysunek 3.1: The mount supports displays from 13 to 32 inches and up to 20 kg.
4. Konfiguracja i instalacja
4.1 przed instalacją
Before mounting, carefully plan the location of your display. Consider viewing angles, cable management, and the type of wall you are mounting to.
Zgodność typu ściany
This mount is suitable for installation on:
- Wooden Walls (single stud)
- Solid Brick Walls
- Betonowe ściany
Notatka: Do not install on drywall alone without securing to a stud or using appropriate anchors for the wall material.

Rysunek 4.1: Compatible wall types for secure installation.
Zgodność ze standardem VESA
The mount supports VESA patterns of 75x75 mm and 100x100 mm. Verify your display's VESA pattern before proceeding.
4.2 Kroki instalacji
Refer to the included illustrated installation guide for detailed, step-by-step instructions. A general overview Proces przebiega następująco:
- Zaznacz miejsca wierceń: Use the wall plate as a template to mark the drilling points on your wall. Use the included spirit level to ensure accuracy.
- Wiercenie otworów: Drill pilot holes at the marked locations according to the recommended drill bit size for your wall type. Insert wall anchors if necessary.
- Zamontuj płytę ścienną: Przymocuj płytę ścienną do ściany za pomocą dołączonych śrub. Upewnij się, że jest solidnie zamocowana i wypoziomowana.
- Attach VESA Plate to Display: Attach the VESA mounting plate to the back of your monitor or TV using the appropriate screws and spacers from the hardware kit.
- Wyświetlacz wiszący: Carefully lift the display with the attached VESA plate and hook it onto the wall mount arm. Secure any safety mechanisms as per the detailed guide.
5. Instrukcja obsługi
Once installed, your conecto wall mount allows for flexible adjustment of your display.
5.1 Regulacja nachylenia
The mount allows for a tilt range of +5° (upwards) to -15° (downwards). To adjust the tilt, loosen the tilt adjustment screws on the VESA plate, set the desired angle, and then securely tighten the screws to hold the position.
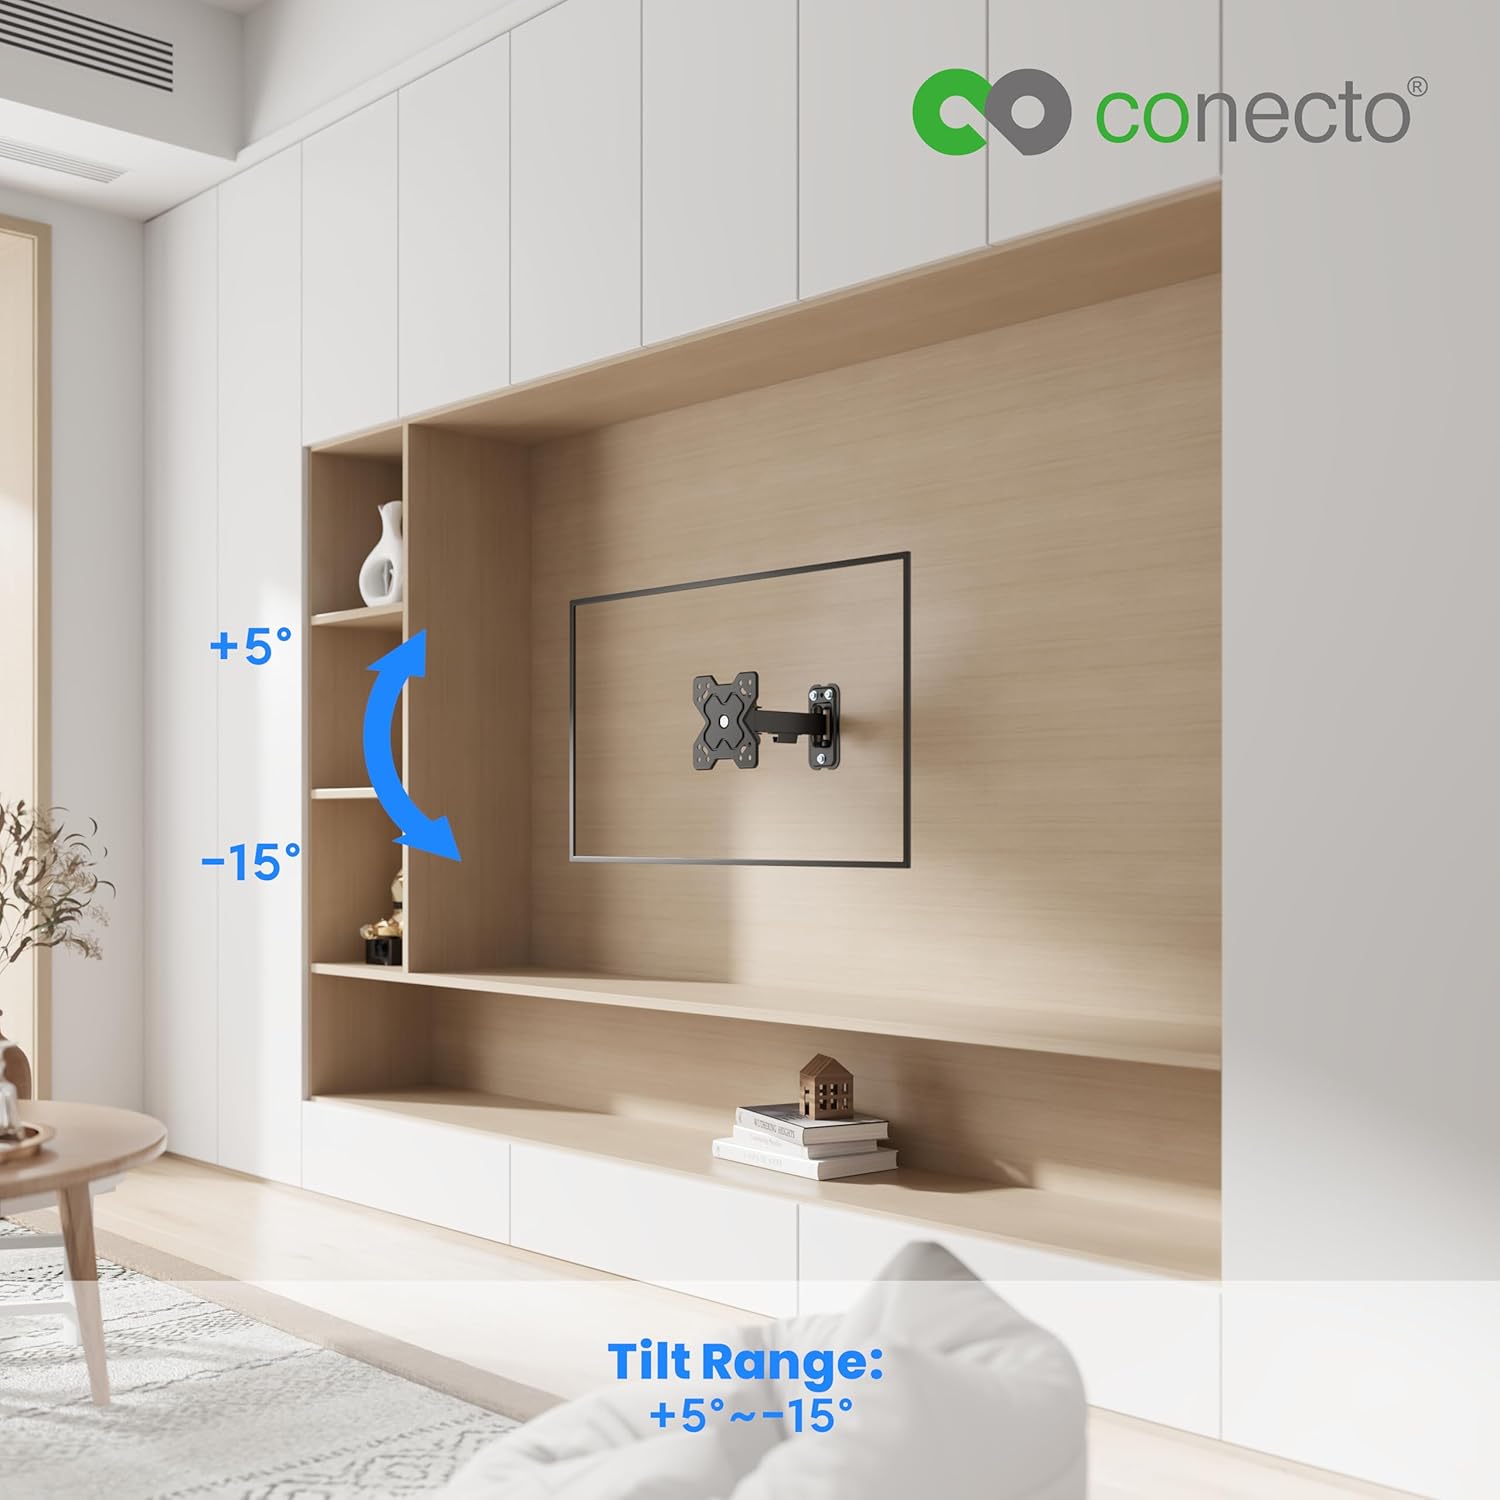
Rysunek 5.1: Tilt range of +5° to -15° for optimal viewing.
5.2 Regulacja obrotu
The mount can swivel up to 90° to the left and 90° to the right. To adjust the swivel, gently push or pull the display to the desired horizontal angle. The friction joints are designed to hold the position.

Rysunek 5.2: Swivel range of up to 90° left and right.
5.3 Wall Clearance
The mount provides a wall clearance that can be adjusted between 62 mm and 194 mm. This allows for better air circulation behind the display and facilitates access to ports and cables.

Rysunek 5.3: Adjustable wall clearance for ventilation and port access.
6. Konserwacja
Regularna konserwacja zapewnia długowieczność i bezpieczne działanie uchwytu ściennego.
- Czyszczenie: Przetrzyj uchwyt miękką, suchą ściereczką. Unikaj środków czyszczących o właściwościach ściernych i rozpuszczalników, które mogłyby uszkodzić wykończenie.
- Sprawdź połączenia: Periodically check all screws and bolts to ensure they remain tight and secure. Re-tighten if necessary.
- Sprawdź zużycie: Inspect the mount for any signs of wear, damage, or corrosion. If any issues are found, discontinue use and contact customer support.
7. Rozwiązywanie Problemów
Jeśli masz problemy z uchwytem ściennym, zapoznaj się z poniższymi typowymi problemami i rozwiązaniami:
- Góra nie jest wypoziomowana: Ensure the wall plate was installed level. If not, you may need to re-drill or adjust. The VESA plate on the display may also have a slight rotational adjustment feature; check your specific display's manual.
- Display sags or does not hold position: Ensure all tilt and swivel adjustment screws are sufficiently tightened. Verify that the display's weight does not exceed the mount's maximum capacity.
- Trudności w dostosowywaniu ruchu: Check for any obstructions. Ensure all moving parts are clean and free of debris. Do not force adjustments.
- Brakujące części: Refer to the 'Package Contents' section. If parts are missing upon unboxing, contact conecto customer support immediately.
8. Gwarancja i wsparcie
For warranty information, please refer to the documentation provided with your purchase or visit the official conecto website. If you require technical assistance or have questions not covered in this manual, please contact conecto customer support through their official channels.
Producent: Satchef GmbH