Nafewin Induction Cooktop
Nafewin Portable Induction Cooktop 1800W User Manual
Model: Płyta indukcyjna
1. Wprowadzenie
Thank you for choosing the Nafewin Portable Induction Cooktop. This 1800W single burner unit is designed for efficient and versatile cooking, suitable for various settings including homes, dorms, offices, RVs, and camping. It features LED touch controls, a 4-hour timer, and multiple power and temperature settings to meet diverse culinary needs. Please read this manual thoroughly before operation to ensure safe and optimal performance.

Figure 1.1: The Nafewin Portable Induction Cooktop with included fry pan.
This image displays the compact and sleek design of the cooktop, featuring a black glass surface and a stainless steel fry pan with salmon and vegetables. The control panel is visible at the front.
2. Ważne informacje dotyczące bezpieczeństwa
Aby zapobiec obrażeniom lub uszkodzeniom, należy zawsze przestrzegać następujących środków ostrożności:
- Upewnij się, że płyta grzewcza jest umieszczona na stabilnej, płaskiej i odpornej na ciepło powierzchni.
- Nie zanurzaj urządzenia w wodzie ani innym płynie.
- Przechowywać w miejscu niedostępnym dla dzieci i zwierząt domowych.
- Use only induction-compatible cookware with a magnetic base.
- Do not touch the heating surface immediately after use, as residual heat may be present.
- Avoid blocking the ventilation openings on the bottom of the unit.
- Do not place metal objects (knives, forks, spoons, lids) on the cooktop surface as they may become hot.
- Unplug the cooktop when not in use and before cleaning.
- If the surface is cracked, discontinue use and contact customer support.

Rysunek 2.1: Koniecview of cooktop features.
This image highlights the cooktop's features: Touch Control, 8 Temperature Levels (176°F-518°F), Overheat Protection, 1800W High Power, Easy to Clean, and Timer Setting (0-240 Mins). It also shows the 110/120V plug-in requirement.
3. Koniec produktuview
3.1 Składniki
- Płyta indukcyjna
- 10.24-inch PFOA-free Fry Pan
- Instrukcja obsługi
3.2 Panel sterowania
The cooktop features an intuitive LED touch control panel with a digital display. The controls include:
- Przycisk WŁ./WYŁ.: Włącza i wyłącza urządzenie.
- Przycisk timera: Aktywuje funkcję timera.
- Przyciski funkcyjne: Dedicated buttons for common cooking modes such as Fry, BBQ, Soup, and Hot Pot.
- +/- Buttons (Knob): Adjusts power (W) or temperature (°F) settings, and timer duration.

Rysunek 3.1: Szczegóły panelu sterowania.
Na tym obrazie przedstawiono szczegółowo view of the cooktop's control panel, illustrating the digital display, function buttons (Fry, BBQ, Soup, Hot Pot), Timer, ON/OFF, and the adjustable knob for power and temperature settings. It emphasizes the ease of operation with 8 distinct power and temperature levels.
4. Konfiguracja
- Unpack the induction cooktop and all accessories. Remove all packaging materials.
- Place the cooktop on a dry, stable, and level surface. Ensure there is adequate ventilation around the unit. The cooktop features rubber feet for stability.
- Plug the 3-foot power cord into a standard 110V/120V electrical outlet.
- Place induction-compatible cookware (such as the included fry pan) centrally on the cooking zone.
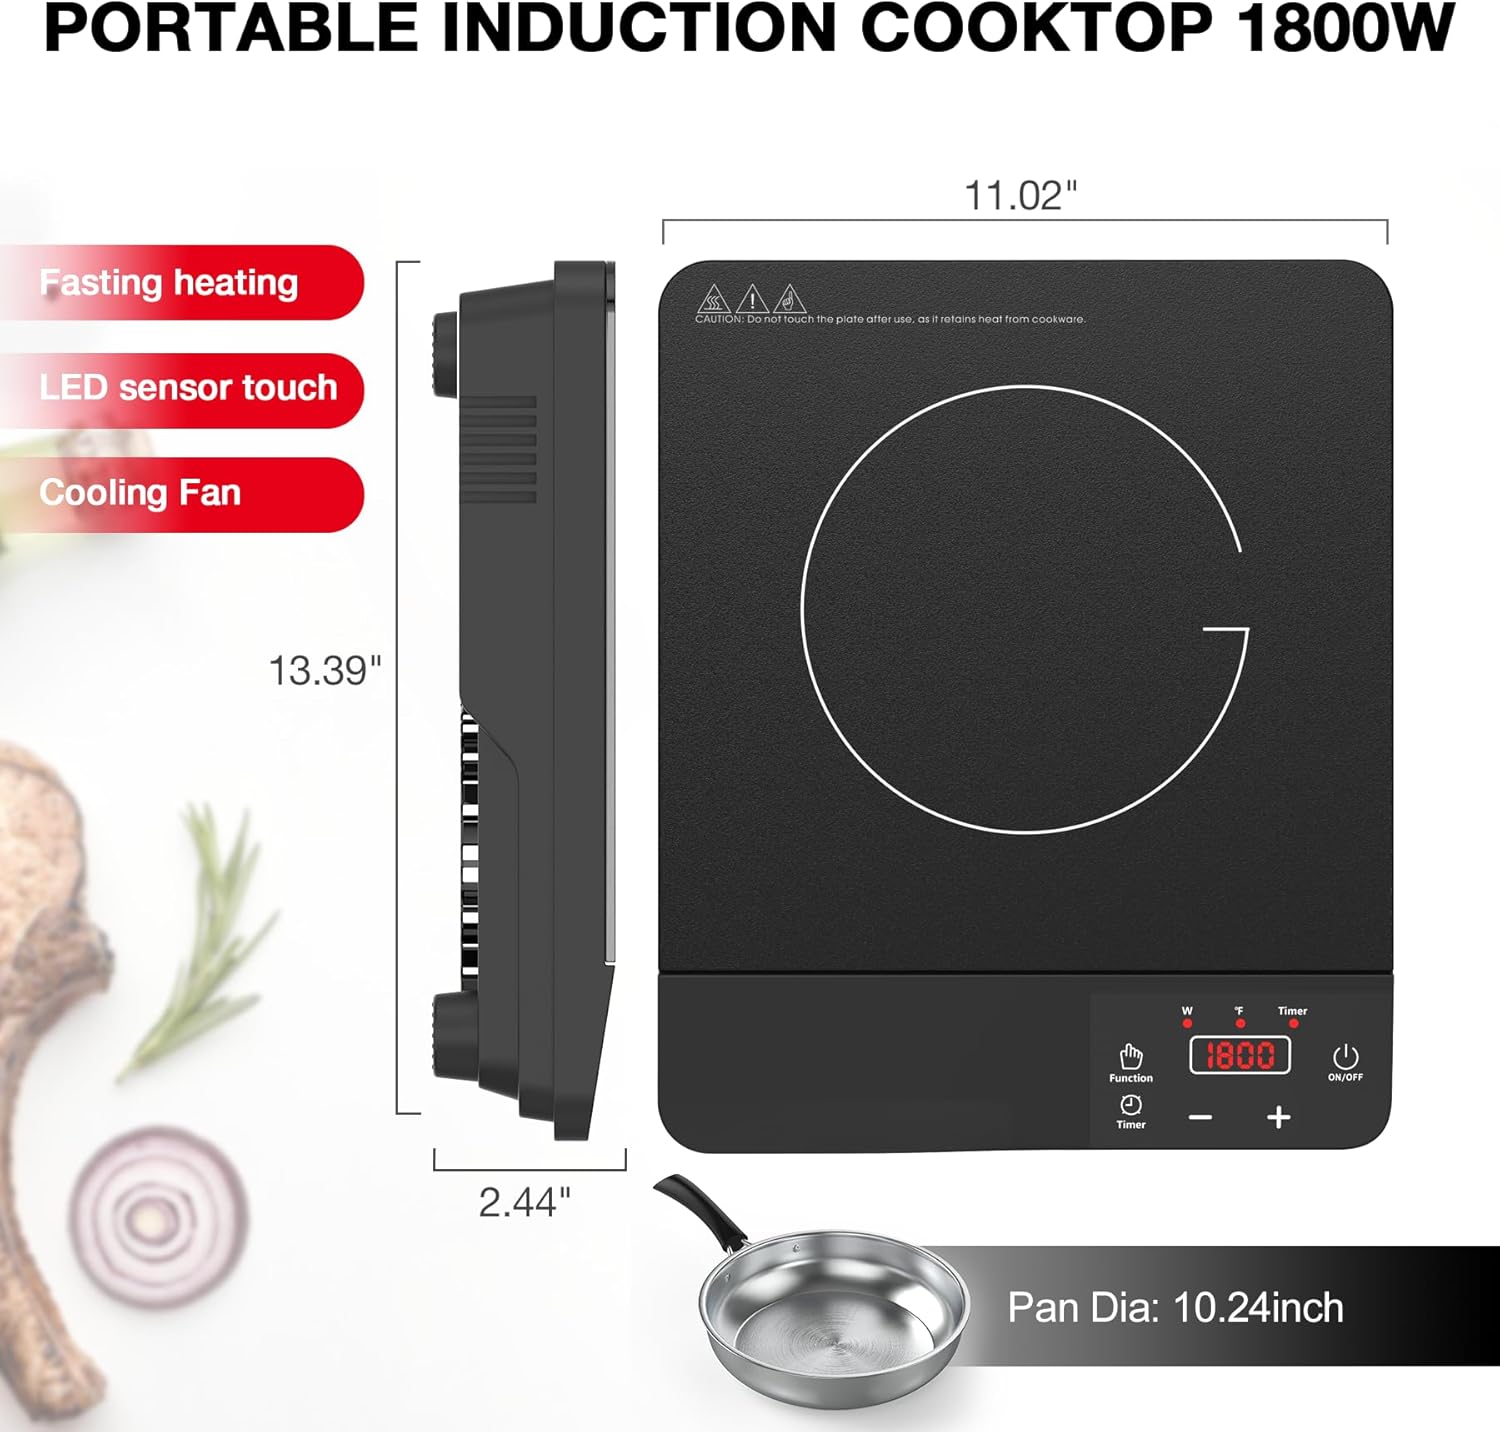
Figure 4.1: Cooktop Dimensions.
This image shows the dimensions of the portable induction cooktop: 11.02 inches deep, 13.39 inches wide, and 2.44 inches high. It also indicates the fry pan diameter is 10.24 inches, highlighting its compact and portable design.
5. Instrukcja obsługi
5.1 Włączanie/wyłączanie zasilania
Naciśnij WŁ./WYŁ. button to turn the cooktop on. The digital display will light up. Press it again to turn the unit off.
5.2 Regulacja mocy i temperatury
The cooktop offers 8 power settings (100W to 1800W) and 8 temperature levels (176°F to 518°F). Use the +/- buttons (knob) to adjust the desired power or temperature. The LCD display provides real-time feedback.
5.3 Using Function Modes
Select a preset cooking mode by pressing the corresponding function button (Fry, BBQ, Soup, Hot Pot). The cooktop will automatically adjust to an optimal power/temperature for that mode.
5.4 Funkcja timera
Naciśnij Regulator czasowy button to activate the timer mode. The default shutdown time is 10 minutes. Use the +/- buttons to set the timer from 1 minute to 4 hours. The cooktop will automatically shut off once the set time expires.

Figure 5.1: Cooking Zone and Controls.
Na tym zdjęciu widać widok z góry view of the cooktop with a plate of steak and potatoes on the cooking zone. It points out the 'Function' and 'Timer' buttons, the power range (100W-1800W), temperature range (176°F-518°F), and the ON/OFF, Down, and Up controls.
6. Kompatybilne naczynia kuchenne
The Nafewin Induction Cooktop requires cookware with a magnetic base. Compatible materials include:
- Lane żelazo
- Żelazo emaliowane
- Stal nierdzewna z podstawą magnetyczną
To test compatibility, simply place a magnet on the bottom of your cookware. If the magnet sticks, the cookware is compatible. Non-compatible materials include copper, ceramic, glass, aluminum, and cookware with uneven bottoms.
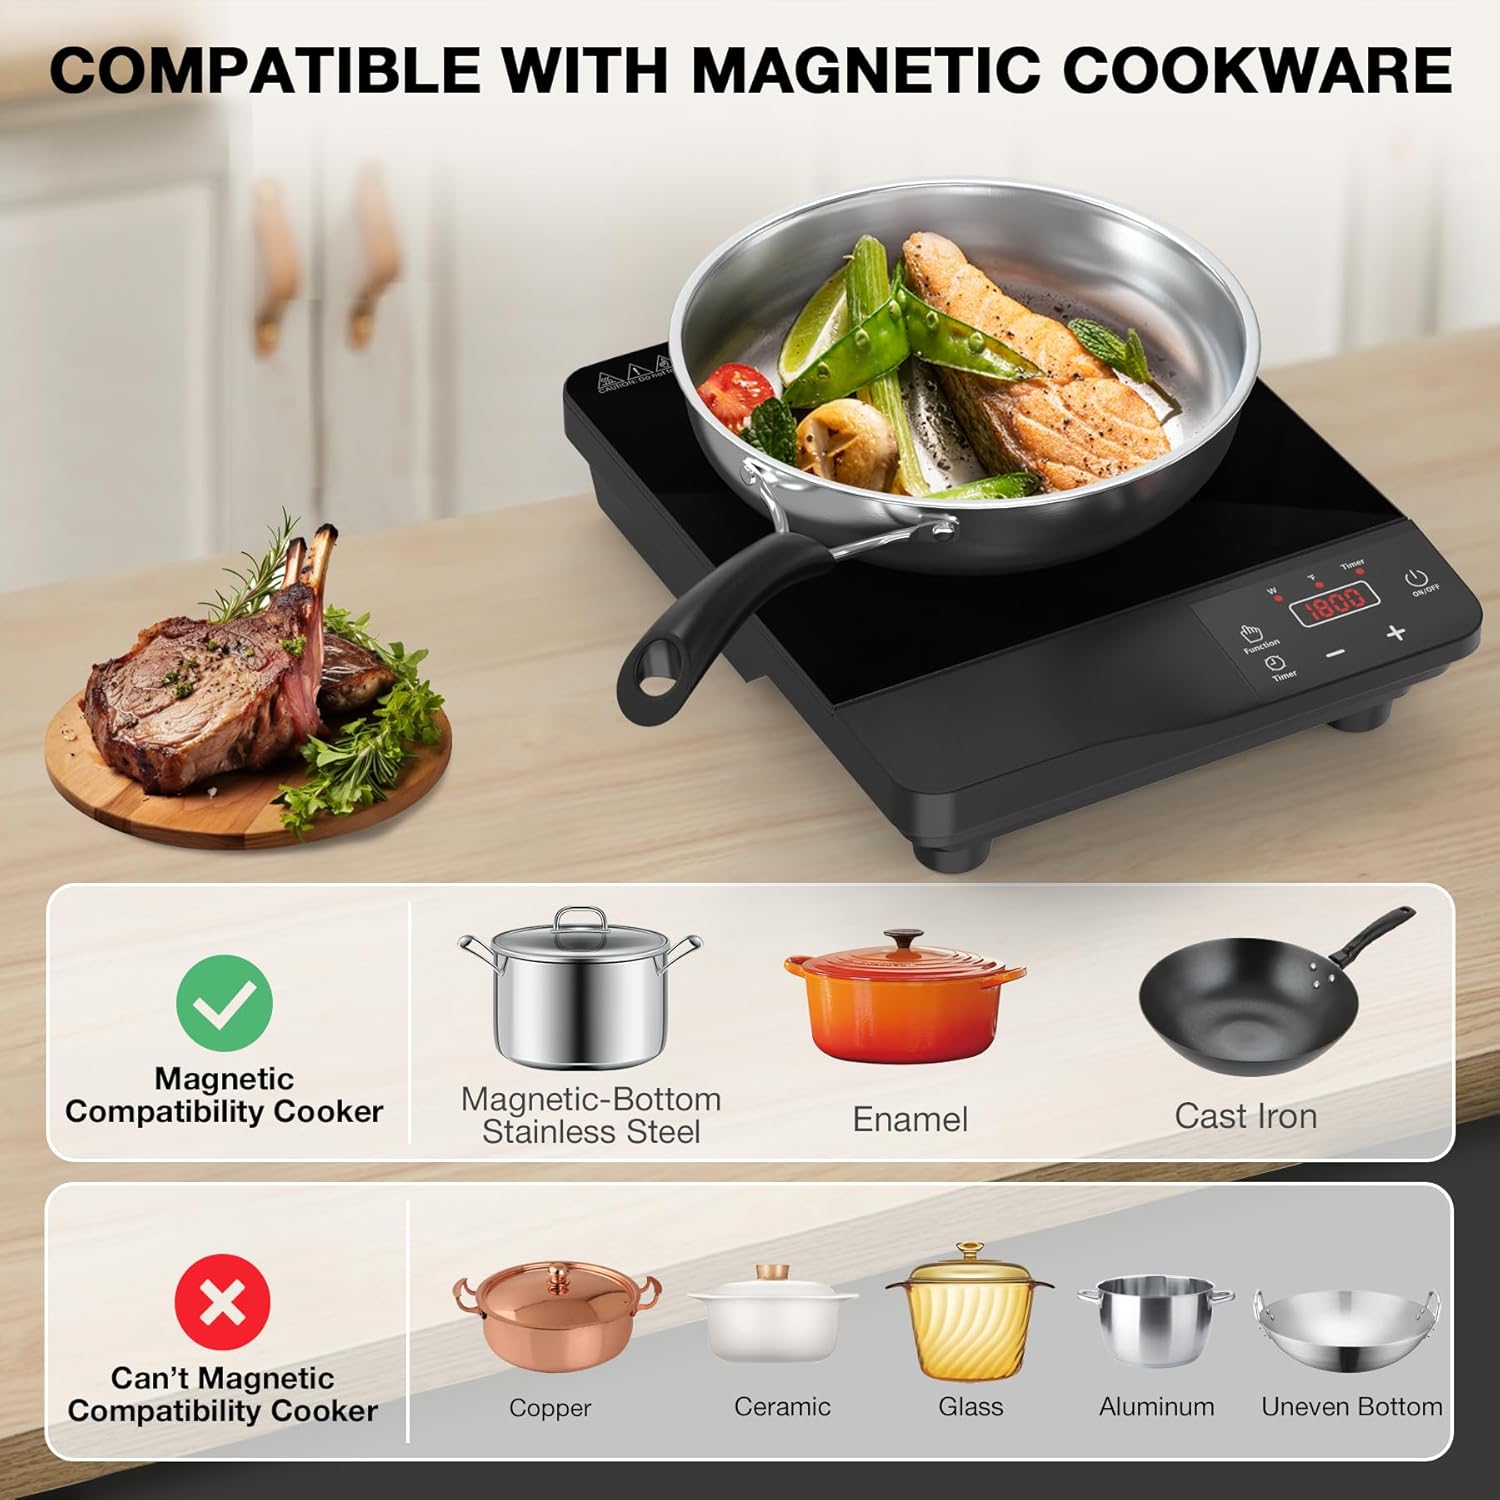
Figure 6.1: Cookware Compatibility.
This image visually demonstrates which types of cookware are compatible with the induction cooktop (magnetic-bottom stainless steel, enamel, cast iron) and which are not (copper, ceramic, glass, aluminum, uneven bottom). It also shows a hand holding a magnet to a pan to illustrate the compatibility test.

Figure 6.2: How Induction Works.
This diagram explains the principle of induction cooking, showing the electromagnet and power coil generating a magnetic field that directly heats the induction-compatible magnetic cookware placed on the black crystal glass plate.
7. Konserwacja
The cooktop features a high-temperature resistant black crystal plate that is easy to clean.
- Przed czyszczeniem należy zawsze odłączyć płytę grzewczą od zasilania i poczekać, aż całkowicie ostygnie.
- Przetrzyj powierzchnię wodąamp szmatką i łagodnym detergentem.
- Do not use abrasive cleaners, steel wool, or harsh chemicals, as these can scratch or damage the surface.
- Ensure the bottom radiator fan area is clear of debris for optimal cooling.

Figure 7.1: Easy Maintenance.
This image demonstrates the ease of cleaning the cooktop's high-temperature resistant black crystal plate with a damp cloth. It also highlights the scratch resistance and water-proof features, along with a view of the bottom radiator fan.
8. Rozwiązywanie Problemów
Jeśli masz problemy z płytą grzewczą, zapoznaj się z poniższymi typowymi problemami i ich rozwiązaniami:
| Problem | Możliwa przyczyna | Rozwiązanie |
|---|---|---|
| Płyta grzewcza nie włącza się. | No power supply; loose plug; circuit breaker tripped. | Check power plug; ensure outlet is working; reset circuit breaker. |
| Płyta grzewcza przestaje grzać w trakcie pracy. | Overheat protection activated; incompatible cookware. | Allow unit to cool; ensure cookware is induction-compatible. |
| Wyświetlacz pokazuje kod błędu. | Refer to user manual for specific error code meanings. | Consult the user manual's troubleshooting section for detailed steps. |
For problems not listed or if solutions do not resolve the issue, please contact Nafewin customer support.
9. Specyfikacje
| Funkcja | Specyfikacja |
|---|---|
| Marka | Nafewin |
| Numer modelu | Płyta indukcyjna |
| Moc | 1800 W |
| Tomtage | 110 V/120 V |
| Zakres temperatur | 176°F - 518°F (8 levels) |
| Ustawienia zasilania | 100W - 1800W (8 levels) |
| Regulator czasowy | 1 minuta - 4 godzin |
| Typ sterowania | Sterowanie dotykowe LED |
| Wymiary produktu | 11.02" gł. x 13.39" szer. x 2.68" wys. |
| Included Pan Diameter | 10.24 cale (26 cm) |
| Tworzywo | Metal, szkło hartowane |
| Waga przedmiotu | 7.34 funta |
10. Gwarancja i wsparcie
For warranty information, product registration, or technical support, please refer to the documentation included with your purchase or visit the official Nafewin webInformacje kontaktowe do działu obsługi klienta można zazwyczaj znaleźć na opakowaniu produktu lub u producenta. webstrona.
11. Filmy produktowe
No official seller videos are available for embedding at this time. Please refer to the product images and text for visual information.