1. Wprowadzenie
This manual provides detailed instructions for the safe and proper installation, operation, and maintenance of your MOUNTUP MU0057-L Full Motion TV Wall Mount. Please read all instructions carefully before installation to ensure correct setup and to prevent damage or injury. Keep this manual for future reference.
The MOUNTUP MU0057-L is designed to securely mount most 42-75 inch flat or curved screen televisions weighing up to 99 lbs (45 kg). It features a 30-inch extension arm, +/-90° swivel, +5°/-10° tilt, and +/-3° leveling for optimal viewelastyczność.
2. Informacje dotyczące bezpieczeństwa
OSTRZEŻENIE: Niezapoznanie się z treścią niniejszej instrukcji i nieprzestrzeganie jej może spowodować poważne obrażenia ciała, uszkodzenie mienia lub unieważnienie gwarancji.
- Nośność: Nie przekraczać maksymalnego udźwigu 45 kg (99 funtów). Ten uchwyt jest przeznaczony wyłącznie do użytku z maksymalnym obciążeniem wskazanym w instrukcji. Użycie produktów o wadze większej niż wskazana w instrukcji może spowodować niestabilność i ewentualne obrażenia.
- Rozmiar telewizora: This mount is compatible with TVs from 42 to 75 inches.
- Zgodność z VESA: Ensure your TV's VESA pattern (mounting hole spacing) is within the range of 150x100mm to 600x400mm.
- Typ ściany: This mount is designed for installation on solid concrete/brick walls or single wood studs. NIE montuj samodzielnie w płycie gipsowo-kartonowej.
- Profesjonalna instalacja: If you have any doubts about your ability to safely install this mount, consult a qualified professional.
- Kontrola komponentów: Before installation, verify that all components are present and undamaged. Do not use damaged or defective parts.
- Narzędzia: Do montażu użyj odpowiednich narzędzi.
3. Zawartość opakowania
Please check the package to ensure all parts are included and undamaged. If any parts are missing or damaged, contact MOUNTUP customer service.
- Montaż płyty ściennej
- Uchwyty TV (2)
- Zestaw elementów montażowych (różne śruby, podkładki, dystanse, kotwy)
- Poziomica pęcherzykowa
- Szablon do wiercenia
- Instrukcja obsługi
4. Specyfikacje
| Specyfikacja | Wartość |
|---|---|
| Model | MU0057-L |
| Kompatybilność z rozmiarem telewizora | 42 - 75 cali |
| Nośność | Do 99 funtów (45 kg) |
| Zgodność ze standardem VESA | 150x100mm do 600x400mm |
| Przedłużenie od ściany | 3 cala (po złożeniu) do 30 cala (po rozłożeniu) |
| Zakres obrotu | +/-90° |
| Zakres pochylenia | +5° / -10° |
| Regulacja poziomu | +/-3° |
| Tworzywo | Metal |
| Kolor | Czarny |
| Waga przedmiotu | 13.77 funta |
Notatka: The TV plate is offset approximately 8.5 inches (215mm) from the wall plate center. Consider this when positioning your TV on the wall.

Image: TV Plate Offset Diagram
5. Instrukcje instalacji
5.1 Kontrole przed instalacją
- Sprawdź kompatybilność telewizora: Check your TV's size, weight, and VESA mounting pattern. The VESA pattern refers to the four mounting holes on the back of your TV.
- Zidentyfikuj typ ściany: Determine if your wall is solid concrete/brick or a single wood stud.
- Check TV Ports: Ensure the mount will not block any necessary ports on your TV.

Image: Available VESA Patterns and TV Mounting Holes

Image: Diverse Wall Compatibility

Image: Ensure Mount Won't Block Ports
5.2 Instalacja krok po kroku
The installation process involves three main steps:
- Mount Brackets to TV: Attach the TV brackets to the back of your television using the appropriate screws, washers, and spacers from the hardware kit. Ensure they are securely fastened.
- Zainstaluj płytę ścienną: Using the provided drilling template and bubble level, mark and drill pilot holes in your wall. Secure the wall plate assembly to the wall with the appropriate anchors and lag bolts.
- Hang TV onto Wall Plate: Carefully lift your TV with the attached brackets and hook them onto the wall plate. Secure the TV to the wall plate using the safety screws or locking mechanisms.


Image: Easy & Quick 3-Step Installation Overview
6. Obsługa i regulacje
6.1 Wysuwanie i cofanie
The mount allows your TV to extend up to 30 inches from the wall and retract to approximately 3 inches, providing flexibility for various viewing positions and saving space when not in use.
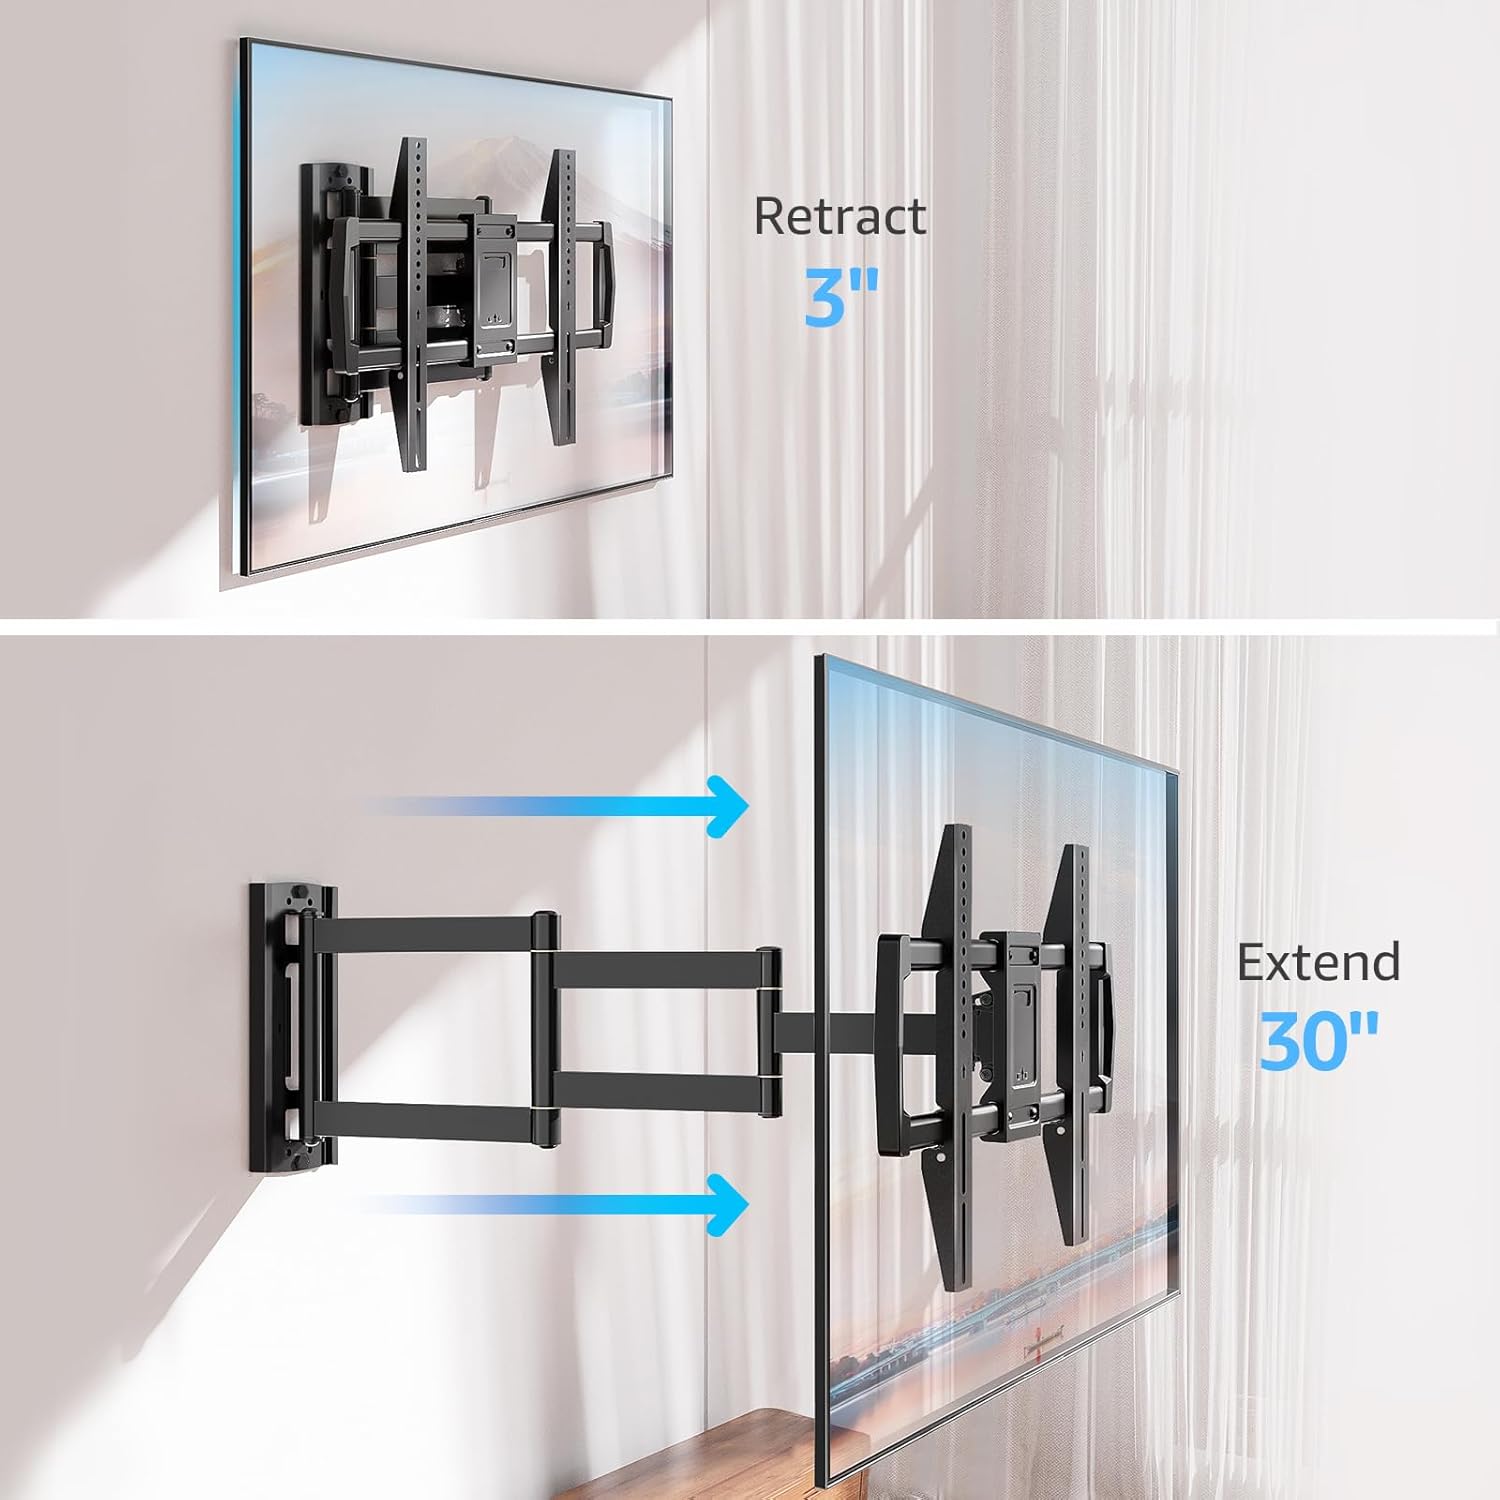
Image: Mount Extension and Retraction
6.2 Regulacja obrotu
The articulating arm allows for a smooth +/-90° swivel, enabling you to adjust the TV's angle to suit different viewing areas within a room, including corner mounting scenarios.
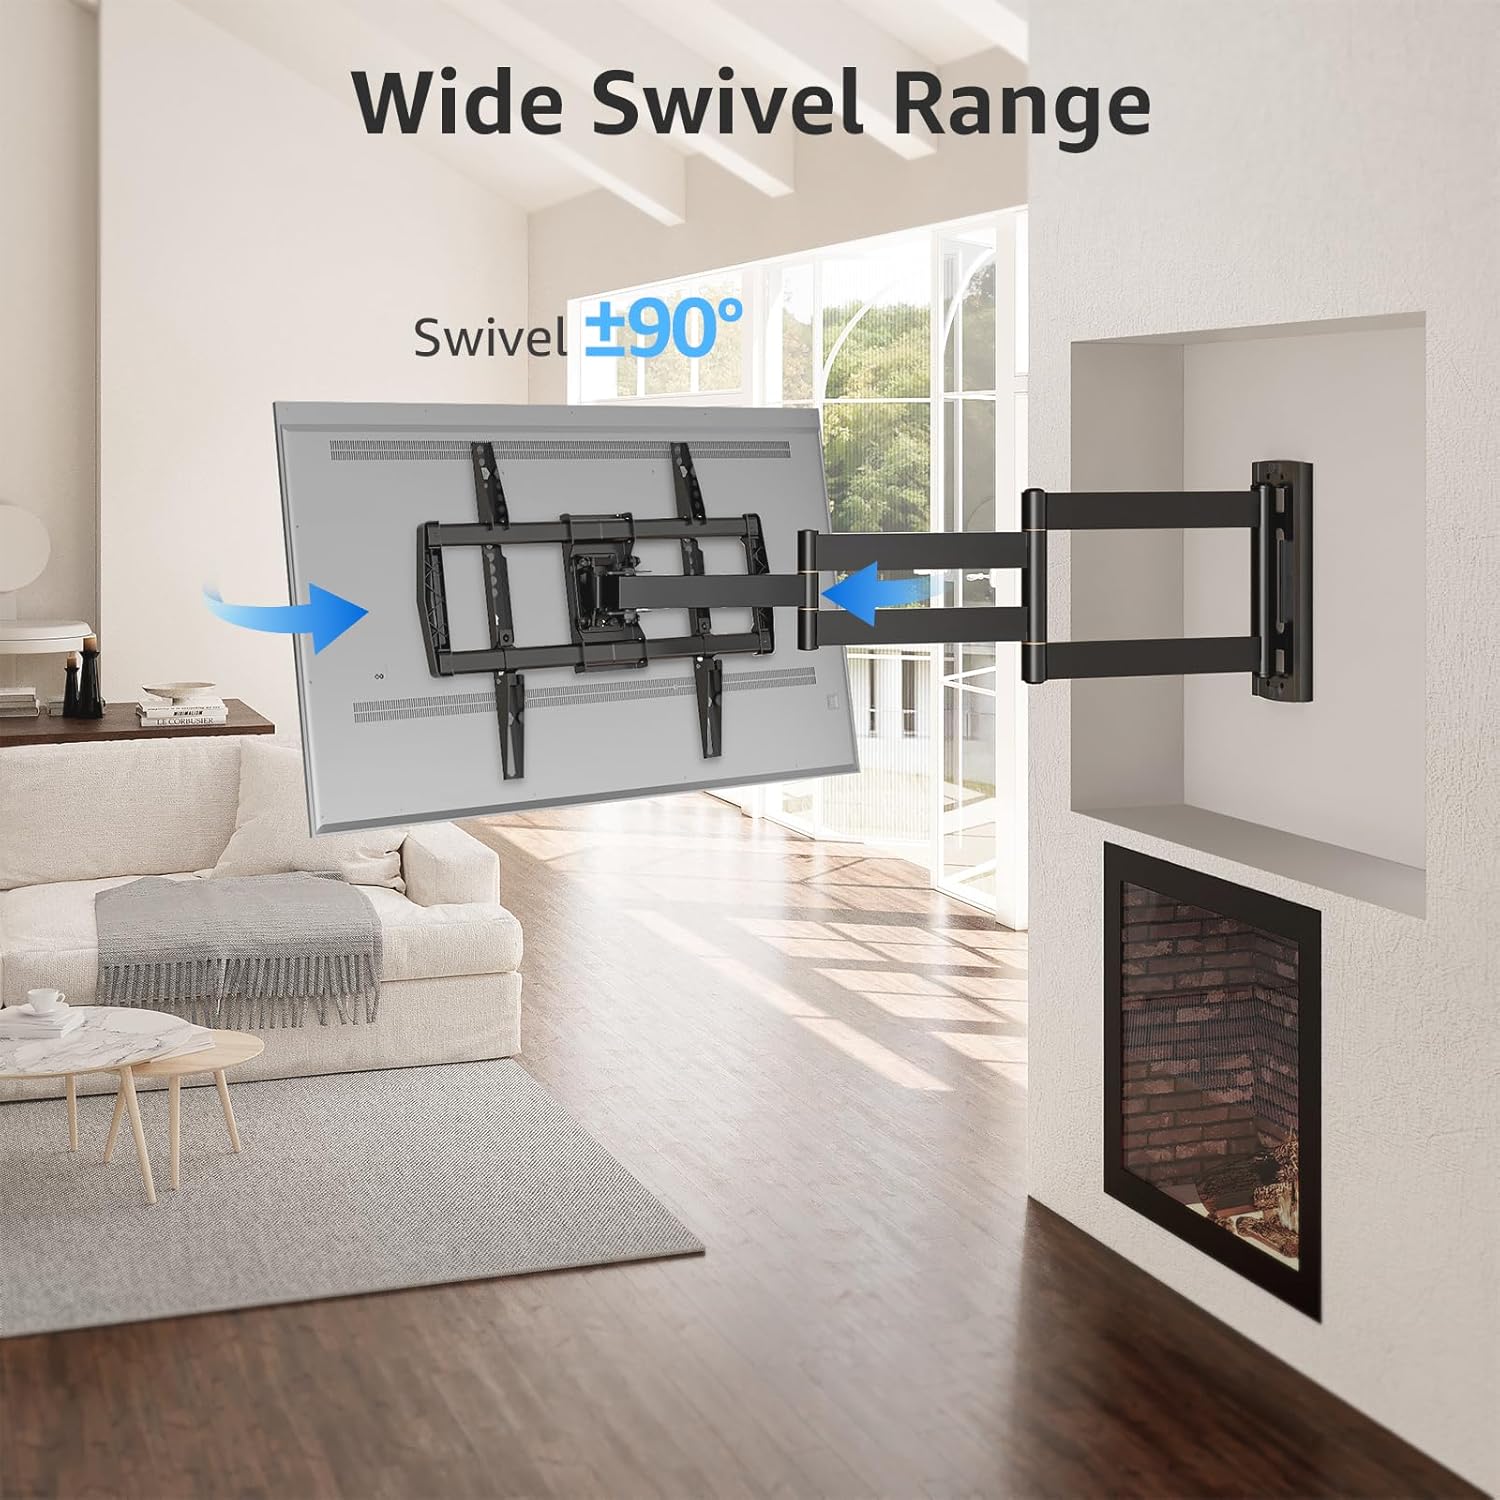
Image: Wide Swivel Range for Corner Mounting
6.3 Regulacja nachylenia
Adjust the TV's vertical angle with a +5°/-10° tilt range. This feature helps reduce glare from lights or windows and provides a comfortable viewkąt.
6.4 Leveling Adjustment
After installation, you can make minor horizontal adjustments of +/-3° to ensure the TV is perfectly level.

Image: Level and Tilt Adjustments
7. Konserwacja
Regularna konserwacja zapewnia długowieczność i bezpieczne działanie uchwytu ściennego do telewizora.
- Czyszczenie: Przetrzyj uchwyt miękką, suchą ściereczką. Unikaj środków czyszczących o właściwościach ściernych i rozpuszczalników, które mogłyby uszkodzić wykończenie.
- Kontrola elementów złącznych: Periodically check all screws and bolts to ensure they remain tight and secure. Re-tighten if necessary.
- Kontrola Ruchu: Test the mount's full range of motion (extension, retraction, swivel, tilt) occasionally to ensure smooth operation.
8. Rozwiązywanie Problemów
Jeśli w trakcie lub po instalacji wystąpią problemy, zapoznaj się z poniższymi typowymi problemami i ich rozwiązaniami:
- Telewizor nie jest wypoziomowany: Use the +/-3° post-installation leveling feature to adjust the TV's horizontal position.
- Mocowanie wydaje się luźne: Re-check all wall and TV fasteners to ensure they are securely tightened. Do not overtighten.
- Difficulty moving the arm: The mount's joints may be stiff initially. Apply gentle force. If persistent, ensure no cables are snagged.
- Telewizor nie pasuje do wzorca VESA: Double-check your TV's VESA pattern against the mount's specifications (150x100mm to 600x400mm). If incompatible, the mount cannot be used.
9. Gwarancja i wsparcie
MOUNTUP is dedicated to providing quality products and customer satisfaction. While specific warranty details are not provided in this document, MOUNTUP offers comprehensive support.
If you have any questions, require assistance with installation, or need to report a missing/damaged part, please contact MOUNTUP customer service. Experts are available 7 days a week to provide support and advanced technology solutions.
For more information or to contact support, please visit the official MOUNTUP store or webstrona.