Produkt ponadview
The Sannwsg 20x20 Heavy Duty Metal Carport is designed to provide robust and reliable shelter for vehicles and outdoor equipment. Its galvanized metal roof and alloy steel frame ensure durability against various weather conditions, including snow and strong winds. This manual provides comprehensive instructions for assembly, operation, maintenance, and troubleshooting to ensure safe and effective use of your carport.

Image: The Sannwsg 20x20 Metal Carport providing shelter for vehicles in snowy conditions.
This carport offers a spacious 400 sq. ft. storage area, comfortably accommodating two cars, trucks, or larger vehicles. Its high-pitched roof is specifically designed for efficient shedding of snow and rain, preventing accumulation and potential damage. The robust galvanized steel frame is engineered to withstand winds up to 100 MPH and snow loads of 49.2 PSF, ensuring reliable protection in all seasons.

Image: A diagram illustrating the 20x20 dimensions and 400 sq. ft. storage capacity of the carport.
Informacje dotyczące bezpieczeństwa
Ważne środki ostrożności:
- Zawsze należy dokładnie i w całości przestrzegać instrukcji montażu.
- Ensure the carport is secured to a stable and level foundation to prevent tipping or collapse, especially in strong winds.
- Przechowuj wszystkie małe części i akcesoria poza zasięgiem dzieci, aby uniknąć ryzyka zadławienia.
- Regularly inspect the carport for any signs of wear, damage, or loose connections. Perform necessary maintenance and repairs promptly to ensure its safety and longevity.
- Nie należy wieszać ciężkich przedmiotów na ramie wiaty.
- Clear excessive snow accumulation from the roof to prevent structural strain.
Lista części
Przed rozpoczęciem montażu należy sprawdzić, czy wszystkie wymienione poniżej elementy są obecne i nieuszkodzone. W celu identyfikacji wizualnej należy zapoznać się z załączonym schematem części.
Structural Components:
- Alloy Steel Frame Components (various lengths and shapes, labeled A, B, C, D, D1, E, F1, F2, F3)
- Galvanized Metal Roof Panels (labeled G, H)
- Reinforcement Bars (labeled P)
Dołączone akcesoria:
- Durable PE Material Side Walls (for enhanced enclosure and weather protection)
- Taśma wodoodporna
- Sealing Caulk
- Waterproof Sealing Strips
- Słoneczny Lamp (for illumination)
- Side Barriers
- Perimeter-Guard Rails
- Ground Anchors (K)
- Fasteners (screws, bolts, washers, labeled I, J, T)

Image: A visual representation of all included carport parts and accessories.
Instrukcja montażu
Assembly requires at least two people. Follow these steps carefully. A video guide is provided below for visual assistance.
Krok 1: Złóż ramę bazową
Connect the bottom support rods (B and C) using the provided fasteners (I). Ensure all connections are secure. Repeat for all base sections.

Image: Illustration of connecting bottom support rods (B and C).
Step 2: Construct the Roof Trusses
Assemble the upper frame components (A, D, D1, E, F1, F2, F3) to form the roof trusses. Pay close attention to the orientation of each piece and secure them with the appropriate fasteners (J, T).

Obraz: Szczegółowy view of assembling the roof truss components.
Step 3: Connect Vertical Supports
Attach the vertical support poles (A) to the assembled base frame (B) using fasteners (I). Ensure all connections are tight and the structure is stable.

Image: Illustration of attaching vertical support poles to the base frame.
Step 4: Install Reinforcement Bars
Install the reinforcement bars (P) to the upper frame structure. These bars provide additional stability and strength to the carport frame.

Image: Visual guide for installing the reinforcement bars.
Step 5: Secure the Frame to the Ground
Once the main frame is assembled, use the provided ground anchors (K) to firmly secure the carport to a level surface. This step is crucial for stability and wind resistance.

Image: Instructions for anchoring the carport frame to the ground.
Krok 6: Zamontuj panele dachowe
Begin installing the galvanized metal roof panels (G and H) from the top down, ensuring proper overlap for water shedding. Use the provided fasteners (I) to secure them to the frame. Apply sealing tape and strips as indicated in the parts list to prevent leaks.
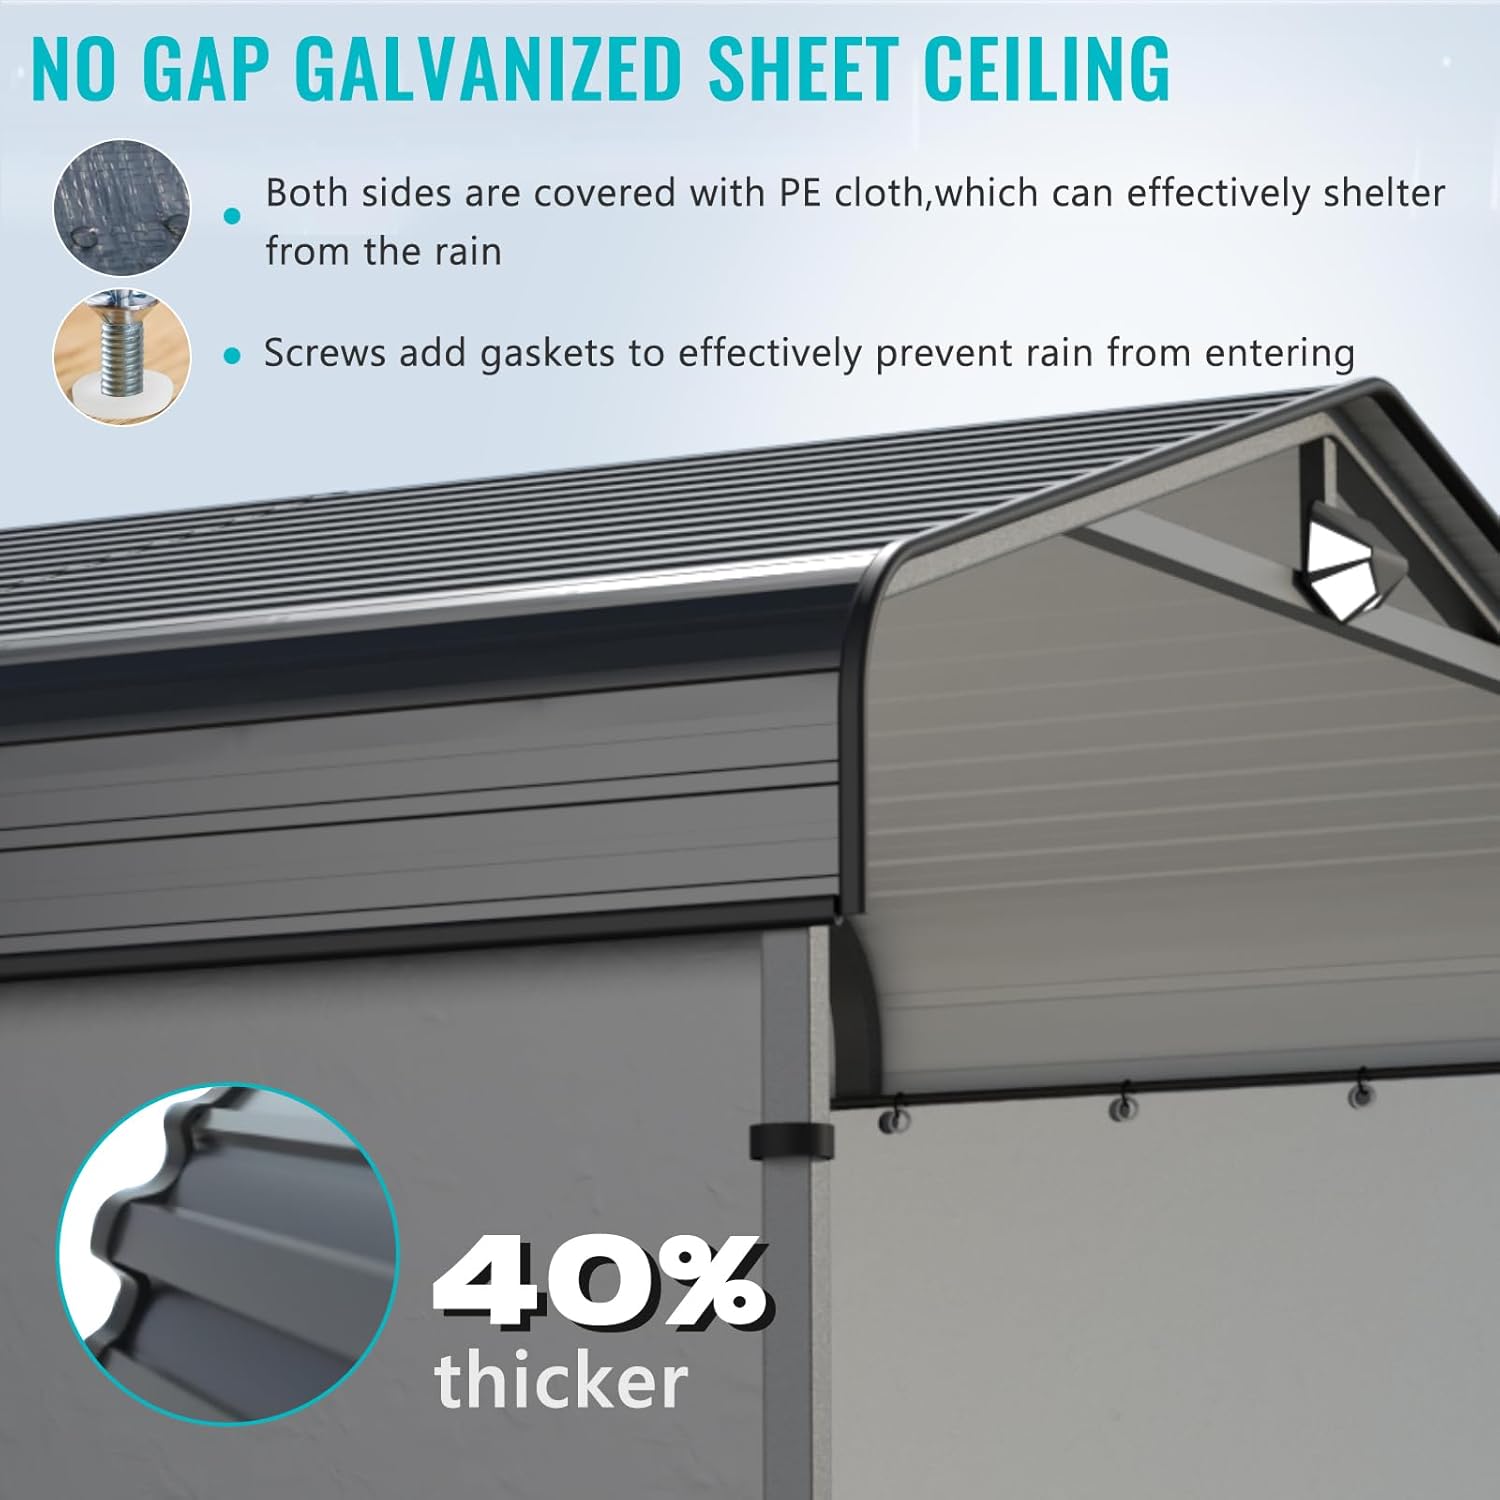
Obraz: Zbliżenie view of the galvanized metal roof panels, highlighting their leak-proof design and thickness.

Image: Step-by-step guide for installing the roof panels.
Step 7: Install Perimeter-Guard Rails
Install the perimeter-guard rails along the edges of the roof. These rails help secure the roof panels and provide a finished look.

Image: Visual instructions for installing the perimeter-guard rails.
Step 8: Attach Side Walls (Optional)
If using the included PE material side walls, attach them to the carport frame using the designated attachment points and fasteners (P, S, R). Ensure they are securely fastened to provide full enclosure.

Image: The carport with optional sidewalls installed, providing full enclosure.

Obraz: Szczegółowy view of attaching the sidewalls to the carport frame.
Instrukcja montażu w formie filmu:
Video: A comprehensive assembly guide for the Sannwsg 20x20 Metal Carport. This video demonstrates each step of the installation process, from frame assembly to roof panel and sidewall attachment, providing visual clarity for users.
Instrukcja obsługi
The Sannwsg Metal Carport is designed for straightforward operation. Once fully assembled and secured, it provides immediate shelter.
- Parking dla pojazdów: Drive vehicles slowly and carefully into the carport, ensuring adequate clearance on all sides to prevent accidental contact with the frame.
- Składowanie: The carport can also be used for storing various outdoor items such as boats, ATVs, or hay bales, protecting them from the elements.
- Multi-use Shelter: Beyond vehicle storage, the carport can serve as a versatile outdoor shelter for gatherings, workshops, or temporary storage needs.

Obraz: Byłyamples of the carport's versatile uses, from sheltering vehicles to providing space for outdoor activities.
Konserwacja
Regular maintenance will extend the lifespan and ensure the continued performance of your Sannwsg Metal Carport.
- Czyszczenie: Periodically clean the roof panels and frame with mild soap and water to remove dirt, debris, and environmental buildup. Avoid abrasive cleaners or tools that could scratch the galvanized finish.
- Odśnieżanie: In areas with heavy snowfall, regularly remove accumulated snow from the roof to prevent excessive weight and potential damage to the structure.
- Kontrola elementów złącznych: Annually, or after severe weather events, inspect all bolts, screws, and anchors to ensure they remain tight. Tighten any loose fasteners.
- Kontrola nieszczelności: Check for any signs of water leakage, especially around seams and fastener points. Use the included waterproof tape, sealing caulk, or waterproof sealing strips to address any leaks promptly.

Image: Visual representation of the leak-proof features and accessories provided for maintenance.
Rozwiązywanie problemów
Here are solutions to common issues you might encounter with your carport:
- Issue: Carport feels unstable or sways in wind.
Rozwiązanie: Ensure all ground anchors are fully driven into the ground and tightened. Verify that the installation surface is level. Check all frame connections (bolts and screws) for tightness and secure any loose ones. - Issue: Water leakage from the roof.
Rozwiązanie: Inspect the roof panels for proper overlap and ensure all screws are tightly fastened. Apply the provided waterproof tape, sealing caulk, or waterproof sealing strips along seams and around screw points where leaks are detected. - Issue: Difficulty in assembling parts.
Rozwiązanie: Double-check the part labels against the assembly diagrams. Ensure components are oriented correctly. Do not force parts together; if a fit is too tight, re-examine the instructions for correct part identification or potential minor manufacturing variations. Contact customer service if parts appear to be defective or severely misaligned.
Video: This video demonstrates the application of sealant and tape to prevent leaks, which can be useful for troubleshooting minor leakage issues after installation.
Specyfikacje
| Atrybut | Szczegół |
|---|---|
| Marka | Sannwsg |
| Numer modelu | car port |
| Tworzywo | Metal with PE sidewall |
| Kolor | Ciemnoszary |
| Wymiary produktu | 240" dł. x 240" szer. x 120" wys. (20 stóp x 20 stóp x 10 stóp) |
| Materiał ramy | Stal stopowa |
| Poziom wodoodporności | Wodoodporny |
| Wymagany montaż | Tak |
| Odporność na wiatr | Do 100 mil na godzinę |
| Nośność śniegu | 49.2 stóp kwadratowych |
Gwarancja i wsparcie
Your Sannwsg Metal Carport comes with a standard manufacturer's warranty. For specific details regarding warranty coverage, duration, and claims, please refer to the documentation included with your purchase or contact Sannwsg customer service directly.
Obsługa klienta: For any questions, missing parts, damaged components, or technical assistance, please contact the seller, gardensure, through your purchase platform or refer to the contact information provided in your product packaging. They are committed to ensuring a smooth experience and addressing any concerns.
Additional protection plans may be available for purchase to extend coverage beyond the standard warranty. Please check your purchase details for options such as 2-Year or 3-Year Protection Plans.