
1. Wprowadzenie
Dziękujemy za zakupasing the Audizio Genua DAB Radio. This manual provides essential information for the safe and efficient operation of your device. Please read it thoroughly before use and retain it for future reference. The Audizio Genua is a versatile DAB+/FM stereo radio featuring Bluetooth connectivity, USB playback, and an alarm function, designed for both home and portable use.
2. Informacje dotyczące bezpieczeństwa
- Źródło zasilania: Używaj wyłącznie dołączonego zasilacza. Upewnij się, że napięcietage odpowiada wymaganiom Twojego regionu.
- Woda i wilgoć: Nie wystawiać urządzenia na działanie deszczu, wilgoci ani kapiących/rozpryskujących się płynów. Nie stawiać na urządzeniu przedmiotów wypełnionych płynami, takich jak wazony.
- Wentylacja: Zapewnij odpowiednią wentylację. Nie blokuj otworów wentylacyjnych.
- Ciepło: Trzymaj urządzenie z dala od źródeł ciepła, takich jak grzejniki, kratki wentylacyjne, piece lub inne urządzenia (w tym amp(lifiers) wytwarzające ciepło.
- Czyszczenie: Czyścić wyłącznie suchą szmatką.
- Serwisowanie: Nie próbuj samodzielnie naprawiać tego produktu. Wszelkie czynności serwisowe należy powierzyć wykwalifikowanemu personelowi serwisowemu.
- Antena: Do not bend or force the antenna.
3. Zawartość opakowania
Po rozpakowaniu sprawdź, czy wszystkie przedmioty są obecne i w dobrym stanie:
- Audizio Genua DAB Radio
- Zdalne sterowanie
- Zasilacz
- Quick Start Guide (language not guaranteed)
4. Koniec produktuview
4.1 Elementy sterujące i wyświetlacz na panelu przednim

Rycina 4.1: Przód view of the Audizio Genua DAB Radio.
The front panel features a clear color TFT display, two speaker grilles, and an array of control buttons and a central rotary knob. The display shows station information, track details, time, and menu options. Buttons include Menu, Preset, Scan, Dimmer, Alarm, and playback controls (Play/Pause, Skip). The central knob is used for volume adjustment, tuning, and selection.
4.2 Połączenia panelu tylnego
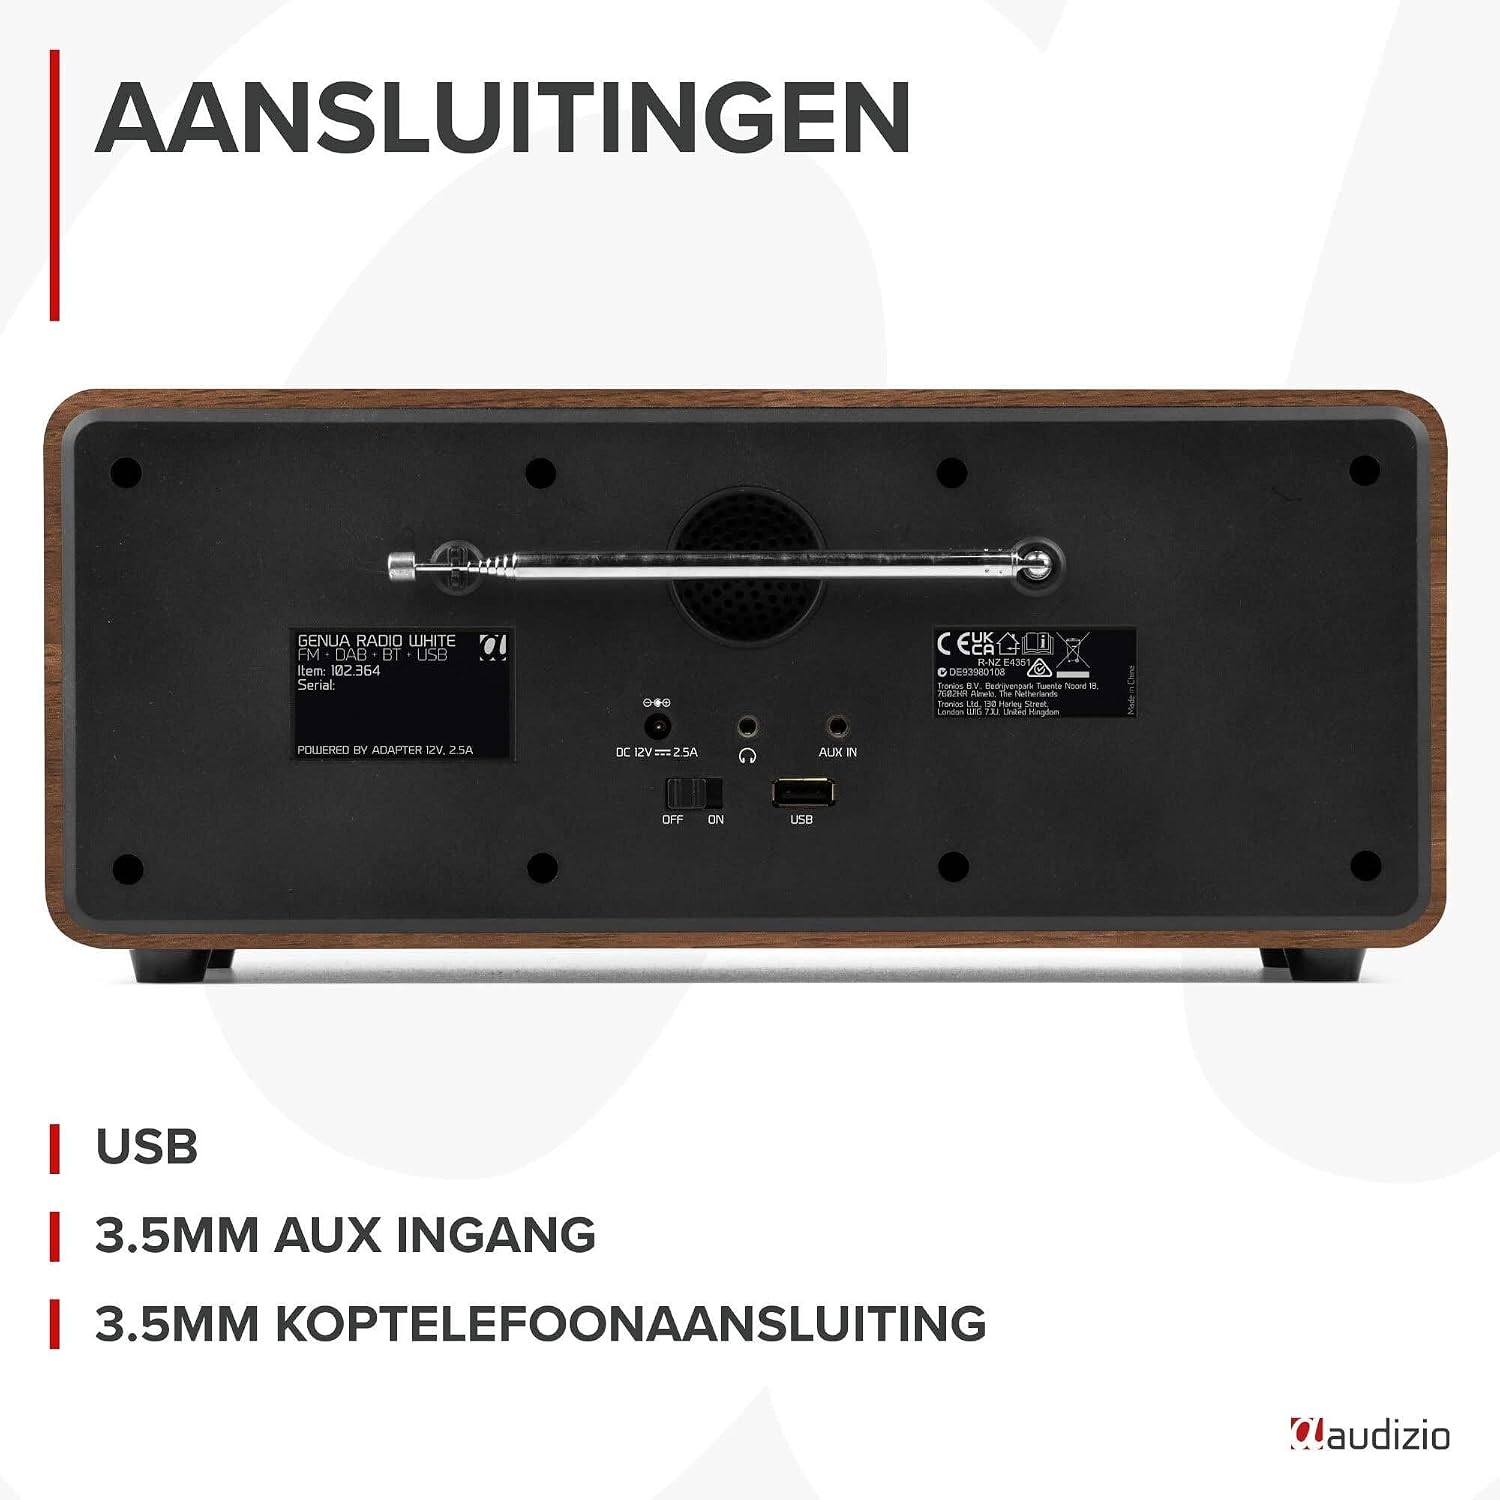
Rysunek 4.2: Tył view of the Audizio Genua DAB Radio with connections.
The rear panel includes the telescopic antenna for radio reception, a USB port for media playback, a 3.5mm AUX input for external audio devices, a 3.5mm headphone output, a DC 12V power input, and a main power ON/OFF switch.
4.3 Pilot zdalnego sterowania

Figure 4.3: Remote control for the Audizio Genua DAB Radio.
The included remote control provides full functionality, allowing you to power on/off, adjust volume, change modes, navigate menus, set alarms, and control playback from a distance.
5. Konfiguracja
5.1 Połączenie zasilania
- Connect the power adapter to the DC 12V input on the rear of the radio.
- Podłącz zasilacz do odpowiedniego gniazdka ściennego.
- Flip the main power switch on the rear panel to the 'ON' position.
5.2 Regulacja anteny
Rozłóż całkowicie antenę teleskopową, aby uzyskać optymalny odbiór radia DAB+ i FM. Dostosuj jej położenie, aby uzyskać najlepszą jakość sygnału.
5.3 Konfiguracja początkowa i automatyczne skanowanie
- Upon first power-on, the radio may prompt you to perform an auto-scan for DAB+ stations. Select 'Yes' or press the 'Scan' button.
- Radio wyszuka dostępne stacje DAB+ i je zapisze. Ten proces może potrwać kilka minut.
- Po zakończeniu skanowania radio dostroi się do pierwszej dostępnej stacji.
6. Instrukcja obsługi
6.1 Wybór trybu
Press the 'Mode' button on the remote control or the 'Menu' button on the unit to cycle through available modes: DAB+, FM, Bluetooth, USB, and AUX In.
6.2 Obsługa radia DAB+
- Select DAB+ mode.
- If no stations are found or you wish to rescan, press the 'Scan' button to perform a full scan.
- Use the 'Tune/Select' knob or the navigation buttons on the remote to browse through the list of available stations.
- Press the 'OK' button (on remote) or push the 'Tune/Select' knob to select a station.
- Przechowywanie presetów: To store a favorite station, press and hold the 'Preset' button until the preset menu appears. Use the knob/navigation to select a preset number (1-30) and press 'OK' to confirm.
- Przywoływanie ustawień wstępnych: Briefly press the 'Preset' button, then use the knob/navigation to select the desired preset and press 'OK'.
6.3 Obsługa radia FM
- Wybierz tryb FM.
- Automatyczne skanowanie: Press the 'Scan' button to automatically scan for and store available FM stations.
- Strojenie ręczne: Use the 'Tune/Select' knob to manually tune to a specific frequency.
- Przechowywanie presetów: Similar to DAB+ mode, press and hold 'Preset', select a number, and confirm.
- Przywoływanie ustawień wstępnych: Briefly press 'Preset', select the desired preset, and confirm.
6.4 Łączność Bluetooth
- Select Bluetooth mode. The display will show "Pairing" or "Waiting for connection".
- Włącz Bluetooth na swoim smartfonie lub innym urządzeniu z obsługą Bluetooth i wyszukaj dostępne urządzenia.
- Select "Audizio Genua" from the list of devices.
- Once paired, the radio will confirm the connection, and you can start playing audio from your device.
6.5 Odtwarzanie USB
- Włóż dysk flash USB zawierający plik MP3 filedo portu USB na tylnym panelu.
- Select USB mode. The radio will automatically detect the USB drive and begin playing the first compatible audio file.
- Use the playback control buttons (Play/Pause, Skip Forward/Backward) on the unit or remote to manage your music.
6.6 Wejście AUX
- Connect an external audio device (e.g., MP3 player, smartphone) to the 3.5mm AUX IN port on the rear panel using an audio cable (not included).
- Wybierz tryb AUX.
- Steruj odtwarzaniem i głośnością z urządzenia zewnętrznego.
6.7 Alarm i timer snu
- Ustawianie alarmu: Press the 'Alarm' button on the unit or remote. Follow the on-screen prompts to set Alarm 1 and Alarm 2, including time, source (DAB/FM/Buzzer), and volume.
- Funkcja drzemki: When the alarm sounds, press any button (except Power) to activate snooze. The alarm will sound again after a set interval.
- Wyłącznik czasowy: Press the 'Sleep' button on the remote to set a sleep timer (e.g., 15, 30, 60 minutes). The radio will automatically turn off after the selected time.
6.8 Ściemniacz wyświetlacza
Press the 'Dimmer' button on the unit or remote to adjust the brightness of the display. This is useful for different lighting conditions or for use in a bedroom.
7. Konserwacja
- Czyszczenie: Do czyszczenia obudowy radia należy używać miękkiej, suchej ściereczki. Nie należy używać środków ściernych, wosków ani rozpuszczalników.
- Antena: Handle the telescopic antenna with care to prevent damage.
- Składowanie: If storing the radio for an extended period, disconnect it from the power supply.
8. Rozwiązywanie Problemów
| Problem | Możliwa przyczyna | Rozwiązanie |
|---|---|---|
| Brak zasilania | Power adapter not connected; Main power switch off | Ensure power adapter is securely connected and plugged in; Turn main power switch to 'ON' |
| Słaby odbiór radia (DAB+/FM) | Antena nie jest wysunięta; Obszar słabego sygnału; Zakłócenia | Fully extend and adjust the telescopic antenna; Try repositioning the radio; Move away from other electronic devices |
| Bluetooth nie łączy się | Radio not in Bluetooth mode; Device not discoverable; Already paired with another device | Select Bluetooth mode on the radio; Ensure Bluetooth is enabled on your device and it's in pairing mode; Disconnect from other Bluetooth devices |
| Odtwarzanie USB nie działa | Dysk USB nie został prawidłowo włożony; niezgodny file format; USB drive corrupted | Ensure USB drive is fully inserted; Check if files are in MP3 format; Try a different USB drive |
| Brak dźwięku | Głośność zbyt niska; Wyciszenie włączone; Wybrano nieprawidłowe źródło | Increase volume; Check if mute is active; Ensure correct input source (DAB/FM/BT/USB/AUX) is selected |
9. Specyfikacje

Figure 9.1: Audizio Genua DAB Radio dimensions.
- Marka: Audizio
- Numer modelu: Genua
- Kolor: Biały
- Dodatek specjalny: Bluetooth Connectivity, DAB+ Radio
- Technologia łączności: Aux, Bluetooth, USB
- Wymiary produktu (dł. x szer. x wys.): Wymiary 13.5 x 31 x 13.3 cm
- Technologia tunera: DAB+
- Styl: Nowoczesny
- Źródło zasilania: Elektryczny przewodowy
- Obsługiwane pasma radiowe: UKF, DAB+
- Zgodne urządzenia: Smartphone, Tablet, Laptop, MP3 Player, Headphones, Speaker
- Tomtage: 220 wolty
- Maksymalna moc wyjściowa głośnika: 50 watów
- Liczba baterii: 1 Non-standard battery (Type of battery required)
- Typ ekranu: TFT
- Waga przedmiotu: 2.25 kilograma
10. Gwarancja i wsparcie
This product is covered by a standard manufacturer's warranty. For detailed warranty terms and conditions, please refer to the documentation provided at the time of purchase or contact your retailer. For technical support or service inquiries, please contact the Audizio customer support team through their official webmiejscu lub w miejscu zakupu.