
1. Wprowadzenie
The virtavo VistaFlask 2K Security Camera is a wireless, battery-powered outdoor camera designed to enhance your home security. Featuring 2K QHD imaging, AI motion detection, starlight lens for colorful night vision, and weatherproof construction, it provides reliable surveillance in various conditions. This manual provides detailed instructions for setting up, operating, maintaining, and troubleshooting your camera.

Image: Two virtavo VistaFlask 2K security cameras, designed for outdoor use.
2. Informacje dotyczące bezpieczeństwa
- Upewnij się, że kamera jest solidnie zamontowana, aby zapobiec jej upadkowi.
- Use only the specified charging cable and power adapter to charge the battery.
- Nie wystawiaj aparatu na działanie ekstremalnych temperatur wykraczających poza zakres jego działania.
- Avoid disassembling or modifying the camera, as this will void the warranty and may cause damage.
- Przechowuj aparat i jego akcesoria poza zasięgiem dzieci.
3. Zawartość opakowania
- virtavo VistaFlask 2K Security Camera(s)
- Wsporniki montażowe
- Kabel ładujący USB
- Instrukcja obsługi
- Śruby montażowe i kotwy
4. Koniec produktuview
The virtavo VistaFlask camera features a compact design with essential components for optimal performance. Key elements include the lens, IR LEDs for night vision, a microphone for audio input, a speaker for two-way communication, and a motion sensor. The power switch, sync button, and charging port are located at the bottom of the camera, alongside the microSD card slot for local storage.

Obraz: Wewnętrzny view highlighting the battery and electronic components.

Obraz: Dół view of the camera with power switch, charging port, sync button, and microSD card slot.
5. Przewodnik konfiguracji
5.1 Konfiguracja początkowa
- Naładuj aparat: Before first use, fully charge the camera using the provided USB cable. The battery lasts 1-3 months per charge depending on usage.
- Pobierz aplikację: Szukaj 'HOME V' in your smartphone's app store (iOS or Android) and download the application.
- Utwórz konto: Open the 'HOME V' app and follow the on-screen instructions to register a new account or log in if you already have one.
5.2 Parowanie i podłączanie kamery
Follow these steps to pair your virtavo VistaFlask camera with the 'HOME V' app. For a visual guide, please refer to the official installation video below.
Video: Official virtavo VistaFlask Installation Guide Setup. This video demonstrates the step-by-step process of binding the camera to the 'HOME V' app using QR codes, including powering on the camera, confirming the red light flashing, connecting to the camera's hotspot, and connecting to your home Wi-Fi network.
- Dodaj urządzenie: In the 'HOME V' app, tap the '+' icon to add a new device.
- Skanowania QR code: Grant camera access to the app. Scan the QR code located on the back of your virtavo VistaFlask camera.
- Włączanie: Ensure the camera is powered on. The power switch is located at the bottom.
- Confirm Flashing Light: Confirm that the camera's red indicator light is flashing rapidly. If not, press and hold the 'Sync' button for 5-10 seconds until you hear a 'Du' sound or see rapid flashing.
- Connect to Camera Hotspot: The app will prompt you to connect to the camera's Wi-Fi hotspot (e.g., 'IPC365_AP-XXXX'). Confirm and join this network.
- Select Home Wi-Fi: Choose your home 2.4GHz Wi-Fi network from the list and enter the correct password. Note: This device only supports 2.4GHz Wi-Fi.
- Nazwij swój aparat: Once connected, name your camera for easy identification (e.g., 'Front Door', 'Living Room').
5.3 Fizyczna instalacja
The virtavo VistaFlask camera is designed for easy installation, both indoors and outdoors. Its weatherproof design ensures durability.

Image: Easy installation on smooth surfaces like glass or tiles, no drilling required.

Image: Wireless connection for remote access.
- Wybierz lokalizację: Select a location with good Wi-Fi signal strength and a clear view obszaru, który chcesz monitorować.
- Montowanie: Use the provided mounting bracket, screws, and anchors to securely attach the camera to a wall or other suitable surface. Ensure the camera is positioned to capture the desired field of view.
- Odporność na warunki atmosferyczne: The camera is designed to withstand various weather conditions, making it suitable for outdoor use.
6. Instrukcja obsługi
6.1 Na żywo View i dwukierunkowe audio
Access real-time video feed and communicate through the camera using the 'HOME V' app.
- Na żywo View: Otwórz aplikację i wybierz kamerę, aby view kanał na żywo.
- Dwukierunkowy dźwięk: Kliknij ikonę mikrofonu na żywo view to speak through the camera's speaker, and listen through its microphone.
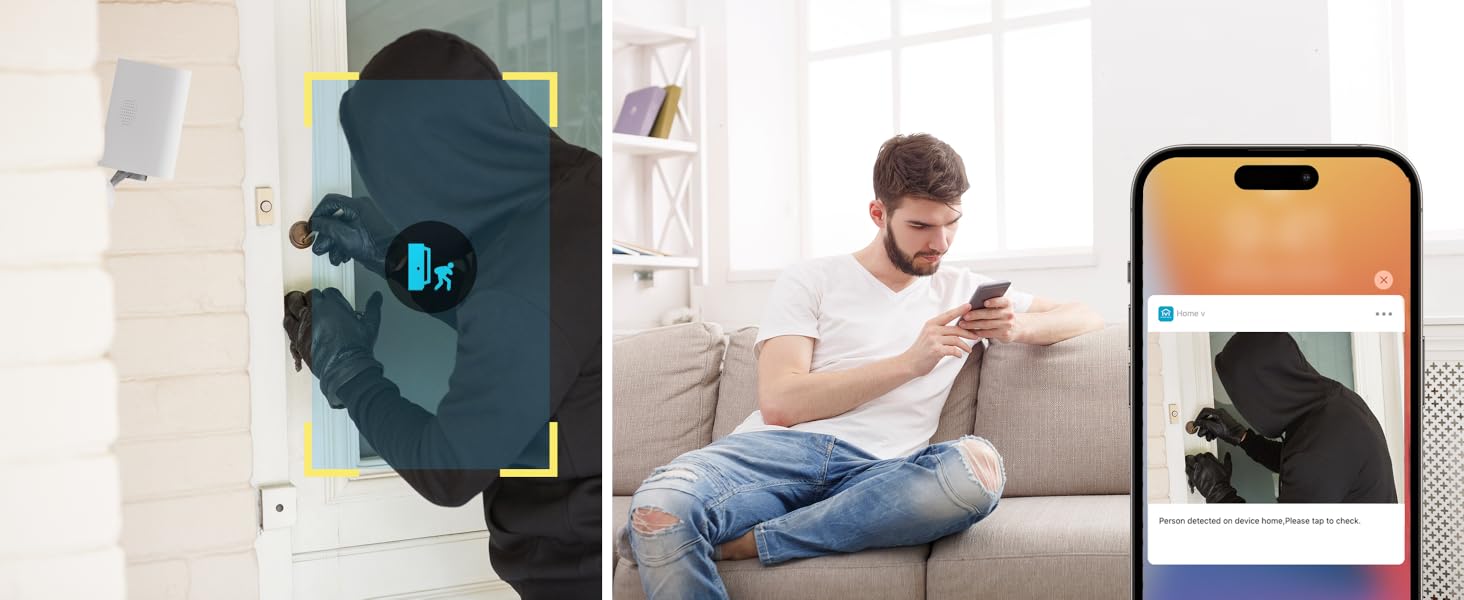
Image: Two-way audio feature for communication.
6.2 Detekcja ruchu i alerty
The camera features advanced PIR motion detection and AI capabilities to minimize false alarms.
- Detekcja ruchu PIR: Detects motion up to 30 feet.
- Inteligentne alerty: Otrzymuj natychmiastowe powiadomienia na swój smartfon po wykryciu ruchu.
- AI Detection (Cloud Subscription): With an optional cloud subscription, the camera can differentiate between humans, vehicles, and animals, reducing irrelevant alerts.
- Konfigurowalne strefy wykrywania: Set specific areas for motion detection to focus on critical zones and ignore others.
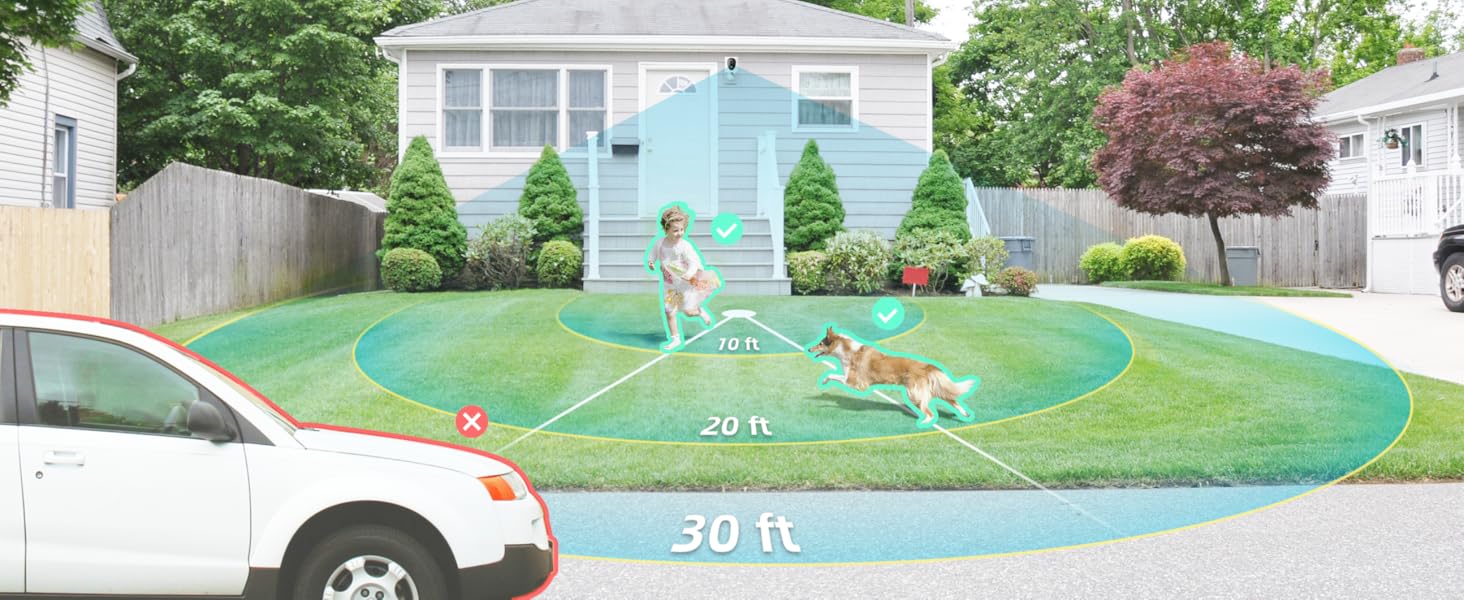
Image: Smart detection distinguishing between people, vehicles, and animals.
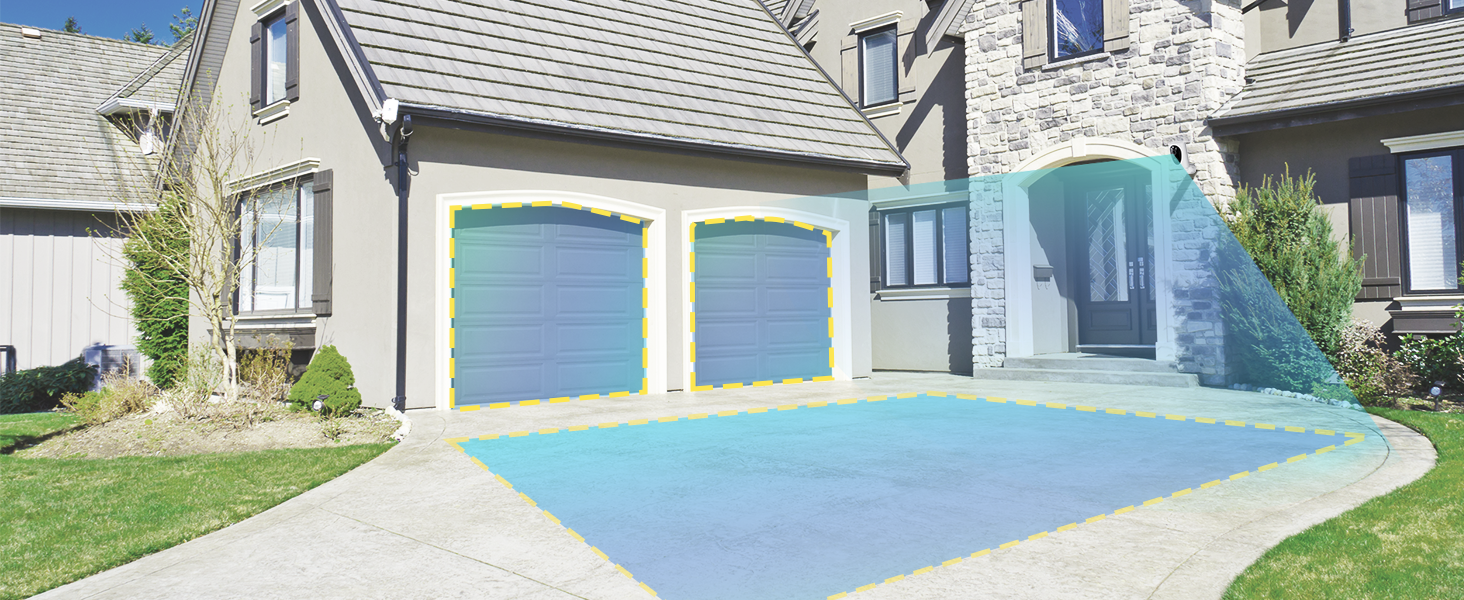
Image: Customizable motion detection zones.

Image: Instant alerts with image previews.
6.3 Widzenie nocne
The camera provides clear vision even in low-light conditions.
- Kolorowe widzenie nocne: Utilizes Starlight technology and a wide F1.6 aperture for vivid, color-rich images in low light.
- IR Night Vision: Equipped with 2 high-intensity IR LEDs for clear black-and-white vieww całkowitej ciemności.

Image: Superior 2K QHD imaging and color-rich night vision.
6.4 Rejestrowanie i przechowywanie
Your data is secured with flexible storage options.
- Pamięć lokalna: Supports microSD cards from 32GB to 256GB for continuous recording, even without network access. (MicroSD card not included).
- Przechowywanie w chmurze: Optional cloud storage plans offer additional features like snapshot alerts and advanced AI capabilities. Video encryption ensures privacy.

Image: Comparison of no-fee basic storage (SD card) and cloud storage options.
6.5 App Features and Remote Access
Manage and control your security remotely via the 'HOME V' app.
- Zdalne monitorowanie: Monitor your home from anywhere with an internet connection.
- Dostęp wieloużytkownikowy: Udostępnij dostęp do kamery członkom rodziny.
- Harmonogram: Set schedules for recording or alerts.

Image: Remote access and multi-user monitoring via the 'HOME V' app.
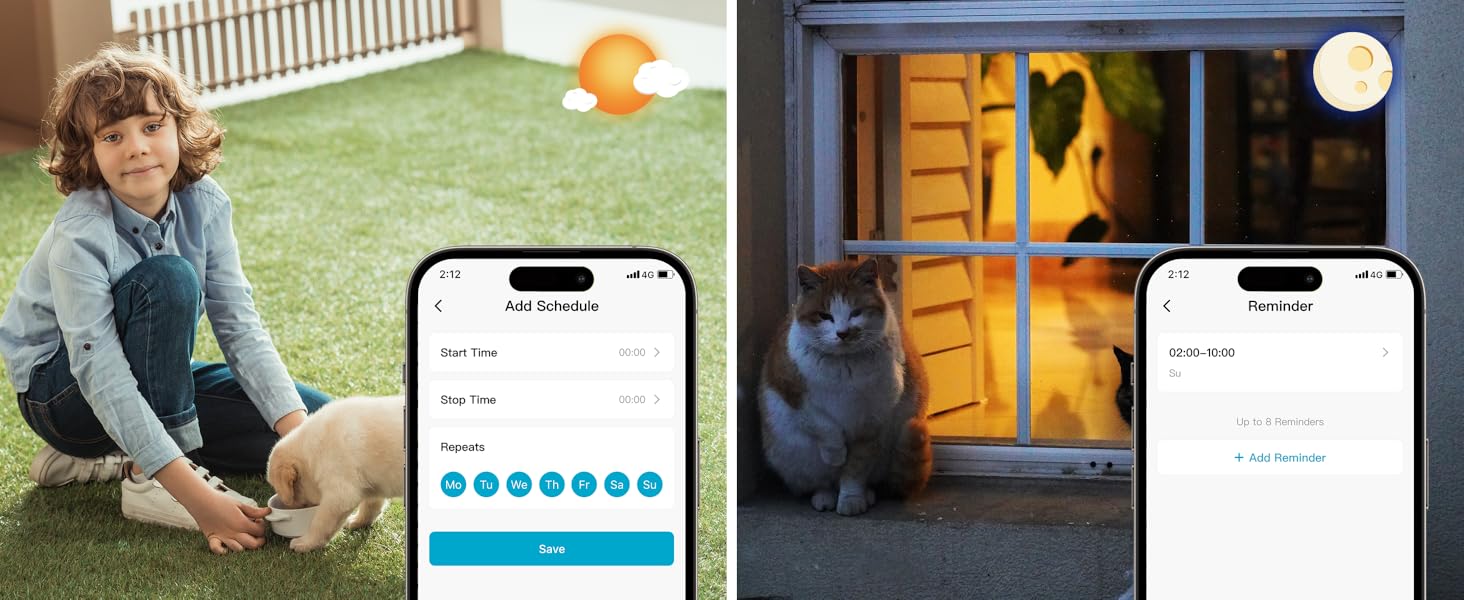
Image: App features including scheduling and reminders.
7. Konserwacja
- Ładowanie akumulatora: Recharge the camera battery when prompted by the app. A full charge can last 1-3 months depending on activity.
- Czyszczenie: Delikatnie przetrzyj obiektyw i korpus aparatu miękką szmatką.amp płótno. Unikaj ściernych środków czyszczących.
- Aktualizacje oprogramowania układowego: Regularly check the 'HOME V' app for firmware updates to ensure optimal performance and security.
8. Rozwiązywanie Problemów
| Wydanie | Możliwa przyczyna | Rozwiązanie |
|---|---|---|
| Aparat się nie włącza | Bateria rozładowana; Wyłącz zasilanie | Charge the camera fully; Ensure power switch is in the 'ON' position. |
| Nie można połączyć się z siecią Wi-Fi | Incorrect Wi-Fi password; 5GHz Wi-Fi network; Weak Wi-Fi signal | Verify password; Ensure you are connecting to a 2.4GHz network; Move camera closer to router or use a Wi-Fi extender. |
| Częste fałszywe alarmy | High motion sensitivity; Unfiltered motion sources (e.g., trees, animals) | Adjust motion sensitivity in app; Set up detection zones to exclude irrelevant areas; Consider cloud subscription for AI detection. |
| Poor night vision clarity | Dirty lens; Obstruction in front of camera; Insufficient ambient light for color night vision | Clean the lens; Remove obstructions; Ensure adequate ambient light for color mode or switch to IR night vision. |
| Bateria szybko się rozładowuje | High activity/recordings; Frequent live view access; Weak Wi-Fi signal | Reduce motion detection sensitivity; Limit live view sessions; Improve Wi-Fi signal strength. |
9. Specyfikacje
| Funkcja | Szczegół |
|---|---|
| Nazwa modelu | LJH10 |
| Zastosowanie wewnątrz/na zewnątrz | Wewnątrz, Na zewnątrz |
| Źródło zasilania | Battery Powered (4400mAh rechargeable Lithium battery) |
| Protokół łączności | Wi-Fi (tylko 2.4 GHz) |
| Typ kontrolera | HOME V App |
| Typ montażu | Montaż ścienny |
| Rozdzielczość przechwytywania wideo | 2K QHD |
| Viewing kąt | 120 Degrees (Field of View: 130 Degrees) |
| Zakres noktowizora | 30 stóp |
| Technologia słabego oświetlenia | Starlight (F1.6 aperture, 3.0mm focal length) |
| Liczba diod LED podczerwieni | 2 |
| Poziom wodoodporności | Wodoodporny |
| Wymiary (dł. x szer. x wys.) | 2.7 x 1.3 x 3.2 cala |
| Waga przedmiotu | 1.41 funtów |
| Opcje przechowywania | MicroSD (32GB-256GB), Cloud Storage |
| Cechy specjalne | 2-Way Audio, Battery Powered, Local Recording, Motion Sensor, Night Vision, AI Motion Detection |
10. Gwarancja i wsparcie
virtavo products are designed for reliability and performance. For information regarding product warranty, please refer to the warranty card included in your product packaging or visit the official virtavo website. If you encounter any issues or have questions not covered in this manual, please contact virtavo customer support through the 'HOME V' app or their official support channels for assistance.