1. Wprowadzenie
Dziękujemy za zakupasing the JAPANNEXT JN-IPS321UHD 32-inch 4K UHD IPS Monitor. This monitor is designed to provide a high-quality visual experience with its 3840x2160 resolution, wide viewing angles, and HDR support. This manual will guide you through the setup, operation, maintenance, and troubleshooting of your new monitor to ensure optimal performance and longevity.
2. Informacje dotyczące bezpieczeństwa
Please read and follow these safety guidelines carefully before using the monitor:
- Nie wystawiaj monitora na działanie deszczu, wilgoci ani ekstremalnych temperatur.
- Aby zapobiec przegrzaniu, należy zapewnić odpowiednią wentylację wokół monitora.
- Należy używać wyłącznie zasilacza dołączonego do monitora.
- Unikaj umieszczania ciężkich przedmiotów na przewodzie zasilającym.
- Nie próbuj samodzielnie demontować ani naprawiać monitora. Wszelkie czynności serwisowe powierzaj wykwalifikowanemu personelowi.
- Czyść ekran miękką, niepozostawiającą włókien ściereczką. Unikaj stosowania silnych środków chemicznych.
3. Zawartość opakowania
Sprawdź, czy w opakowaniu znajdują się wszystkie elementy:
- JAPANNEXT JN-IPS321UHD Monitor
- Podstawa monitora
- Kabel HDMI
- Kabel DisplayPort
- Kabel zasilający
- Zasilacz
- Instrukcja obsługi
- Karta gwarancyjna
- Pilot zdalnego sterowania (baterie nie są dołączone)
4. Konfiguracja
4.1 Mocowanie stojaka
Carefully place the monitor face down on a soft, clean surface to prevent scratches. Attach the stand base to the stand neck, then secure the assembled stand to the back of the monitor using the provided screws.
Obraz: Przód view of the monitor with its attached stand.
4.2 Montaż uchwytu VESA (opcjonalnie)
The monitor supports a 100x100mm VESA mount. If you prefer to mount the monitor on a wall or an alternative stand, remove the factory stand and attach your VESA-compatible mounting bracket. Ensure the mounting screws are of appropriate length to avoid damaging internal components.

Obraz: Tył view of the monitor, highlighting the VESA mount area and input ports.
4.3 Kable połączeniowe
Connect the power adapter to the monitor's power port and then to a power outlet. Connect your video source (PC, game console, etc.) to one of the available input ports (HDMI or DisplayPort) on the monitor. If desired, connect external speakers or headphones to the audio output port.
Image: Close-up of the monitor's input panel, showing Audio Out, DisplayPort 1.4 (x2), HDMI 2.1 (x2), and Power Port.
5. Obsługa monitora
5.1 Włączanie/wyłączanie zasilania
Press the power button on the monitor or the remote control to turn the monitor on or off. The power indicator light will show the monitor's status (e.g., blue for on, amber for standby).
5.2 Wybór wejścia
Use the input selection button on the monitor or the remote control to cycle through the available input sources (HDMI 1, HDMI 2, DisplayPort 1, DisplayPort 2). The monitor will automatically detect an active signal.
5.3 Menu ekranowe (OSD)
Access the OSD menu using the buttons on the monitor or the remote control to adjust various settings such as brightness, contrast, color temperature, and picture modes. Navigate through the menu using the directional buttons and confirm selections with the OK/Enter button.
5.4 Picture-by-Picture (PBP) and Picture-in-Picture (PIP)
The monitor supports PBP and PIP functions, allowing you to display content from multiple input sources simultaneously. Refer to the OSD menu for options to configure these modes, including layout and source selection. PBP mode can display up to two input images side-by-side, while PIP mode displays one input as a smaller window over another main input.
5.5 Tryb gry
The monitor features a dedicated Game Mode to optimize visual settings for gaming. This mode can enhance visibility in dark areas and improve response times. Activate and configure Game Mode through the OSD menu.

Image: Monitor screen showing a game with the 'Picture Mode' menu, including FPS and Game options.
5.6 Funkcje audio
The monitor includes built-in 2W x 2 stereo speakers for audio output. You can adjust the volume through the OSD menu or the remote control. For higher quality audio, connect external speakers or headphones to the audio output port.

Image: Monitor displaying a music scene, illustrating the integrated speakers.
Obsługa HDR 5.7
The monitor supports High Dynamic Range (HDR) content, providing a wider range of colors and contrast for a more immersive viewing experience. Ensure your connected device and content also support HDR for this feature to function.
5.8 Blue Light Reduction
To reduce eye strain during prolonged use, the monitor features a blue light reduction mode. This setting can be adjusted or enabled/disabled via the OSD menu.
6. Konserwacja
6.1 Czyszczenie monitora
Before cleaning, ensure the monitor is turned off and unplugged from the power outlet. Use a soft, dry, lint-free cloth to gently wipe the screen and exterior surfaces. For stubborn marks, lightly dampen the cloth with water. Avoid using alcohol, ammonia, or abrasive cleaners, as these can damage the screen or finish.
6.2 Ogólna opieka
Keep the monitor away from direct sunlight, heat sources, and areas with high humidity. Do not block the ventilation openings. When moving the monitor, handle it carefully to avoid impact or damage.
7. Rozwiązywanie Problemów
Jeśli masz problemy z monitorem, zapoznaj się z poniższymi typowymi problemami i ich rozwiązaniami:
- Brak zasilania: Upewnij się, że kabel zasilający jest prawidłowo podłączony do monitora i gniazdka elektrycznego. Sprawdź, czy zasilacz działa prawidłowo.
- Brak sygnału: Verify that the video cable (HDMI or DisplayPort) is properly connected to both the monitor and your source device. Ensure the correct input source is selected on the monitor.
- Migotanie lub zniekształcenie obrazu: Check the video cable for damage. Try a different cable or input port. Ensure your source device's display resolution and refresh rate are compatible with the monitor's specifications.
- Brak dźwięku z głośników: Check the volume settings on both the monitor and your source device. Ensure the audio cable (if used) is properly connected.
- Pilot nie działa: Sprawdź baterie w pilocie. Upewnij się, że między pilotem a odbiornikiem podczerwieni monitora nie ma żadnych przeszkód.
Jeśli po wypróbowaniu tych kroków problem nadal występuje, skontaktuj się z obsługą klienta.
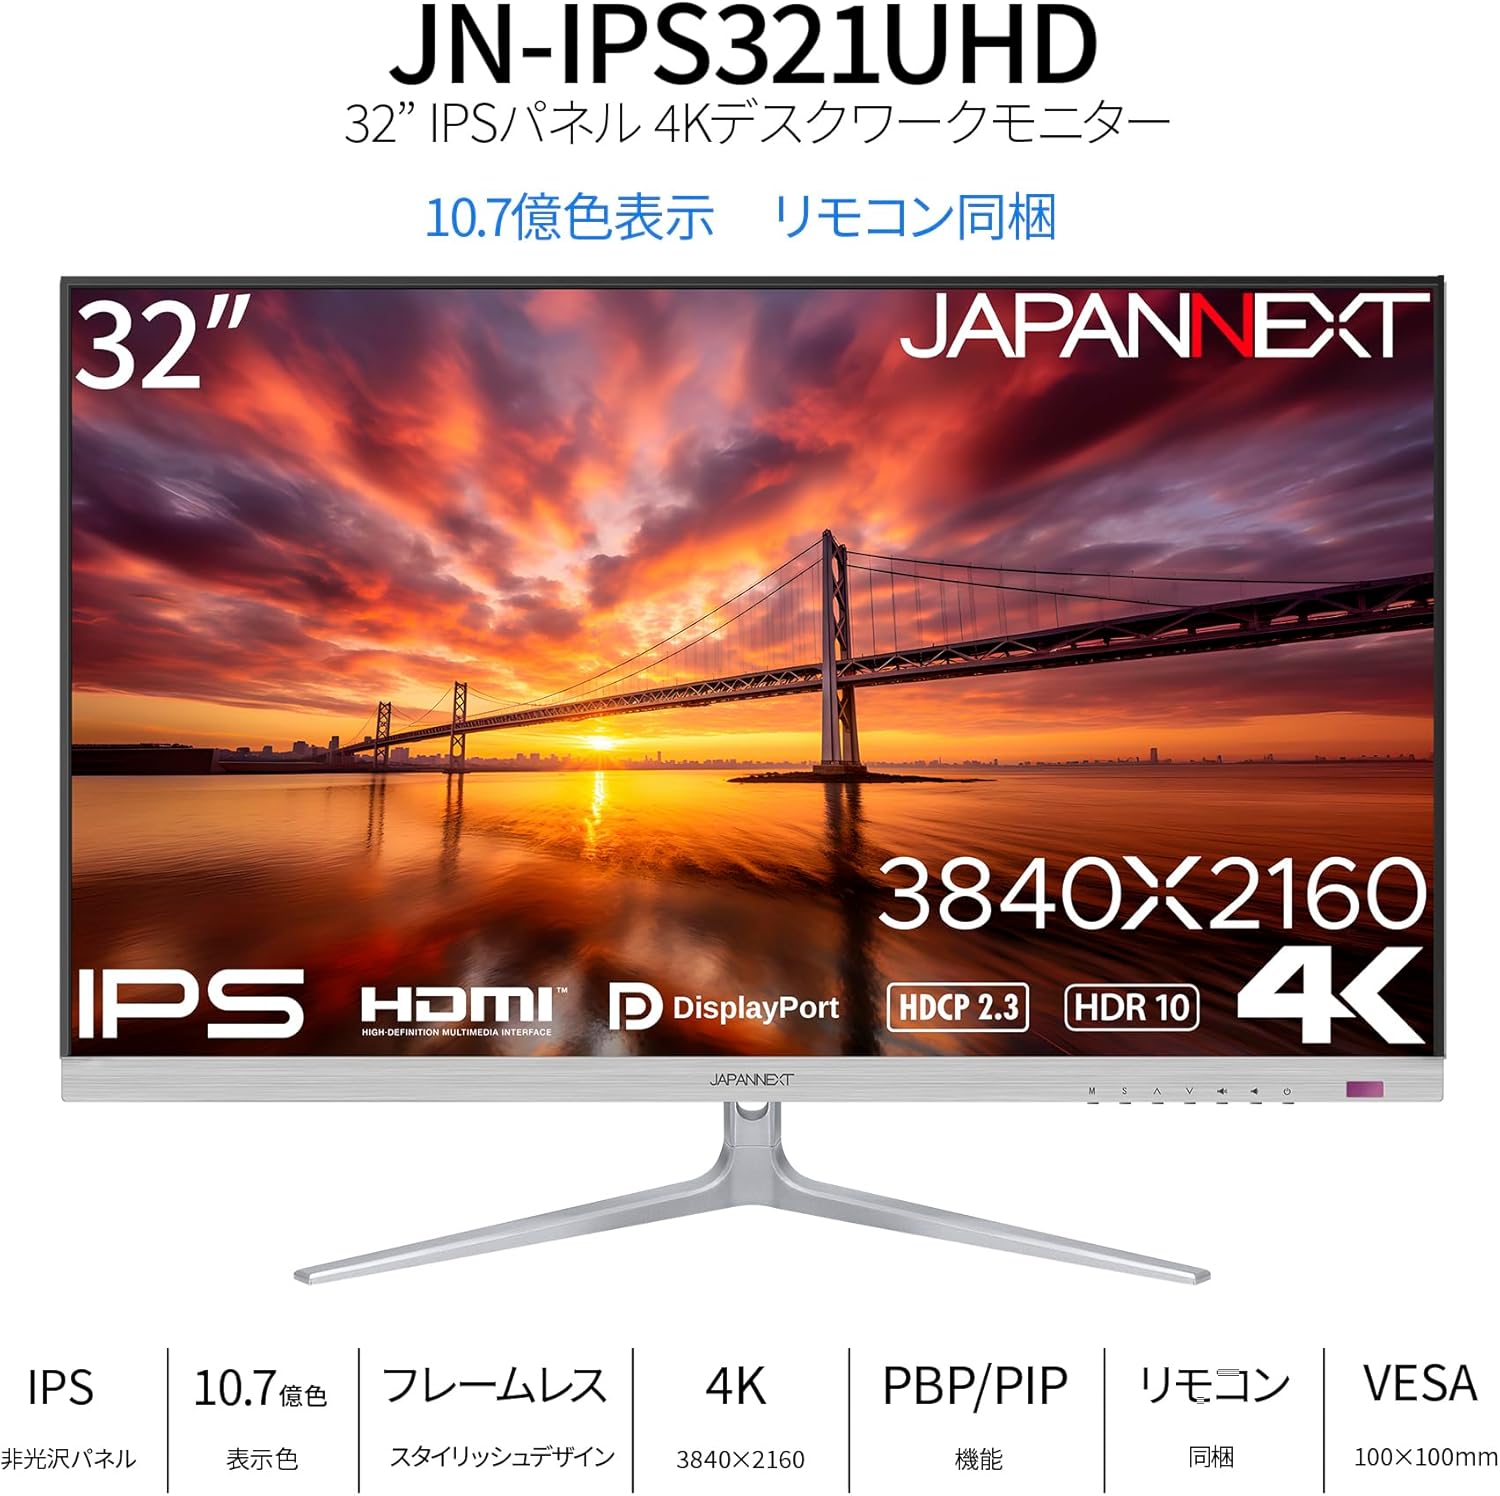
8. Specyfikacje
Below are the detailed technical specifications for the JAPANNEXT JN-IPS321UHD monitor:

Image: Detailed specifications table for the monitor.
| Funkcja | Specyfikacja |
|---|---|
| Numer modelu | JN-IPS321UHD |
| Rozmiar ekranu | 32 cali |
| Typ panelu | IPS (AHVA) |
| Rezolucja | 3840 x 2160 (4K UHD) |
| Proporcje obrazu | 16:9 |
| Częstotliwość odświeżania | 60 Hz |
| Czas reakcji | 12 ms (maks.) |
| Jasność | 300 cd/m² |
| Współczynnik kontrastu | 1000:1 |
| Viewing kąt | Wys.:178° Pion.:178° |
| Obsługa kolorów | 1.07 billion colors, sRGB:96% |
| Obsługa HDR | HDR10 |
| Wsparcie HDCP | HDCP2.3 jest standardem, który umożliwia: |
| Wejścia | HDMI 2.1 x2 (60Hz), DisplayPort 1.4 x2 (60Hz) |
| Wyjście audio | Tak |
| Głośniki | 2W x 2 |
| Mocowanie VESA | 100x100mm |
| Wymiary (z podstawką) | 725mm x 505mm x 207mm |
| Wymiary (bez podstawki) | 725mm x 432mm x 51mm |
| Waga (produktu) | 8.9 kilogramów |
| Pobór mocy | 47W (typical), 1W (standby) |
9. Gwarancja i wsparcie
Your JAPANNEXT JN-IPS321UHD monitor comes with a warranty. Please refer to the included warranty card for detailed terms and conditions, including the warranty period and coverage. Keep your proof of purchase for warranty claims.
For technical assistance, troubleshooting beyond this manual, or warranty inquiries, please contact JAPANNEXT customer support. Contact information can typically be found on the official JAPANNEXT webstronie internetowej lub na karcie gwarancyjnej dołączonej do produktu.