
1. Wprowadzenie
This manual provides essential information for the safe and efficient operation of your TOPBULL 40A MPPT Solar Charge Controller. This device is designed to optimize power harvesting from your solar panels and efficiently charge various battery types in 12V or 24V systems. It features advanced Maximum Power Point Tracking (MPPT) technology, comprehensive protection functions, and a user-friendly LCD interface.

Obraz 1: Przód view of the TOPBULL 40A MPPT Solar Charge Controller, showing the LCD display and control buttons.
2. Instrukcje bezpieczeństwa
Please read all safety instructions carefully before installation and operation. Failure to follow these instructions may result in personal injury or damage to the controller or other components.
- Przed podłączeniem zasilania należy upewnić się, że wszystkie połączenia są prawidłowe i bezpieczne.
- Nie rozmontowuj ani nie próbuj naprawiać kontrolera. W celu naprawy skontaktuj się z wykwalifikowanym personelem.
- Zainstaluj kontroler w dobrze wentylowanym pomieszczeniu, z dala od materiałów łatwopalnych i wilgoci.
- Zawsze podłączaj najpierw akumulator do kontrolera, następnie panel słoneczny, a na końcu obciążenie. Odłączaj w odwrotnej kolejności.
- Wear appropriate personal protective equipment, including eye protection, when working with batteries and electrical systems.
- The controller includes multiple electronic protections such as reverse polarity, overcharge, over-discharge, overload, short-circuiting, TVS lightning, overpower, reverse current, and overtemperature protection. However, proper installation is crucial for optimal safety.
3. Zawartość opakowania
Sprawdź, czy w opakowaniu znajdują się wszystkie elementy:
- TOPBULL 40A MPPT Solar Charge Controller
- Śruby montażowe
- Instrukcja obsługi (ten dokument)

Image 2: Contents of the product package, showing the controller, user manual, and mounting hardware.
4. Koniec produktuview
The TOPBULL 40A MPPT Solar Charge Controller features a clear LCD display and intuitive buttons for monitoring and configuration. It is equipped with terminals for solar panel input, battery connection, DC load output, and dual USB ports.
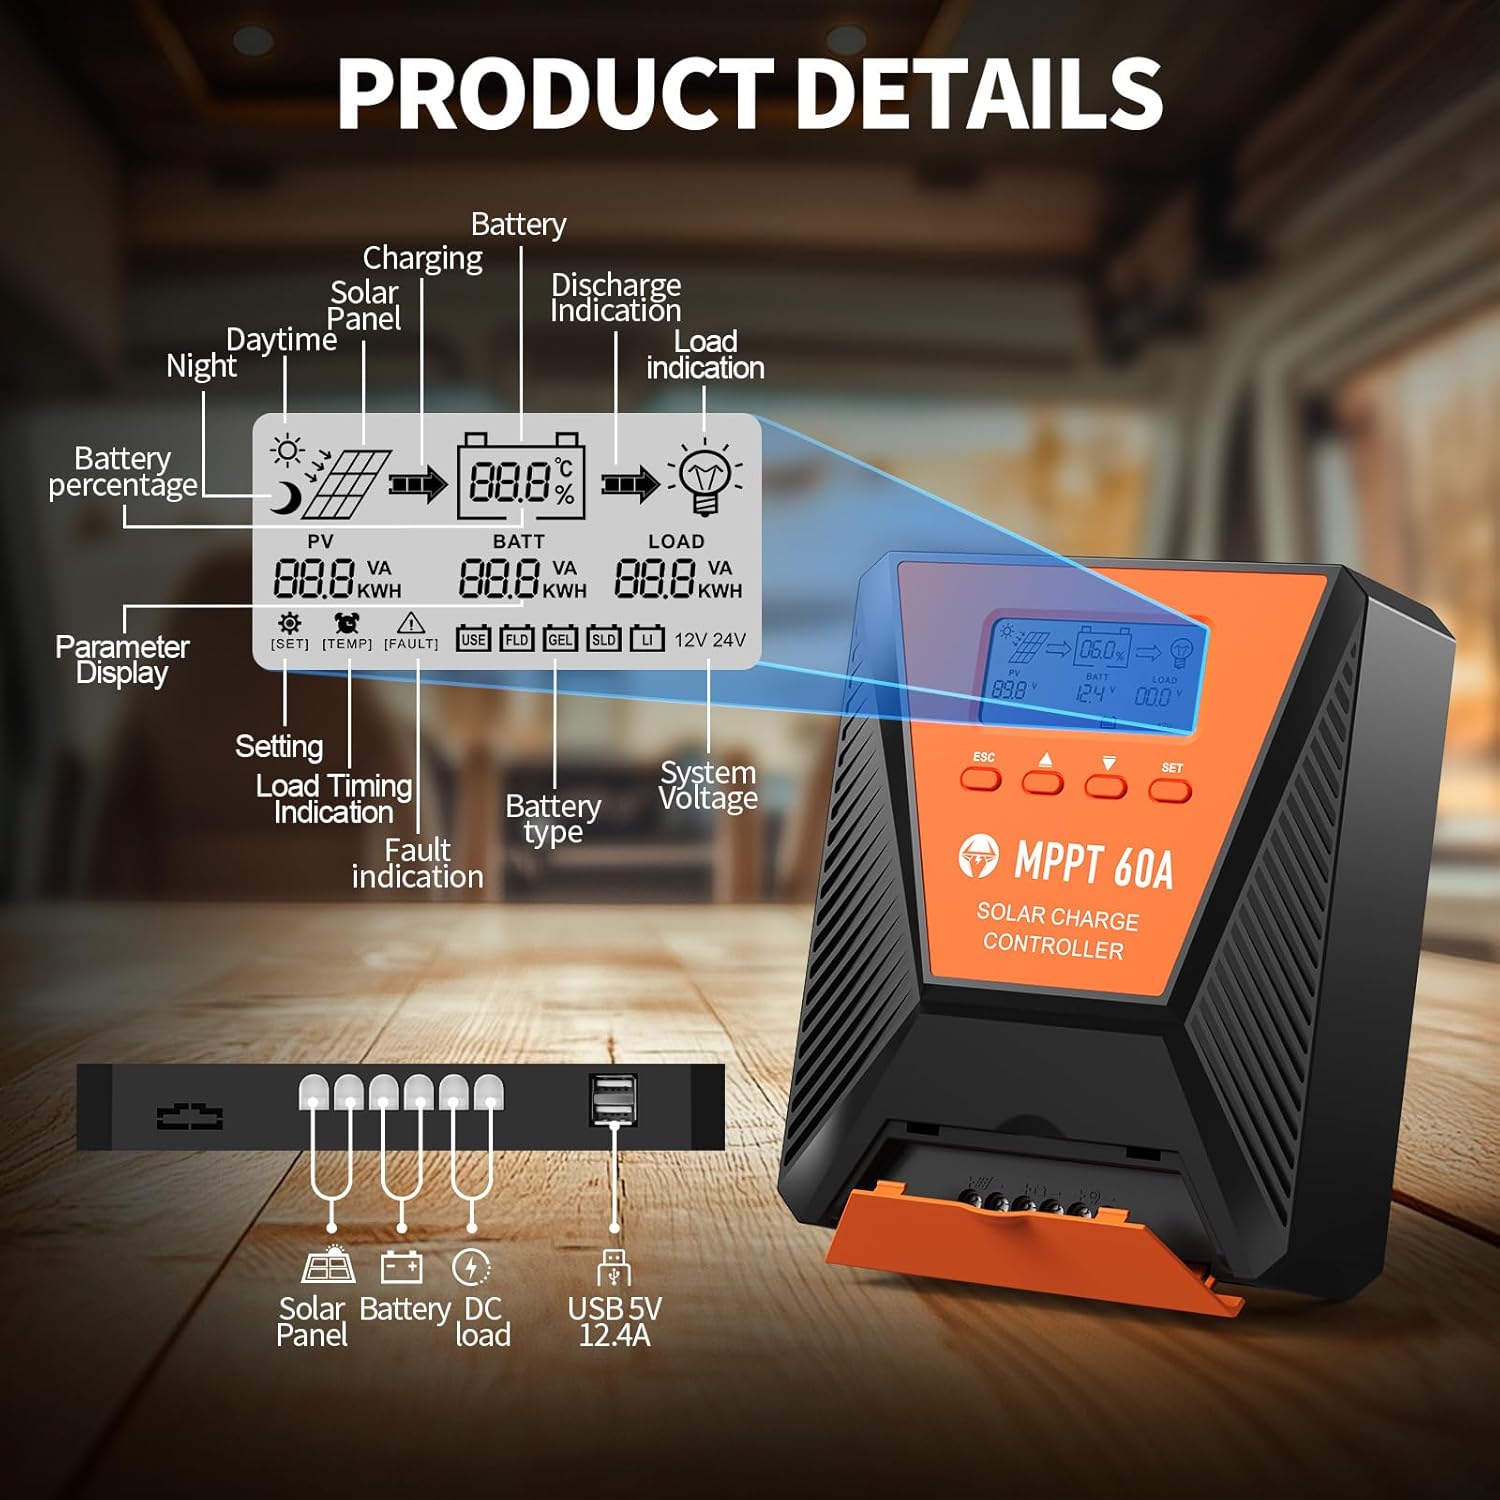
Rysunek 3: Szczegółowy view of the controller's LCD display, showing various indicators and parameters, along with the connection ports at the bottom.
Wskaźniki wyświetlacza LCD:
- Reporter: Panel słoneczny objtage i moc.
- AKUMULATOR: Pojemność bateriitage, charge status, and type.
- ZAŁADUJ: Load status and power.
- Procent bateriitage: Aktualny poziom naładowania baterii.
- Charging/Discharge Indication: Arrows indicating power flow.
- Wskazanie błędu: Error codes displayed if issues occur.
- Objętość systemutage: Automatically detected 12V or 24V.
Przyciski sterujące:
- ESC: Exit menu or cancel setting.
- Strzałki GÓRA/DÓŁ: Poruszaj się po menu lub zmieniaj wartości.
- ZESTAW: Enter menu or confirm setting.
5. Konfiguracja i instalacja
Aby prawidłowo zainstalować regulator ładowania słonecznego, wykonaj następujące czynności:
- Montowanie: Choose a suitable location for the controller, ensuring adequate ventilation and protection from direct sunlight, high temperatures, and moisture. Use the provided mounting screws to secure the controller.
- Podłączenie akumulatora: Connect the battery to the controller's battery terminals first. Ensure correct polarity (positive to positive, negative to negative). The controller will automatically detect the 12V or 24V system voltage.
- Podłączenie panelu słonecznego: Connect the solar panel to the controller's solar input terminals. Ensure correct polarity. The controller will begin charging the battery.
- Podłączenie obciążenia DC (opcjonalnie): Connect your DC loads to the load terminals. Ensure correct polarity.

Image 4: Connection diagram illustrating how to connect the solar panel, battery bank, inverter (for AC load), and DC load to the MPPT controller.
The controller supports various deep cycle battery types, including FLD, LiFePO4, SLD, GEL, and AGM. It also supports 0V lithium battery charging (lithium battery activation function).

Image 5: The controller is compatible with various 12V/24V battery types, automatically identifying voltage and supporting custom parameters and 0V lithium battery charging.
6. Instrukcja obsługi
LCD Display and Parameter Settings:
The LCD display provides real-time information about your solar charging system. Use the four buttons (ESC, UP, DOWN, SET) to navigate menus and adjust parameters.
- Naciskać USTAWIĆ aby wejść do menu głównego.
- Używać GÓRA/DÓŁ to scroll through options such as battery type, load timer settings, and other customizable parameters.
- Naciskać USTAWIĆ again to select an option and then use GÓRA/DÓŁ zmienić wartości.
- Naciskać USTAWIĆ to confirm changes, or ESC wyjść bez zapisywania.
Proces ładowania:
The controller utilizes a smart 4-stagProces ładowania optymalizujący stan i żywotność akumulatora:
- Ładunek zbiorczy: Szybkie ładowanie pozwalające naładować baterię do około 80% jej pojemności.
- Ładunek absorpcyjny: Charging at a constant voltage to bring the battery to 100% capacity.
- Opłata za pływak: Maintaining the battery at full charge with a lower voltage.
- Equalization Charge (for specific battery types): Periodically overcharging to balance cell voltagt.j.
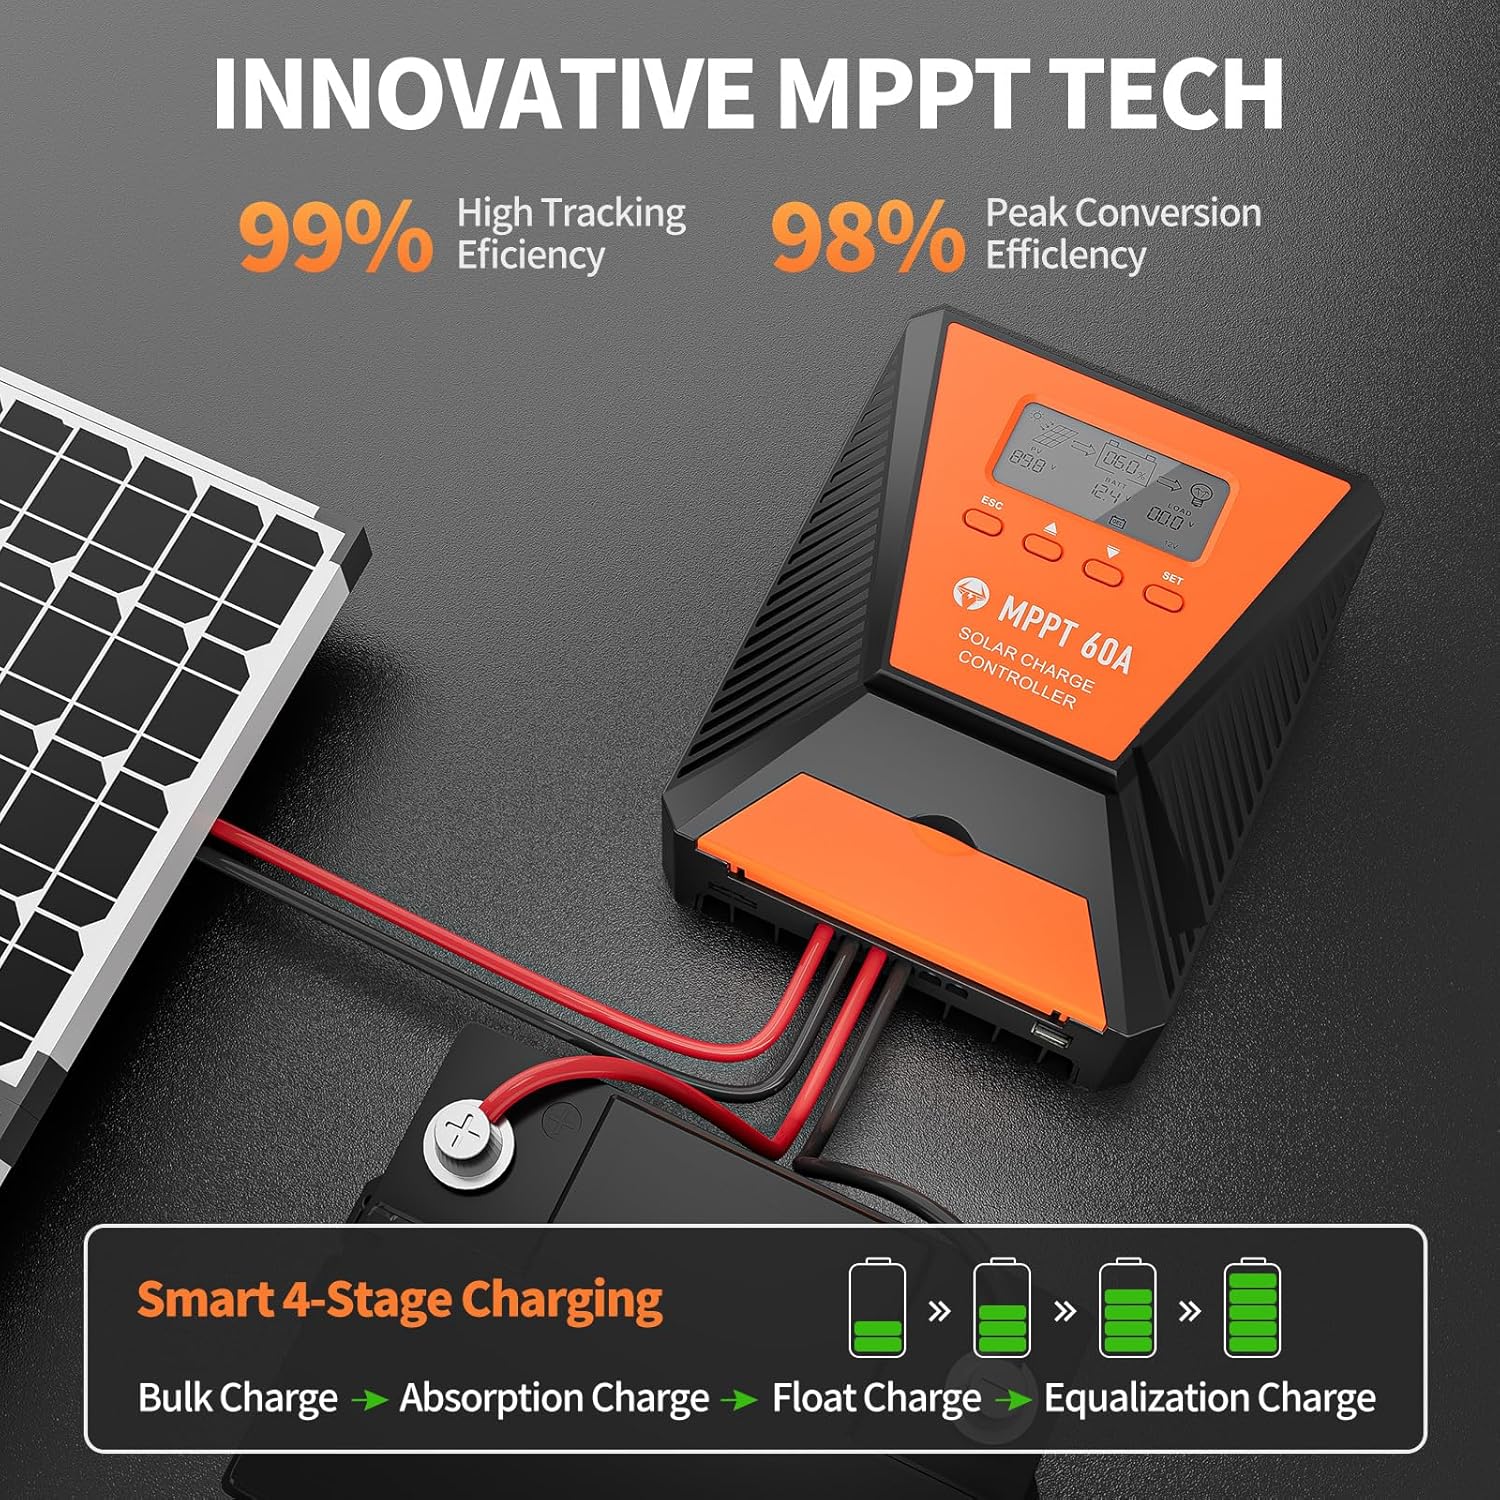
Image 6: The controller features 99% high tracking efficiency and 98% peak conversion efficiency, along with a smart 4-stagProces ładowania.
Ładowanie przez USB:
The controller includes dual USB ports for charging electronic devices. These ports provide 5V DC output.
7. Konserwacja
Regular maintenance ensures optimal performance and extends the lifespan of your solar charge controller and battery system.
- Sprawdź połączenia: Okresowo sprawdzaj wszystkie połączenia przewodów pod kątem szczelności i korozji.
- Wyczyść kontroler: Utrzymuj kontroler w czystości, bez kurzu i zanieczyszczeń. Do czyszczenia używaj suchej ściereczki.
- Wentylacja: Ensure the installation area remains well-ventilated to prevent overheating. The controller is designed with a metal case and dual high-speed intelligent fans for enhanced heat dissipation.
- Kontrola baterii: Należy przestrzegać wskazówek producenta dotyczących konserwacji konkretnego typu akumulatora.
- Kompensacja temperatury: The controller features a temperature compensation function that automatically adjusts charging and discharging parameters to prolong battery life.
8. Rozwiązywanie Problemów
If you encounter issues with your controller, refer to the LCD display for error codes and consult the following common troubleshooting steps:
- Brak wyświetlacza: Sprawdź połączenia akumulatora i upewnij się, że akumulator ma wystarczającą pojemność.tage.
- Brak ładowania: Verify solar panel connections and ensure adequate sunlight. Check for any fault indications on the LCD.
- Ładowanie nie działa: Check load connections and ensure the load is within the controller's rated capacity. Verify load timer settings.
- Kody błędów: The LCD display will show specific error codes for various issues (e.g., overvoltage, podobjtage, overtemperature, short circuit). Refer to the controller's internal error code list (if provided in a separate document) for detailed explanations and solutions.
The controller incorporates 9 intelligent protection features to safeguard your system:

Image 7: The controller provides 9 intelligent protection features, including protection against reverse polarity, overcharging, over-discharging, overload, short-circuiting, TVS lightning, overpower, reverse current, and overtemperature.
9. Specyfikacje
| Funkcja | Specyfikacja |
|---|---|
| Model | 40A |
| Marka | TOPBULL |
| Objętość systemutage | 12V/24V Automatic Recognition |
| Wydajność śledzenia | >99% |
| Maksymalna wydajność konwersji | Maksymalnie 98% |
| Kompatybilne typy baterii | FLD, LiFePO4, SLD, GEL, AGM |
| Maks. Objętość wejścia PVtage | 100V prądu stałego |
| Max Solar Input Power (12V System) | 720 W |
| Max Solar Input Power (24V System) | 1440 W |
| Wyjście USB | Dual USB Ports, 5V DC |
| Typ wyświetlacza | LCD |
| Wymiary (pakiet) | Wymiary 23.6 x 22.1 x 10.59 cm |
| Waga (opakowanie) | 1.25 kilogramów |
| Dołączone akcesoria | Śruby montażowe |
10. Gwarancja i wsparcie
TOPBULL is committed to providing professional technical support. If you have any questions or require assistance with your MPPT solar charge controller, please contact our customer service. We strive to meet your needs and provide the best possible support.