1. Ważne informacje dotyczące bezpieczeństwa
WARNING: Ozone is a powerful oxidant and can be harmful if inhaled.
- Use in Unoccupied Spaces ONLY: This ozone generator must only be operated in spaces that are completely free of humans, pets, and plants.
- Wentylacja: After each treatment cycle, ensure the treated area is thoroughly ventilated for at least 30 minutes to several hours before re-entry. The ozone smell should dissipate before re-occupying the space.
- No Entry Sign: Always use the provided 'NO ENTRY' sign on the door of the treated area to prevent accidental entry.
- Umieszczenie: Do not place the unit near furnace intake vents or in areas where air circulation is restricted.
Failure to follow these safety instructions can result in serious health risks.

Image: The 'NO ENTRY' sign provided with the ONAMOR Digital Ozone Generator, to be used during operation for safety.
2. Koniec produktuview
The ONAMOR Digital Ozone Generator is designed for high-capacity odor removal in various environments, including homes, cars, basements, and offices. It utilizes ozone (O3) to neutralize tough odors caused by smoke, pets, cooking, and more.
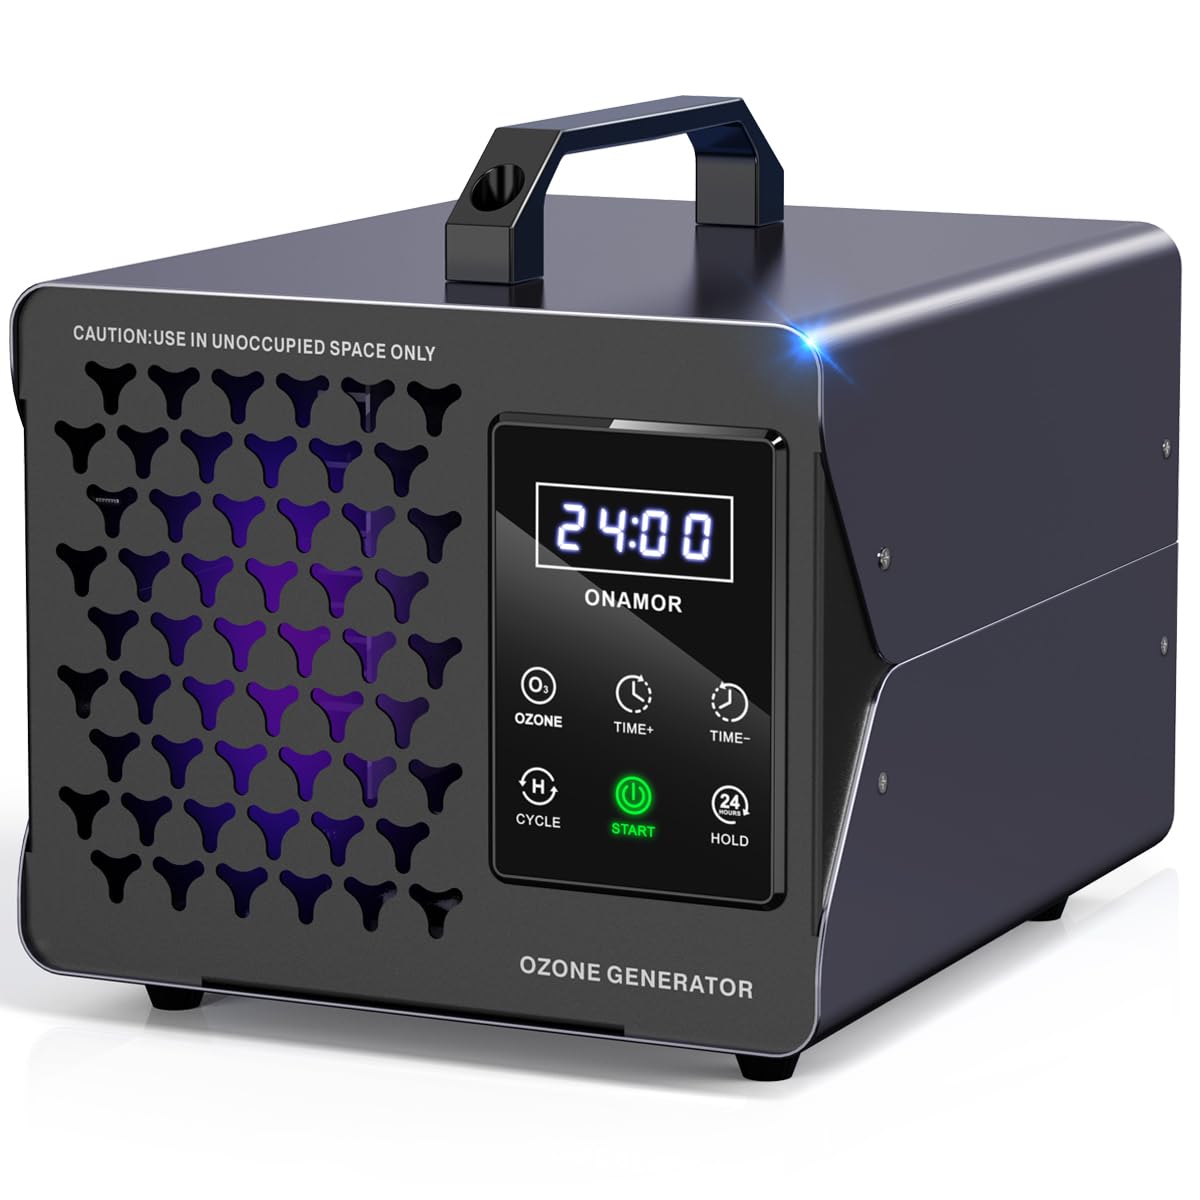
Image: The ONAMOR Digital Ozone Generator, a compact and portable device for odor elimination.
Główne cechy:
- Intuicyjne sterowanie dotykowe: Features six buttons and a user-friendly digital display for easy operation.
- Elastyczne ustawienia timera: Adjustable timer from 0-24 hours in 5-minute increments, with a 'Cycle' function for half-hour intervals.
- Strong Ozone Output: Generates 180,000 mg/h of ozone, capable of treating spaces up to 8,000 square feet.
- Mocny wentylator: Equipped with a 2600 RPM fan for rapid ozone diffusion, cleaning 100 sq. ft. in approximately 7 minutes.
- Trwała konstrukcja: Robust all-aluminum alloy shell with an independent ozone module, upgraded ceramic ozone plate, and three replaceable fuses.
- 5-sekundowe opóźnienie startu: Provides a brief delay after setting to allow users to leave the treatment area safely.
- Post-Treatment Fan Circulation: For cycles over 30 minutes, ozone generation stops 5 minutes before the end, while the fan continues to circulate to help dissipate residual ozone odor.
3. Zawartość opakowania
Upon unpacking your ONAMOR Digital Ozone Generator, please ensure all items listed below are present:
- 1 x ONAMOR Digital Ozone Generator (Grey)
- 1 x kabel zasilający AC (1.5 m)
- 1 x Instrukcja obsługi
- 1 x Warning Card ('NO ENTRY' door hanger)
- 3 x Glass Fuses (preinstalled, plus spares)
- 1 x Ceramic Ozone Plate (preinstalled)
- 1 x Washable Stainless Filter (preinstalled)

Image: All items included in the ONAMOR Digital Ozone Generator package.
4. Konfiguracja
- Przygotuj obszar: Remove all humans, pets, and plants from the room or vehicle to be treated.
- Clean Odor Source: For best results, clean or remove the source of the odor as much as possible before ozone treatment.
- Umieszczenie: Place the ozone generator in a central location within the treatment area, ensuring it is on a stable, flat surface. Avoid placing it directly against walls or furniture to allow for optimal air circulation.
- Podłącz zasilanie: Plug the AC power cable into the generator and then into a standard electrical outlet.
- Zabezpiecz obszar: Close all windows and doors in the treatment area. Place the 'NO ENTRY' warning card on the door handle.

Image: Visual guide for the four-step process of using the ozone generator.
5. Instrukcja obsługi
Panel sterowania nadview:
- Wyświetlacz cyfrowy: Shows current time settings.
- Przycisk OZONE: Short press to turn ozone generation ON/OFF.
- TIME+ / TIME- Buttons: Adjust treatment time in 5-minute increments. Long press for quick settings.
- Przycisk CYKL: Quickly set 30-minute interval cycles (e.g., 3H, 6H, 9H, etc.).
- Przycisk Start: Short press to pause/start operation. Long press to turn the unit ON/OFF.
- Przytrzymaj przycisk: Activates 24-hour continuous operation.

Obraz: Szczegółowy view panelu sterowania dotykowego i jego funkcji.
Rozpoczęcie operacji:
- Włączanie: Long press the 'START' button to turn the unit on.
- Ustaw czas leczenia: Use the 'TIME+' or 'TIME-' buttons to set the desired treatment duration. Refer to the 'Recommended Operating Times' table below. For continuous operation, press 'HOLD'. For interval cycles, press 'CYCLE'.
- Initiate Cycle: Short press the 'START' button to begin the ozone generation. The unit will emit a 5-second delay buzzer, allowing you time to safely exit the area.
- Exit the Area: Immediately leave the treated space and ensure no one enters until the cycle is complete and the area has been thoroughly ventilated.
Zatrzymywanie operacji:
- The unit will automatically shut off after the set time has elapsed.
- To manually stop the unit, long press the 'START' button.
Video Guide: How to Operate
Video: A step-by-step guide on how to operate the ONAMOR Digital Ozone Generator, including setting the timer and starting the ozone treatment.
6. Recommended Operating Times
The optimal treatment time depends on the size of the area and the intensity of the odor. The following table provides general recommendations:
| Rozmiar obszaru | Zalecany czas |
|---|---|
| 100 stóp kwadratowych | 7 minut |
| 200 stóp kwadratowych | 15 minut |
| 300 stóp kwadratowych | 30 minut |
| 500 stóp kwadratowych | 60 minut |
| 1000 stóp kwadratowych | 90 minut |
| 1500 stóp kwadratowych | 120 minut |
| 2000 stóp kwadratowych | 150 minut |
| 3000 stóp kwadratowych | 180 minut |
| 8000 stóp kwadratowych | HOLD (Continuous) |
Notatka: Always ensure the space is unoccupied during treatment. Adjust times based on odor severity and ventilation capabilities.

Image: Recommended operating times for various area sizes.
7. Konserwacja
Regular maintenance ensures optimal performance and longevity of your ozone generator.
Czyszczenie filtra powietrza:
The unit is equipped with a washable stainless steel filter to block impurities. Clean it regularly, especially in dusty environments.
- Odłącz urządzenie od źródła zasilania.
- Locate the fan cover on the back of the unit.
- Carefully remove the fan cover and the stainless steel filter.
- Wash the filter with water and mild soap. Rinse thoroughly and allow it to dry completely before reinstallation.
- Reattach the filter and fan cover.

Image: Instructions for detaching and cleaning the fan filter.
Wymiana bezpieczników:
The unit comes with three replaceable fuses for added dependability.
- Odłącz urządzenie od źródła zasilania.
- Locate the fuse compartment next to the power inlet on the back of the unit.
- Use a small flat-head screwdriver to gently pry open the fuse compartment.
- Remove the old fuse and replace it with a new one (ensure it's the correct rating).
- Dokładnie zamknij komorę bezpieczników.
Replacing Ozone Plate:
The ceramic ozone plate is designed for long life but may require replacement over time. Consult the full user manual for detailed instructions on replacing the ozone plate.
8. Rozwiązywanie Problemów
If you encounter issues with your ONAMOR Digital Ozone Generator, refer to the following common troubleshooting steps:
- Urządzenie nie włącza się:
- Ensure the power cable is securely plugged into both the unit and a working electrical outlet.
- Check the fuses. Replace if blown (refer to Maintenance section).
- Ensure the 'START' button is long-pressed to power on the unit.
- No Ozone Output:
- Verify that the ozone generation is activated via the 'OZONE' button and the timer is set.
- Check if the ceramic ozone plate is clean and properly installed.
- Weak Odor Removal:
- Increase the treatment time or consider a 'HOLD' (continuous) cycle for severe odors.
- Ensure the room is properly sealed during treatment.
- Clean the air filter and ozone plate.
For further assistance, please contact ONAMOR customer support.
9. Specyfikacje
| Funkcja | Szczegół |
|---|---|
| Numer modelu | NM-009D-Grey-01 |
| Wyjście ozonu | 180,000 mg/godz. |
| Obszar zasięgu | Do 8,000 stóp kwadratowych. |
| Źródło zasilania | prąd zmienny (110-120 V) |
| Cotage | 100 watów |
| Metoda kontroli | Dotykać |
| Zakres timera | 0–24 godzin (przyrosty 5-minutowe) |
| Prędkość wentylatora | 2600 obr./min. |
| Poziom hałasu | 45 decybeli |
| Wymiary produktu | 8.3 x 6 x 7.1 cala |
| Waga przedmiotu | 3.2 funtów |
| Kolor | Szary |
| Certyfikaty | Certyfikat FCC |

Image: Key specifications and dimensions of the ONAMOR Digital Ozone Generator.
10. Gwarancja i wsparcie
ONAMOR is committed to providing reliable products and excellent customer service. We have specialized in ozone machine manufacturing for over 7 years.
If you have any questions or concerns regarding your ONAMOR Digital Ozone Generator, please do not hesitate to reach out to our customer support team. We aim to provide a satisfactory solution within 24 hours.
Notatka: This product is not for sale in California.