1. Wprowadzenie
Thank you for choosing the XIAOMI Flexible Rechargeable LampNiniejsza instrukcja zawiera podstawowe informacje dotyczące bezpiecznego i efektywnego użytkowania nowego urządzenia.ampPrzed rozpoczęciem użytkowania należy uważnie przeczytać instrukcję i zachować ją do wykorzystania w przyszłości.

Figure 1: XIAOMI Flexible Rechargeable Lamp
2. Informacje dotyczące bezpieczeństwa
- Do not disassemble, repair, or modify the lamp się.
- Utrzymaj lamp away from water, moisture, and high temperatures.
- Do ładowania należy używać wyłącznie dołączonego kabla ładującego lub certyfikowanego kabla USB-C.
- Unikaj bezpośredniego, długotrwałego wystawiania oczu na działanie źródła światła.
- Produkt i baterię należy utylizować zgodnie z lokalnymi przepisami.
3. Zawartość opakowania
Sprawdź, czy w opakowaniu znajdują się wszystkie elementy:
- XIAOMI Elastyczny akumulator Lamp Jednostka
- Lamp Opierać
- Clamp Załącznik
- Kabel ładujący USB-C
- Instrukcja obsługi (ten dokument)
4. Koniec produktuview
The XIAOMI Flexible Rechargeable Lamp is designed for versatile illumination, functioning as a desk lamp, clip-on lamp, or handheld light source. It features a magnetic attachment for easy angle adjustment and multiple lighting modes.

Figure 2: Versatile Usage Modes

Figure 3: Design Details (Charging Port, Button, Anti-slip Strip)
5. Konfiguracja
- Opłata początkowa: Przed pierwszym użyciem należy całkowicie naładować akumulator.amp using the provided USB-C cable. Connect the cable to the lamp's Type-C port and a compatible USB power adapter (not included). The battery status indicator will show charging progress.
- Assembly (Desk Lamp): Umieść lamp unit onto the circular lamp base. The magnetic connection will secure it.
- Assembly (Clip-on Lamp): Podłącz clamp accessory to a suitable surface (e.g., desk edge, shelf). Then, magnetically attach the lamp unit to the designated area on the clamp.
6. Instrukcja obsługi
6.1 Włączanie/wyłączanie i wybór trybu
- Krótkie naciśnięcie: Briefly press the power button to turn the lamp Włączone lub wyłączone.
- Długie naciśnięcie: Press and hold the power button to cycle through the four available lighting modes.

Rysunek 4: Cztery tryby oświetlenia
6.2 Regulacja kąta
Lamp head is attached magnetically, allowing for flexible positioning:
- Obrót pionowy: Dostosuj lamp head up or down by up to 180 degrees.
- Obrót poziomy: Obróć lamp head horizontally by up to 360 degrees.
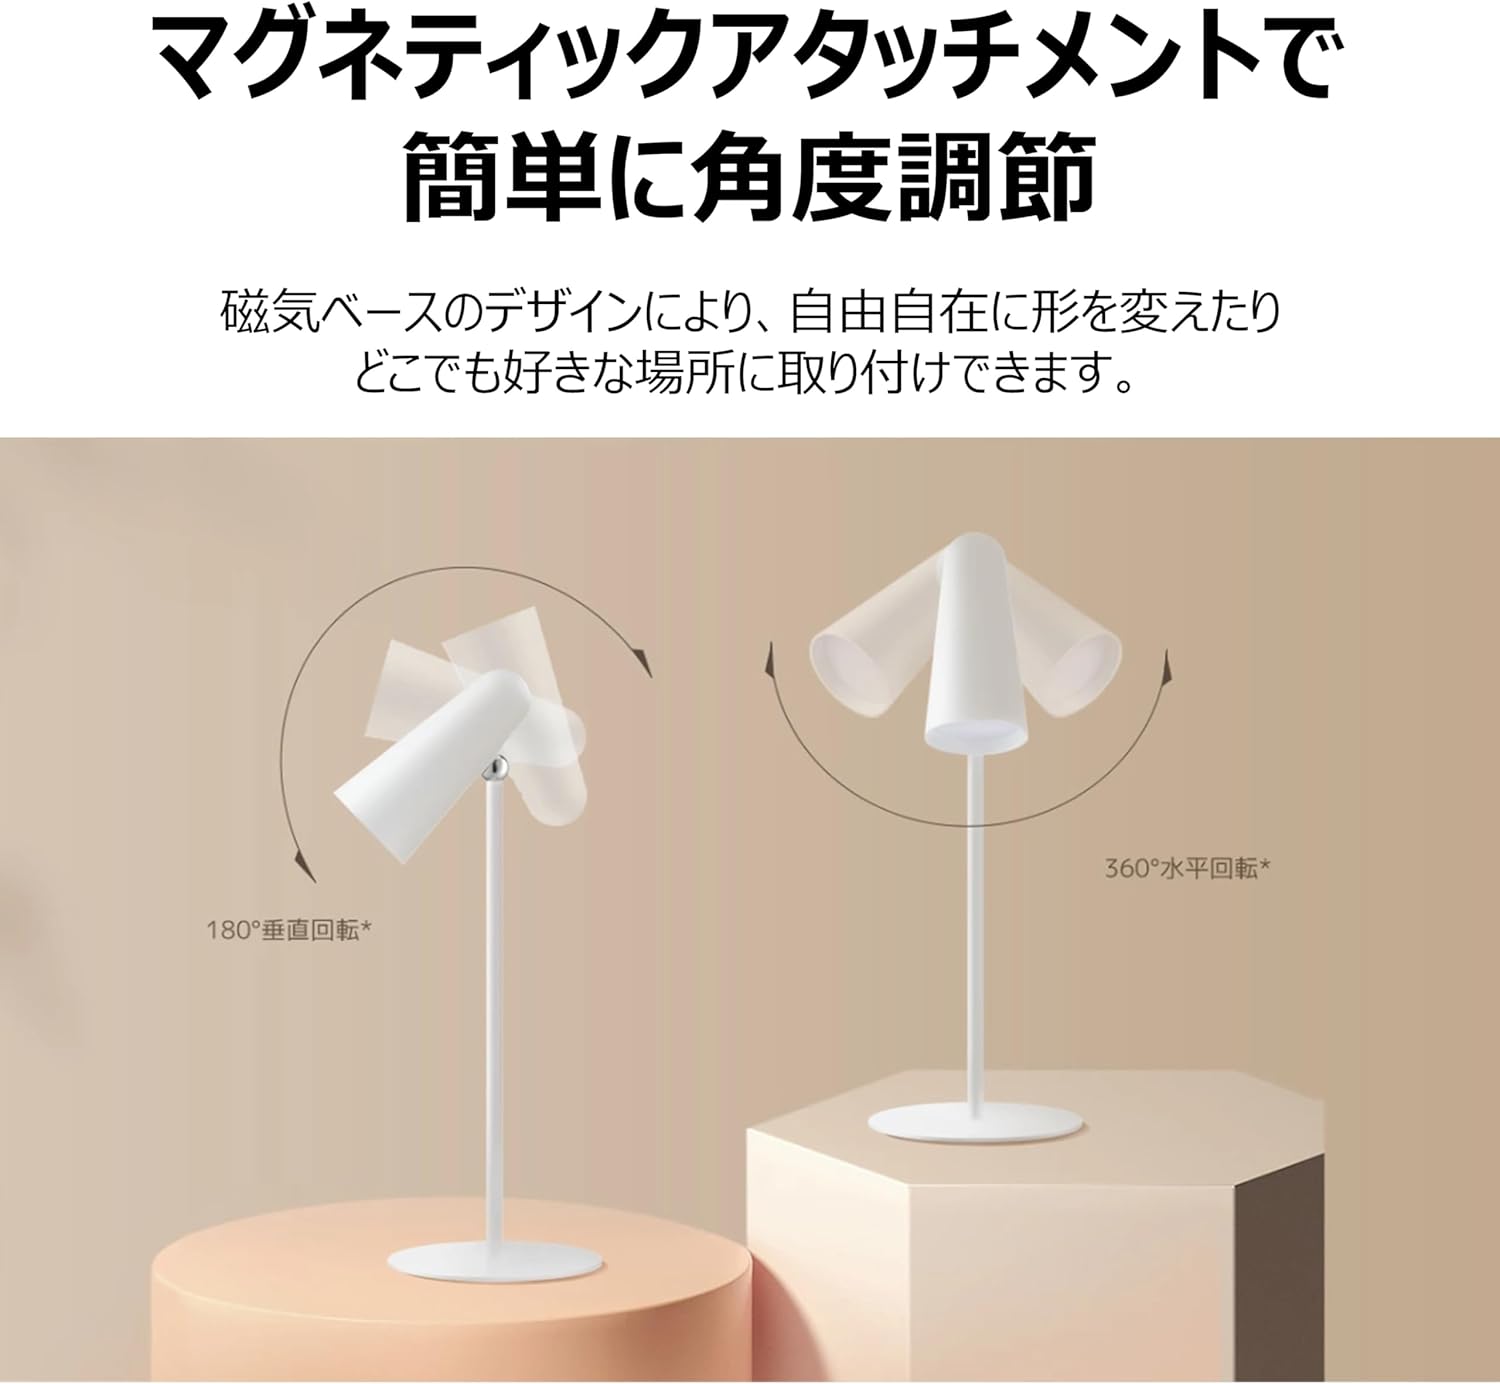
Figure 5: Magnetic Angle Adjustment
6.3 Ładowanie
Podłącz lamp to a power source using the USB-C cable. The lamp maintains consistent brightness even while charging. A full charge provides over 40 hours of illumination at the lowest brightness setting.

Figure 6: Charging the Lamp
7. Konserwacja
- Czyszczenie: Wytrzyj lamp miękką, suchą ściereczką. Nie używaj środków czyszczących o właściwościach ściernych ani rozpuszczalników.
- Składowanie: Przechowuj lamp w chłodnym i suchym miejscu, jeżeli nie jest używany przez dłuższy czas.
- Pielęgnacja baterii: Aby przedłużyć żywotność baterii, należy unikać jej całkowitego rozładowania.amp frequently. Charge it regularly, even if not in constant use.
8. Rozwiązywanie Problemów
| Problem | Możliwa przyczyna | Rozwiązanie |
|---|---|---|
| Lamp nie włącza się | Niski poziom naładowania baterii; przycisk zasilania nie został prawidłowo naciśnięty | Naładuj lamp; Ensure a firm short press on the power button. |
| Lamp nie ładuje się | Wadliwy kabel lub adapter; Luźne połączenie | Check USB-C cable and adapter; Ensure connections are secure; Try a different cable/adapter. |
| Światło jest słabe lub migocze | Niski poziom baterii | Naładuj lamp w pełni. |
| Magnetic attachment feels loose | Lamp not properly seated on base/clamp | Re-seat the lamp unit firmly onto the magnetic base or clamp. |
9. Specyfikacje
| Funkcja | Specyfikacja |
|---|---|
| Numer modelu | BHR8959GL |
| Wymiary (gł. x szer. x wys.) | 4.72" x 2.21" x 11.42" |
| Waga przedmiotu | 14.1 uncji (400 grama) |
| Źródło zasilania | Zasilanie bateryjne (litowo-jonowe) |
| Żywotność baterii | Up to 40 Hours (lowest brightness) |
| Typ źródła światła | PROWADZONY |
| Cotage | 5 watów |
| Tomtage | 5 wolty |
| Tworzywo | Plastic (Acrylonitrile Butadiene Styrene base) |
| Metoda kontroli | Touch (Magnetic Switch) |
| Wskaźnik oddawania barw (CRI) | Ra90 |
| Zawarte komponenty | Stand, Clamp |
10. Gwarancja i wsparcie
This XIAOMI product is covered by a limited warranty. For detailed warranty terms and conditions, please refer to the warranty card included with your purchase or visit the official XIAOMI webstrona.
For technical support, troubleshooting assistance, or service inquiries, please contact XIAOMI customer support through their official channels. Contact information can typically be found on the XIAOMI webwitryny lub dokumentacji zakupu.