1. Wprowadzenie
This manual provides comprehensive instructions for the safe and efficient operation, maintenance, and troubleshooting of your Hanchen Automatic Weight-Based Filling Machine, model HT-622-MLY. Please read this manual thoroughly before using the machine to ensure proper function and longevity.
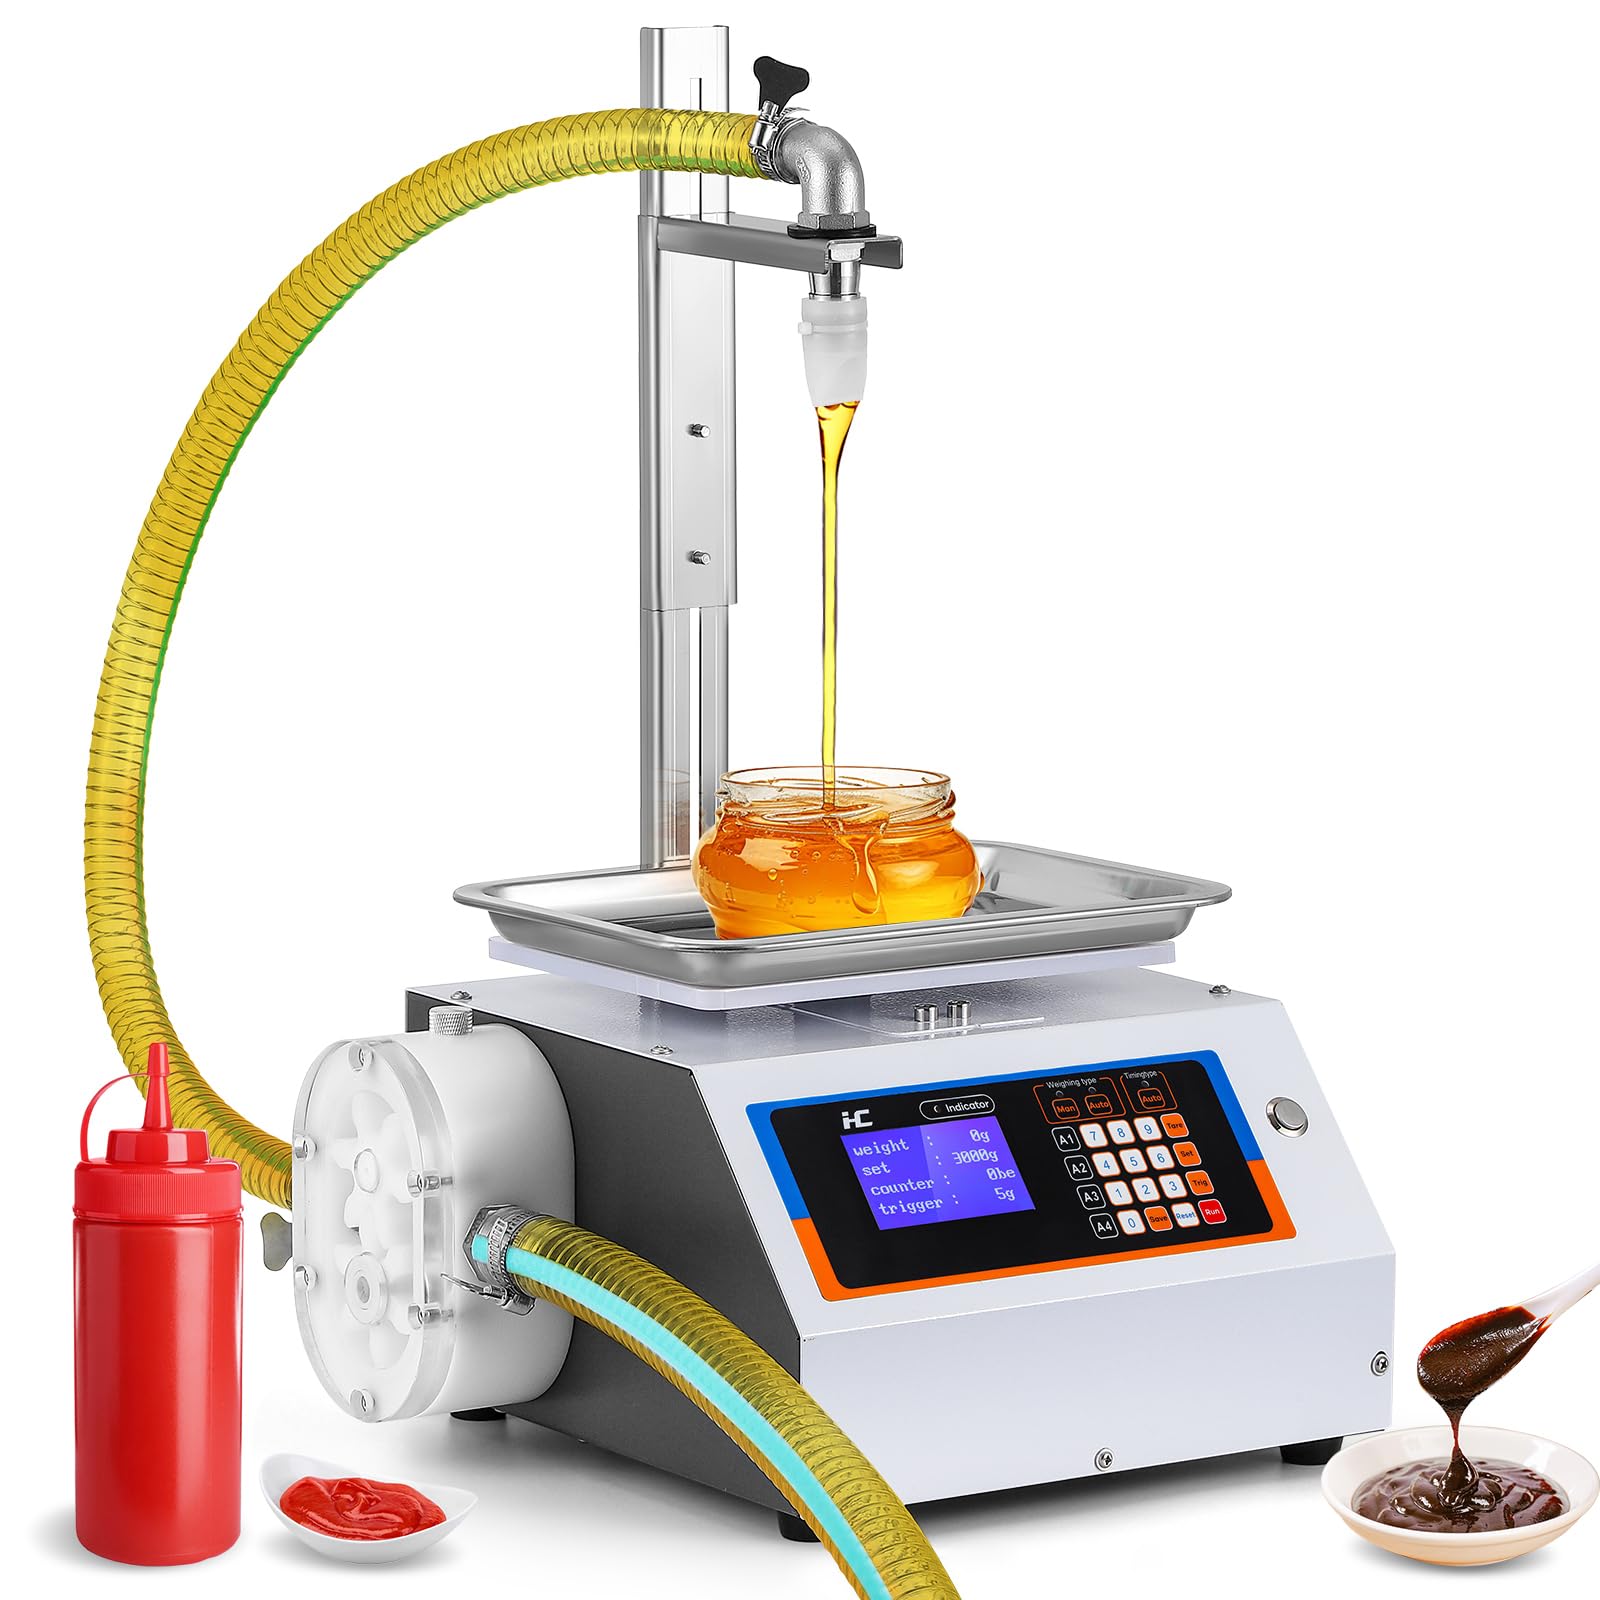
Image 1.1: The Hanchen Automatic Weight-Based Filling Machine in operation, filling honey into a jar.
2. Informacje dotyczące bezpieczeństwa
Przestrzeganie tych wytycznych bezpieczeństwa jest kluczowe dla uniknięcia obrażeń ciała i uszkodzenia maszyny.
- Always read and understand all instructions in this manual before operating the machine.
- Ensure the machine is connected to a properly grounded electrical outlet with the correct voltage.
- Nie używaj this machine with corrosive liquids (e.g., strong acids or alkalis), thin liquids (e.g., water, wine, glass cleaner), pastes (e.g., toothpaste), or liquids containing solid particles (e.g., juice with pulp). This machine is designed for viscous liquids.
- Keep hands, hair, and loose clothing clear of all moving parts during operation.
- Disconnect the power supply before performing any cleaning, maintenance, or troubleshooting.
- Operate the machine in a well-ventilated area to prevent motor overheating.
- Do not attempt to modify the machine. Use only original replacement parts.
3. Koniec produktuview
3.1 Główne cechy
- Weight-Based Filling: Ensures precise and consistent filling volumes for each container.
- Działanie automatyczne: Automatically starts filling when a bottle is placed, tares the container weight, and stops when the target weight is reached.
- Przechowywanie danych: Ability to store up to four different filling parameter sets for quick recall.
- Dysza zapobiegająca kapaniu: Prevents leakage and ensures clean filling.
- Responsive Weight Sensor: Minimizes errors and enhances filling accuracy.
- Easy-to-Replace Tube Design: Simplifies maintenance and cleaning of the liquid path.
- Tryb czyszczenia: Reverses the pump to clear tubing of residual material.

Image 3.1: Key components for precise filling: anti-drip nozzle, weigh pan, and speed control knob.
3.2 Składniki
The main components of the Hanchen Automatic Weight-Based Filling Machine include:
- Discharge Nozzle: Where the liquid exits into the container.
- Regulowane wsparcie: Holds the discharge nozzle and allows height adjustment.
- Outlet Tubing: Connects the gear pump to the discharge nozzle.
- Weigh Pan: Platform for placing containers to be filled, integrated with the weight sensor.
- Panel sterowania: User interface for setting parameters and controlling operation.
- Przycisk WŁ./WYŁ.: Główny wyłącznik zasilania.
- Gear Pump: Drives the liquid through the tubing.
- Inlet Tubing: Connects the liquid source to the gear pump.

Image 3.2: Labeled diagram of the Hanchen Automatic Weight-Based Filling Machine components.
3.3 Liquid Compatibility
This machine is suitable for viscous liquids with a temperature up to 212 ℉ (100 ℃). Exampobejmują:
- Miód
- Olej
- Proszek do prania
- Ketchup
- Sauces (e.g., barbecue sauce, oyster sauce)
- Jogurt
- Shampoo
- Smary
Nie nadaje się dla:
- Thin, water-like products (e.g., wine, glass detergent)
- Corrosive liquids (e.g., strong acid or alkaline solutions)
- Pastes (e.g., toothpaste)
- Liquids with particles (e.g., juice with pulp)

Image 3.3: Visual guide to liquid compatibility for the filling machine.
4. Specyfikacje
| Specyfikacja | Wartość |
|---|---|
| Numer modelu | HT-622-MLY |
| Waga przedmiotu | 31.9 funtów (14.47 kg) |
| Wymiary opakowania | 19 x 16.5 x 13.5 cala (48.26 x 41.91 x 34.29 cm) |
| Producent | Hanczen |
| ASIN | B0DFB38GLB |
| Data pierwszej dostępności | 27 sierpnia 2024 r. |
5. Konfiguracja
- Rozpakuj komponenty: Ostrożnie wyjmij wszystkie elementy z opakowania. Sprawdź, czy wszystkie części są zgodne z listą przewozową.
- Assemble Support and Nozzle: Attach the adjustable support rod to the main unit. Secure the discharge nozzle to the adjustable support.
- Podłącz rurkę: Connect one end of the inlet tubing to your liquid source and the other end to the inlet port of the gear pump. Connect the outlet tubing from the gear pump's outlet port to the discharge nozzle. Ensure all tubing connections are tight and secure to prevent leaks.
- Place Weigh Pan: Position the weigh pan securely on the designated area of the machine.
- Podłączenie zasilania: Plug the power cord into the machine and then into a suitable electrical outlet.
6. Działanie
6.1 Panel sterowania ponadview
The control panel allows you to configure filling parameters. It features a display screen, numeric keypad, and function buttons.

Image 6.1: The control panel for setting and monitoring filling operations.
6.2 Proces napełniania
- Włączanie: Naciśnij przycisk WŁ./WYŁ., aby włączyć urządzenie.
- Select Weighing Type: On the control panel, select the "Weighting type" mode. For automatic weight-based filling, choose "Auto".
- Set Target Weight: Use the numeric keypad to enter your desired fill weight. This is the weight of the liquid you want in each container.
- Funkcja tary: Place an empty container on the weigh pan. Press the "Tare" button on the control panel to zero the scale. This ensures only the liquid's weight is measured.
- Dostosuj prędkość napełniania: Use the speed knob located on the side of the machine to adjust the flow rate. A slower speed is recommended for highly viscous liquids or smaller containers to prevent splashing and ensure accuracy.
- Start Filling: Place a container on the weigh pan. The machine will automatically detect the container, perform an automatic tare, and begin dispensing liquid until the preset target weight is reached. The filling process will then automatically stop.
- Store Data (Optional): The machine allows you to store up to four different sets of filling parameters (A1-A4) for quick access. Refer to the control panel instructions for saving and recalling these settings.
7. Czyszczenie i konserwacja
Regular cleaning and maintenance ensure the longevity and hygienic operation of your filling machine.
7.1 Tryb czyszczenia
The machine features a dedicated cleaning mode:
- After completing your filling tasks, activate the cleaning mode via the control panel.
- In cleaning mode, the gear pump will reverse its direction, effectively discharging any remaining material from the inlet and outlet tubing back into your source container. This minimizes waste and simplifies the cleaning of the liquid path.
- Follow up by running a suitable cleaning solution (e.g., warm water for honey, or a food-grade sanitizer) through the system in cleaning mode, then rinse thoroughly with clean water.

Image 7.1: Illustration of the gear pump's reverse action during cleaning mode.
7.2 Wymiana rurki
The inlet and outlet tubes are designed for easy replacement without requiring disassembly of the pump head. Regularly inspect the tubing for signs of wear, cracks, or discoloration. Replace tubes as needed to maintain hygiene and prevent leaks.
7.3 Ogólne czyszczenie
- Wytrzyj zewnętrzną część urządzenia miękką szmatką.amp płótno. Unikaj stosowania ściernych środków czyszczących i rozpuszczalników.
- Ensure the weigh pan is kept clean and free of spills or debris, as this can affect weighing accuracy.
- Nie zanurzaj jednostki głównej w wodzie lub innym płynie.
- When not in use, store the machine in a dry, clean environment away from direct sunlight and extreme temperatures.
8. Rozwiązywanie Problemów
This section addresses common issues you might encounter with your filling machine.
| Problem | Możliwa przyczyna | Rozwiązanie |
|---|---|---|
| Maszyna się nie włącza | Power cord disconnected; ON/OFF switch off; power outlet issue | Check power cord connection. Ensure ON/OFF switch is in the 'ON' position. Test power outlet with another device. |
| Inaccurate filling volume | Weigh pan obstructed; incorrect tare; incorrect target weight setting; liquid viscosity change | Ensure weigh pan is clean and clear. Re-tare the scale with an empty container. Verify target weight setting. Adjust speed knob for liquid viscosity. |
| Liquid not flowing or slow flow | Tubing kinked or blocked; pump not connected; liquid too viscous or incompatible | Check tubing for kinks or blockages. Ensure pump is properly connected and running. Confirm liquid compatibility (refer to Section 3.3). Adjust speed knob. |
| Dripping from nozzle | Anti-drip nozzle dirty or improperly installed; worn nozzle seal | Clean the anti-drip nozzle. Ensure it is securely installed. Inspect and replace nozzle seal if worn. |
| Przegrzanie maszyny | Cooling fan obstructed; prolonged heavy use in poor ventilation | Ensure cooling fan vents are clear. Operate in a well-ventilated area. Allow machine to cool down if used continuously for extended periods. |
9. Wsparcie
For technical assistance, replacement parts, or repair services, please contact Hanchen customer support. Our dedicated team provides after-sales support with a response within 24 hours. Repair services are available at our repair warehouse located in the United States.
Please have your model number (HT-622-MLY) and ASIN (B0DFB38GLB) ready when contacting support to ensure efficient service.