1. Instrukcje bezpieczeństwa
Please read and understand all safety information before operating this product. Failure to follow these instructions may result in electric shock, fire, or serious injury.
- Use this device exclusively with compatible Ryobi 18V Lithium-Ion batteries. Do not attempt to use with Ni-Cd or Ni-MH batteries, as this may cause damage to the device or battery.
- Do not expose the device to rain, moisture, or extreme temperatures. Operate within the recommended ambient temperature range of 5°C to 40°C (41°F to 104°F).
- Avoid dropping or subjecting the device to strong impacts. If the device is damaged, do not use it.
- Nie rozmontowuj, nie modyfikuj ani nie próbuj naprawiać urządzenia. Wszelkie prace serwisowe powierzaj wykwalifikowanemu personelowi.
- Trzymaj urządzenie z dala od materiałów łatwopalnych i źródeł ciepła.
- Ensure proper ventilation during operation. Do not cover the device.
- Unplug the device from any power source and remove the battery when not in use or before cleaning.
2. Koniec produktuview
The SYMIK PSC is a versatile two-way charger and portable power station designed for Ryobi 18V Lithium-Ion batteries. It functions as both a high-speed charger for your Ryobi batteries and a powerful portable power bank for various electronic devices.
Główne cechy:
- Ładowanie 100 W: Charges compatible Ryobi 18V Lithium-Ion batteries via USB-C1 port.
- 145W Power Source: Provides power output through 2 USB-C ports and 1 USB-A port for charging laptops, tablets, smartphones, and other small electronics.
- Ekran OLED-owy: Displays real-time charging/discharging data, battery status, and operational modes.
- LED Task Light: Integrated light with adjustable brightness and multiple strobe modes, including SOS.
- OEM Charging Specifications: Engineered to comply with original equipment manufacturer charging standards for safe operation.
Składniki:
Familiarize yourself with the various parts of your SYMIK PSC device:
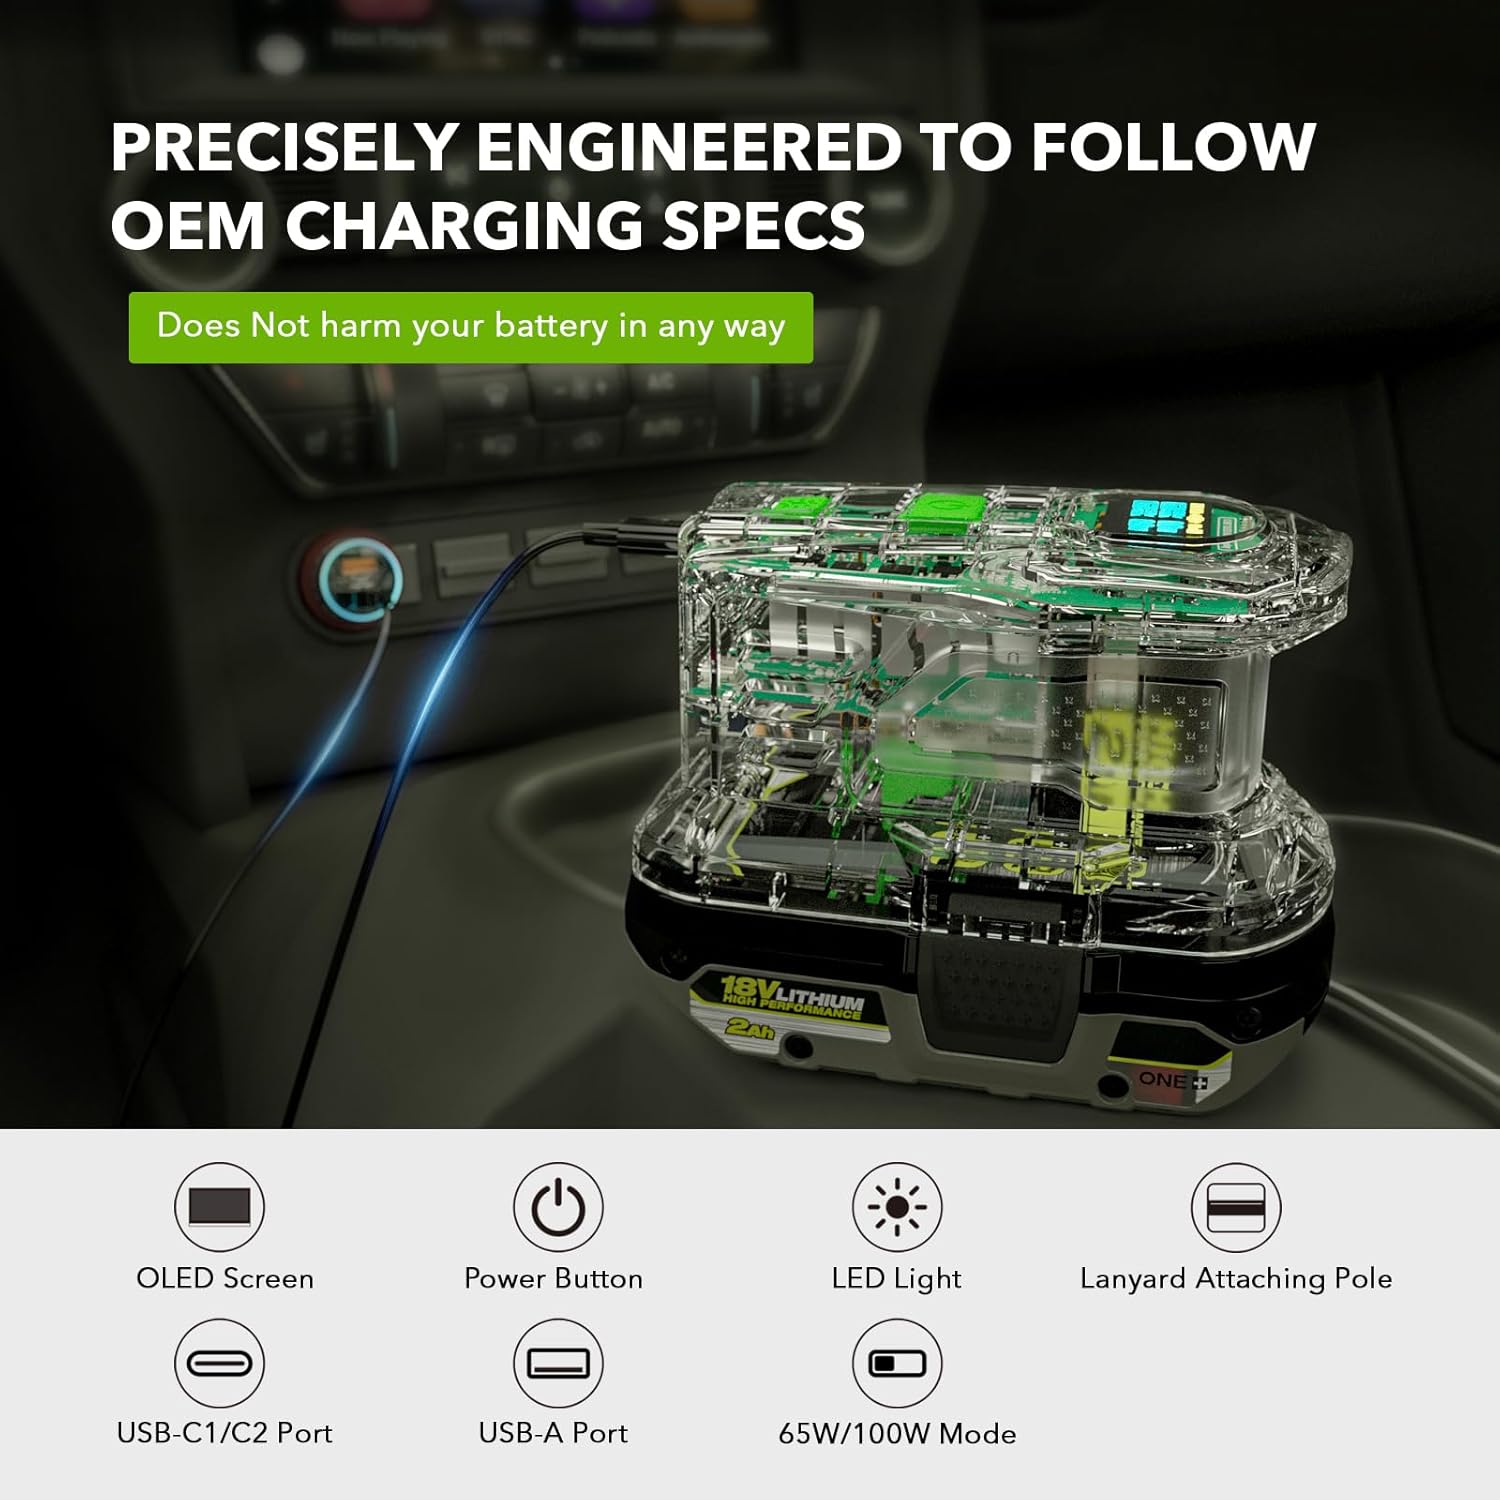
Image 2.1: SYMIK PSC Components Overview
This diagram illustrates the key components of the SYMIK PSC, including the OLED display, power button, LED light, lanyard attachment point, USB-C ports, USB-A port, and the mode selection button.

Image 2.2: SYMIK PSC Device
Czysty view of the SYMIK PSC, highlighting its transparent casing that reveals the internal electronic components and the integrated OLED display.
3. Specyfikacje
The following table details the technical specifications of the SYMIK PSC:
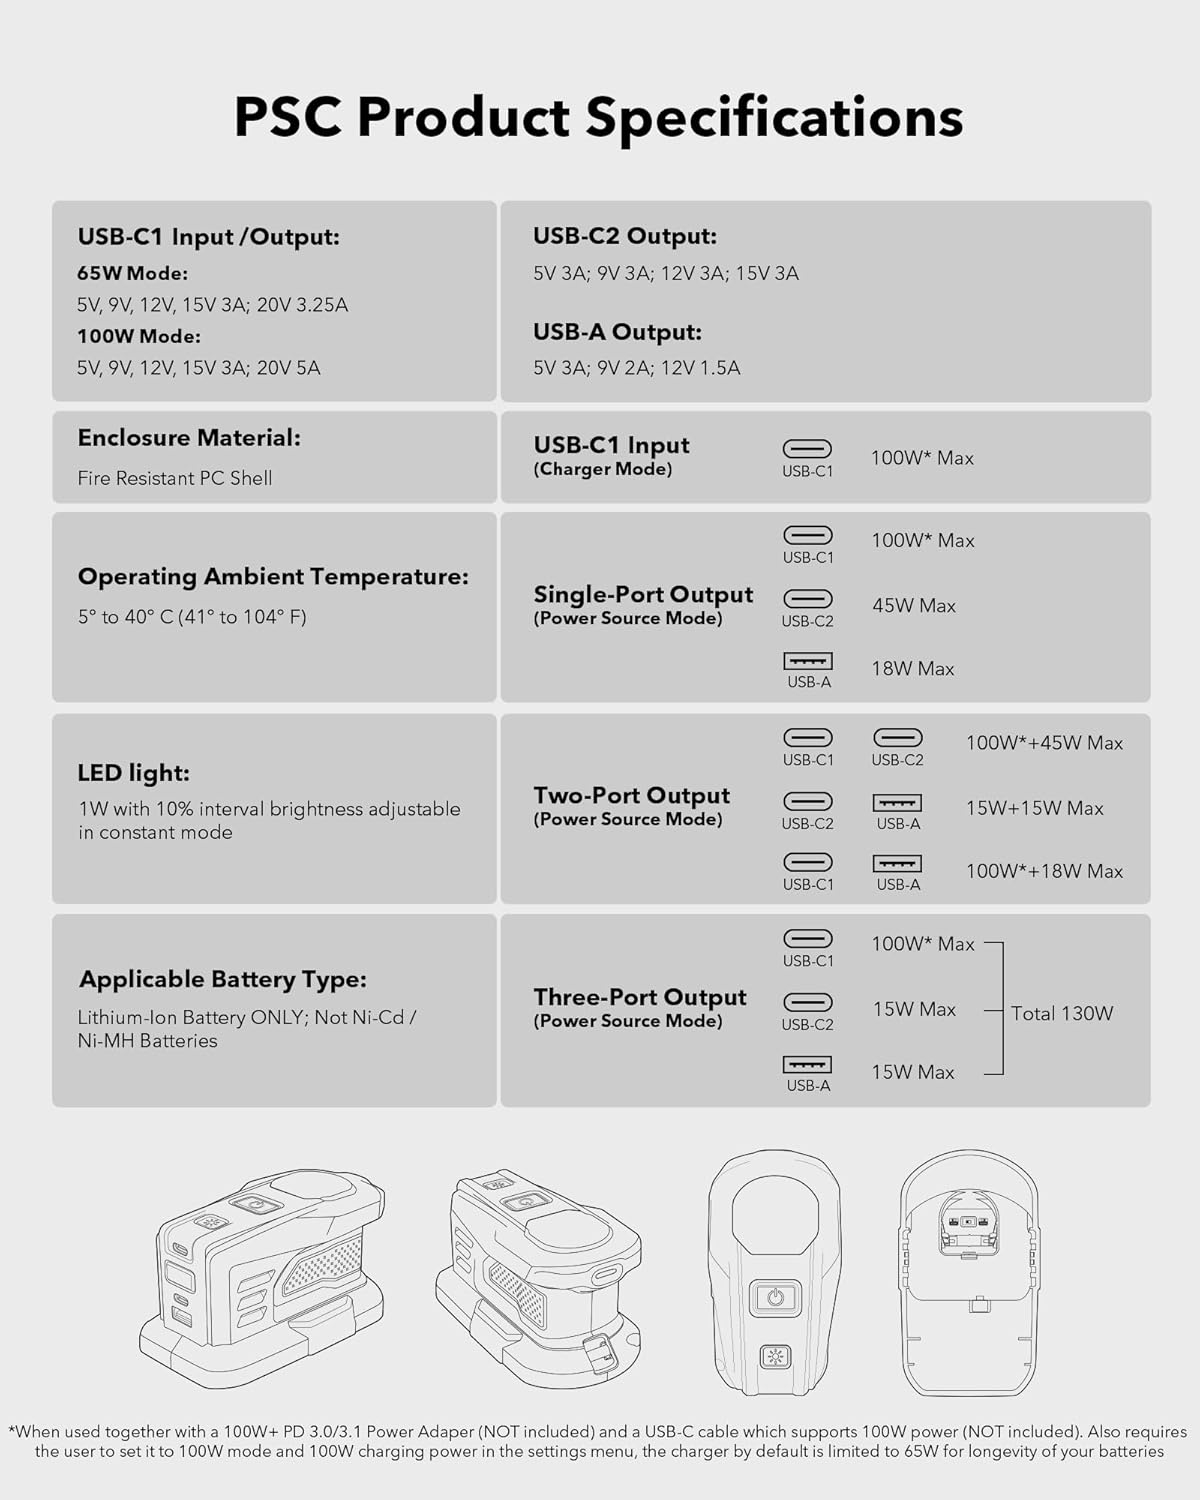
Image 3.1: SYMIK PSC Product Specifications
This image provides a comprehensive table outlining the input and output capabilities of the USB ports, material, operating conditions, LED light features, compatible battery types, and various power output configurations for the SYMIK PSC.
| Funkcja | Specyfikacja |
|---|---|
| Wymiary produktu | 5.31 x 2.95 x 3.07 cala (5.28" gł. x 2.95" szer. x 3.15" wys.) |
| Waga przedmiotu | 8.1 uncji |
| Wejście Voltage | 18 Volts (from Ryobi battery) |
| Objętość wyjściatage | 18 V (prąd stały) |
| Wejście/wyjście USB-C1 | 65W Mode: 5V 3A, 9V 3A, 12V 3A, 15V 3A, 20V 3.25A 100W Mode: 5V 3A, 9V 3A, 12V 3A, 15V 3A, 20V 5A |
| Wyjście USB-C2 | 5 V 3 A, 9 V 2 A, 12 V 1.5 A (maks. 45 W) |
| Wyjście USB-A | 5 V 3 A, 9 V 2 A, 12 V 1.5 A (maks. 18 W) |
| Maksymalna całkowita moc wyjściowa | 145W (USB-C1 and USB-C2 combined) |
| Materiał obudowy | Fire Resistant PC Shell |
| Temperatura otoczenia podczas pracy | 5° do 40° C (41° do 104° F) |
| Światło LED | 1W with 10% interval brightness adjustable in constant mode |
| Odpowiedni typ baterii | Lithium-Ion Battery ONLY; Not for Ni-Cd / Ni-MH Batteries |
4. Konfiguracja i pierwsze użycie
To begin using your SYMIK PSC, follow these steps:
- Attach a Ryobi 18V Battery: Align the SYMIK PSC with a compatible Ryobi 18V Lithium-Ion battery. Slide the PSC onto the battery until it clicks securely into place. Ensure a firm connection.

Image 4.1: Device Attached to Battery
This image shows the SYMIK PSC securely mounted on a Ryobi 18V Lithium-Ion battery, demonstrating the correct attachment for operation.
- Włączanie: Press the power button located on the device. The OLED screen will illuminate, displaying current battery information and operational status.
5. Instrukcja obsługi
5.1 Wyświetlacz OLED
The integrated OLED screen provides essential information about the device's status. It typically displays:
- Pojemność bateriitage i Percentage
- Current Input/Output Wattagi i Amperage for each USB port
- Charging/Discharging Status
- Selected Mode (e.g., Constant LED, Strobe LED)

Image 5.1: OLED Screen Detail
Na tym zdjęciu widać szczegółowy view of the OLED screen, illustrating the various data points displayed during operation, such as voltage, power output for connected devices, and battery charge level.
5.2 Charging Ryobi Batteries
To charge a Ryobi 18V Lithium-Ion battery using the SYMIK PSC:
- Ensure a Ryobi 18V Lithium-Ion battery is securely attached to the PSC.
- Connect a compatible USB-C power adapter (not included) to the USB-C1 port on the SYMIK PSC.
- The OLED screen will indicate the charging status and power input.
- The USB-C1 port supports two charging modes: 65W (default) and 100W. To utilize 100W charging, a 100W+ PD 3.0/3.1 power adapter and a USB-C cable supporting 100W power are required. The 100W mode must also be enabled in the device's advanced settings menu. The default 65W setting is recommended for optimal battery longevity.

Image 5.2: Charging Ryobi Battery
This image demonstrates the SYMIK PSC charging a Ryobi 18V battery. A USB-C cable connects the PSC to a power adapter, and the OLED screen shows the charging wattage.
5.3 Using as a Power Bank (Discharging)
To use the SYMIK PSC as a portable power bank:
- Ensure a charged Ryobi 18V Lithium-Ion battery is securely attached to the PSC.
- Connect your electronic devices (laptops, tablets, smartphones, etc.) to the available output ports:
- USB-C1: Maksymalna moc wyjściowa do 100 W.
- USB-C2: Maksymalna moc wyjściowa do 45 W.
- USB-A: Maksymalna moc wyjściowa do 18 W.
- The OLED screen will display the output wattage and current for each connected device. The maximum combined output power is 145W.

Image 5.3: Power Bank Functionality
This image illustrates the SYMIK PSC functioning as a power bank, simultaneously charging a laptop, tablet, and smartphone, showcasing dzięki możliwości ładowania wielu urządzeń.
5.4 USB-C1 Role Change
The USB-C1 port offers flexible functionality. Its role can be changed between "Auto," "Input Only," and "Output Only" modes. This feature allows for specific control over power flow, which can be beneficial when interacting with other power banks or devices that might attempt to draw or supply power unexpectedly.
- Automatycznie (domyślnie): The port automatically detects whether to charge the Ryobi battery or provide power to a connected device.
- Tylko wejście: The port will only accept power to charge the Ryobi battery.
- Tylko wyjście: The port will only provide power to connected devices.
Refer to the Advanced Settings Menu section for instructions on how to change this setting.
5.5 LED Task Light Operation
The SYMIK PSC includes an integrated LED task light for enhanced visibility.

Image 5.4: LED Task Light Features
This image displays the SYMIK PSC with its LED light active, demonstrating the constant mode with varying brightness levels and the available strobe light modes, including an SOS function.
- Tryb stały: The LED light provides a steady illumination at 1W. Brightness can be adjusted in 10% intervals.
- Strobe Light Modes: The device features multiple strobe patterns, including an SOS distress mode.
To activate and cycle through the LED light modes and adjust brightness, use the dedicated buttons on the device. Specific controls for strobe modes can also be found in the Advanced Settings Menu.
5.6 Menu ustawień zaawansowanych
The SYMIK PSC features an advanced settings menu accessible via the OLED screen and control buttons. This menu allows for customization of various operational parameters.

Image 5.5: Advanced Settings Menu
This image shows the OLED display presenting the Advanced Settings Menu, where users can configure various device parameters such as power limits, display timers, and light controls.
Available settings include:
- C2 Output Power Limit: Adjust the maximum power output for the USB-C2 port.
- Screen Off After: Set the idle time before the OLED screen turns off to conserve battery.
- Power Off After: Configure the idle time before the entire device powers off automatically.
- Power Off Current: Set a minimum current threshold for automatic power off.
- Strobe Modes Control: Customize or enable/disable specific strobe light patterns.
- Przywróć ustawienia domyślne: Restore all settings to their factory defaults.
Navigate the menu using the device's buttons. Consult the on-screen prompts for specific adjustment procedures.
6. Konserwacja
Proper maintenance ensures the longevity and optimal performance of your SYMIK PSC.
- Czyszczenie: Disconnect the device from any power source and remove the battery before cleaning. Use a soft, dry cloth to wipe the exterior. Do not use abrasive cleaners, solvents, or immerse the device in water.
- Składowanie: Store the device in a cool, dry place away from direct sunlight and extreme temperatures. If storing for extended periods, ensure the Ryobi battery is partially charged (e.g., 50%) to maintain battery health.
- Kontrola: Periodically inspect the device and its ports for any signs of damage, wear, or debris.
7. Rozwiązywanie Problemów
If you encounter issues with your SYMIK PSC, refer to the following common troubleshooting steps:
- Urządzenie nie włącza się:
- Ensure the Ryobi 18V battery is securely attached and sufficiently charged.
- Naciśnij i przytrzymaj przycisk zasilania przez kilka sekund.
- Akumulator nie ładuje się:
- Verify that the USB-C power adapter and cable are functioning correctly and support the required wattage (65W lub 100W).
- Check the connection to the USB-C1 port.
- Confirm that the attached Ryobi battery is a compatible Lithium-Ion type and not damaged.
- Ensure the USB-C1 port role is set to 'Auto' or 'Input Only' in the advanced settings.
- Devices Not Charging from PSC (Power Bank Function):
- Ensure the attached Ryobi battery has sufficient charge.
- Check the cables connecting your devices to the PSC's USB ports.
- Verify that the USB-C1 port role is set to 'Auto' or 'Output Only' if using USB-C1 for output.
- Confirm that the connected devices are compatible with the output specifications of the PSC.
- OLED Screen Not Displaying Information:
- Upewnij się, że urządzenie jest włączone.
- Check the 'Screen Off After' setting in the advanced menu; the screen might be in sleep mode.
If the issue persists after attempting these steps, please contact SYMIK customer support for further assistance.
8. Gwarancja i wsparcie
Warranty information for your SYMIK PSC is typically provided with the product at the time of purchase. Please refer to the documentation included in your product packaging for specific warranty terms and conditions.
For technical support, troubleshooting assistance beyond this manual, or warranty claims, please contact SYMIK customer support through the official SYMIK webna stronie internetowej lub u sprzedawcy.
Zachowaj paragon lub dowód zakupu w celach gwarancyjnych.