
1. Wprowadzenie
This manual provides detailed instructions for the installation, operation, maintenance, and troubleshooting of your Generic H61 Motherboard Combo. This combo includes an H61 Express motherboard, an Intel Core i3 3rd Gen processor (3240/3220), 4GB DDR3 RAM, and a high-performance CPU fan. It is designed for stability and reliability in both home and office environments.
2. Koniec produktuview
The Generic H61 Motherboard Combo is a pre-assembled set of core computer components, offering a solid foundation for building or upgrading a personal computer. It supports Intel's 2nd and 3rd generation Core i3, i5, and i7 processors.
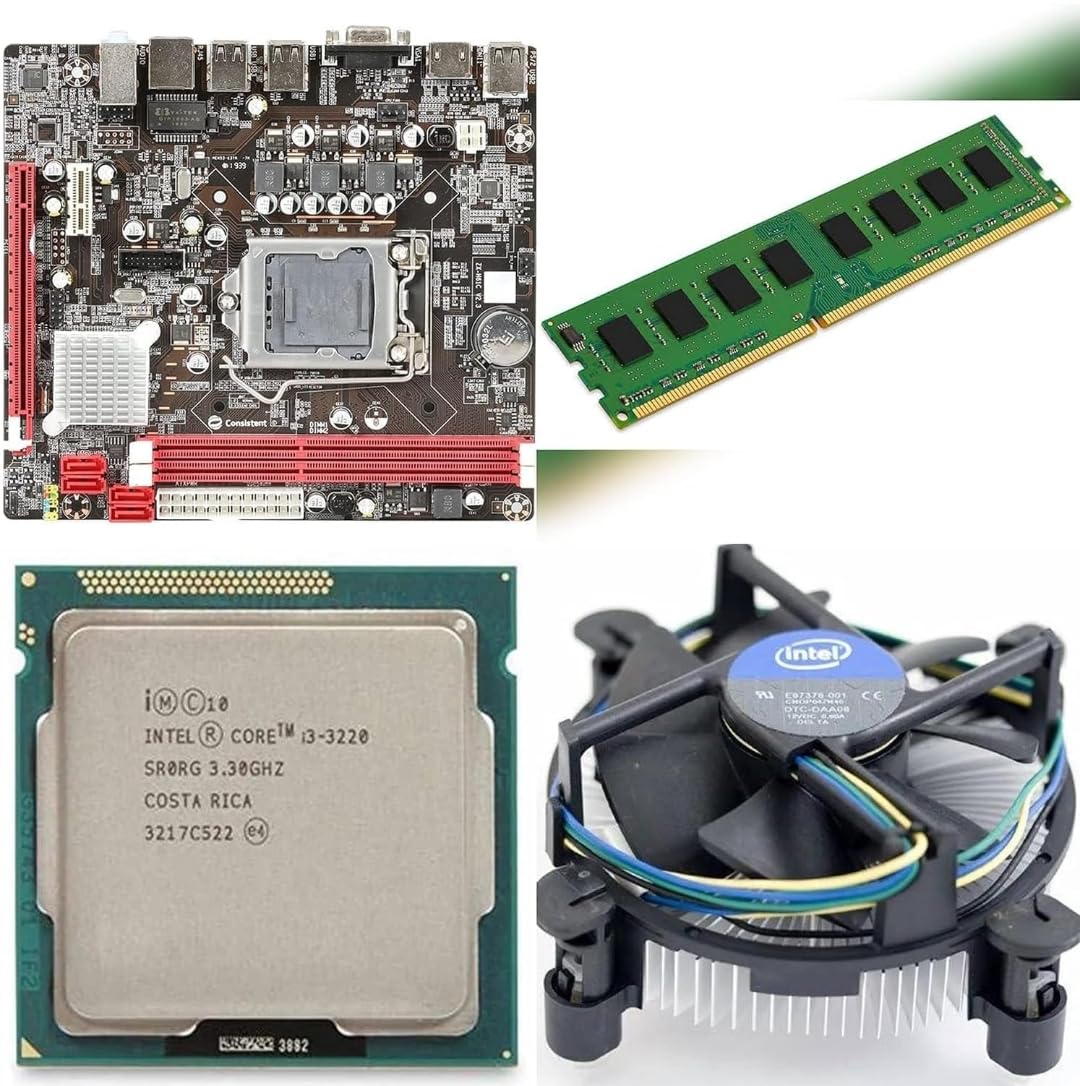
Image: Generic H61 Motherboard Combo, showcasing the motherboard, CPU, RAM, and CPU fan.
Główne cechy:
- Zgodność: Supports Intel 2nd and 3rd generation Core i3, i5, and i7 processors.
- Zestaw układów scalonych: Intel H61 Express chipset.
- Pamięć: Supports DDR3 memory up to 16 GB, with a clock speed of 1600 MHz.
- Łączność: Multiple ports including HDMI, VGA, USB 2.0, and LAN.
- Ekspansja: PCI Express x16 and PCI Express x1 slots for graphics cards or other components.
- Składowanie: Features NVMe M.2 chip support and SATA 2.
3. Przewodnik konfiguracji
Follow these steps to properly install and set up your motherboard combo into a computer chassis.
3.1. Przygotowanie
- Upewnij się, że Twój zasilacz (PSU) jest kompatybilny i zapewnia wystarczającą moc.tage.
- Gather necessary tools: screwdriver, thermal paste (if not pre-applied to CPU fan), anti-static wrist strap.
- Work on a clean, static-free surface.
3.2. Instalacja płyty głównej
- Carefully place the motherboard into your PC case, aligning it with the standoffs.
- Przymocuj płytę główną za pomocą śrub, upewniając się, że jest dobrze osadzona, ale nie dokręcona zbyt mocno.
3.3. CPU, RAM, and CPU Fan Installation (Pre-installed in combo)
The CPU (Intel Core i3 3rd Gen), RAM (4GB DDR3), and CPU fan are pre-installed on the motherboard as part of this combo. If you need to re-seat or replace these components, refer to the following general guidelines:
- Procesor: Open the CPU socket lever, align the CPU with the triangular mark on the socket, gently place it in, and close the lever.
- BARAN: Open the clips on the DDR3 memory slots, align the RAM module notch with the slot key, and press down firmly until the clips snap into place.
- Wentylator procesora: Apply a thin layer of thermal paste to the CPU (if not pre-applied). Align the fan's mounting pins with the motherboard holes and press down until secured. Connect the CPU fan cable to the 'CPU_FAN' header on the motherboard.
3.4. Podłączanie zasilania
- Podłącz 24-pinowe złącze zasilania ATX zasilacza do głównego gniazda zasilania na płycie głównej.
- Connect the 4-pin or 8-pin CPU power connector (EPS12V) from your PSU to the corresponding socket near the CPU.
3.5. Pamięć masowa i urządzenia peryferyjne
- Dysk SSD NVMe M.2: If using an NVMe M.2 SSD, insert it into the M.2 slot and secure it with the provided screw.
- Dyski SATA: Connect SATA data cables from your hard drives or SSDs to the SATA ports on the motherboard. Connect SATA power cables from your PSU to the drives.
- Złącza na panelu przednim: Connect the power button, reset button, USB ports, and audio jacks from your PC case to the corresponding headers on the motherboard. Refer to your PC case manual for specific pin layouts.
- Karta graficzna (opcjonalnie): If installing a dedicated graphics card, insert it into the PCI Express x16 slot and secure it. Connect any required PCIe power cables from your PSU.
- Urządzenia peryferyjne zewnętrzne: Connect your monitor to the HDMI or VGA port, and connect USB devices (keyboard, mouse) and LAN cable.
4. Initial System Boot and BIOS Configuration
After all components are connected, you can proceed with the initial boot.
- Włączanie: Connect the power cord to your PSU and turn on the power switch. Press the power button on your PC case.
- Dostęp do BIOS-u/UEFI: During startup, repeatedly press the designated key (usually USUNĄĆ, F2, Lub F10) aby wejść do narzędzia konfiguracji BIOS/UEFI.
- Podstawowe ustawienia:
- Verify that the CPU, RAM, and storage devices are correctly detected.
- Ustaw prawidłową datę i godzinę.
- Skonfiguruj kolejność rozruchu, aby nadać priorytet nośnikowi instalacyjnemu systemu operacyjnego (dyskowi USB lub płycie DVD).
- Zapisz i wyjdź: Zapisz zmiany i wyjdź z BIOS-u. System uruchomi się ponownie.
- Instalacja systemu operacyjnego: Proceed with the installation of your preferred operating system.
- Instalacja sterownika: After OS installation, install all necessary drivers for the motherboard chipset, audio, LAN, and any discrete graphics card. Drivers can typically be found on the manufacturer's webstrona.
5. Konserwacja
Regular maintenance ensures the longevity and optimal performance of your motherboard combo.
- Usuwanie kurzu: Periodically clean dust from the CPU fan, heatsinks, and other components using compressed air. Ensure the system is powered off and unplugged before cleaning.
- Przepływ powietrza: Ensure your PC case has adequate airflow to prevent overheating. Keep vents clear of obstructions.
- Aktualizacje BIOS-u: Check the motherboard manufacturer's webStrona z aktualizacjami BIOS/UEFI. Aktualizacje mogą poprawić stabilność, kompatybilność i wydajność. Postępuj zgodnie z instrukcjami aktualizacji, aby uniknąć uszkodzenia systemu.
- Zarządzanie kablami: Uporządkuj kable wewnętrzne, aby poprawić przepływ powietrza i zapobiec zakłóceniom.
6. Rozwiązywanie Problemów
Jeśli napotkasz problemy, zapoznaj się z poniższymi typowymi procedurami rozwiązywania problemów.
6.1. Brak zasilania
- Check if the power cord is securely connected to the PSU and the wall outlet.
- Upewnij się, że przełącznik zasilacza jest w pozycji „ON”.
- Verify that the 24-pin and CPU power connectors are firmly seated on the motherboard.
- Confirm that the front panel power button cable is correctly connected to the motherboard.
6.2. Brak wyświetlacza
- Ensure the monitor is powered on and the video cable (HDMI/VGA) is securely connected to the motherboard's output and the monitor's input.
- If using a discrete graphics card, connect the monitor to the graphics card's output, not the motherboard's.
- Ponownie zamontuj moduły RAM. Spróbuj uruchomić komputer z zainstalowanym tylko jednym modułem RAM.
- Clear the CMOS (Complementary Metal-Oxide-Semiconductor) by removing the motherboard battery for 30 seconds or using the CMOS clear jumper.
6.3. System Instability / Random Restarts
- Check CPU and system temperatures. Overheating can cause instability.
- Uruchom narzędzie diagnostyczne pamięci, aby sprawdzić, czy pamięć RAM jest uszkodzona.
- Upewnij się, że wszystkie sterowniki są aktualne.
- Sprawdź co to jest zasilacztage jest wystarczające dla wszystkich komponentów.
7. Specyfikacje
Detailed technical specifications for the Generic H61 Motherboard Combo.
| Funkcja | Specyfikacja |
|---|---|
| Marka | Ogólny |
| Gniazdo procesora | LGA 1155 |
| Kompatybilne urządzenia | Komputer osobisty |
| Technologia pamięci RAM | DDR3 |
| Typ chipsetu | Intel H61 Express |
| Gniazdo procesora | LGA 1155 |
| Prędkość zegara pamięci | 1600MHz |
| CPU Model (Included) | Core i3 3rd Gen (3240/3220) |
| Drive Memory Storage Capacity (Max) | 16 GB |
| Maksymalny rozmiar pamięci RAM | 16 GB |
| Typ głównego złącza zasilania | 24-stykowy |
| Interfejs karty graficznej | PCI-Express x16 |
| Dostępne gniazda pamięci | 2 |
| Obsługiwany standard magistrali systemowej | SATA 2 |
| Wymiary przedmiotu Dł. x Szer. x Wys. | 38L x 12W x 38H centymetrów |
| Waga przedmiotu | 900 gram |
8. Gwarancja i wsparcie
This Generic H61 Motherboard Combo comes with a 2-letnia gwarancja marki. For warranty claims or technical support, please contact your retailer or the brand's customer service channel. Ensure you retain your proof of purchase for warranty validation.