Produkt ponadview
This document provides instructions for the installation, operation, and maintenance of the Laptop Keyboard for MEDION AKOYA S4402 MD63410 Swiss SW with Backlit Black. This keyboard is designed as a replacement part for compatible laptop models, offering a Swiss (SW) layout and integrated backlighting for improved visibility in low-light conditions.
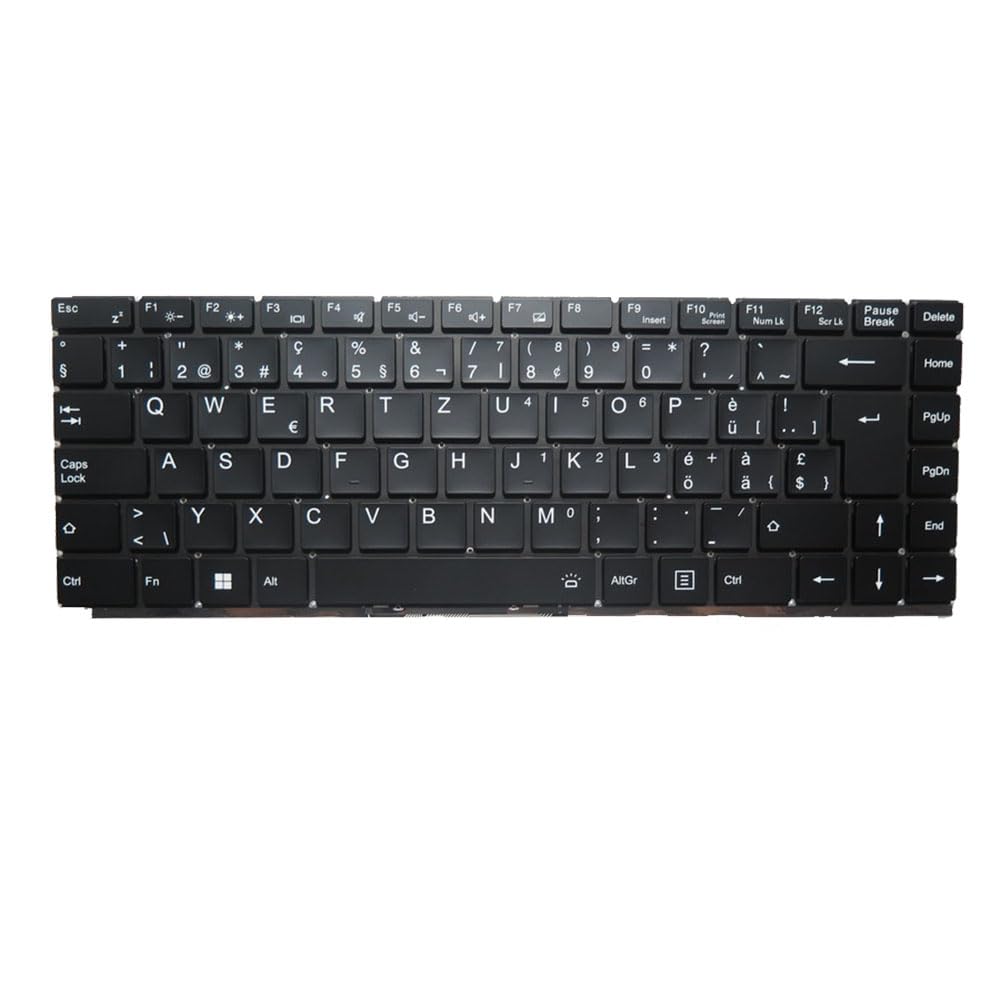
Obraz: Przód view of the Laptop Keyboard for MEDION AKOYA S4402 MD63410. The keyboard features a black finish with white key legends, including a full alphanumeric section, function keys (F1-F12), navigation keys, and a numeric keypad. The layout is Swiss (SW), indicated by specific characters like '§', '€', 'é', 'à', 'ö', 'ä', 'ü', and '£'. The keyboard includes dedicated keys for backlight control (likely via Fn combinations) and standard laptop keyboard functions.
Specyfikacje
| Funkcja | Szczegół |
|---|---|
| Typ produktu | Laptop Keyboard Replacement Part |
| Zgodność | MEDION AKOYA S4402 MD63410 |
| Układ | Swiss (SW) |
| Podświetlenie | Tak |
| Kolor | Czarny |
| Wymiary produktu | 11.81 x 7.87 x 3.94 cala |
| Waga przedmiotu | 1.76 funta |
| Producent | Ogólny |
| Numer modelu | MD63410-5. |
| Kraj pochodzenia | Chiny |
Konfiguracja i instalacja
Installing a laptop keyboard typically requires technical expertise and careful handling of internal components. It is highly recommended to consult your laptop's official service manual or seek professional assistance for installation to avoid damage to your device.
General Guidelines (Consult Professional for Specific Steps):
- Wyłączone: Ensure the laptop is completely powered off and disconnected from all power sources, including the battery.
- Demontaż: Carefully disassemble the laptop components that obstruct access to the keyboard. This may involve removing the bottom cover, battery, optical drive, or top case, depending on the laptop model.
- Disconnect Old Keyboard: Locate the keyboard ribbon cable connector on the motherboard. Gently unlatch the connector and disconnect the old keyboard's cable.
- Remove Old Keyboard: Unscrew or unclip the old keyboard from its housing.
- Zainstaluj nową klawiaturę: Position the new keyboard into the housing. Ensure it fits correctly and all mounting points align.
- Connect New Keyboard: Carefully insert the new keyboard's ribbon cable into the connector on the motherboard and secure the latch. Ensure the cable is not bent or creased.
- Ponowny montaż: Reassemble the laptop components in reverse order. Double-check all connections before fully closing the laptop.
- Funkcjonalność testu: Power on the laptop and test all keyboard keys, including the backlight function, to ensure proper installation.
Zastrzeżenie: Improper installation can lead to damage to your laptop. The manufacturer is not responsible for any damage incurred during self-installation.
Instrukcja obsługi
This keyboard functions as a standard laptop keyboard with additional features specific to the Swiss (SW) layout and integrated backlighting.
Główne funkcje:
- Standardowe klawisze alfanumeryczne: Służy do wpisywania liter, cyfr i symboli.
- Klawisze funkcyjne (F1-F12): These keys often have secondary functions (e.g., volume control, screen brightness, Wi-Fi toggle) when pressed in combination with the Fn key. Refer to your laptop's specific documentation for exact Fn key combinations.
- Kontrola podświetlenia: The keyboard features integrated backlighting. Typically, the backlight can be toggled on/off or adjusted in brightness using a specific Fn key combination (e.g., Fn + Fx, where Fx is a function key with a backlight icon). Locate the key with a backlight symbol (often resembling a sun or light bulb) to control this feature.
- Swiss (SW) Layout Specifics: This keyboard includes characters and symbols specific to the Swiss layout, such as '§', '€', 'é', 'à', 'ö', 'ä', 'ü', and '£'. Familiarize yourself with the placement of these characters.
- Klawisze nawigacyjne: Includes Home, End, PgUp (Page Up), PgDn (Page Down), and arrow keys for document navigation.
Konserwacja
Właściwa konserwacja może wydłużyć żywotność klawiatury i zapewnić optymalną wydajność.
- Czyszczenie: Regularly clean the keyboard surface with a soft, lint-free cloth slightly dampened with water or a mild, non-abrasive cleaning solution. Avoid spraying liquids directly onto the keyboard.
- Usuwanie kurzu: Use compressed air to remove dust and debris from between the keys. Hold the can upright and spray in short bursts.
- Unikaj wycieków: Protect the keyboard from liquid spills, which can cause permanent damage.
- Delikatne użycie: Avoid excessive force when typing to prevent premature wear on the keys.
Rozwiązywanie problemów
If you encounter issues with your keyboard, consider the following common troubleshooting steps:
- Klawiatura nie odpowiada:
- Ensure the keyboard ribbon cable is securely connected to the motherboard.
- Uruchom ponownie laptopa.
- Check device drivers in your operating system. Reinstall or update if necessary.
- Niektóre klawisze nie działają:
- Check for physical obstructions or debris under the non-functional keys.
- If multiple keys in a specific area are not working, it might indicate a cable connection issue or a defect in the keyboard itself.
- Podświetlenie nie działa:
- Ensure the backlight function is enabled via the appropriate Fn key combination.
- Check your laptop's BIOS/UEFI settings for keyboard backlight options.
- Incorrect Characters Typed:
- Verify that the correct keyboard layout (Swiss SW) is selected in your operating system settings.
If issues persist after attempting these steps, professional diagnosis and repair may be required.
Gwarancja i wsparcie
Ten produkt jest dostarczany z 90-dniowa gwarancja od daty zakupu. Niniejsza gwarancja obejmuje wady produkcyjne i zapewnia, że produkt działa zgodnie z opisem przy normalnym użytkowaniu.
Gwarancja nie obejmuje uszkodzeń powstałych na skutek:
- Improper installation or handling.
- Accidental damage, spills, or physical abuse.
- Nieautoryzowane naprawy lub modyfikacje.
- Normalne zużycie.
For warranty claims or technical support, please contact the seller or retailer from whom you purchased this product. Ensure you have your proof of purchase readily available.


