
1. Wprowadzenie i koniecview
This manual provides detailed instructions for the installation, operation, and maintenance of your JideTech 4K 8 Channel PoE Network Video Recorder (NVR). This NVR is designed for home security camera systems, supporting up to 12 channels and resolutions up to 12MP. It features Power over Ethernet (PoE) for simplified camera connections, remote access capabilities, and advanced video compression.
2. Co znajduje się w pudełku
Proszę sprawdzić zawartość przesyłki na poniższej liście:
- 1x 8 Channel NVR PoE Unit
- 1x Instrukcja obsługi
- 1x zasilacz NVR
- 1x 1M kabel sieciowy
- Mysz
- Screws (for HDD installation)

Image: The JideTech 4K 8 Channel PoE NVR unit.
3. Instrukcje konfiguracji
3.1. Połączenia fizyczne
Follow these steps to connect your NVR to your network and display:
- Podłącz rejestrator NVR do źródła zasilania za pomocą dołączonego zasilacza.
- Connect the NVR to your router using the included network cable.
- Podłącz monitor do rejestratora NVR za pomocą portu HDMI lub VGA.
- Connect the USB mouse to a USB port on the NVR for local control.
- Connect your PoE cameras to the NVR's PoE ports. For non-PoE cameras, connect them to your network via a router and ensure they are powered separately.
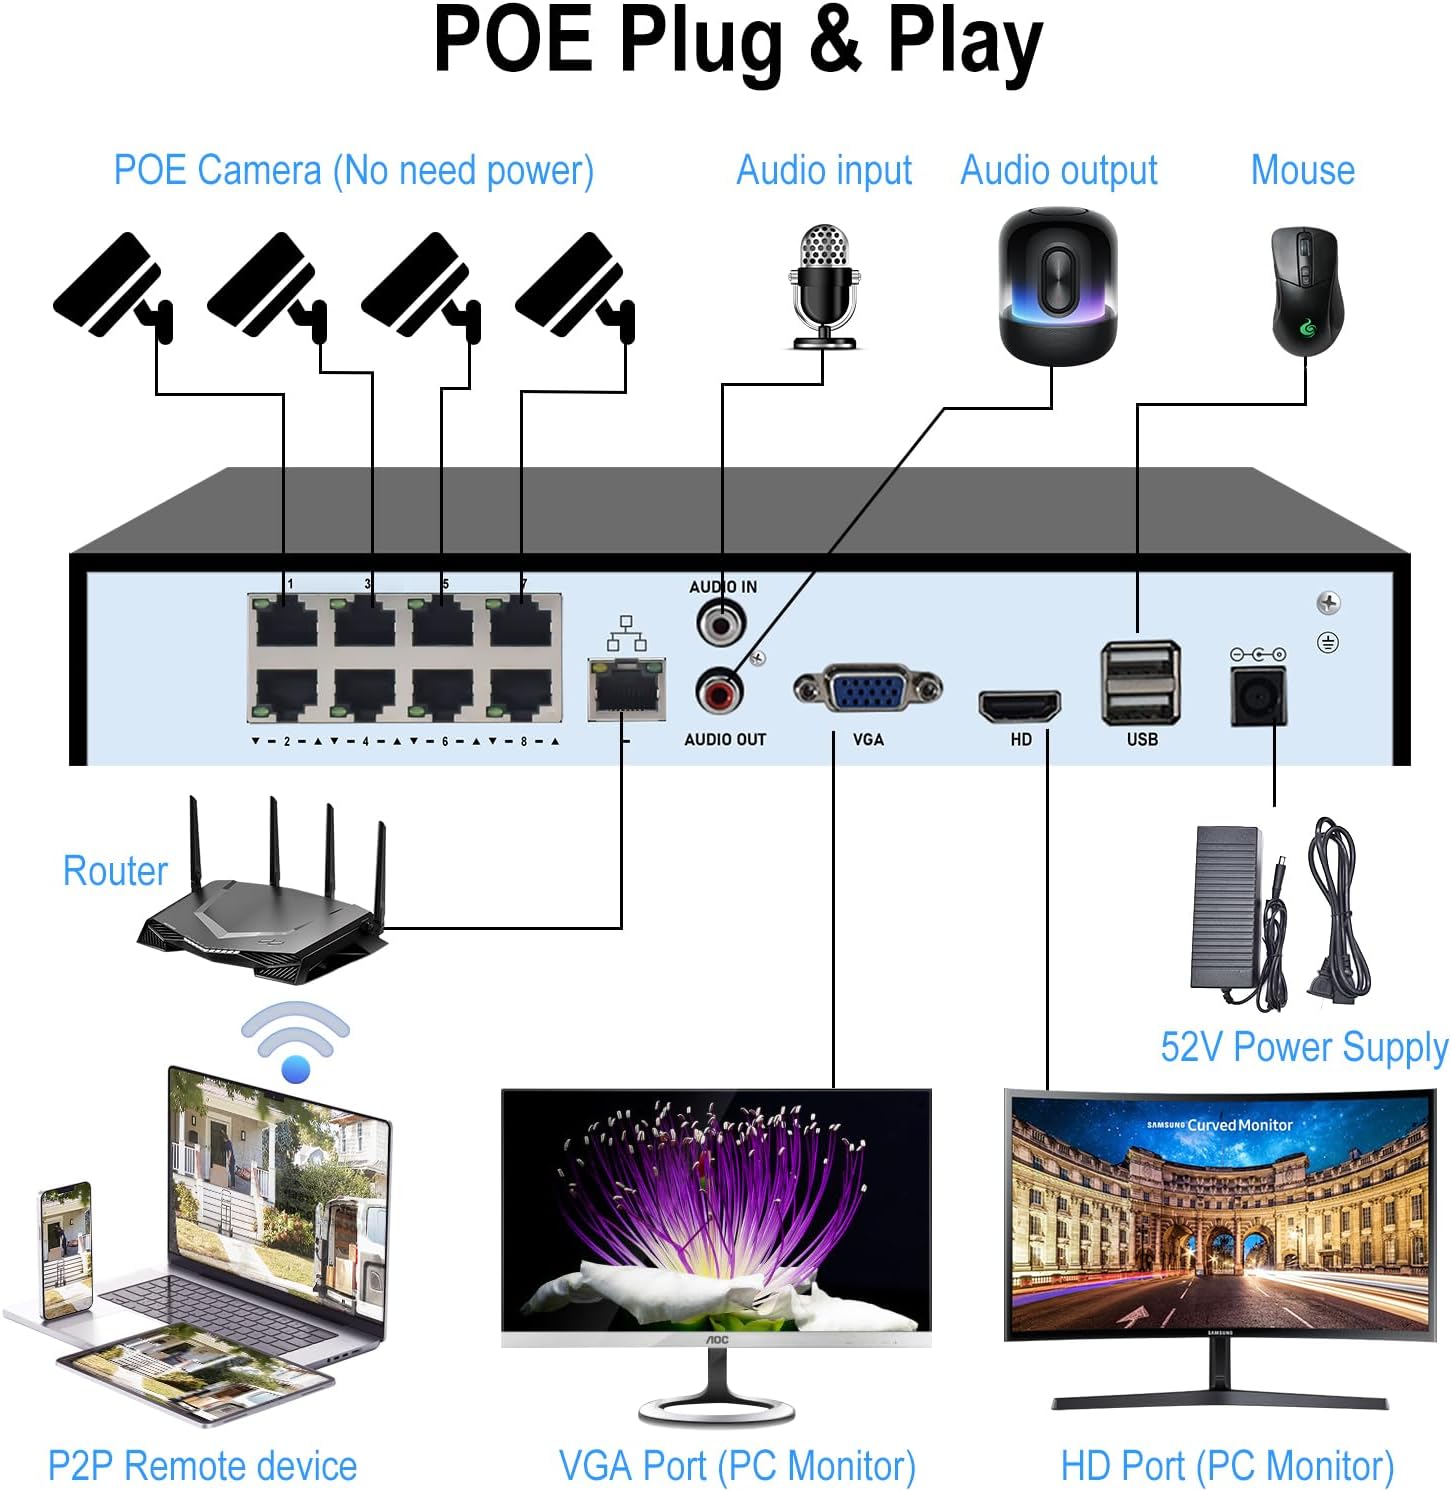
Image: Connection diagram illustrating how to connect PoE cameras, router, monitor, and mouse to the NVR.

Image: Diagram detailing the connection of a wired ONVIF camera to the NVR, requiring a power adapter and Ethernet cable.
3.2. Instalacja dysku twardego (dysk twardy nie jest dołączony)
The NVR requires a 3.5-inch SATA hard drive (up to 14TB) for recording. Please follow these steps to install it:
- Unscrew and remove the top cover of the NVR unit.
- Podłącz kabel danych SATA i kabel zasilający rejestratora NVR do dysku twardego.
- Secure the hard drive inside the NVR chassis using the provided screws.
- Replace the NVR cover and fasten the screws.
Video: Instructions on how to install a hard drive into the NVR unit.

Image: The NVR unit shown with a hard drive, highlighting its maximum storage capacity of 14TB.
4. Instrukcja obsługi
4.1. Dostęp zdalny
The NVR supports remote access via PC/Mac or the Videolink App for Android/iOS. Once connected to the internet, you can view foo w czasie rzeczywistymtagi odtwarzanie nagrań z dowolnego miejsca.

Image: Illustration of remote access to the NVR system using various devices like a PC, tablet, and smartphone application.
4.2. Motion Detection and Smart Playback
Configure motion detection settings to receive instant notifications and email alerts on your phone when movement is detected. The smart playback feature allows you to quickly review recorded video at up to 16x speed to locate specific events.

Image: Depiction of the smart human detection feature, triggering app alerts when motion is detected.
5. Główne cechy
- Rozdzielczość 4K UltraHD: Supports recording, playback, and live view up to 12MP resolution. HDMI output up to 4K@30fps, VGA output up to 1080P@30fps.
- 12 Channel Expandable NVR: Built-in 8 PoE ports (IEEE802.3at, up to 30W per port) for 8 PoE cameras. Expandable to 12 channels with additional PoE switches.
- Kompatybilność z ONVIF: Works with most third-party ONVIF IP cameras.
- Zaawansowana kompresja wideo: Supports H.265+/H.265/H.264 formats, reducing storage space and bandwidth by up to 75%.
- Duża pojemność pamięci: Equipped with 1 SATA interface, supporting a single hard drive up to 14TB (HDD not included).
- Motion Detection & Smart Playback: Instant notifications and email alerts for detected motion. Playback recording at up to 16x speed.
- Local & Remote Access: Easy configuration and control via PC/Mac or Videolink App (Android/iOS).
Video: Demonstration of how to connect a network video recorder surveillance system.
6. Specyfikacje
| Marka | JideTech |
| Numer modelu | 8CH-NVR |
| Technologia łączności | Ethernet, HDMI, USB, VGA |
| Kompatybilne urządzenia | IP Camera, PoE Camera |
| Wymiary produktu (dł. x szer. x wys.) | 9.88" x 8.42" x 1.57" |
| Pojemność pamięci masowej | Do 14 TB (dysk twardy nie jest dołączony) |
| Liczba kanałów | 8 (rozszerzalne do 12) |
| Format nośnika Wideo cyfrowe | Dysk twardy |
| Wejście audio | RCA |
| Łączna liczba portów USB | 2 |
| Wejście wideo | HDMI, VGA, |
| Waga przedmiotu | 2.8 funtów |
7. Konserwacja
To ensure optimal performance and longevity of your NVR, consider the following maintenance tips:
- Regularne czyszczenie: Utrzymuj urządzenie NVR w czystości, bez kurzu i zanieczyszczeń. Do czyszczenia używaj miękkiej, suchej ściereczki. Upewnij się, że otwory wentylacyjne nie są zablokowane.
- Aktualizacje oprogramowania układowego: Okresowo sprawdzaj producenta website for firmware updates. Keeping your NVR's firmware up-to-date can improve performance, add new features, and enhance security.
- Kopia zapasowa danych: Regularnie twórz kopie zapasowe ważnych nagrań na zewnętrznym urządzeniu pamięci masowej lub w usłudze w chmurze, aby zapobiec utracie danych.
- Warunki środowiskowe: Operate the NVR within recommended temperature and humidity ranges to prevent damage. Avoid direct sunlight and excessive heat.
8. Rozwiązywanie Problemów
If you encounter issues with your JideTech NVR, refer to the following common troubleshooting steps:
- Brak zasilania:
- Ensure the power adapter is securely connected to both the NVR and a working power outlet.
- Sprawdź, czy gniazdko elektryczne działa prawidłowo, podłączając do niego inne urządzenie.
- Brak wyjścia wideo:
- Check HDMI/VGA cable connections between the NVR and the monitor.
- Sprawdź, czy monitor jest włączony i ustawiony na prawidłowe źródło sygnału wejściowego.
- Jeśli to możliwe, wypróbuj inny kabel HDMI/VGA lub monitor.
- Kamery nie wyświetlają:
- For PoE cameras, ensure they are properly connected to the NVR's PoE ports and receiving power.
- For non-PoE cameras, verify they are powered on and connected to the same local network as the NVR.
- Sprawdź adresy IP kamer i upewnij się, że nie są one ze sobą sprzeczne.
- Confirm cameras are ONVIF compatible and added correctly to the NVR system.
- Problemy ze zdalnym dostępem:
- Upewnij się, że rejestrator NVR jest podłączony do Internetu.
- Verify network settings (IP address, gateway, DNS) on the NVR.
- Sprawdź ustawienia zapory sieciowej na routerze, które mogą blokować dostęp.
- Ensure the Videolink App or PC software is up-to-date.
- Problemy z nagrywaniem:
- Confirm a hard drive is installed and properly formatted by the NVR.
- Check the hard drive status in the NVR's system settings.
- Sprawdź, czy harmonogramy nagrywania są prawidłowo skonfigurowane.
If these steps do not resolve your issue, please contact JideTech customer support for further assistance.
9. Gwarancja i wsparcie
JideTech offers comprehensive support for its products. For specific warranty details, please refer to the documentation included with your purchase or visit the official JideTech webstrona.
Można zakupić dodatkowe plany ochrony:
- 2-letni plan ochrony
- 3-letni plan ochrony
- Pełna ochrona (rozliczenie miesięczne)
For technical support, troubleshooting, or any product-related inquiries, please contact JideTech customer service.