
1. Wprowadzenie
This manual provides detailed instructions for the installation, operation, and maintenance of your CSBST 24V 36V 48V 350W Brushless Ebike Controller and LCD Display Kit. Please read this manual thoroughly before use to ensure proper function and safety.
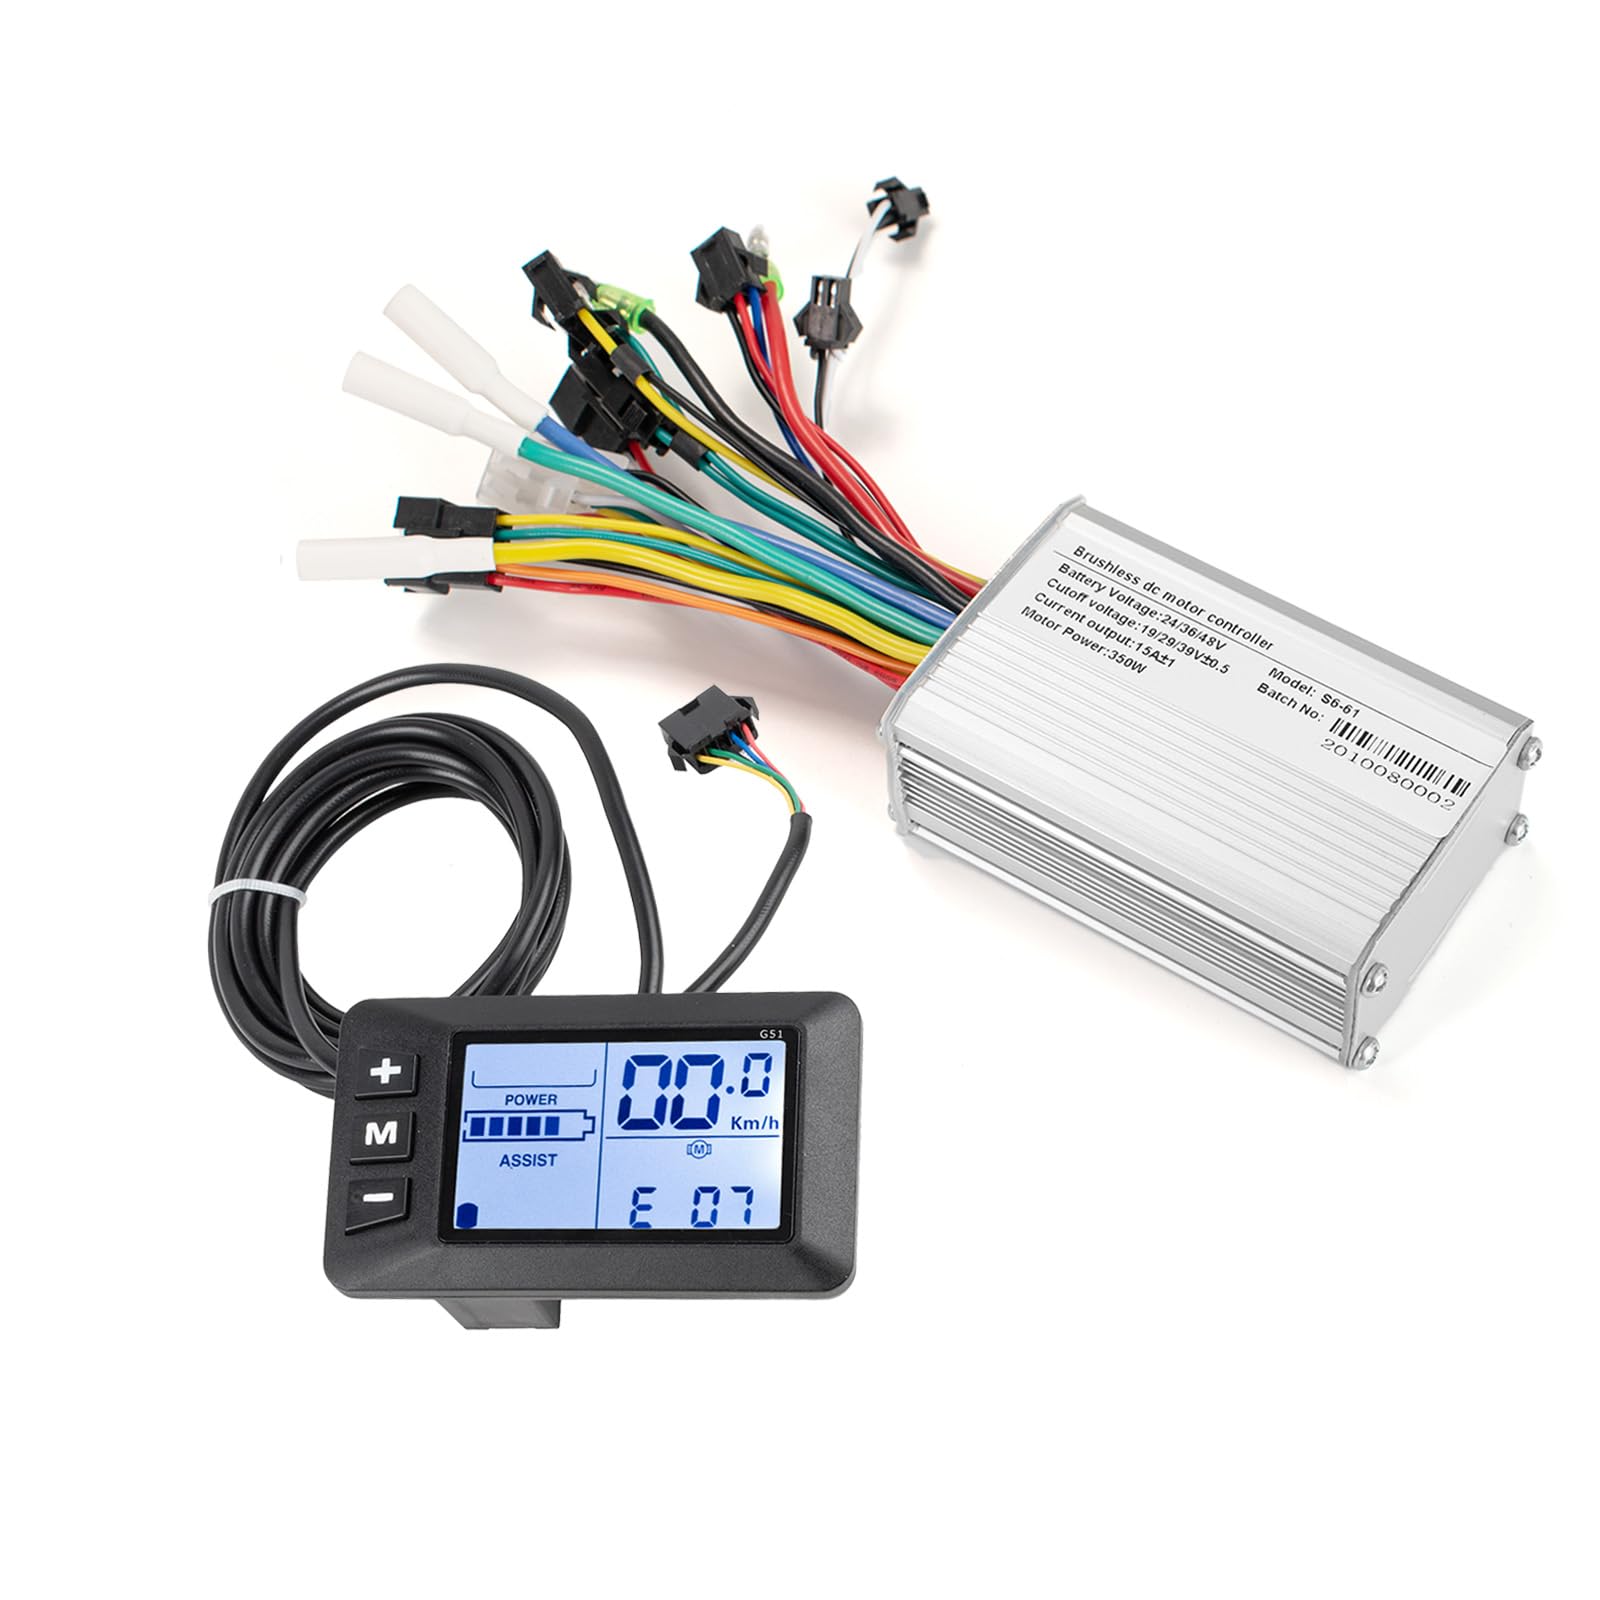
Figure 1: CSBST Brushless Ebike Controller and LCD Display Kit.
2. Koniec produktuview
2.1 Składniki
Zestaw zawiera następujące elementy:
- 1 × Brushless Controller
- 1 × LCD Display
2.2 Główne cechy
- High Performance Controller: Constructed from quality materials for good heat dissipation, low noise, and durability, ensuring a long service life.
- Wrażliwa kontrola: Provides steady speed and responsive control for braking and direction changes. Includes brake power-off, undervoltagOchrona e i ochrona nadprądowa.
- Versatile LCD Display: Indicates real-time speed, battery power, riding time, total mileage, and single mileage. Adjustable settings and waterproof, wear-resistant, backlit screen for use in various environments.
- Szerokie zastosowanie: Suitable for ebikes, electric bicycles, e-scooters, mini motorcycles, dirt bikes, and DIY bike projects.
- Łatwa instalacja: Interfaces are clearly labeled with cable instructions for straightforward connection. The LCD display includes a mounting bracket for 22mm/0.8in diameter handlebars.
2.3 Specyfikacje
| Parametr | Wartość |
|---|---|
| Marka | CSBST |
| Model | CONTROLLER350W-G51LCD |
| Tworzywo | Aluminium, Plastik |
| Typ wyświetlacza | LCD |
| Tomtage | 24 V / 36 V / 48 V. |
| Moc | 350 W |
| Aktualny | 17A |
| Rozmiar kontrolera | 85mm × 53mm × 30mm (Approx.) |
| Waga kontrolera | Około 200g |
| LCD Display Mounting Hole | 22 mm / 0.8 cala |
| Waterproof Rating (LCD) | IP65 |

Figure 2: Controller parameters and dimensions.
3. Instalacja i konfiguracja
Follow these steps to install your ebike controller and LCD display kit:
- Connect the Battery and Motor: First, connect the controller's power wires to the battery. Then, connect the controller's motor phase wires and Hall wires to the motor one by one. Finally, connect the controller to the display.
- Connect the Self-Learning Wire to Match with the Motor: Long press the power button of the display for 3 seconds to power on the display. Find the two green self-learning wires on the controller and plug them together for 10 to 20 seconds. The motor will automatically rotate. If the motor rotates forward, the self-learning is complete. If the motor doesn't work, rotates in reverse, or makes noise, disconnect the self-learning wires, reconnect them, and the motor should rotate forward. After the self-learning is completed, disconnect these wires to prevent the motor from learning again next time.
- Connect the Throttle and Other Function Wires: After completing the above steps, the motor matching is complete. You can now connect the throttle to test motor function. For other controller functions, connect according to the definitions of the controller sockets. Unneeded functions can be left unconnected.

Figure 3: General installation steps for the ebike controller.
3.1 Schemat okablowania

Figure 4: Detailed wiring diagram for the brushless motor controller, showing connections for battery, throttle, Hall sensor, display, brake, PAS sensor, and headlight power.
3.2 Self-Learning Wire Guide
The self-learning wires are crucial for initial motor matching. Connect them temporarily during setup and disconnect them afterward.

Figure 5: Steps for connecting and detaching the self-learning wires.
3.3 Important Notices for Installation
- The controller voltage (24V/36V/48V) can be set via the P03 menu on the display.
- If your display has an integrated thumb throttle, connecting an additional throttle will not work.
- If the throttle fails to work, check the display's P10 menu (drive mode setting) and ensure it is set to 1 or 2, as the throttle will work with this setting.
- Operating the throttle may interfere with the controller's self-learning process. Complete the self-learning process before testing the throttle.
- The controller's two light wires can supply power to vehicle lights. If you need to control the lights' on/off, you will need to install a separate switch.
4. Instrukcja obsługi
4.1 Funkcje wyświetlacza LCD
The G51 LCD display provides various functions for monitoring and controlling your ebike:

Rysunek 6: Koniecview of G51 LCD display functions including mileage, power switch, mode setting, electricity display, brightness setting, fault display, voltage setting, speed display, and headlight display.
4.2 przycisk obsługi
The LCD display features intuitive button controls:
- Turn ON/OFF the Meter: Naciśnij i przytrzymaj [M] przycisk przez 3 sekundy.
- Operacja konfiguracji: Naciskać [+] I [-] buttons together for 3 seconds to enter the setting interface. Press [M] to enter a setting item. Use [+] or [-] aby wybrać parametry.
- Headlight Display: Naciśnij i przytrzymaj [+] button for 3 seconds to turn on/off the lights power.
- Cruise and Boost:
- When the bike is in a stop state: press and hold the [-] button to start 6km/h Boost. Press again to stop.
- When the bike is running: press and hold the [-] button to close cruise control.
- Wielofunkcyjny obszar wyświetlania: Dotknij [M] button to switch between Total mileage, ODO, Single Mileage TRIP, Digital Vol, and TIME.

Figure 7: Guide to the G51 LCD display button operations.
4.3 LCD Display Settings (Basic Information)
The display allows for various parameter adjustments:
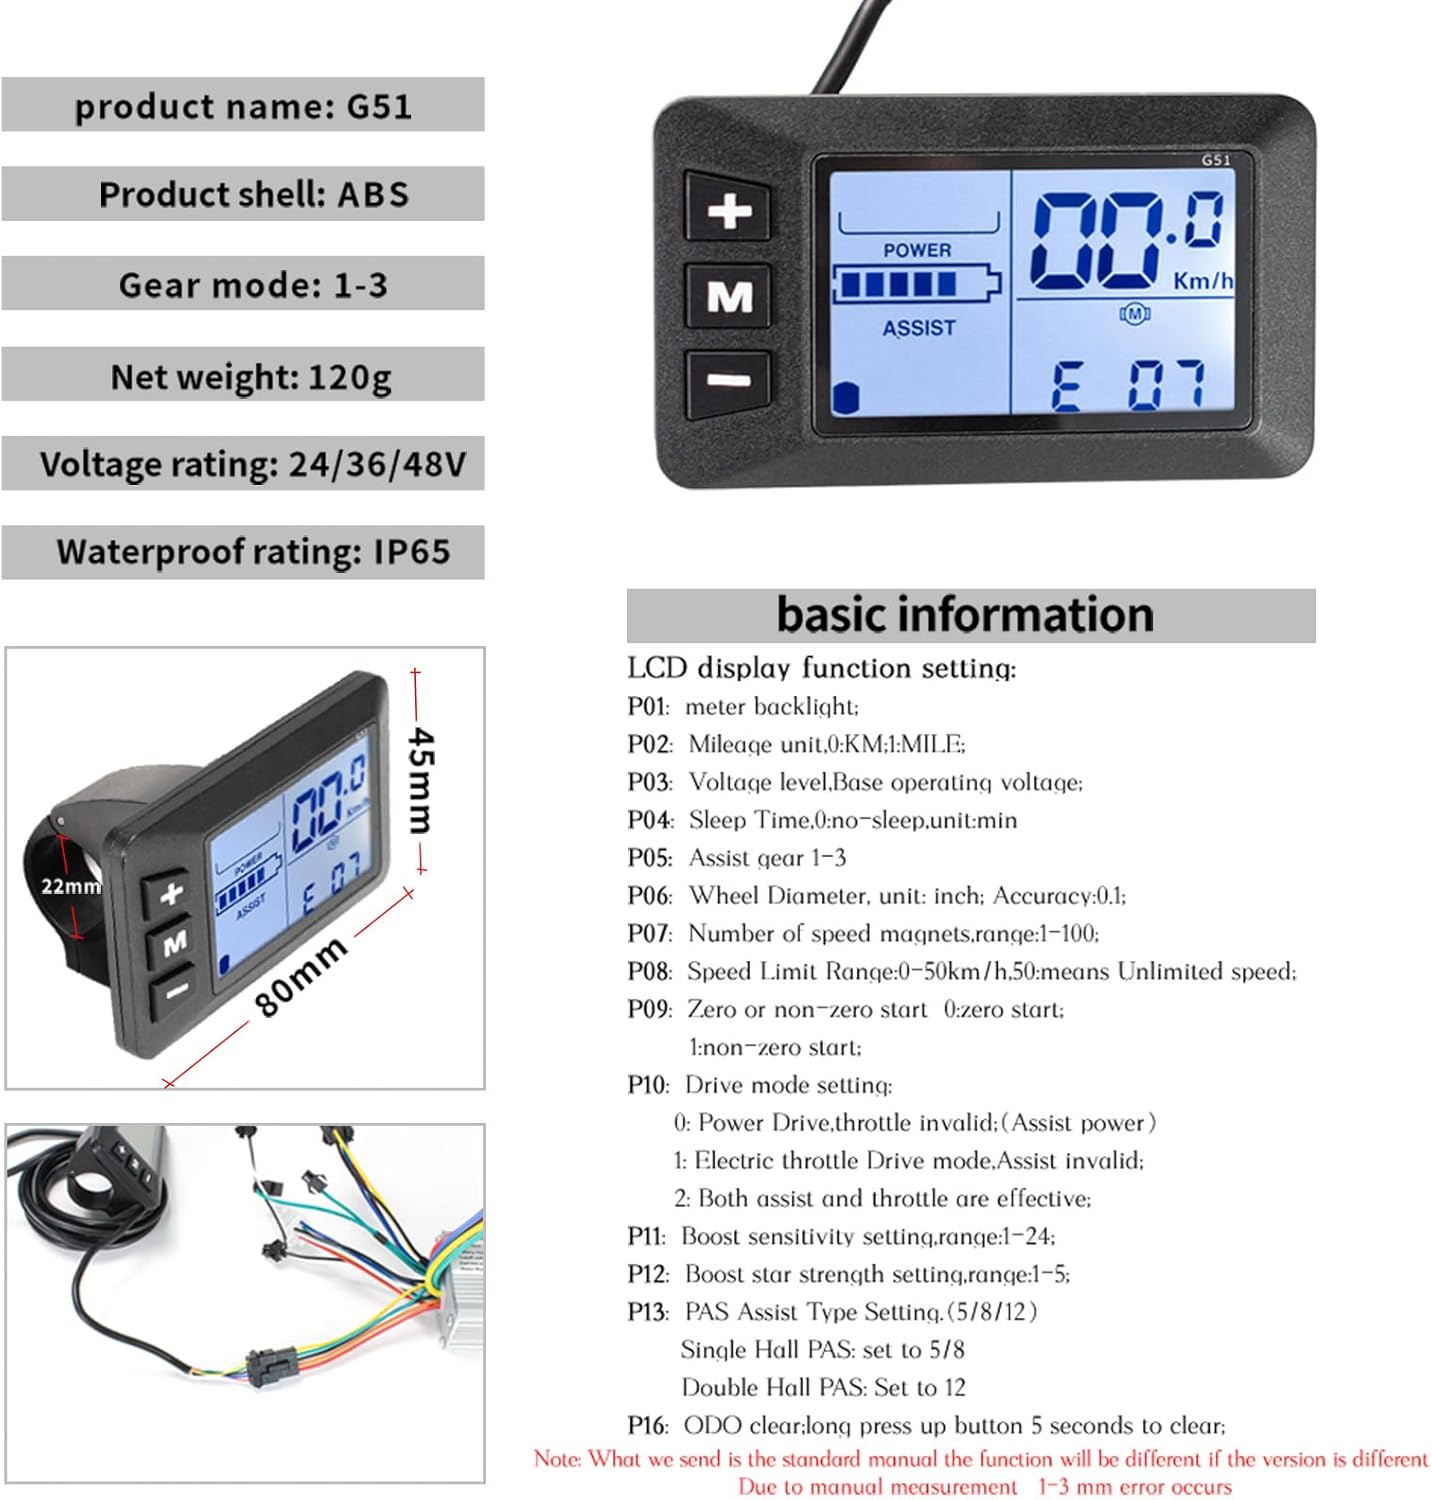
Figure 8: Basic information and adjustable settings for the G51 LCD display, including backlight, mileage unit, voltage, sleep time, assist gear, wheel diameter, speed limit, zero/non-zero start, drive mode, boost sensitivity, boost start strength, PAS assist type, and Hall PAS settings.
5. Konserwacja
To ensure the longevity and optimal performance of your controller and display kit, follow these general maintenance guidelines:
- Regularne czyszczenie: Keep the controller and display clean from dust and dirt. Use a soft, dry cloth for cleaning.
- Narażenie na działanie wody: While the display is IP65 waterproof, avoid prolonged immersion in water. If it gets wet, wipe it dry promptly.
- Kontrola kabla: Periodically check all cable connections for wear, damage, or loose connections. Ensure all plugs are securely seated.
- Unikaj uszkodzeń fizycznych: Chroń kontroler i wyświetlacz przed uderzeniami i upadkami.
- Kontrola temperatury: Operate and store the kit within recommended temperature ranges to prevent damage to electronic components.

Figure 9: The LCD display features IP65 waterproof rating. Wipe dry after use in wet conditions.
6. Rozwiązywanie Problemów
Refer to the following common questions and solutions for troubleshooting:

Figure 10: Common questions and troubleshooting steps for the ebike controller and display.
- Why is the speed not showing or inaccurate on the display?
The speed display is related to the settings of Parameter P06 and P07. P07 sets the motor's magnet count. If unsure of the correct value, adjust it incrementally until the speed shown on the display closely matches your GPS speed. This indicates the setting is accurate.
- Why is the throttle or PAS not responding?
Check the display settings: set parameter P10 to 2 to enable both the throttle and PAS. For the PAS type, set P13 to 5 or 8 for a single Hall sensor, or to 12 for a dual Hall sensor. If acceleration feels too slow with the throttle, you may increase the assist gear for stronger power output.
- What types of e-bike motors is the product compatible with?
This controller is compatible with motors equipped with Hall sensors, but not suitable for Hall sensorless motors or Hall sensors with malfunctions.
- Why is self-learning required after initial controller replacement?
To ensure proper matching of phase and Hall signal parameters between the newly installed controller and your e-bike motor, the self-learning process is essential. If you skip it, the motor may fail to rotate, run in reverse, or vibrate abnormally, making it unusable.
- Why connect the throttle after self-learning is finished?
It is not recommended to connect the throttle during self-learning, as it may interfere with the controller's learning process, causing matching failure, and resulting in unresponsive throttle operation afterward.
- How to troubleshoot the E07 error code?
E07 indicates a motor fault code. Please check if the motor phase wires and Hall sensor wire connectors are loose, and then perform the controller self-learning process again. Skipping self-learning can cause parameter mismatch and trigger E07.
6.1 Compatibility and Size Confirmation
- Controller Hardware Compatibility: Before ordering, ensure the controller's wiring harness has all necessary connectors and is compatible with your bike's wiring configuration, including connector types for all components. If any connectors do not match, you may need to strip and splice wires.
- Product Size Confirmation: The meter's mounting hole is 0.87 inches, fitting 0.87-inch handlebars. The controller dimensions are 3.35 × 2.17 × 1.18 inches (L×W×H). Verify these dimensions fit within your vehicle's frame.
7. Informacje o gwarancji
Ten produkt jest dostarczany z 6-miesięczna gwarancja od daty zakupu. Gwarancja obejmuje wady produkcyjne i usterki powstałe w wyniku normalnego użytkowania. Prosimy zachować dowód zakupu na wypadek roszczeń gwarancyjnych.
8. Wsparcie
For further assistance, technical support, or warranty inquiries, please contact CSBST customer service through the platform where you purchased the product. You may also visit the official CSBST store for more information and products.
Oficjalny film o produkcie:
Video 1: E-bike Controller and Display: Presentation & Usage Guide. This video provides a visual overview and usage demonstration of the CSBST ebike controller and display kit.


