1. Wprowadzenie
This manual provides essential instructions for the safe and efficient operation, installation, and maintenance of your AFYEEV 11 kW EV Charging Station. Please read this manual thoroughly before using the product and retain it for future reference.
2. Informacje dotyczące bezpieczeństwa
Always observe the following safety precautions to prevent injury or damage to the charging station and your vehicle:
- Ensure the charging station is connected to a properly grounded CEE 3-phase socket.
- Nie należy podejmować prób otwierania, rozmontowywania ani modyfikowania stacji ładującej.
- Keep the charging station away from flammable materials, liquids, and gases.
- Do not use the charging station if the cable or connector is damaged.
- In case of emergency, use the emergency stop switch immediately.
- The charger includes multiple protection functions: overcurrent protection, earth protection, lightning protection, overvoltage protection, under-frequency protection, overheating protection, and earthing warning.
- The unit is IP65 rated for dust and water resistance, suitable for outdoor use in various weather conditions (-30°C to 50°C).
3. Zawartość opakowania
Sprawdź, czy w opakowaniu znajdują się wszystkie elementy:
- 1 x EV Charging Station
- 1 x uchwyt na kabel
- 2 karty RFID
- 1 x Dishcloth (for cleaning)
4. Konfiguracja
4.1 Fizyczna instalacja
The AFYEEV 11 kW EV Charging Station is designed for simple plug-and-play operation, requiring no complex wiring. It connects directly to an existing CEE 3-phase socket.
- Select a suitable location for the charging station, ensuring it is within reach of your vehicle and a CEE 3-phase socket. The unit is IP65 rated, making it suitable for both indoor and outdoor environments.
- Mount the charging station securely to a wall or suitable support structure using appropriate fasteners (not included).
- Plug the charging station's CEE 3-phase plug into the existing CEE 3-phase socket.
- Install the provided cable holder to manage the charging cable when not in use.

Obraz: The AFYEEV EV Charging Station is designed for safe outdoor use, featuring an IP65 rating for dust and water resistance, and operating effectively in temperatures from -30°C to +50°C.
4.2 Instalacja i połączenie aplikacji
The charging station can be controlled via a smart application. The recommended application is the Tuya Smart App.
- Download the Tuya Smart App from your device's app store (iOS or Android) or scan the QR code provided on the product packaging or in the image below. Pobierz aplikację Tuya Smart
- Zarejestruj się lub zaloguj na swoje konto.
- Upewnij się, że Bluetooth i Wi-Fi w Twoim smartfonie są włączone.
- Follow the in-app instructions to add your EV charging station. The app will guide you through connecting via Bluetooth or Wi-Fi.
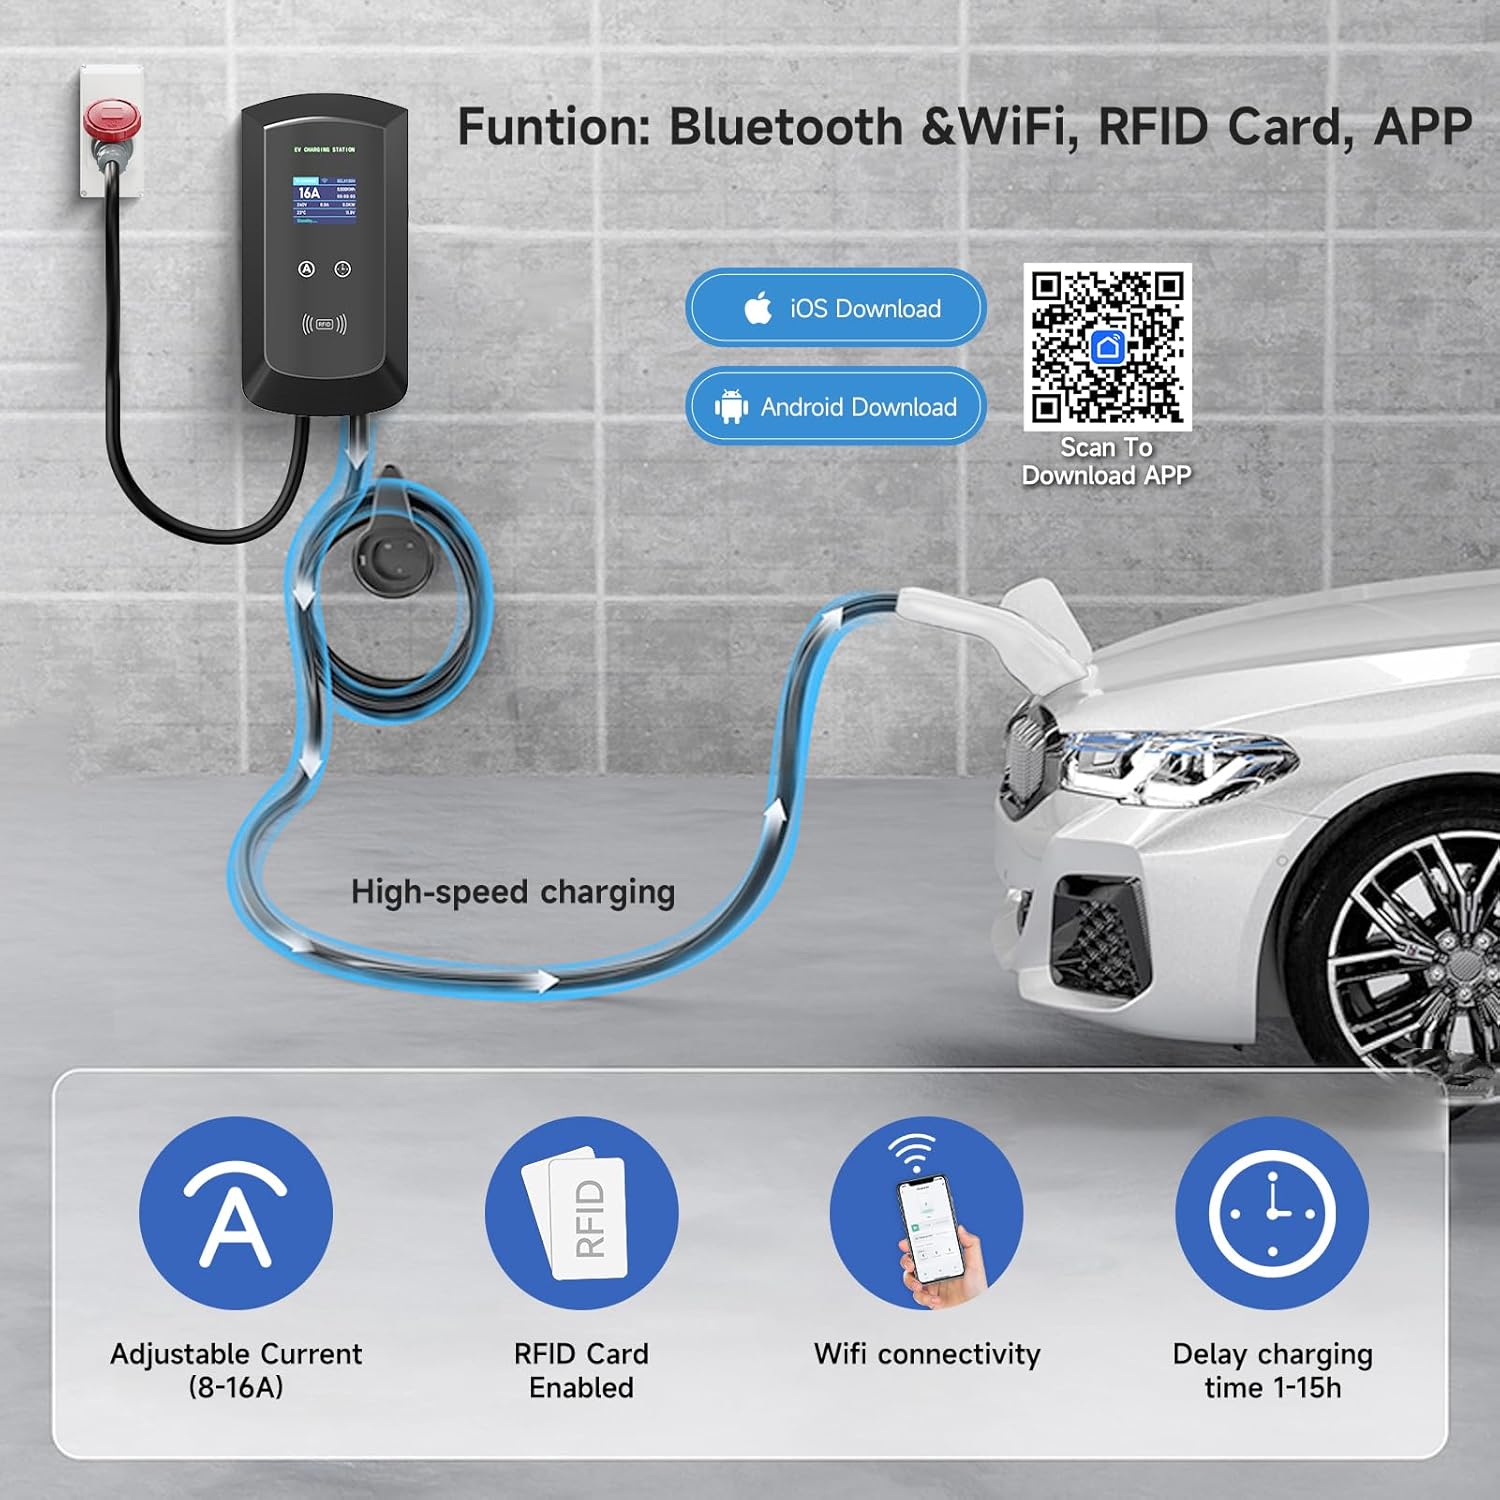
Obraz: The charging station offers smart control via Bluetooth and Wi-Fi using the Tuya Smart App, allowing for adjustable current, RFID card enablement, and delayed charging time settings.
4.3 Konfiguracja karty RFID
The included RFID cards provide an alternative method to start and stop charging, enhancing security and convenience.
- The RFID cards are pre-configured for use with your charging station.
- To initiate charging, simply swipe an authorized RFID card over the designated RFID reader area on the charging station.
- To stop charging, swipe the card again.
5. Instrukcja obsługi
5.1 Starting and Stopping a Charge
You can start and stop charging using either the RFID card or the smart application.
- Connect the Vehicle: Plug the charging cable into your electric vehicle's charging port.
- Start Charging (RFID): Swipe an authorized RFID card over the RFID reader on the charging station. The display will indicate that charging has begun.
- Start Charging (App): Open the Tuya Smart App, select your charging station, and initiate charging through the app interface.
- Stop Charging (RFID): Swipe the authorized RFID card over the reader again.
- Stop Charging (App): Use the app interface to stop the charging session.
- Disconnect the Vehicle: Once charging is complete or stopped, safely disconnect the charging cable from your vehicle.

Obraz: Charging can be easily initiated by swiping an RFID card over the designated area on the EV charging station, providing a secure and straightforward method to start and stop charging.
5.2 Regulacja prądu ładowania
The charging current can be adjusted between 8A and 16A to suit your vehicle's requirements or available power supply. This can be done manually or via the app.
- Regulacja ręczna: Use the physical buttons on the charging station to cycle through available current settings (8A, 10A, 13A, 16A). The station has a memory function for the last selected current.
- Dostosowanie aplikacji: Within the Tuya Smart App, navigate to the charging settings to select your desired current (8A-16A).
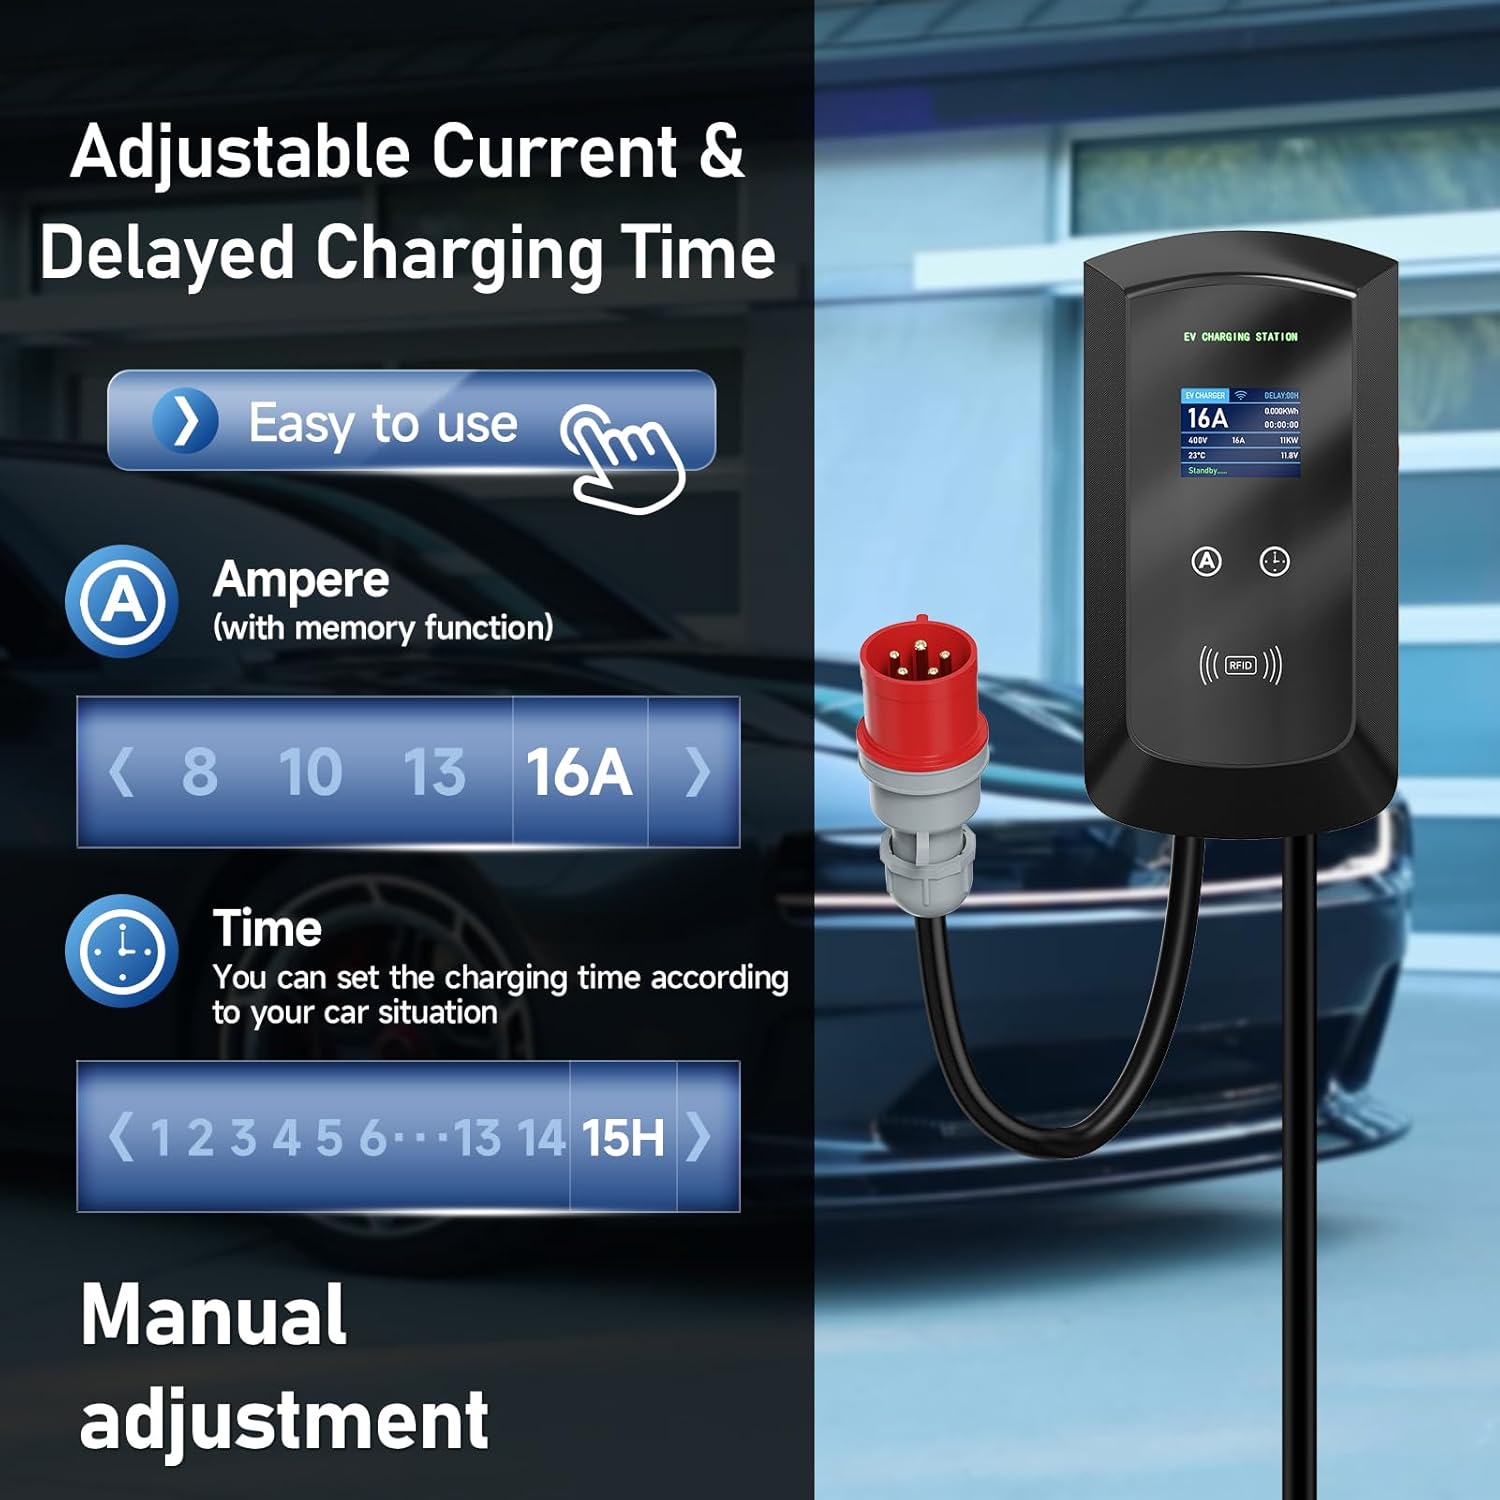
Obraz: The charging station allows for easy manual adjustment of the charging current (8A-16A) and setting delayed charging times (1-15 hours) directly from the unit.
5.3 Ładowanie zaplanowane
Utilize the smart app to schedule charging sessions during off-peak hours to save on electricity costs.
- Open the Tuya Smart App and select your charging station.
- Access the "Scheduled Charging" or "Time Setting" feature.
- Set your desired start and end times for the charging session.
- Confirm the schedule. The charging station will automatically begin and end charging according to your settings.

Obraz: The smart app enables scheduled charging, allowing users to set specific times for charging, such as during off-peak hours, to optimize electricity costs.
5.4 Monitorowanie stanu ładowania
The large screen display on the charging station provides real-time information about the charging process.
- Prąd (A): Displays the active charging current.
- Tomtage (v): Pokazuje wolumen w czasie rzeczywistymtage.
- Moc (kW): Indicates the current charging power.
- Energia (kWh): Tracks the total energy delivered during the session.
- Temperatura (°C): Displays the internal temperature of the unit.
- Status: Shows the current operational status (e.g., "Standby", "Charging").
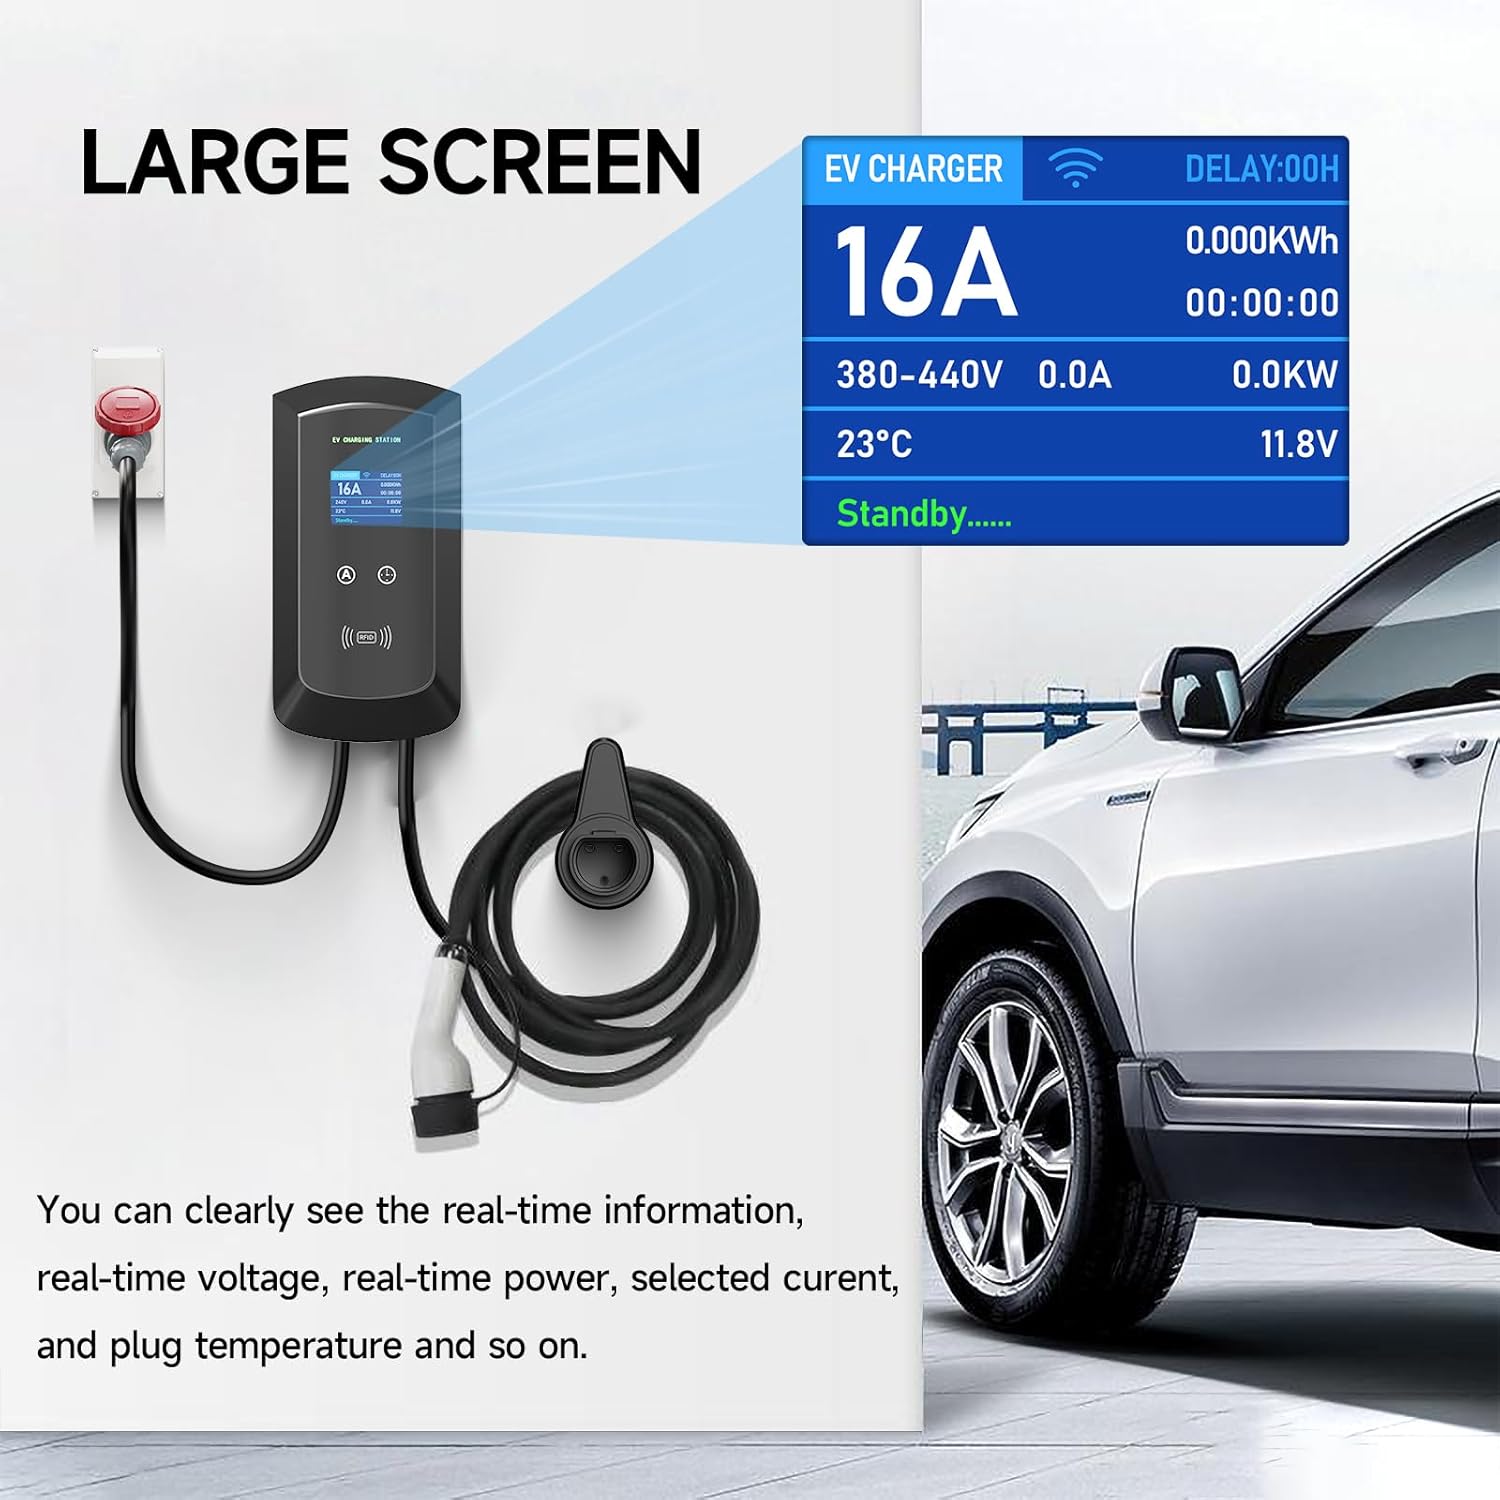
Obraz: The large screen on the EV charger provides clear, real-time information including current, voltage, power, temperature, and charging status, ensuring users can easily monitor the charging process.
6. Konserwacja
Regularna konserwacja zapewnia długowieczność i bezpieczną pracę stacji ładowania.
- Czyszczenie: Użyj miękkiego, damp cloth (like the provided dishcloth) to clean the exterior of the charging station. Do not use abrasive cleaners or solvents. Ensure the unit is powered off before cleaning.
- Kontrola kabla: Okresowo sprawdzaj kabel ładujący i złącze pod kątem oznak zużycia, uszkodzeń lub przetarć. W przypadku stwierdzenia jakichkolwiek uszkodzeń, natychmiast przerwij użytkowanie i skontaktuj się z pomocą techniczną.
- Warunki środowiskowe: While the unit is IP65 rated, avoid prolonged exposure to extreme weather conditions if possible. Ensure proper ventilation around the unit.
7. Rozwiązywanie Problemów
If you encounter issues with your charging station, refer to the following common troubleshooting steps:
- Brak zasilania:
- Check if the CEE 3-phase socket has power.
- Ensure the charging station's plug is fully inserted.
- Sprawdź, czy w Twoim wyłączniku obwodu nie wystąpiły żadne zadziałania.
- Ładowanie nie rozpoczyna się:
- Ensure the charging cable is securely connected to both the station and the vehicle.
- Verify that the RFID card is authorized and swiped correctly.
- Check the app for any error messages or scheduled charging conflicts.
- Upewnij się, że Twój pojazd jest gotowy na przyjęcie ładunku.
- Problemy z łącznością aplikacji:
- Ensure your phone's Bluetooth and Wi-Fi are on.
- Check if the charging station is within Wi-Fi or Bluetooth range.
- Uruchom ponownie aplikację i/lub telefon.
- If Wi-Fi connection fails, try reconnecting through the app's device management section.
- Komunikat o błędzie na wyświetlaczu:
- Note down the error code or message.
- Refer to the app for more detailed explanations or contact customer support with the error information.
Jeśli po wykonaniu tych czynności problem nadal występuje, skontaktuj się z obsługą klienta.
8. Specyfikacje
| Funkcja | Szczegół |
|---|---|
| Marka | AFYEEV |
| Numer modelu | 11kW-8-16A-CEEBIGUA-001 |
| Maksymalna moc wyjściowa | 11 kW |
| Maksymalny prąd | 16 A |
| Regulowany prąd | 8 A, 10 A, 13 A, 16 A |
| Typ złącza | CEE 3-phase plug (input), Type 2 (output) |
| Długość kabla | 5m |
| Stopień ochrony IP | IP65 (pyłoszczelność i wodoodporność) |
| Temperatura pracy | -30°C do 50°C |
| Łączność | Wi-Fi, Bluetooth, RFID Card |
| Funkcje bezpieczeństwa | Overcurrent, Earth, Lightning, Overvoltage, Under-frequency, Overheating Protection, Emergency Stop Switch |
| Zgodność ze standardem | IEC 62196-2 (European Standard) |
9. Gwarancja i wsparcie
For warranty information, technical support, or service inquiries, please contact AFYEEV customer service through the retailer where you purchased the product or visit the official AFYEEV webstrona.
Please have your model number (11kW-8-16A-CEEBIGUA-001) and purchase date available when contacting support.