
1. Wprowadzenie
Thank you for choosing the Sandberg Survivor Radio All-in-1 2000, Model 421-04. This versatile device is designed to provide reliable communication and essential functions in various situations, including emergencies. It features AM/FM/WB radio reception, a powerful flashlight, an SOS alarm, and multiple charging options including solar, hand crank, and USB. This manual will guide you through the proper setup, operation, and maintenance of your radio to ensure its optimal performance and longevity.
2. Instrukcje bezpieczeństwa
Przed użyciem produktu należy przeczytać i zrozumieć wszystkie instrukcje bezpieczeństwa. Nieprzestrzeganie tych instrukcji może spowodować porażenie prądem, pożar lub poważne obrażenia.
- Nie wystawiaj urządzenia na działanie ekstremalnych temperatur, bezpośredniego światła słonecznego i wysokiej wilgotności.
- Keep the device away from water and other liquids. If it gets wet, turn it off immediately and allow it to dry completely before reuse.
- Nie należy podejmować prób demontażu, naprawy ani modyfikacji urządzenia. Wszelkie czynności serwisowe należy zlecić wykwalifikowanemu personelowi.
- Use only the specified charging methods (USB, hand crank, solar).
- Przechowywać w miejscu niedostępnym dla dzieci.
- Urządzenie i baterię należy utylizować zgodnie z lokalnymi przepisami.
- Avoid prolonged exposure to loud sounds from the radio to prevent hearing damage.
3. Zawartość opakowania
Sprawdź, czy w przesyłce znajdują się wszystkie elementy:
- Sandberg Survivor Radio All-in-1 2000 (Model 421-04)
- Kabel ładujący USB
- Instrukcja obsługi
4. Koniec produktuview
Familiarize yourself with the various parts and controls of your Sandberg Survivor Radio.
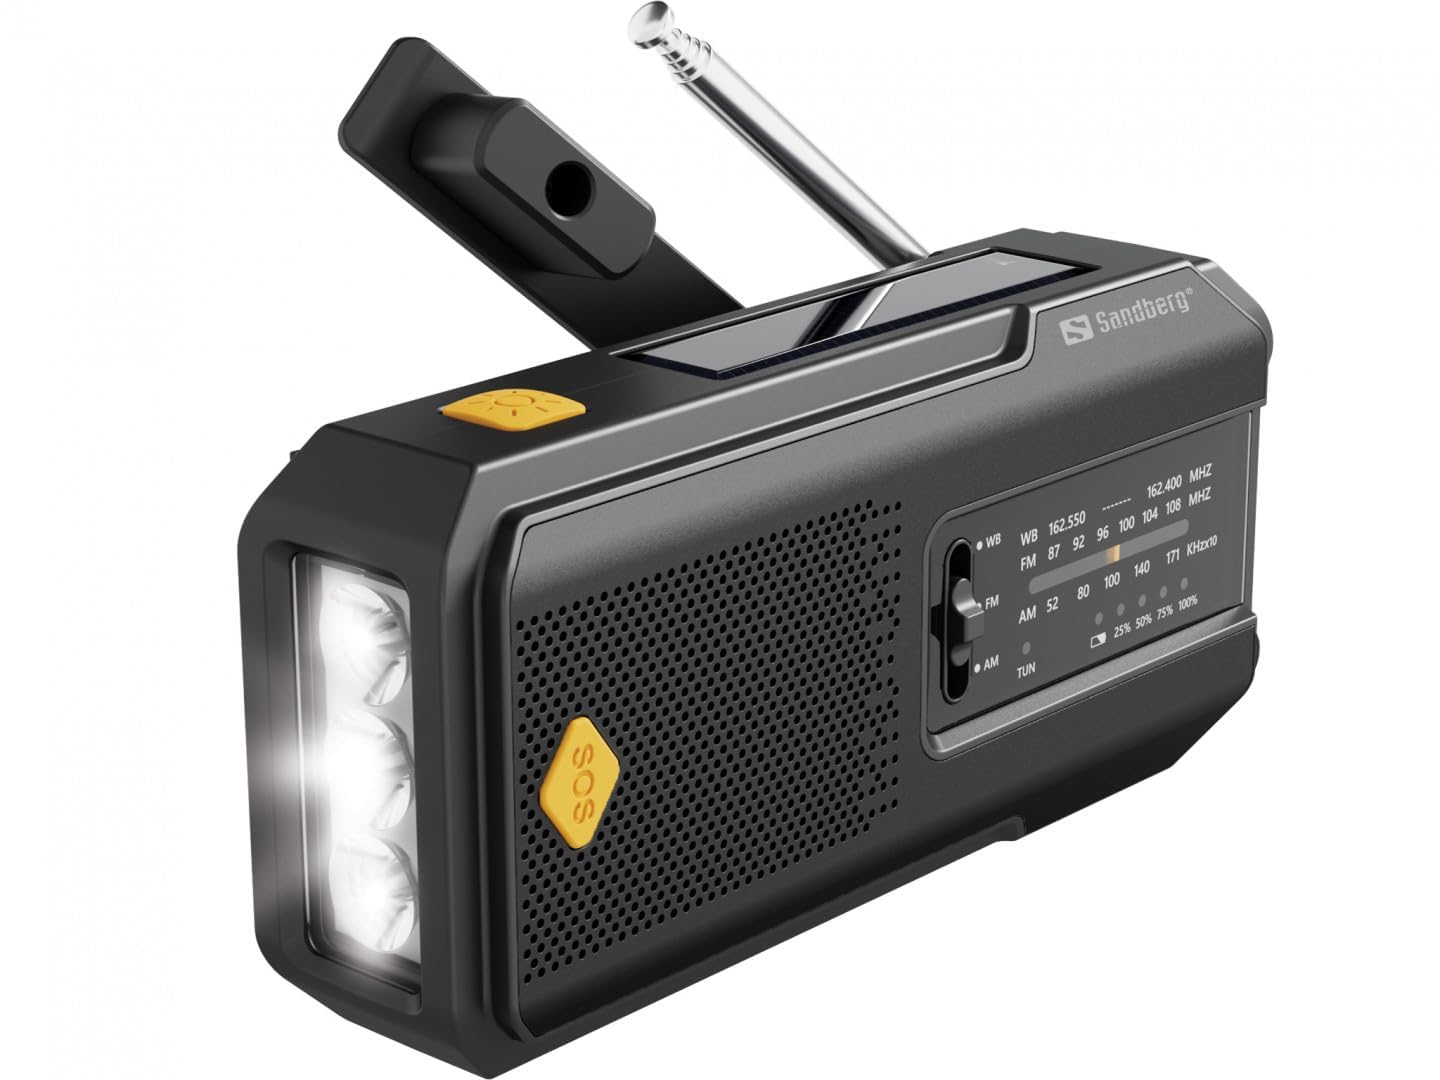
Rysunek 1: Przód view of the Sandberg Survivor Radio, showing the main speaker, tuning dial, antenna, and folded hand crank.
- Antena teleskopowa: Dla lepszego odbioru radia.
- Korba ręczna: Do ręcznego wytwarzania energii.
- Panel słoneczny: For charging the internal battery via sunlight.
- Flesz: Zintegrowane światło LED do oświetlenia.
- Przycisk SOS: Activates an emergency alarm and flashing light.
- Głośnik: Audio output for radio.
- Pokrętło strojenia: Do wyboru częstotliwości radiowych.
- Selektor pasma: Switches between AM, FM, and WB (Weather Band).
- Volume Control / Power Switch: Adjusts volume and turns the radio on/off.
- Port wyjściowy USB: Do ładowania urządzeń zewnętrznych.
- Port wejściowy Micro USB: For charging the radio via USB.
- Wskaźnik baterii: Pokazuje aktualny poziom naładowania baterii.

Rysunek 2: Strona view highlighting the integrated flashlight and the yellow SOS button.

Rysunek 3: Szczyt view illustrating the solar charging panel and the hand crank in its operational position.
5. Konfiguracja
5.1 Pierwsze ładowanie
Before first use, it is recommended to fully charge the radio's internal battery using the USB charging cable.
- Connect the micro USB end of the provided cable to the Micro USB Input Port on the radio.
- Podłącz standardowy koniec USB do zasilacza USB (nie ma go w zestawie) lub do portu USB komputera.
- The battery indicator lights will show charging progress. Once all lights are solid, the radio is fully charged.
6. Działanie
6.1 Włączanie/wyłączanie i regulacja głośności
Obróć Volume Control / Power Switch clockwise to turn the radio on and increase the volume. Rotate counter-clockwise to decrease volume and turn the radio off.
6.2 Radio Function (AM/FM/WB)
- Rozszerz antena teleskopowa fully for optimal reception.
- Użyj Selektor pasma to choose between AM, FM, or WB (Weather Band).
- Obróć Pokrętło strojenia aby wyszukać stacje radiowe.
- Dostosuj Kontrola głośności do pożądanego poziomu słuchania.
Note: Weather Band (WB) provides access to NOAA weather alerts and broadcasts in applicable regions.
6.3 Latarka
Naciśnij dedykowany Przycisk latarki (usually located on the side or front) to turn the flashlight on. Press again to turn it off.
6.4 Alarm SOS
W nagłych wypadkach naciśnij i przytrzymaj Przycisk SOS (often yellow) to activate a loud siren and a flashing light. Press it again to deactivate the alarm.
6.5 Charging the Radio (Internal Battery)
The radio can be charged using three methods:
- Ładowanie przez USB: As described in Section 5.1. This is the fastest and most efficient method.
- Ładowanie korbą ręczną: Rozłóż Korby and rotate it clockwise or counter-clockwise at a steady pace (approximately 130-150 RPM). A few minutes of cranking can provide enough power for a short period of radio use or flashlight operation.
- Ładowanie słoneczne: Place the radio with the Panel słoneczny facing direct sunlight. This method is ideal for maintaining charge or slow charging in emergency situations. It is less efficient than USB or hand cranking for rapid charging.
6.6 Ładowanie urządzeń zewnętrznych (funkcja powerbanku)
The radio can act as a power bank to charge small electronic devices like smartphones.
- Podłącz kabel ładujący urządzenia do Port wyjściowy USB w radiu.
- The radio's internal battery will begin charging your external device.
- Note: This will drain the radio's internal battery. Use this function judiciously, especially in emergency situations.
7. Konserwacja
- Czyszczenie: Wytrzyj radio miękką ściereczką.amp płótno. Nie używaj ostrych środków chemicznych ani ściernych środków czyszczących.
- Składowanie: Store the radio in a cool, dry place away from direct sunlight and extreme temperatures. If storing for extended periods, it is recommended to fully charge the battery every 3-6 months to maintain battery health.
- Pielęgnacja baterii: Avoid fully discharging the battery frequently. Recharge it when the battery indicator shows low power.
8. Rozwiązywanie Problemów
| Problem | Możliwa przyczyna | Rozwiązanie |
|---|---|---|
| Radio się nie włącza. | Bateria jest rozładowana. | Charge the radio using USB, hand crank, or solar power. |
| Słaby odbiór radia. | Antena nie jest wysunięta; sygnał jest słaby; zakłócenia. | Extend the telescopic antenna fully. Try repositioning the radio. Tune slowly. |
| Latarka nie działa. | Battery is depleted; flashlight button not pressed correctly. | Charge the radio. Ensure the flashlight button is pressed firmly. |
| Urządzenie zewnętrzne nie ładuje się. | Niski poziom baterii w radiu; niewłaściwy kabel; urządzenie niekompatybilne. | Ensure the radio has sufficient charge. Use the correct USB cable for your device. Some high-power devices may not be fully supported. |
9. Specyfikacje
- Model: 421-04
- Marka: Sandberg
- Zespoły radiowe: AM, FM, WB (Weather Band)
- Metody ładowania: USB, Hand Crank, Solar Panel
- Funkcje: Radio, Flashlight, SOS Alarm, Power Bank
- Producent: Sandberg
- Kraj/region pochodzenia: Niemcy
10. Gwarancja i wsparcie
Sandberg products are manufactured to high quality standards. For information regarding warranty terms and technical support, please refer to the official Sandberg website or contact your local retailer. Please retain your purchase receipt as proof of purchase for warranty claims.
Aby uzyskać dalszą pomoc, odwiedź stronę: www.sandberg.it