
1. Wprowadzenie
This manual provides detailed instructions for the setup, operation, maintenance, and troubleshooting of your mooas Multi-Hexagon Clock Timer (Yellow Ver.2) and mooas Visual Timer Clock. Please read this manual thoroughly before using the products to ensure proper functionality and to maximize your user experience.
2. Koniec produktuview
2.1 mooas Multi-Hexagon Clock Timer
The Multi-Hexagon Clock Timer is a versatile, compact device designed for efficient time management. Its unique hexagonal shape allows for quick selection of preset timers by simply rotating the device. It features a backlit display for visibility in various lighting conditions and offers both sound and vibration alarm modes.

Image: The yellow mooas Multi-Hexagon Clock Timer, showing the current time.

Image: A comparison of three Multi-Hexagon Timers in different colors, illustrating various timer presets.
2.2 mooas Visual Timer Clock
The Visual Timer Clock is a multi-functional device that displays time, date, temperature, and humidity. It features a large, clear backlit LCD display and is waterproof (IPX5 rated), making it suitable for use in bathrooms and kitchens. It offers flexible placement options including tabletop, wall-mounted, or magnetic attachment.
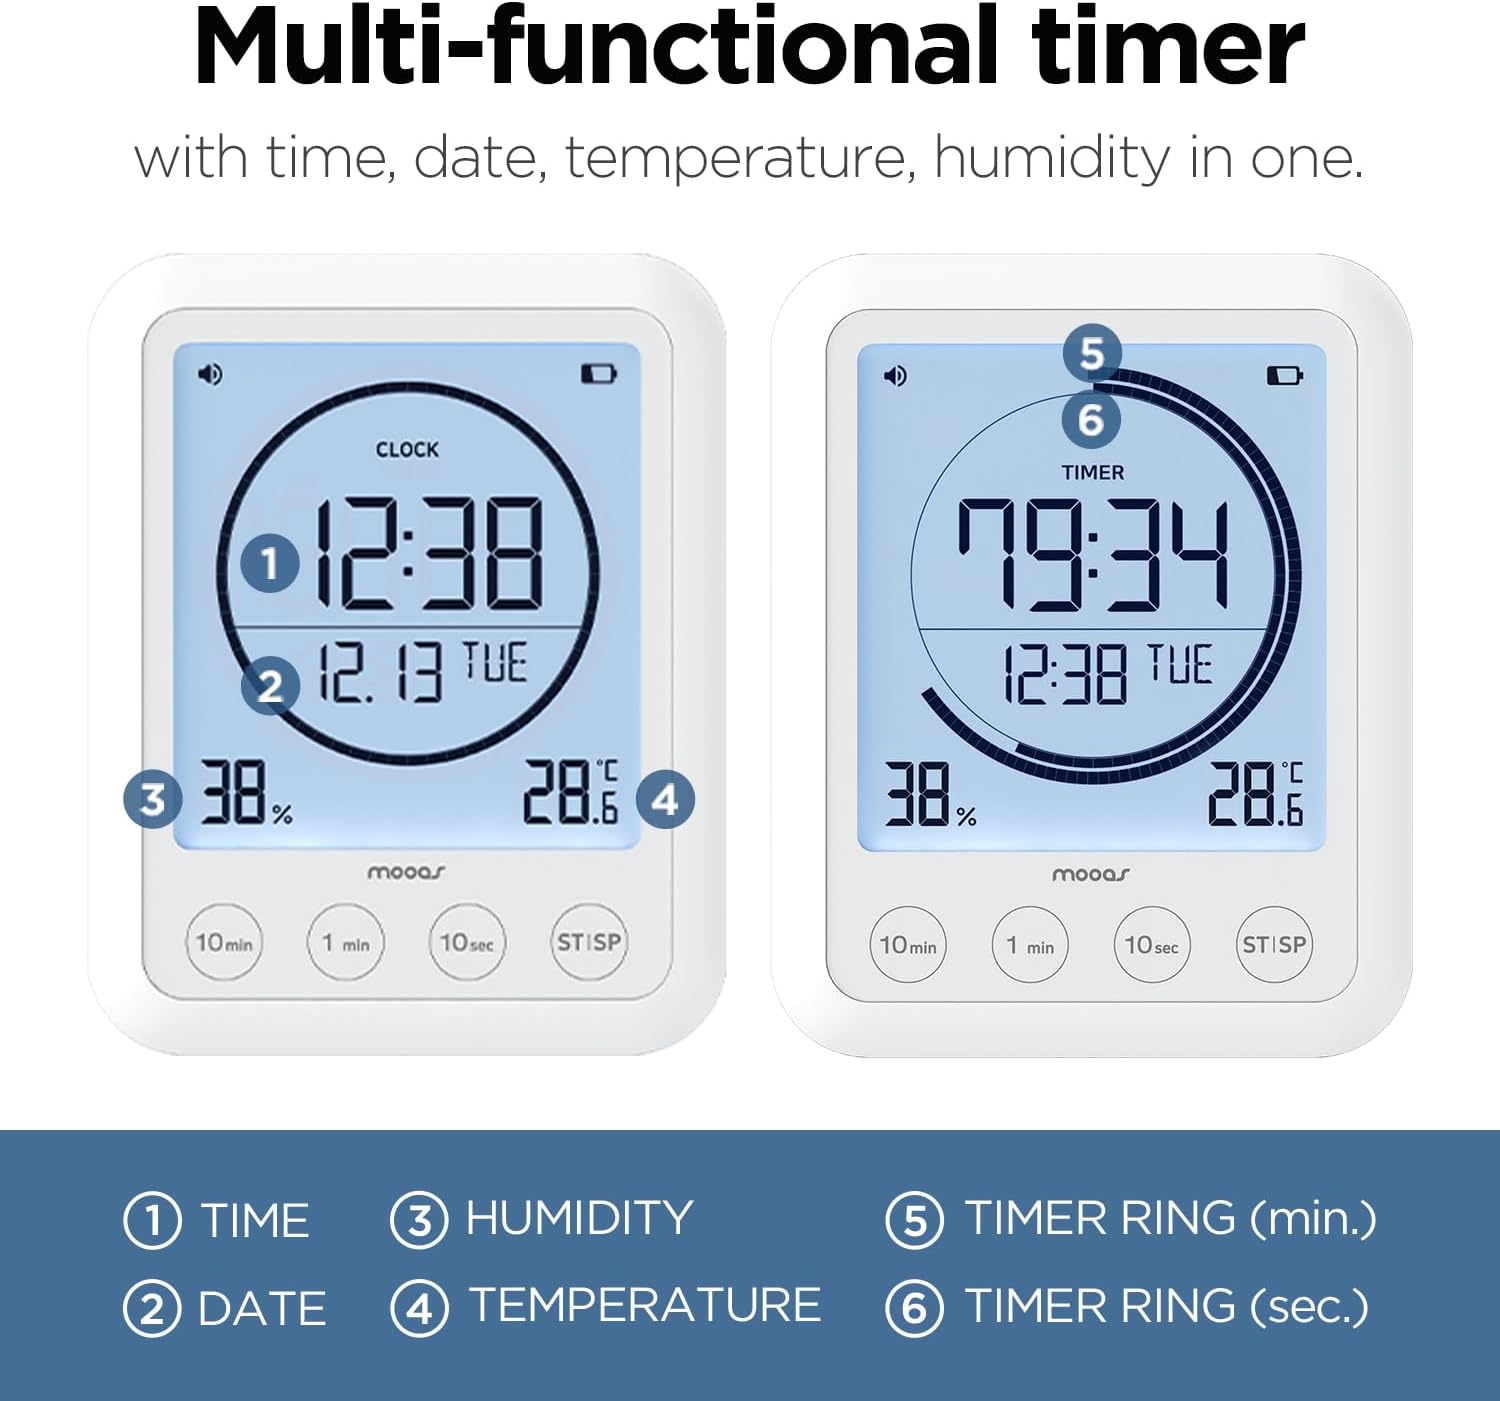
Image: The mooas Visual Timer Clock display, highlighting its various informational readouts.
3. Konfiguracja
3.1 Instalacja baterii
Both the Multi-Hexagon Clock Timer and the Visual Timer Clock are battery-powered. Locate the battery compartment on the back or bottom of each device. Insert the required batteries (typically AAA or AA, refer to the compartment label) ensuring correct polarity (+/-). Close the battery compartment securely.
3.2 Initial Setup - Multi-Hexagon Clock Timer
- Włączanie: After battery installation, the display should activate.
- Ustawianie zegara: Refer to the small buttons on the side or bottom of the device. Typically, a 'SET' or 'MODE' button allows you to cycle through time settings (hour, minute). Use '+' or '-' buttons to adjust values.
- Ustawienia alarmu: Access alarm settings via the 'SET' or 'ALARM' button. Adjust alarm time and select between sound, vibration, or both.
- Podświetlenie: The backlight usually activates automatically when the device is moved or a button is pressed.
3.3 Initial Setup - Visual Timer Clock
- Włączanie: The large LCD display will activate upon battery installation.
- Ustawianie czasu i daty: Use the 'SET' or 'MODE' button to enter time and date adjustment mode. Use the adjustment buttons (e.g., '10min', '1min', '10sec') to change values for hour, minute, year, month, and day.
- Jednostka temperatury: Look for a small button (often on the back or inside the battery compartment) to switch between Celsius (°C) and Fahrenheit (°F).
- Montowanie: Decide on your preferred placement. The Visual Timer Clock can stand on a flat surface using its integrated kickstand, be mounted on a wall using a nail or screw (not included), or attached to a metallic surface via its built-in magnets.
4. Instrukcja obsługi
4.1 Using the Multi-Hexagon Clock Timer
This timer is designed for intuitive operation by rotating its sides.
- Selecting a Preset Timer: Simply rotate the timer so that the desired preset time (e.g., 5, 10, 25, 30, 50, 60 minutes) faces upwards. The timer will automatically start counting down.
- Start/Pause/Reset:

Image: Demonstrating the Start, Pause, and Reset functions of the Multi-Hexagon Timer.
- Start: Once a side is facing up, the timer starts automatically.
- Pauza: To pause the countdown, place the timer on a neutral side (often indicated by a blank face or a specific icon) or press a designated button.
- Reset: To reset the timer, turn it to a different preset or press the reset button if available.
- Funkcja alarmu: When the timer reaches zero, the alarm will activate according to your settings (sound, vibration, or both). To stop the alarm, simply pick up or rotate the timer.
- Podświetlenie: The display features a backlight for improved visibility, especially in low-light conditions. It typically activates with movement or button press.
- Pomodoro Technique: The 25-minute preset is ideal for implementing the Pomodoro Technique for focused work intervals.
4.2 Using the Visual Timer Clock
This timer offers a clear display and button-based operation.
- Wyświetl informacje: The large LCD continuously shows:
- Current Time (1)
- Data (2)
- Wilgotność (3)
- Temperatura (4)
- Ustawianie timerów: Use the dedicated buttons (e.g., '10min', '1min', '10sec') to set your desired countdown time. Pressing these buttons adds the respective time increments.
- Timer startu/zatrzymania: Press the 'ST/SP' (Start/Stop) button to begin or pause the countdown. When the timer reaches zero, an alarm will sound. Press 'ST/SP' again to stop the alarm.
- Regulowana głośność: The timer features adjustable alarm volume. Refer to the side or back of the device for volume control buttons or a switch.
- Licznik czasu: If no countdown time is set and 'ST/SP' is pressed, the device may function as a count-up timer.
- Podświetlenie: The display is backlit for easy reading. The backlight typically activates when buttons are pressed.

Obraz: Byłyamples of the Visual Timer Clock in various daily activities.
5. Konserwacja
- Czyszczenie: Wipe the devices with a soft, dry, or slightly damp ściereczka. Nie należy używać środków czyszczących o właściwościach ściernych ani rozpuszczalników.
- Wymiana baterii: Replace batteries when the display dims or functions become erratic. Always use new batteries of the specified type and dispose of old batteries responsibly.
- Składowanie: Store the timers in a cool, dry place away from direct sunlight and extreme temperatures when not in use for extended periods.
6. Rozwiązywanie Problemów
- Wyświetlacz jest pusty lub przyciemniony: Check battery installation. Replace with fresh batteries.
- Timer not starting/responding: Ensure batteries are correctly installed. For the Multi-Hexagon Timer, ensure a preset side is fully facing upwards. For the Visual Timer, ensure 'ST/SP' button is pressed.
- Inaccurate temperature/humidity readings (Visual Timer): Ensure the device is not placed near heat sources, vents, or in direct sunlight, which can affect sensor accuracy.
- Alarm nie wydaje dźwięku/nie wibruje: Check alarm settings to ensure the desired mode is selected. For the Visual Timer, check volume settings.
7. Specyfikacje
| Funkcja | Szczegół |
|---|---|
| Marka | mouas |
| Typ wyświetlacza | Cyfrowy |
| Styl | Nowoczesny |
| Funkcja specjalna | Adjustable Volume (Visual Timer) |
| Wymiary produktu | 2.46"W x 2.36"H (Multi-Hexagon Timer) |
| Źródło zasilania | Zasilany bateryjnie |
| Typ pokoju | Bathroom, Kitchen, Study |
| Kształt | Hexagonal (Multi-Hexagon Timer) |
| Zastosowanie wewnątrz/na zewnątrz | Wnętrz |
| Baterie w zestawie | Tak |
| Typ montażu | Tabletop, Wall Mount (Visual Timer) |
| Budzik | Tak |
| Tryb działania | Elektryczny |
| Materiał ramy | Plastikowy |
| Formularz zegara | Wiele wyświetlaczy |
| Stopień wodoodporności | IPX5 (Visual Timer) |
8. Gwarancja i wsparcie
For warranty information or technical support, please refer to the product packaging or contact mooas customer service through the retailer's platform where the product was purchased. Keep your purchase receipt for warranty claims.