
KUAIQU SPPS-D6001-232
KUAIQU 600V 1A Programmable Laboratory Power Supply User Manual
Model: SPPS-D6001-232
1. Wprowadzenie
This manual provides detailed instructions for the safe and efficient operation of your KUAIQU 600V 1A Programmable Laboratory Power Supply, model SPPS-D6001-232. This device is designed for precise voltage and current regulation in various laboratory, research, and industrial applications. Please read this manual thoroughly before use and retain it for future reference.
2. Instrukcje bezpieczeństwa
OSTRZEŻENIE: Nieprzestrzeganie tych instrukcji bezpieczeństwa może spowodować porażenie prądem, pożar lub uszkodzenie produktu.
- Zawsze podłączaj zasilacz do uziemionego gniazdka.
- Nie używaj urządzenia w mokrym lub damp warunki.
- Ensure proper ventilation to prevent overheating. The integrated cooling fan automatically controls temperature to prolong product life.
- Nie otwierać casing; wewnątrz nie ma żadnych części nadających się do samodzielnej naprawy przez użytkownika.
- This power supply is equipped with multiple protection systems: Over Voltage Protection (OUP), Over Current Protection (OCP), Over Temperature Protection (OTP), and Short Circuit Protection.
- Always disconnect the load before making adjustments to prevent accidental damage. The built-in output switch allows voltage and current adjustment without active output.
- The device is FCC/CE certified, ensuring reliable and stable performance.
3. Zawartość opakowania
Sprawdź, czy w przesyłce znajdują się wszystkie elementy wymienione poniżej:
- 1 x KUAIQU Programmable Laboratory Power Supply (SPPS-D6001-232)
- 1 x Przewód zasilający
- 1 x Output Cable (with alligator clips)
- 1 x kabel USB
- 1 x Instrukcja obsługi
4. Koniec produktuview
Familiarize yourself with the components and controls of your power supply.
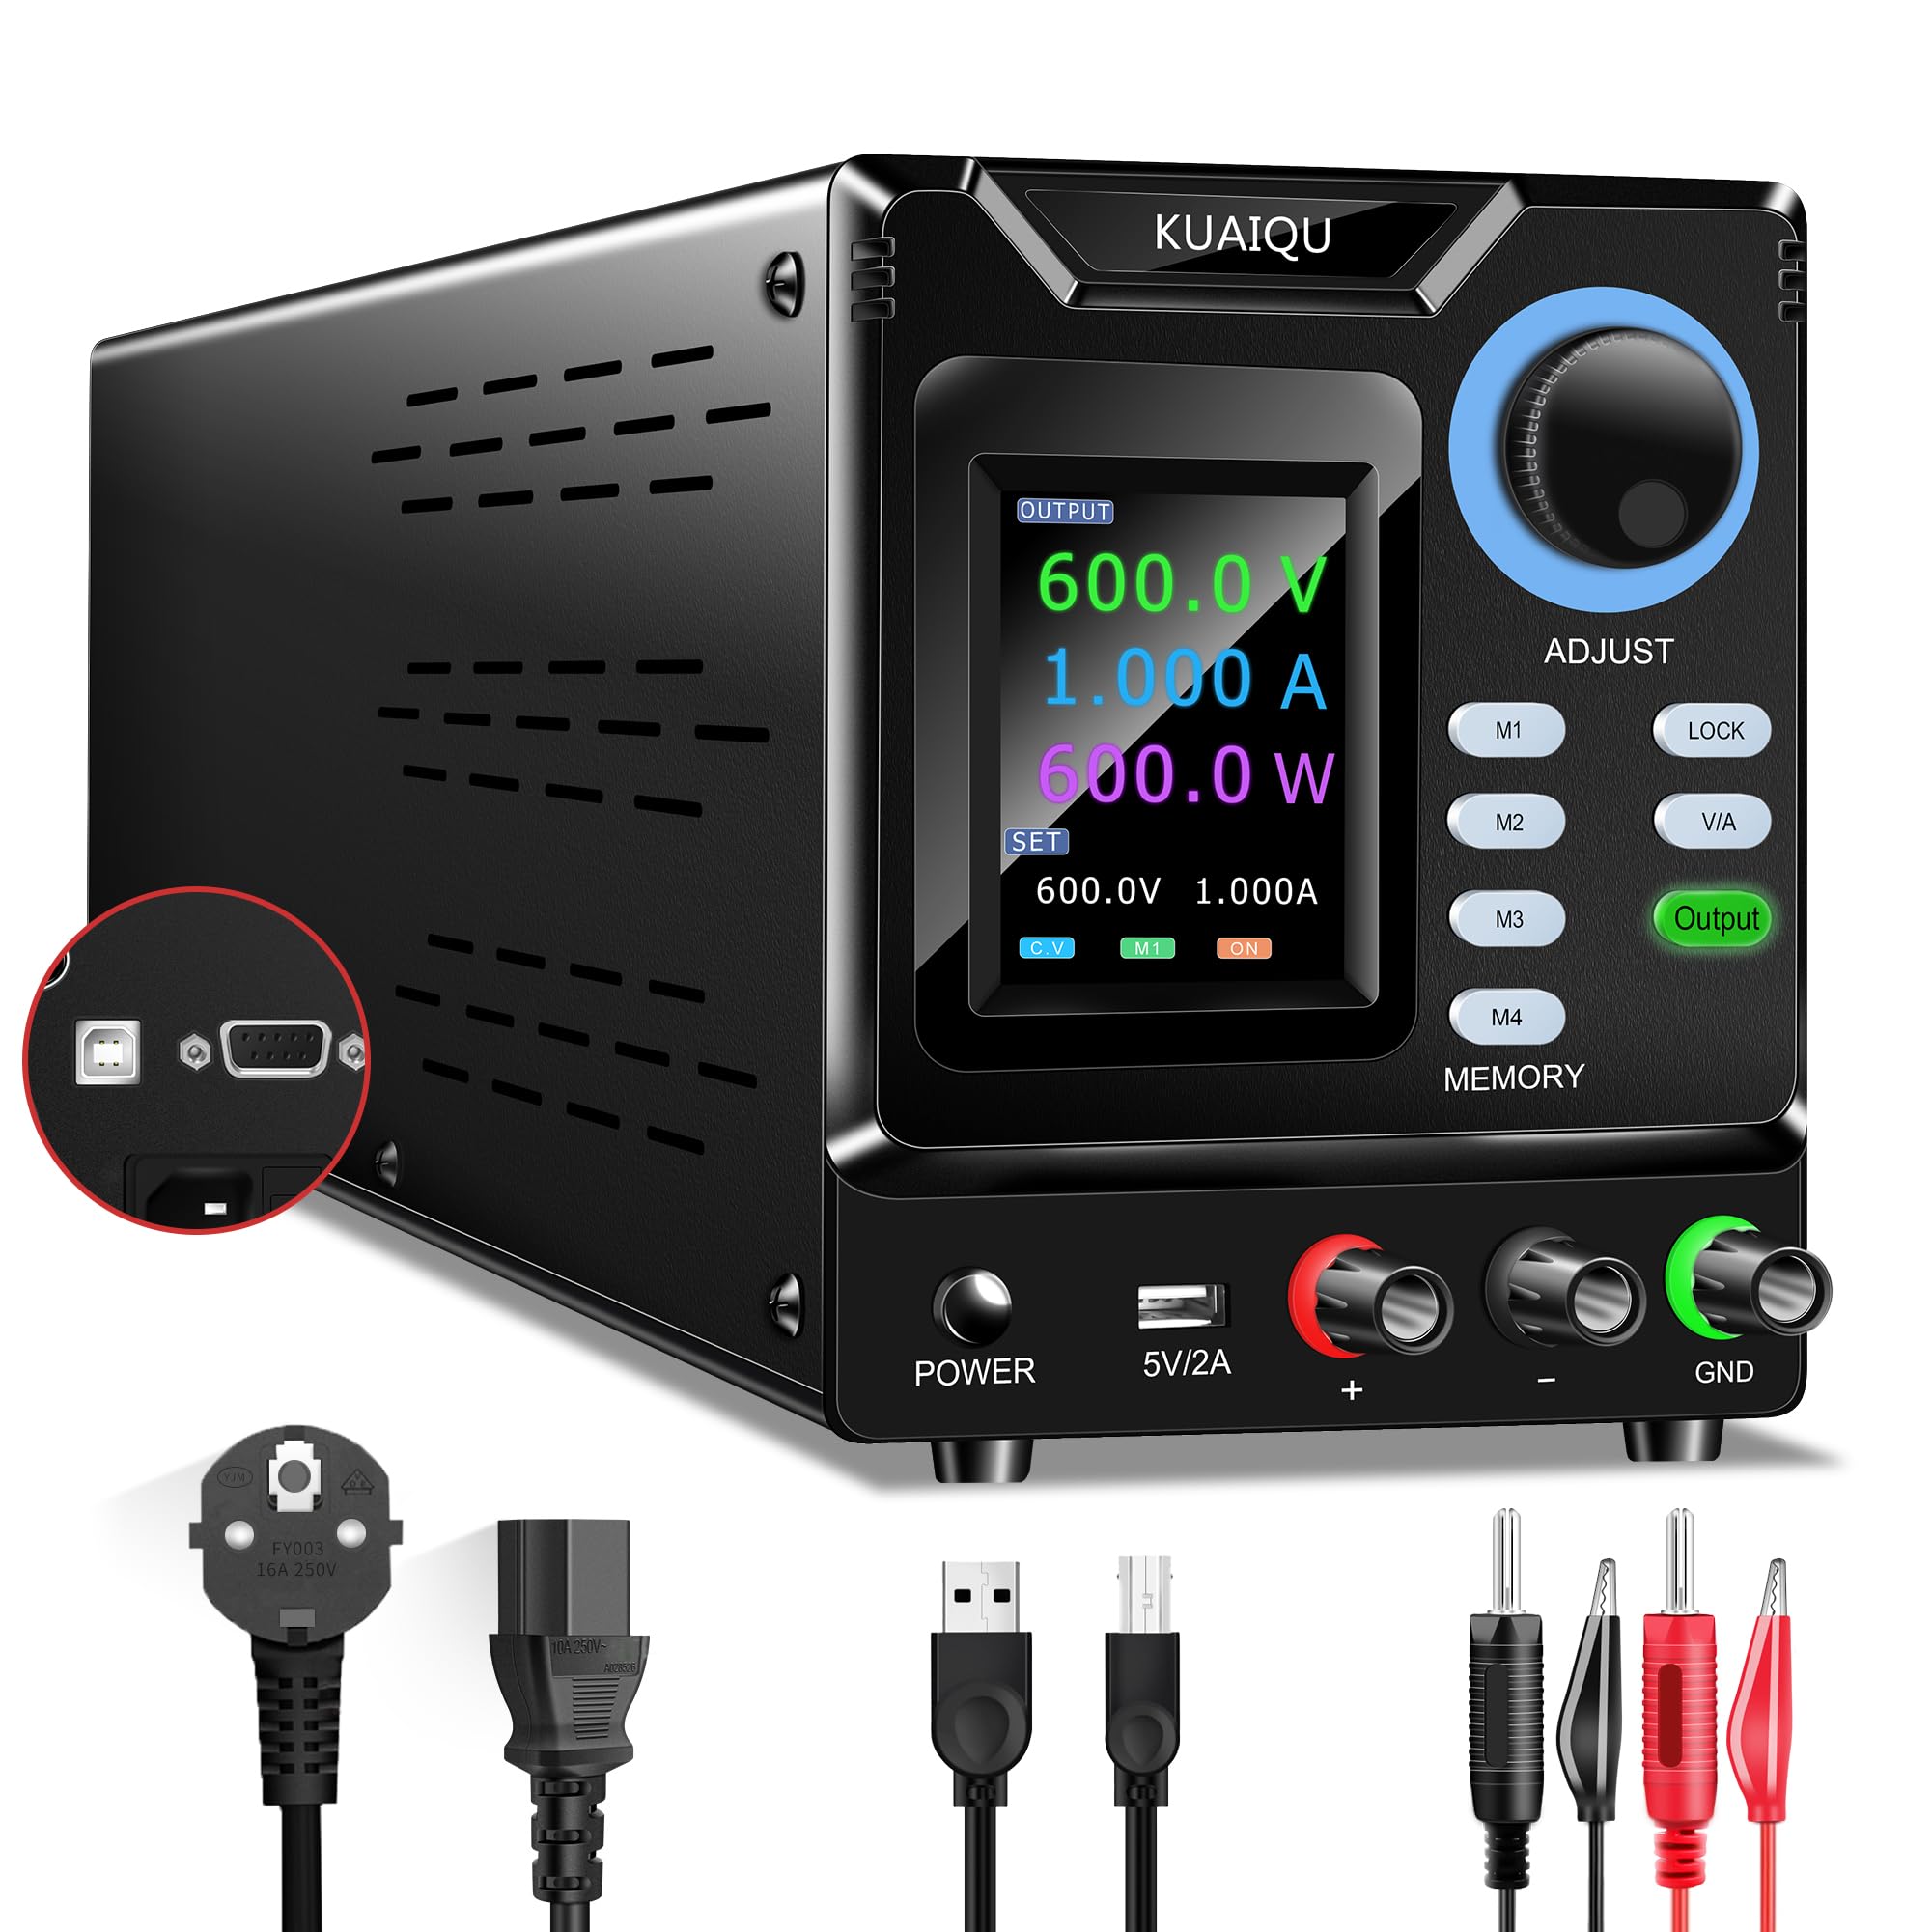
Rysunek 4.1: Układ i elementy sterujące panelu przedniego
4.1 Funkcje panelu przedniego
- Wyświetlacz LCD: A 4-digit color backlit LCD shows voltage, current, and power readings with high precision (0.01V, 0.001A resolution). It also displays set values.
- Encoder Knob (ADJUST): Used for precise adjustment of voltage and current values. Press to switch between digits, then rotate to change the value.
- Przyciski pamięci M1-M4: Store and recall up to four sets of frequently used voltage i bieżące ustawienia.
- Przycisk blokujący: Prevents accidental changes to settings by locking the controls.
- Przycisk V/A: Przełącza między głośnościątagi aktualne tryby regulacji.
- Przycisk wyjściowy: Włącza lub wyłącza zasilanie wyjściowe na zaciskach.
- Przycisk zasilania: Główny wyłącznik zasilania urządzenia.
- 5V/2A USB Port (Front): Provides a 5V, 2A output for charging mobile devices or powering small USB accessories.
- Zaciski wyjściowe (+, -): Connect your load here. Red for positive (+), Black for negative (-).
- Zacisk GND: Połączenie uziemienia.
4.2 Funkcje panelu tylnego
- Pobór mocy: Podłącz tutaj dołączony przewód zasilający.
- USB Port (Rear): Used for connecting the power supply to a computer for programmable control and firmware updates.
- Port RS232: Alternative serial port for computer connectivity and control.
- Wentylator chłodzący: Uruchamia się automatycznie, aby rozproszyć ciepło i utrzymać optymalną temperaturę pracy.
5. Konfiguracja
5.1 Połączenie początkowe
- Ensure the power supply is placed on a stable, level surface with adequate ventilation.
- Connect the provided power cord to the power input on the rear panel of the power supply and then to a grounded AC power outlet.
- Do not connect any load to the output terminals yet.
5.2 Włączanie
Naciśnij MOC button on the front panel to turn on the unit. The LCD display will illuminate, showing the current voltagodczyty prądu, energii i mocy.
6. Instrukcja obsługi
6.1 Regulacja głośnościtage i Aktualne

Rysunek 6.1: Działanie pokrętła enkodera
- Ensure the output is OFF (Output button LED is off).
- Naciśnij V / A button to select whether to adjust voltage (V) or current (A). The active parameter will be highlighted on the LCD.
- To adjust the value, press the Encoder Knob (ADJUST). This will highlight a digit on the display.
- Obróć Pokrętło enkodera to change the value of the highlighted digit (0-9).
- Naciśnij Pokrętło enkodera again to move to the next digit. Repeat until the desired voltage or current is set.
- Once the desired values are set, connect your load to the output terminals.
- Naciśnij Wyjście button to enable the power output. The Output button LED will illuminate.
6.2 Memory Function (M1-M4)

Figure 6.2: Memory Storage Function
The power supply allows you to store and recall up to four sets of voltage i bieżące ustawienia.
6.2.1 Zapisywanie ustawień
- Ustaw żądaną głośnośćtage and current values using the Encoder Knob as described above.
- Naciśnij i przytrzymaj jeden z M1-M4 buttons for approximately 3 seconds until the display indicates the settings have been saved.
6.2.2 Przywoływanie ustawień
Aby przywołać zapisane ustawienie, wystarczy nacisnąć odpowiedni przycisk M1-M4 button. The stored voltage and current values will be loaded.
6.3 Funkcja blokady
Naciśnij ZAMEK button to prevent accidental changes to the voltage, current, and memory settings. When locked, the controls will not respond to input. Press the ZAMEK ponownie, aby odblokować.
6.4 PC Connectivity (USB/RS232)

Figure 6.3: PC Connection via USB/RS232
The power supply can be connected to a computer via the rear USB or RS232 port for precise control and monitoring using dedicated software.
- Connect the power supply to your computer using the provided USB cable (or an RS232 cable, if applicable).
- Install the control software and necessary drivers. Download links and detailed instructions can be found on the product's detail page or by contacting KUAIQU support.
- The software allows for precise adjustment, real-time curve display of current and voltage, and advanced programming features.
6.5 Front USB Charging Port
The 5V 2A USB port on the front panel can be used to charge mobile phones or power other compatible USB devices. Simply connect your device's USB cable to this port.
7. Konserwacja
7.1 Czyszczenie
To clean the exterior of the power supply, use a soft, dry cloth. Do not use abrasive cleaners or solvents. Ensure the unit is powered off and unplugged before cleaning.
7.2 Wentylator chłodzący

Rysunek 7.1: Inteligentny wentylator chłodzący
The power supply features an intelligent temperature-controlled cooling fan. Ensure the rear ventilation openings are not obstructed to allow for proper airflow. The fan will operate automatically as needed to maintain optimal internal temperatures.
8. Rozwiązywanie Problemów
8.1 PC Software Issues
IMPORTANT: The control software is compatible only with WINDOWS operating systems.
If you encounter issues with the PC control software, consider the following:
- Ustawienia językowe: European language settings may cause conflicts. Try setting your computer's language to English (USA). Ensure decimal points in the software input boxes use "." instead of ",".
- Oprogramowanie antywirusowe: Antivirus programs may incorrectly identify the installation files as threats and delete them, preventing the software from functioning. Temporarily disable your antivirus during installation or add the software to its exceptions list.
- Uprawnienia dostępu: Ensure your computer's access permissions allow the software to interact with the necessary system databases. Run the software as an administrator if necessary.
8.2 Kwestie ogólne
- Brak zasilania: Check the power cord connection and the wall outlet. Ensure the POWER button is pressed.
- Brak wyjścia: Verify that the Output button is pressed and its LED is illuminated. Check load connections.
- Nieprawidłowe odczyty: Ensure all connections are secure. If using external meters, compare readings.
9. Specyfikacje
| Funkcja | Specyfikacja |
|---|---|
| Numer modelu | SPPS-D6001-232 |
| Objętość wyjściatage | 0-600 V (regulowane) |
| Prąd wyjściowy | 0-1A (regulowane) |
| Tomtage Rozdzielczość | 0.01 V |
| Aktualna rozdzielczość | 0.001A |
| Wyświetlacz | 4-cyfrowy wyświetlacz LCD |
| Funkcje pamięci | 4 sets (M1-M4) |
| Łączność | Rear USB, RS232 |
| Front USB Output | 5V 2A |
| Funkcje ochronne | OUP, OCP, OTP, Short Circuit |
| Wymiary (dł. x szer. x wys.) | Wymiary 28.5 x 12 x 13 cm |
| Waga | 1.9 kilogramów |
| Producent | KUAIQU |
| Kraj pochodzenia | Chiny |
10. Gwarancja i wsparcie
10.1 Polityka gwarancyjna
This KUAIQU power supply comes with a 12-month warranty from the date of purchase, covering manufacturing defects and malfunctions under normal use.
10.2 Wsparcie techniczne
KUAIQU provides lifetime technical support for this product. If you have any questions, require assistance with setup, operation, or troubleshooting, please do not hesitate to contact us. You can reach our support team through the Amazon backend messaging system, and we will respond within 24 hours.
Ask a question about this manual
Ask about setup, troubleshooting, compatibility, parts, safety, or missing instructions. Manuals+ will review the question and use this page’s manual context to help answer it.