Wstęp
This manual provides essential information for the setup, operation, and maintenance of your new Tucus replacement remote control. This remote is designed to be compatible with various JVC Micro COMPACT COMPONENT Stereo Systems, including models RM-SUXQ30UW, RM-SUXQ30US, UX-Q30S, UX-Q30B, UX-Q30P, and UX-Q30W. While it is a replacement remote and not the original device's remote, common functions are expected to operate normally. Please review this guide thoroughly to ensure proper use and longevity of your remote control.
Organizować coś
1. Instalacja baterii
The remote control requires two (2) AA batteries (not included) for operation. Follow these steps to install them:
- Znajdź komorę baterii z tyłu pilota.
- Aby otworzyć komorę baterii, przesuń ją w dół lub na zewnątrz.
- Włóż dwie baterie AA, upewniając się, że bieguny dodatni (+) i ujemny (-) są prawidłowo ustawione względem oznaczeń wewnątrz komory.
- Przesuń pokrywę komory baterii z powrotem na miejsce, aż zatrzaśnie się pewnie.

Figure 1: Back of the remote control showing the battery compartment cover.
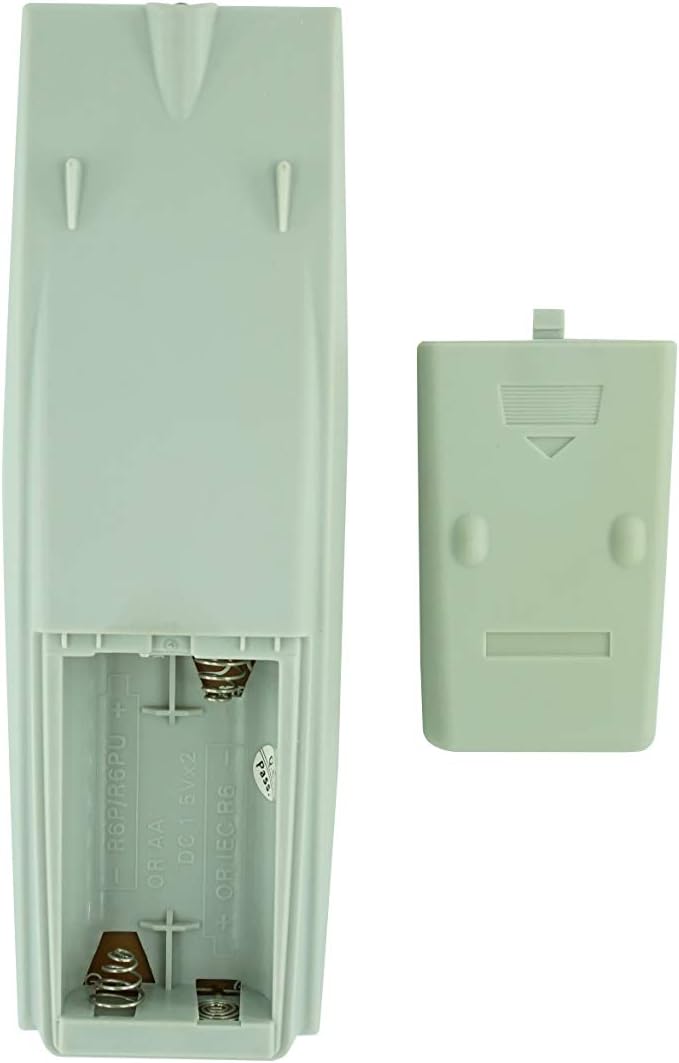
Figure 2: Battery compartment with cover removed, ready for battery insertion.
2. Początkowe użycie
Once batteries are installed, the remote control is ready for use. Point the remote directly at your JVC Micro COMPACT COMPONENT Stereo System. No additional programming is typically required for this replacement remote for the listed compatible models.
Instrukcja obsługi
This remote control provides access to the primary functions of your JVC stereo system. Below is a general overview of common button functions. Please note that while the functionality is guaranteed, the exact button layout may differ slightly from your original remote.

Rycina 3: Przód view pilota z układem przycisków.
Główne funkcje:
- GOTOWOŚĆ/WŁĄCZONY: Powers the stereo system on or off.
- POKAZ: Zmienia lub pokazuje informacje wyświetlane.
- ZEGAR/TIMER: Accesses clock and timer settings.
- SPAĆ: Sets a sleep timer for automatic power off.
- Przyciski numeryczne (0-9, +10): Direct input for track numbers, radio frequencies, etc.
- BAS / WYSOKICH TONÓW: Adjusts bass and treble levels.
- Navigation (UP, DOWN, LEFT, RIGHT, SET): Służy do nawigacji po menu i dokonywania wyborów.
- Playback Controls (PLAY/PAUSE, STOP, FAST FORWARD, REWIND, SKIP): Steruje odtwarzaniem multimediów.
- Source Selection (CD, TAPE, FM/AM, AUX/MD): Wybiera źródło sygnału wejściowego audio.
- FM MODE / REV.MODE: Toggles FM stereo/mono or tape reverse mode.
- AUTO PRESET: Automatically scans and saves radio stations.
- PRGM / RANDOM / REPEAT: Controls program, random, and repeat playback modes.
- PTY SEARCH / PTY SELECT: For Program Type search and selection on radio.
- DISPLAY / TA/News / Info: Provides additional display information or traffic/news announcements.
- AHB PRO: Activates or deactivates Active Hyper-Bass PRO.
- GŁOŚNOŚĆ (+/-): Dostosowuje główny poziom głośności.
For specific advanced functions, please refer to the original instruction manual of your JVC Micro COMPACT COMPONENT Stereo System.
Konserwacja
Czyszczenie pilota
Aby zachować wygląd i funkcjonalność pilota, należy go regularnie czyścić:
- Wytrzyj powierzchnię miękką, suchą szmatką.
- W przypadku uporczywych zabrudzeń, delikatnieampPrzetrzyj ściereczkę wodą lub delikatnym, nieściernym środkiem czyszczącym. Nie rozpylaj środka czyszczącego bezpośrednio na pilota.
- Unikaj stosowania silnych środków chemicznych, rozpuszczalników i ściernych gąbek czyszczących, ponieważ mogą one uszkodzić wykończenie pilota lub jego wewnętrzne podzespoły.
Wymiana baterii
Replace batteries when the remote's response becomes sluggish or it stops functioning. Always replace both batteries at the same time with new ones of the same type (AA). Do not mix old and new batteries, or different types of batteries.
Składowanie
Jeśli pilot nie będzie używany przez dłuższy czas, należy wyjąć baterie, aby zapobiec wyciekowi elektrolitu i potencjalnemu uszkodzeniu pilota.
Rozwiązywanie problemów
- Pilot nie odpowiada:
- Sprawdź, czy baterie zostały włożone prawidłowo, z zachowaniem właściwej polaryzacji (+/-).
- Wymień stare baterie na nowe.
- Ensure there are no obstructions between the remote control and the stereo system's infrared receiver.
- Upewnij się, że znajdujesz się w zasięgu działania pilota.
- Some buttons not working or unexpected behavior:
- This remote is a replacement and while common functions are supported, the button layout or specific advanced functions might not perfectly match your original remote. Refer to the button layout image in the Operating Instructions section.
- Ensure the stereo system is powered on and set to the correct input source.
- Remote appears damaged:
- If the remote has been dropped or exposed to liquids, internal damage may have occurred. In such cases, replacement may be necessary.
Specyfikacje
| Marka | Ogólny |
| Producent | TUCUS |
| Numer modelu | DVT-C9F24992D65E215A7DD6011D34514A46 |
| Kompatybilne modele | JVC RM-SUXQ30UW, RM-SUXQ30US, UX-Q30S, UX-Q30B, UX-Q30P, UX-Q30W Micro COMPACT COMPONENT Stereo SYSTEM |
| Typ materiału | Inny |
| Źródło zasilania | 2 baterie AA (brak w zestawie) |
| ASIN | B0D79958PW |
| Data pierwszej dostępności | Czerwiec 17 2024 |
Informacje o gwarancji
This product comes with a 3-month warranty from the date of purchase. This warranty covers manufacturing defects and ensures the remote control functions as intended for compatible models. Please retain your proof of purchase for any warranty claims.
Obsługa klienta
If you have any questions regarding the compatibility or functionality of this remote control, or if your specific device model is not listed, please contact the seller directly for assistance. The seller stocks a wide range of remote controls and parts and can confirm suitability for your needs.
For general inquiries or to provide feedback, please refer to the contact information provided by your retailer or the seller.


