1. Instrukcje bezpieczeństwa
Przed użyciem urządzenia należy uważnie przeczytać wszystkie instrukcje. Zachowaj instrukcję do wykorzystania w przyszłości.
- Upewnij się, że objętośćtagWartość podana na urządzeniu odpowiada napięciu w sieci.tage przed połączeniem.
- Nie zanurzaj urządzenia, przewodu zasilającego ani wtyczki w wodzie lub innej cieczy.
- Zawsze odłączaj urządzenie od gniazdka elektrycznego przed czyszczeniem i gdy nie jest używane.
- Nie używaj urządzenia z uszkodzonym przewodem lub wtyczką, a także po awarii urządzenia lub jego uszkodzeniu w jakikolwiek sposób.
- Podczas pracy urządzenia należy trzymać ręce i przewody z dala od gorących części urządzenia.
- Urządzenie przeznaczone jest wyłącznie do użytku domowego.
- Dzieci powinny znajdować się pod nadzorem, aby mieć pewność, że nie bawią się urządzeniem.
- Do zbiornika na wodę należy wlewać wyłącznie zimną wodę.
- Nie przepełniaj zbiornika na wodę.
- Always ensure the portafilter is securely locked in place before brewing.
- Należy zachować ostrożność podczas używania dyszy parowej, ponieważ gorąca para może spowodować oparzenia.
2. Koniec produktuview
The SCHNEIDER SCES2312WH espresso machine is designed for preparing espresso and milk-based coffee beverages. Familiarize yourself with its components:
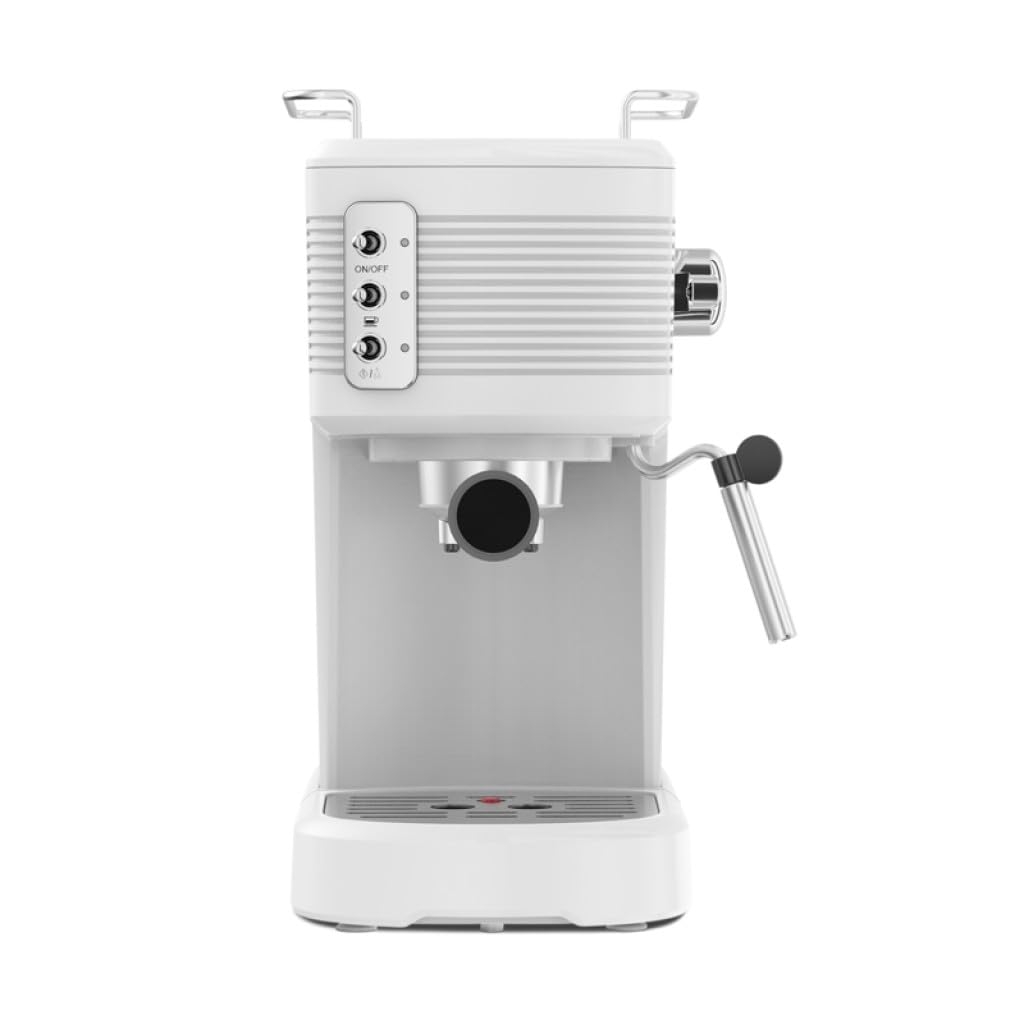
Obraz: Przód view of the Schneider SCES2312WH Espresso Machine, showing the control panel, portafilter, and steam wand.
- Taca do podgrzewania filiżanek: Umieszczony na górze urządzenia, służy do podgrzewania filiżanek.
- Zbiornik na wodę: Transparent, removable 1.2-liter tank with a level indicator.
- Panel sterowania: Buttons for On/Off, Espresso brewing, and Steam function.
- Dysza pary: Do spieniania mleka.
- Uchwyt filtra: Pojemnik na zmieloną kawę do zaparzenia.
- Taca ociekowa: Zbiera nadmiar płynu i można go wyjąć w celu czyszczenia.

Obraz: widok z góry view of the Schneider SCES2312WH Espresso Machine, highlighting the cup warming tray and control knob.
3. Konfiguracja początkowa
Przed pierwszym użyciem wykonaj następujące kroki:
- Rozpakowywanie: Remove all packaging materials and ensure all parts are present.
- Czyszczenie: Wash the water tank, portafilter, and filter basket with warm soapy water. Rinse thoroughly and dry. Wipe the exterior of the machine with a damp płótno.
- Napełnianie zbiornika na wodę: Remove the transparent water tank from the back of the machine. Fill it with fresh, cold water up to the 'MAX' level indicator. Replace the tank securely.
- Zalewanie pompy (pierwsze użycie):
- Podstaw filiżankę pod wylot filtra (bez kawy).
- Plug in the machine and press the On/Off button. The indicator light will illuminate.
- Once the machine has preheated (indicator light stops flashing), press the Espresso brewing button. Allow water to flow through until the tank is about half empty. This primes the pump and flushes the system.
- Repeat this process with the steam wand by turning the steam knob to release steam for a few seconds.
4. Instrukcja obsługi
4.1. Przyrządzanie Espresso
- Ogrzewanie wstępne: Ensure the water tank is filled. Plug in the machine and press the On/Off button. Wait for the indicator light to stop flashing, indicating the machine is preheated.
- Przygotuj kawę: Add finely ground espresso coffee to the filter basket in the portafilter. Tamp kawę równomiernie zamper (not included) to create a compact puck. Do not overfill.
- Zamontuj uchwyt filtra: Insert the portafilter into the brewing head and turn it firmly to the right until it is securely locked.
- Postaw kubek: Position one or two espresso cups on the drip tray, directly under the portafilter spouts.
- Zaparz Espresso: Press the Espresso brewing button. Coffee will begin to flow into the cup(s). Press the button again to stop the flow when the desired volume is reached.
- Wyjmij uchwyt filtra: Carefully remove the portafilter by turning it to the left. Discard the used coffee grounds.

Obraz: Bok view of the Schneider SCES2312WH Espresso Machine with the portafilter attached, ready for brewing.
4.2. Spienianie mleka
Use the integrated steam wand to create creamy milk froth for cappuccinos and lattes.
- Przygotuj mleko: Napełnij dzbanek ze stali nierdzewnej zimnym mlekiem (mlecznym lub roślinnym) do około jednej trzeciej wysokości.
- Aktywuj Steama: Press the Steam button on the control panel. Wait for the indicator light to stop flashing, indicating the machine has reached steaming temperature.
- Dysza pary czyszczącej: Briefly turn the steam knob to release any condensed water from the wand into an empty cup. Turn the knob off.
- Spienione mleko: Immerse the tip of the steam wand just below the surface of the milk. Turn the steam knob to release steam. Move the pitcher up and down gently to incorporate air and create froth.
- Zatrzymaj parowanie: Gdy uzyskasz pożądaną konsystencję i temperaturę, wyłącz pokrętło pary i zdejmij dzbanek.
- Czyszczenie dyszy parowej: Natychmiast wytrzyj dyszę parową wodą.amp cloth to remove any milk residue. Briefly purge the wand again to clear any internal blockages.
5. Konserwacja
5.1. Codzienne czyszczenie
Regularne czyszczenie zapewnia optymalną wydajność i wydłuża żywotność urządzenia.
- Portafiltr i koszyk filtrujący: Po każdym użyciu wyjmij uchwyt filtra, usuń fusy z kawy i opłucz uchwyt filtra oraz koszyk filtra pod bieżącą wodą.
- Taca ociekowa: Regularnie opróżniaj i czyść tackę ociekową. Można ją wyjąć, co ułatwia czyszczenie.
- Dysza pary: As mentioned in the operating instructions, wipe and purge the steam wand immediately after each use.
- Zewnętrzny: Wytrzyj obudowę urządzenia miękką, damp płótno. Nie używaj ściernych środków czyszczących ani zmywaków.
5.2. Odkamienianie
Osady mineralne z wody mogą z czasem gromadzić się, wpływając na wydajność urządzenia. Odkamieniaj urządzenie co 2-3 miesiące lub częściej, jeśli masz twardą wodę.
- Przygotuj roztwór odkamieniający: Mix a commercial descaling solution with water according to the product instructions. Pour the solution into the water tank.
- Uruchom rozwiązanie: Place a large container under the portafilter and steam wand. Turn on the machine and allow it to heat up.
- Brew Cycle: Run several brewing cycles (without coffee) until half of the solution has passed through the portafilter.
- Cykl parowy: Turn the steam knob to release steam through the wand until the remaining solution has passed through.
- Wypłukać: Rinse the water tank thoroughly and fill it with fresh, cold water. Run several full tanks of clean water through both the brewing head and steam wand to flush out any descaling residue.
6. Rozwiązywanie Problemów
W tej sekcji znajdziesz informacje o typowych problemach i ich rozwiązaniach.
| Problem | Możliwa przyczyna | Rozwiązanie |
|---|---|---|
| Brak dozowania kawy | No water in tank; pump not primed; coffee too finely ground or over-tamped; maszyna zatkana. | Fill water tank; prime the pump; use coarser grind or less pressure; descale the machine. |
| Słaba kawa | Insufficient coffee grounds; coffee too coarsely ground; not enough tampciśnienie. | Zwiększ ilość kawy; użyj drobniejszego zmielenia; tamp mocniej. |
| Brak pary z dyszy | Steam button not activated; wand clogged; machine not at steaming temperature. | Ensure steam button is pressed and light is steady; clean/purge steam wand; wait for machine to heat up. |
| Wyciek wody z maszyny | Water tank not seated correctly; portafilter not locked properly; seals worn. | Reseat water tank; ensure portafilter is tight; contact customer support if seals are worn. |
7. Specyfikacje
- Model: SCES2312WH
- Moc: 1100 watów
- Ciśnienie: 15 barów
- Pojemność zbiornika na wodę: 1.2 litrów
- Tomtage: 230 wolty
- Tworzywo: Aluminum (boiler)
- Wymiary (wys. x szer. x gł.): Wymiary: 32.6 cm x 17.9 cm x 28.4 cm
- Waga: 2.73 kilogramów
- Kolor: Biały
8. Gwarancja i wsparcie
This product is covered by a warranty for a period of 2 years for spare parts availability from the date of purchase. Please retain your proof of purchase for any warranty claims.
For technical assistance, troubleshooting beyond this manual, or warranty inquiries, please contact Schneider customer support. Contact details can typically be found on the manufacturer's official webmiejscu lub na opakowaniu produktu.