1. Wprowadzenie
Thank you for choosing the WallarGe Backlight Digital Wall Clock. This clock features a large display, adjustable backlight, temperature and date display, and automatic Daylight Saving Time (DST) adjustment. This manual provides detailed instructions for setup, operation, and maintenance to ensure optimal performance.
2. Zawartość opakowania
- WallarGe Backlight Digital Wall Clock (Model CL5003)
- Elementy montażowe (śruby i kołki)
- Instrukcja obsługi
Notatka: 4 AA batteries are required and are not included in the package.
3. Koniec produktuview
The WallarGe Digital Wall Clock features a large, easy-to-read display showing time, day, date, and indoor temperature. It is designed for versatile placement, either wall-mounted or tabletop.

Obraz: Przód view of the WallarGe Digital Wall Clock displaying time, day, date, and temperature.
4. Konfiguracja
4.1 Instalacja baterii
- Znajdź komorę baterii z tyłu zegara.
- Włóż 4 nowych baterii AA, zwracając uwagę na prawidłową biegunowość (+/-).
- Dokładnie zamknij pokrywę komory baterii.
The clock will power on and display default settings. A low battery symbol will appear on the display when batteries need replacement.

Image: The clock is battery-operated, showing the battery compartment and a fold-out stand for tabletop use.
4.2 Opcje montażu
The clock can be either wall-mounted or placed on a tabletop using its integrated fold-out stand.
- Mocowanie ścienne: Use the provided mounting hardware to securely attach the clock to a wall. Ensure the clock is level before marking drill points.
- Blat stołu: Extend the fold-out stand located on the back of the clock to place it on any flat surface.
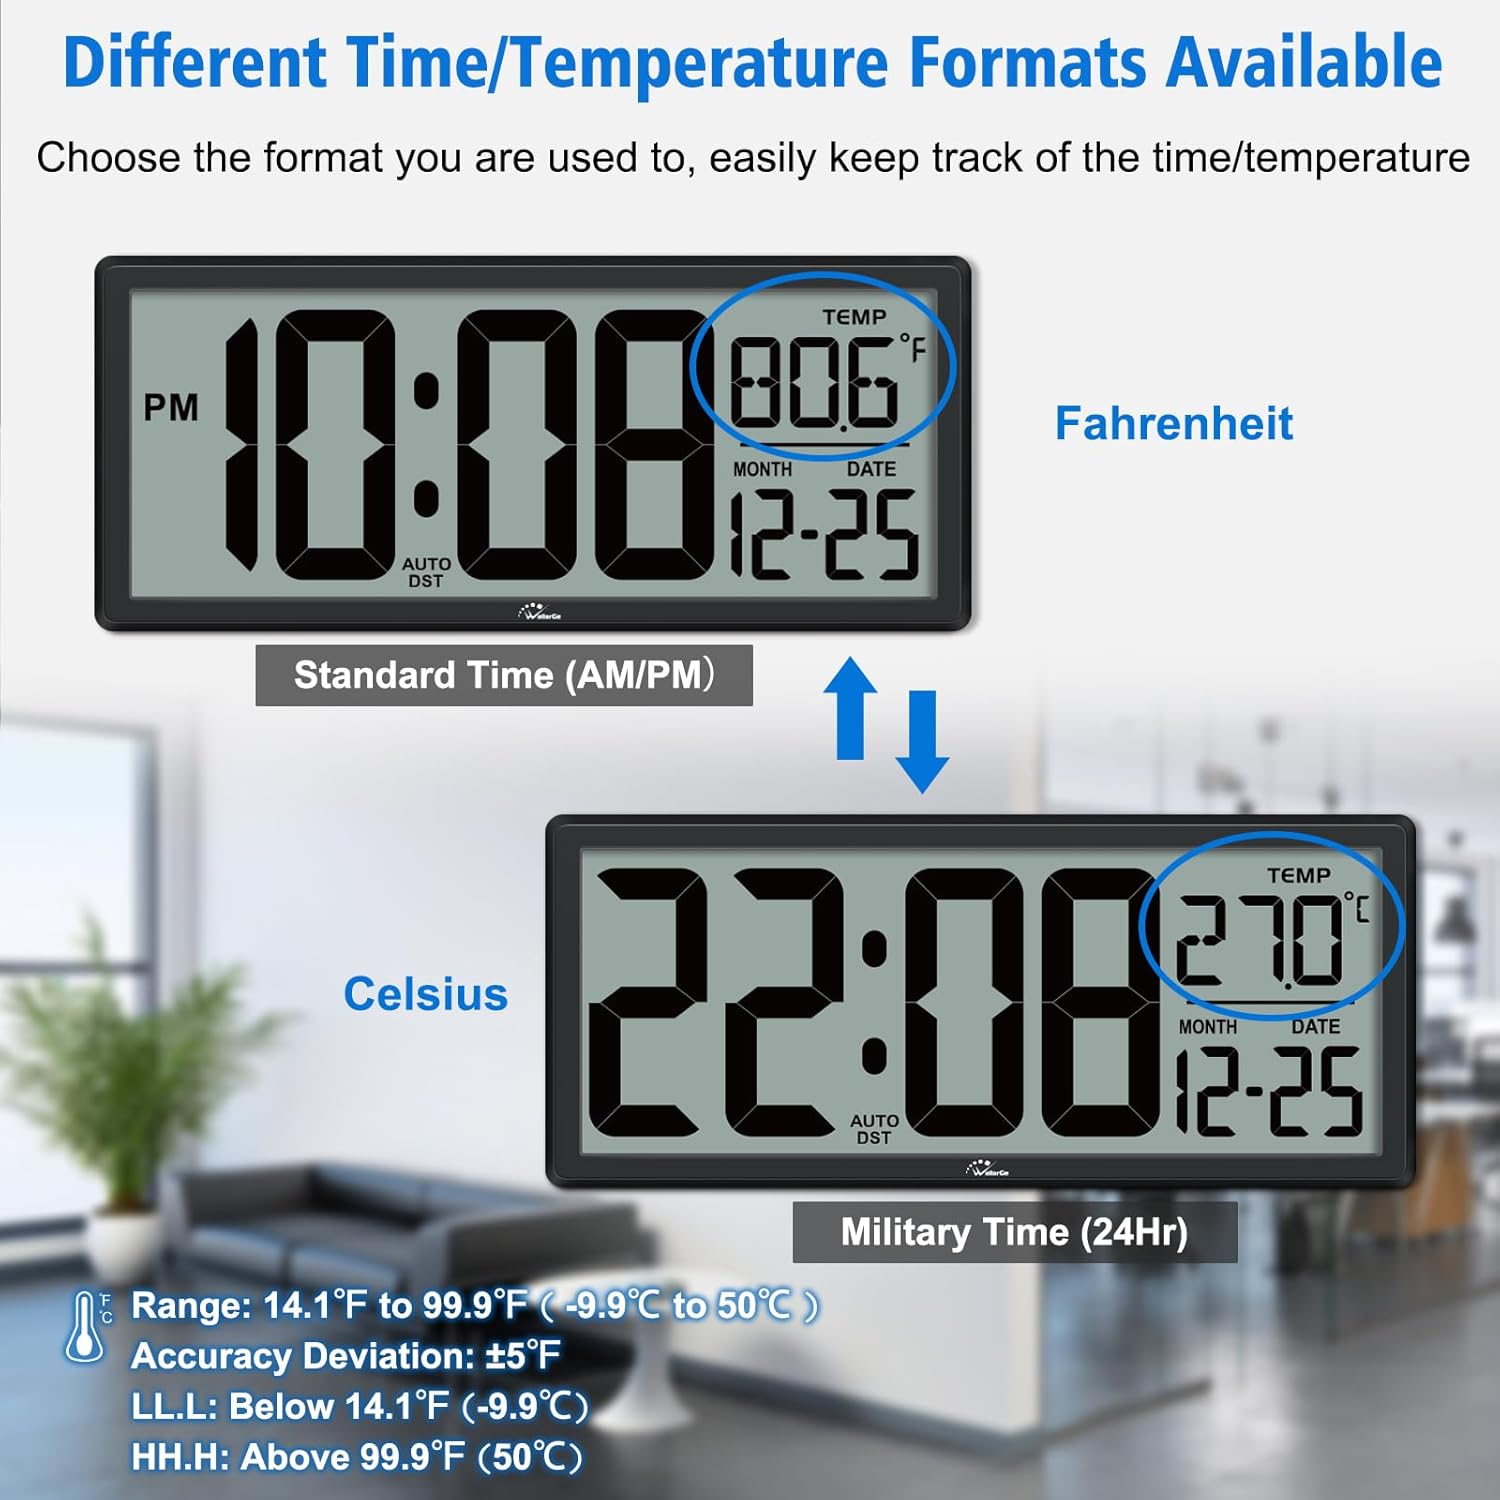
Image: The clock can be wall-mounted or used with its fold-out stand on a tabletop.
4.3 Początkowe ustawienie czasu i daty
The clock features intuitive setting buttons on the back. Refer to the specific button labels (e.g., SET, UP, DOWN) for adjusting time, date, and other settings. Follow the on-screen prompts as you press the SET button to cycle through adjustable parameters.
5. Instrukcja obsługi
5.1 Funkcja podświetlenia
The clock offers a customizable backlight for visibility in various lighting conditions.
- Podświetlenie ręczne: Press the 'LIGHT' button to activate a 5-second backlight.
- Automatyczne światło nocne: Use the 'NIGHT LIGHT' switch (OFF-LOW-HIGH) to set the backlight to automatically illuminate in the dark. Choose between Low or High brightness levels, or turn it off.
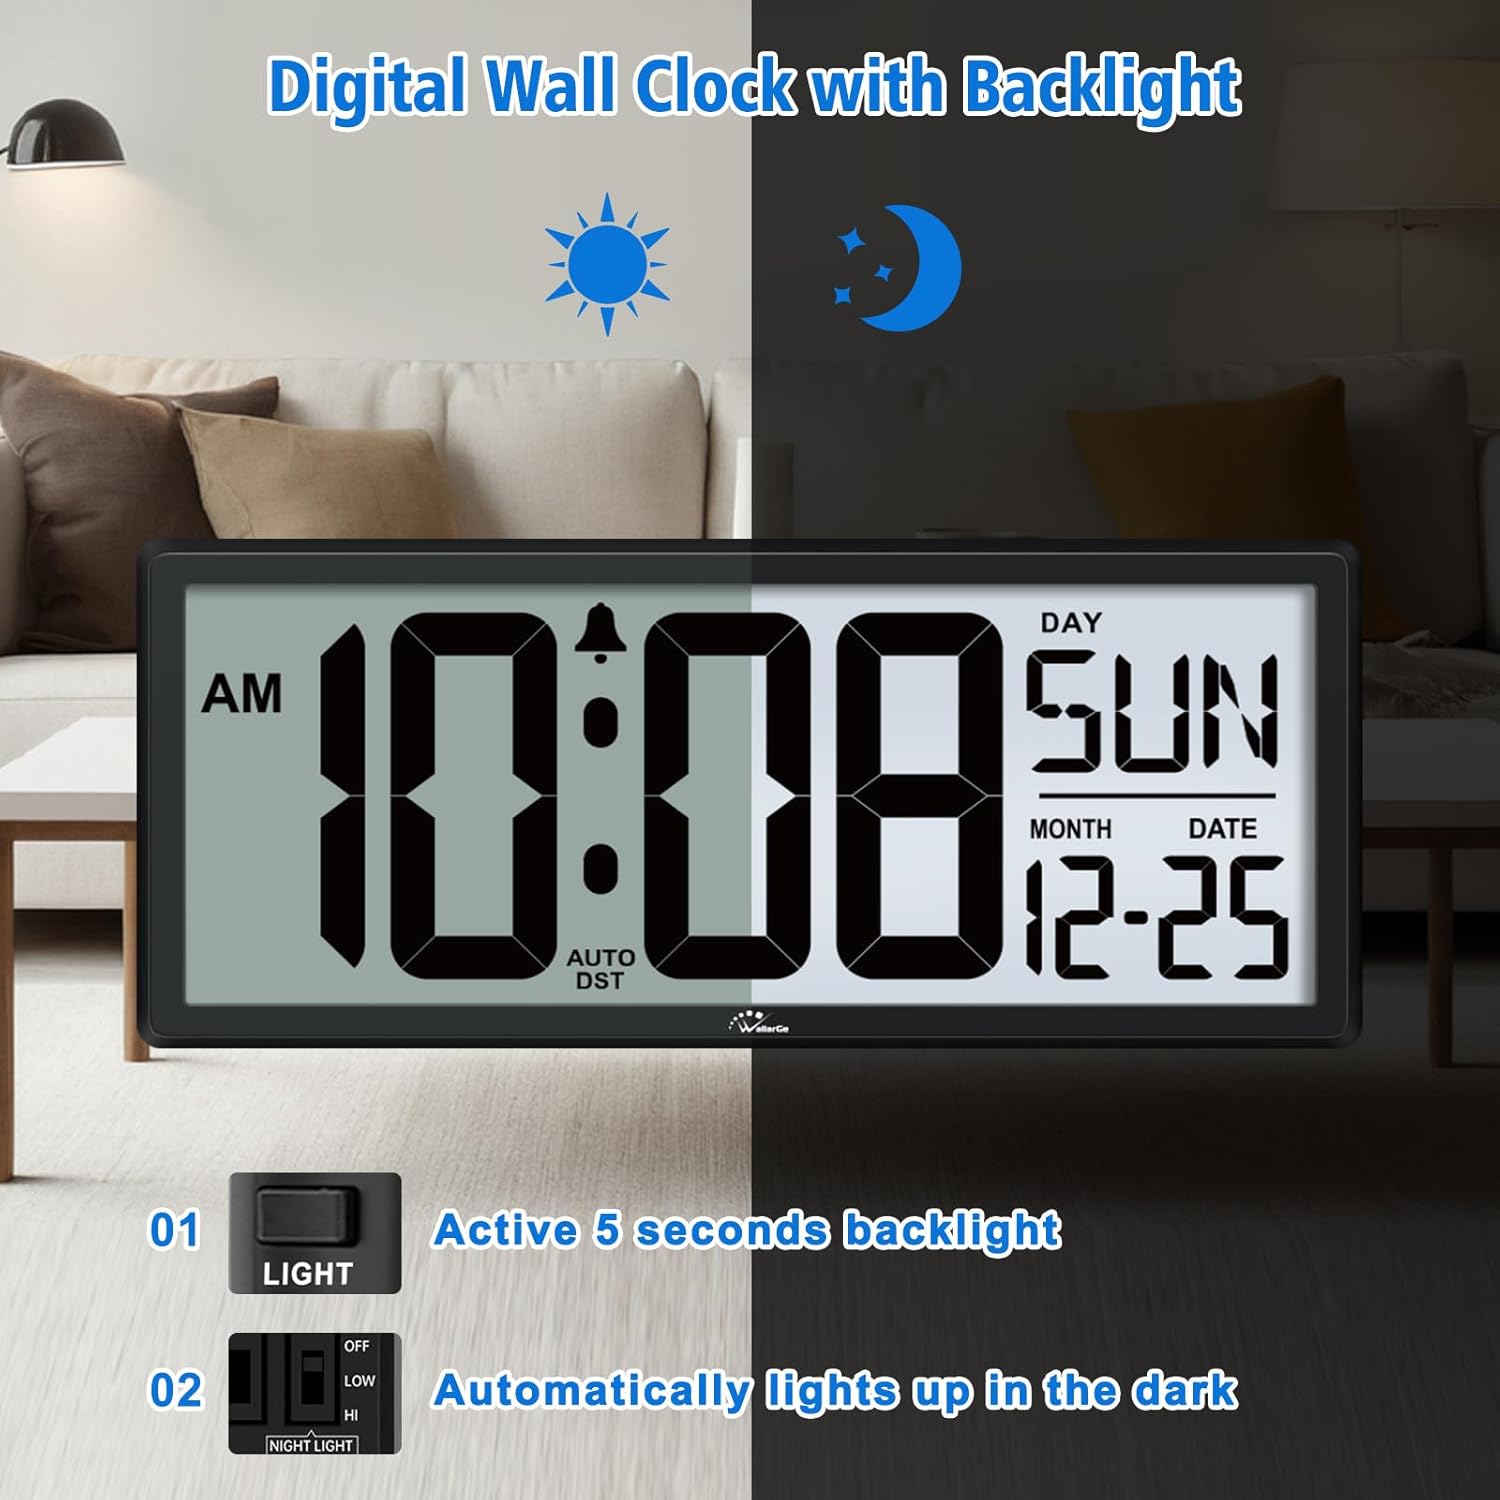
Image: The clock's backlight feature, illustrating its visibility in both bright and dark environments.

Image: Customizable backlight function with OFF, LOW, and HIGH settings to suit user preference.
5.2 Tryby wyświetlania
The clock offers three selectable display modes to show information:
- Day and Date: Wyświetla aktualny dzień tygodnia i datę.
- Temperature and Date: Displays the current indoor temperature and date.
- Day/Temperature Switch: Alternates between displaying the day and temperature every 10 seconds.

Image: The clock offers three display modes: Day and Date, Temperature and Date, or an alternating display.
5.3 Time and Temperature Formats
You can choose your preferred time and temperature display formats:
- Format czasu: Select between 12-hour (AM/PM) or 24-hour (Military Time) format.
- Jednostka temperatury: Przełączaj się między stopniami Celsjusza (°C) i Fahrenheita (°F).

Image: The clock supports both 12/24-hour time formats and Celsius/Fahrenheit temperature units.
5.4 Automatic Daylight Saving Time (DST)
The clock is equipped with an automatic DST feature, which adjusts the time forward or backward by one hour as required by Daylight Saving Time rules. Ensure this feature is enabled during setup if desired.

Image: The clock automatically adjusts for Daylight Saving Time, showing 'Fall Back' and 'Spring Forward' indications.
6. Konserwacja
6.1 Czyszczenie
Aby wyczyścić zegar, delikatnie przetrzyj wyświetlacz iasinPrzetrzyj miękką, suchą ściereczką. Unikaj stosowania środków czyszczących o działaniu ściernym, rozpuszczalników ani sprayów chemicznych, ponieważ mogą one uszkodzić powierzchnię.
6.2 Wymiana baterii
When the low battery indicator appears on the display, replace all 4 AA batteries promptly to ensure accurate timekeeping and backlight functionality. Do not mix old and new batteries or different types of batteries.
7. Rozwiązywanie Problemów
7.1 Incorrect Day of the Week
If the day of the week is incorrect, the most common cause is an incorrectly set year. Press the 'SET' button once to check the current year setting and adjust it if necessary.

Image: Troubleshooting guide for an incorrect day of the week, advising to check the year setting.
7.2 Display Issues or No Power
- Sprawdź, czy baterie zostały włożone prawidłowo, z zachowaniem właściwej polaryzacji.
- Wymień stare lub wyczerpane baterie na nowe.
- If the issue persists, try resetting the clock by removing batteries for a few minutes and then reinserting them.
8. Specyfikacje
| Marka | WallarGe |
| Numer modelu | Nr CL5003 |
| Typ wyświetlacza | Cyfrowy |
| Funkcja specjalna | Backlight, Temperature Display, Date Display, Auto DST |
| Źródło zasilania | Zasilany bateryjnie (4 baterie AA, brak w zestawie) |
| Wymiary produktu | 1.2"W x 6"H (Note: The product title mentions 14.5'' Large Digital Wall Clock, which likely refers to the diagonal or overall width, while the specification lists 1.2"W x 6"H, which might be depth x height. Please refer to the product packaging for exact overall dimensions.) |
| Typ montażu | Montaż ścienny i stołowy |
| Tworzywo | Akrylonitryl-butadien-styren (ABS) |
| Zastosowanie wewnątrz/na zewnątrz | Wnętrz |
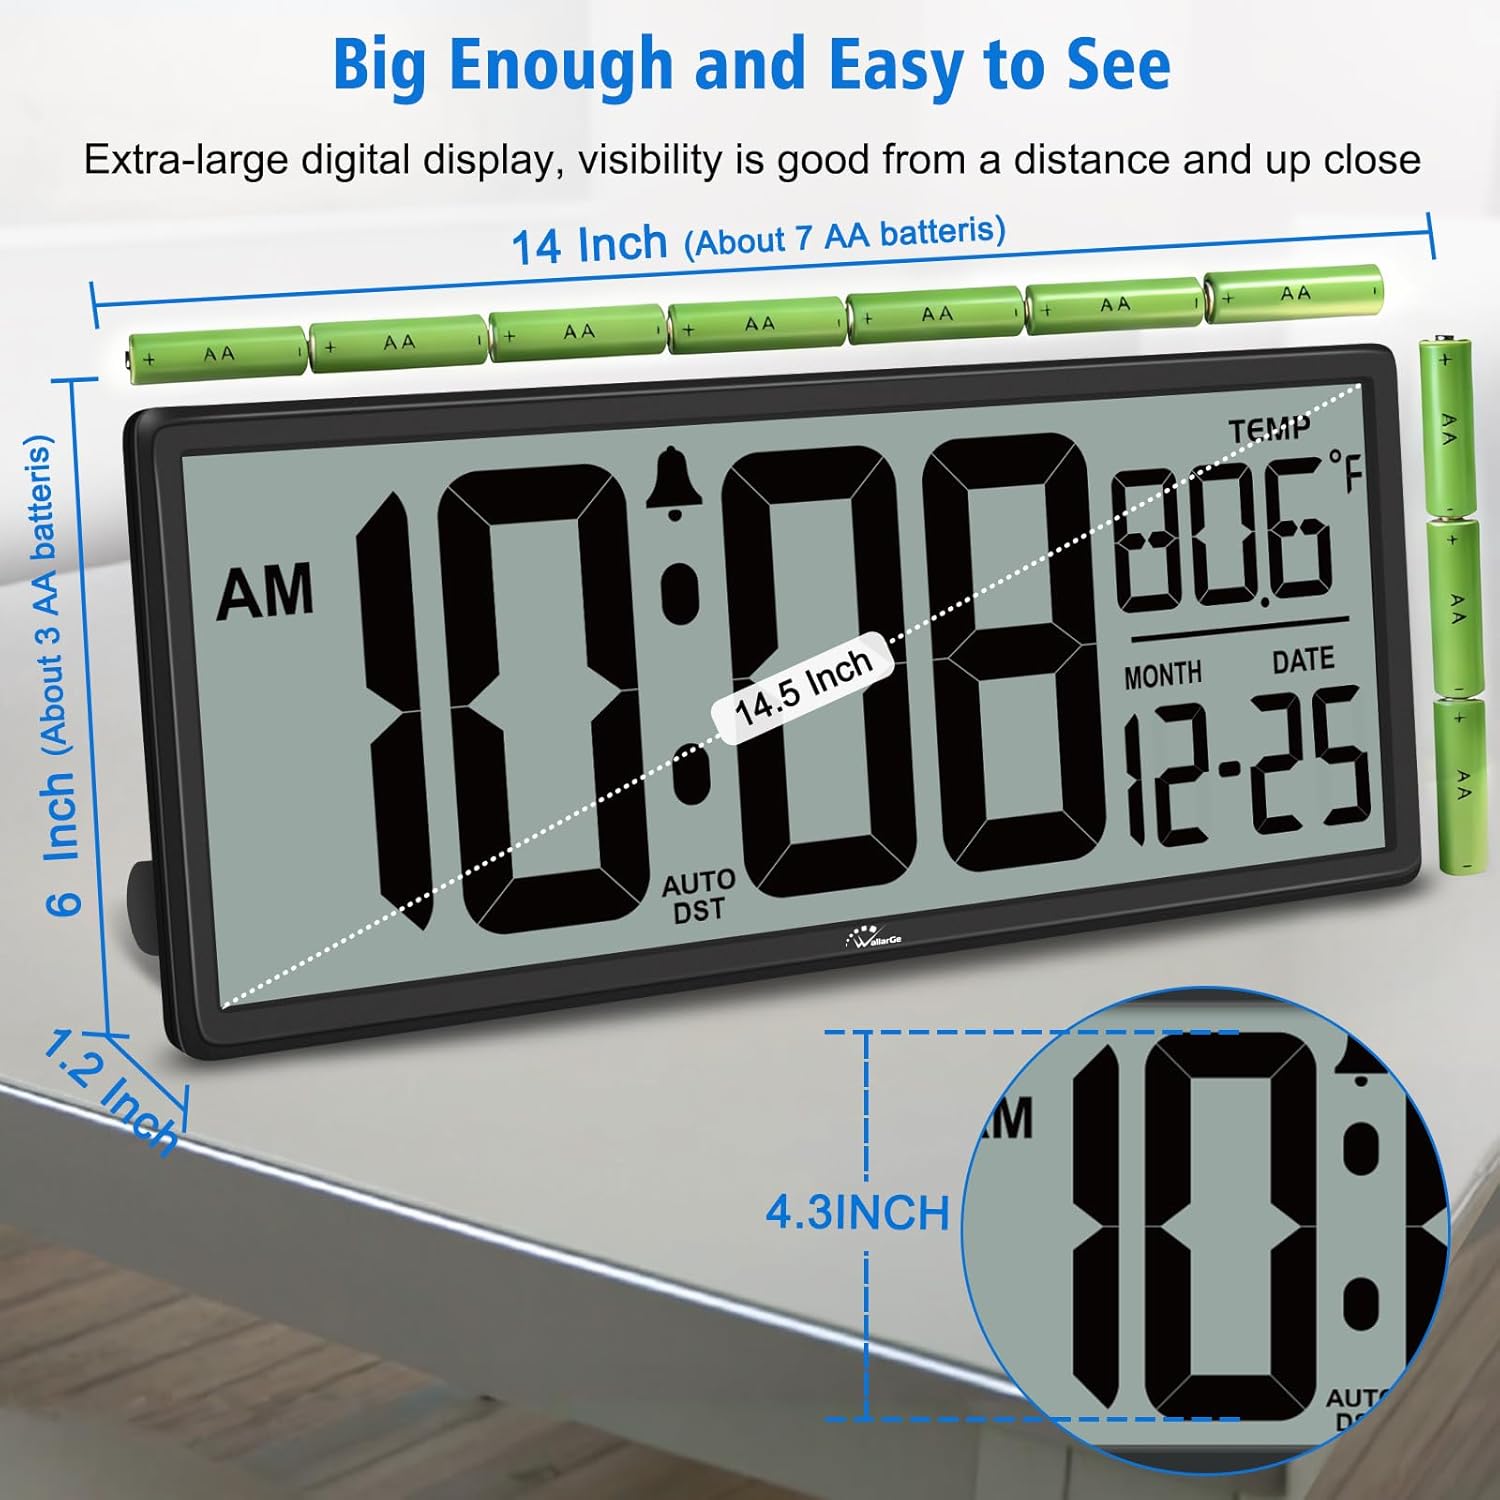
Image: The clock's dimensions, showing a 14.5-inch width and 4.3-inch number height.
9. Informacje o gwarancji
For detailed warranty information, please refer to the warranty card included with your product or contact WallarGe customer support directly. Keep your purchase receipt as proof of purchase for any warranty claims.
10. Obsługa klienta
If you encounter any issues or have questions regarding your WallarGe Digital Wall Clock, please contact our customer support team. Contact details can typically be found on the product packaging or the official WallarGe webstrona.