1. Wprowadzenie
This manual provides detailed instructions for the installation, operation, and maintenance of your GAMEON Midnight I Series Mid Tower Gaming PC Case. Please read this manual thoroughly before beginning installation to ensure proper setup and to maximize the performance and lifespan of your product. Keep this manual for future reference.
2. Informacje dotyczące bezpieczeństwa
- Przed przystąpieniem do wykonywania jakichkolwiek czynności instalacyjnych lub konserwacyjnych wewnątrz obudowy komputera należy zawsze odłączyć zasilanie od gniazdka ściennego.
- Handle the tempered glass panels with care. Tempered glass, while durable, can shatter if dropped or subjected to sharp impacts.
- Avoid exposing the case to extreme temperatures or high humidity.
- Nie próbuj modyfikować obudowy ani jej elementów. Nieautoryzowane modyfikacje mogą unieważnić gwarancję i stanowić zagrożenie dla bezpieczeństwa.
- Trzymaj małe części i śruby poza zasięgiem dzieci.
3. Zawartość opakowania
Sprawdź, czy w przesyłce znajdują się wszystkie wymienione poniżej elementy:
- GAMEON Midnight I Series Mid Tower Gaming PC Case
- 7 x 120mm ARGB PWM Cooling Fans (pre-installed)
- Accessory Box (containing screws, cable ties, and other mounting hardware)
- ARGB/PWM Fan Controller and Remote Control
- Instrukcja obsługi (ten dokument)
4. Koniec produktuview
The GAMEON Midnight I Series PC case is designed for optimal cooling and aesthetic appeal, featuring tempered glass panels and pre-installed ARGB PWM fans.

Figure 4.1: Internal layout of the PC case, highlighting the spacious interior for component installation.

Figure 4.2: Rear and top internal view, illustrating fan placement and overall structure.
4.1 ARGB+PWM Case Fans
The case comes with 7 pre-installed 120mm ARGB PWM fans, providing efficient cooling and customizable lighting. The fans are controlled via an included ARGB/PWM controller and remote.

Figure 4.3: ARGB+PWM fan features and fan mounting support. The front supports 360mm water cooling. Fan mounts include 3x120mm for PSU cover, 3x120mm for bottom, 3x120mm for top, and 1x120mm for rear.
4.2 Porty wejścia/wyjścia z przodu
Panel przedni umożliwia wygodny dostęp do najważniejszych portów umożliwiających łączność.
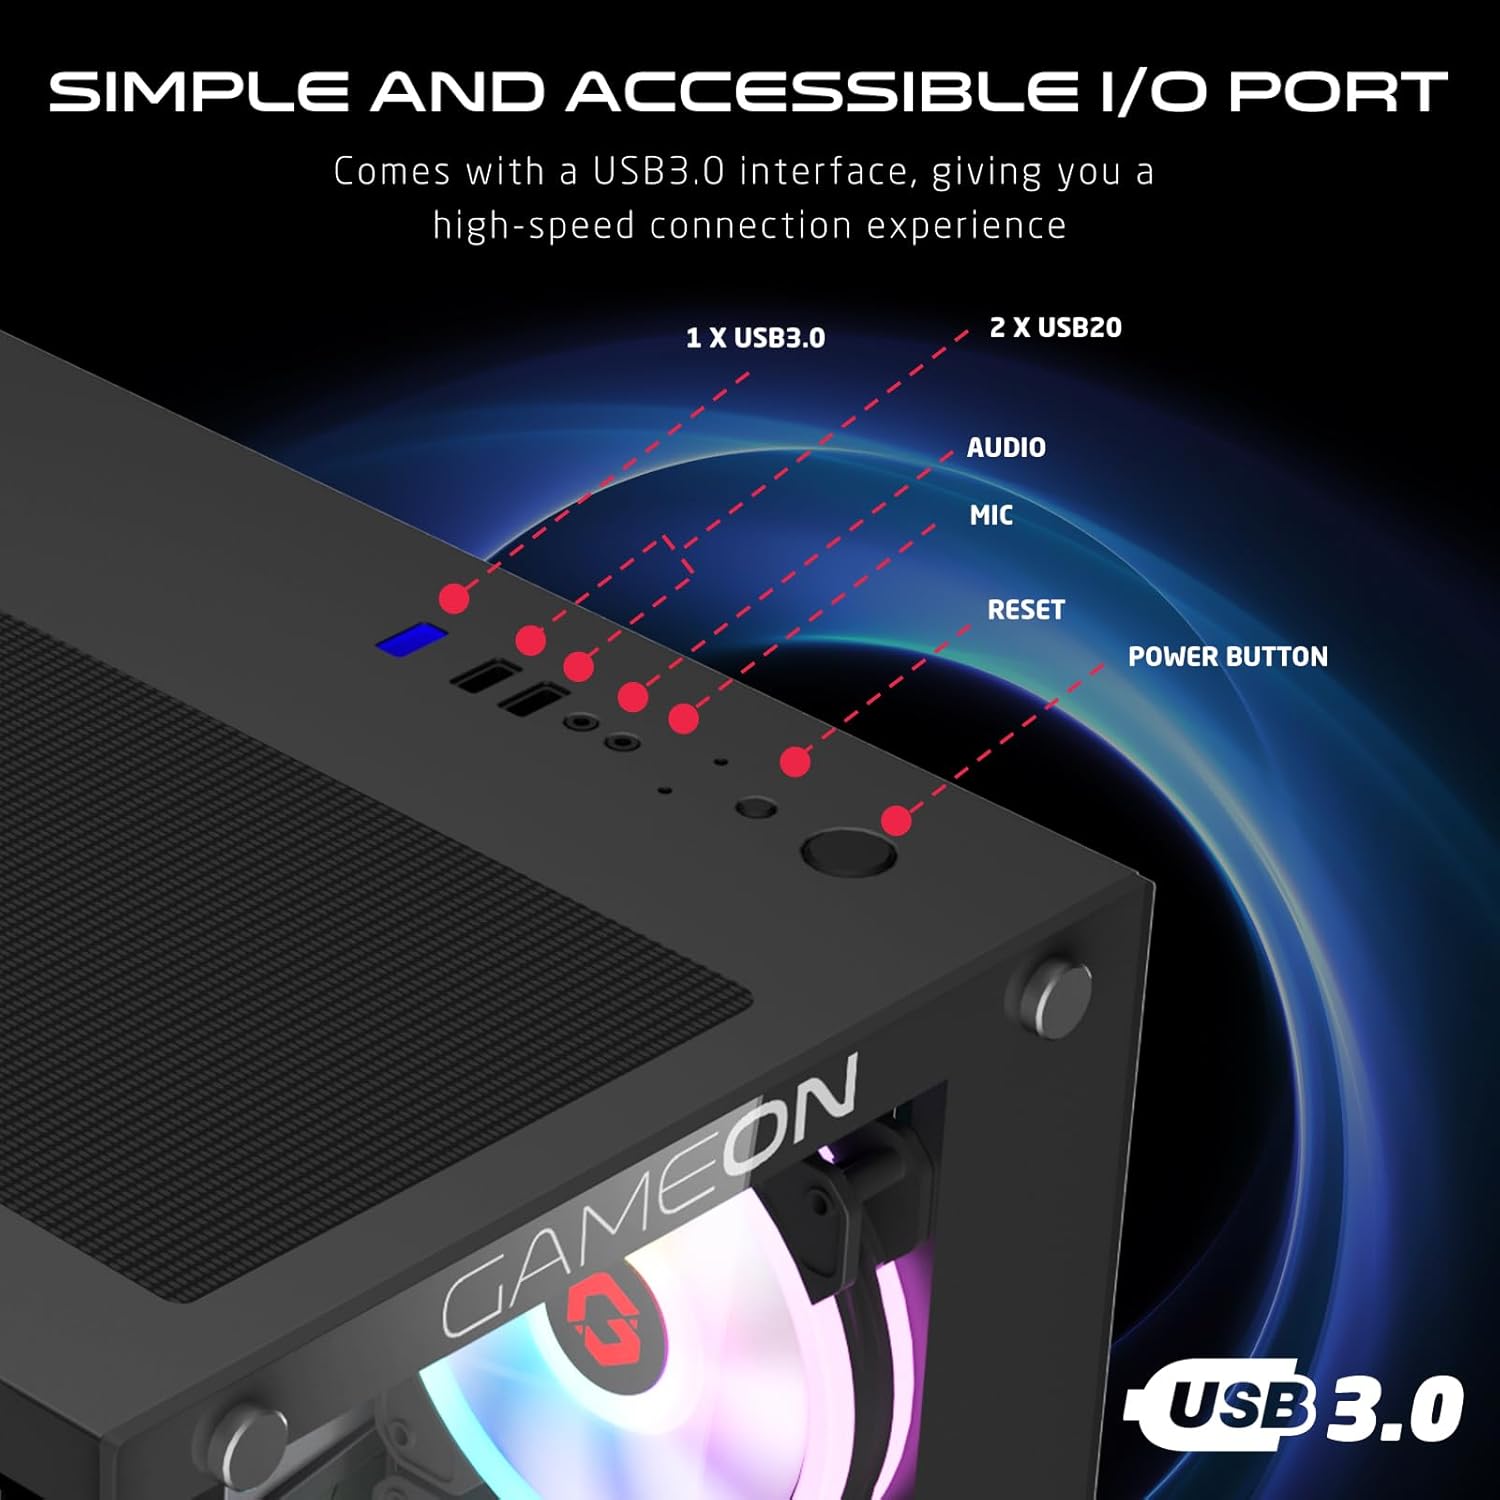
Figure 4.4: Front I/O ports, including 1x USB 3.0, 2x USB 2.0, Audio jack, Microphone jack, Reset button, and Power button.
4.3 Cooling and Construction
The case is designed with an optimized cooling solution, featuring multiple fan mounts and durable tempered glass panels.

Figure 4.5: Optimized cooling solution with massive air intake and exhaust. Features 7 pre-installed fans and durable tempered glass construction.
4.4 Compatibility and Drive Support
The case offers wide compatibility for various motherboard form factors and ample drive bay support.

Figure 4.6: Motherboard compatibility includes ATX, M-ATX, and ITX. Drive bay support for 2x HDD and 2x SSD. Also shown are the front panel header connections.
5. Instrukcje konfiguracji
Follow these steps to install your components into the GAMEON Midnight I Series PC case.
5.1 Przygotowanie sprawy
- Połóż obudowę na płaskiej i stabilnej powierzchni.
- Carefully remove the tempered glass side panel(s) by unscrewing the thumb screws and gently sliding the panel off. Set them aside in a safe place.
- Remove any internal packaging materials.
5.2 Instalacja płyty głównej
- Zainstaluj osłonę I/O (jeśli nie została zamontowana na płycie głównej) w tylnym otworze obudowy.
- Align your motherboard with the standoffs inside the case. Ensure the standoffs match your motherboard's form factor (ATX, M-ATX, ITX).
- Przymocuj płytę główną za pomocą dołączonych śrub.
5.3 Instalacja zasilacza (PSU).
- Znajdź miejsce montażu zasilacza w dolnej tylnej części obudowy.
- Slide your PSU into position from the rear of the case.
- Secure the PSU with the provided screws.
5.4 Instalacja dysku (HDD/SSD)
The case supports 2x 3.5" HDDs and 2x 2.5" SSDs.
- W przypadku dysków twardych 3.5": Locate the drive cage, typically near the PSU shroud. Slide the HDD into the drive bay and secure it with screws.
- W przypadku dysków SSD 2.5": Mount the SSDs to the designated mounting points, usually on the back of the motherboard tray or within the drive cage, using the provided screws.
5.5 Instalacja karty graficznej i karty rozszerzeń
- Zdejmij niezbędne osłony gniazd PCIe z tyłu obudowy.
- Umieść kartę graficzną lub inną kartę rozszerzeń w odpowiednim gnieździe PCIe na płycie głównej.
- Przymocuj karty za pomocą śrub.
5.6 Zarządzanie kablami
Wykorzystaj wycięcia na kable i punkty mocowania za tacką płyty głównej, aby uporządkować kable. Poprawia to przepływ powietrza i estetykę.
5.7 Connecting Front Panel I/O and Fans
- Connect the front panel cables (Power SW, Reset SW, HDD LED, Power LED, USB 3.0, USB 2.0, HD Audio) to their corresponding headers on your motherboard. Refer to your motherboard manual for header locations.
- Ensure the pre-installed ARGB fans are connected to the included ARGB/PWM controller. Connect the controller to a SATA power connector from your PSU and a 3-pin ARGB header (if available) and a 4-pin PWM header on your motherboard for software control, or use the remote for standalone control.
6. Instrukcja obsługi
6.1 Włączanie/wyłączanie
- After all components are installed and cables connected, replace the side panels.
- Connect your monitor, keyboard, mouse, and power cable to the PSU.
- Press the Power button on the front panel to turn on your PC.
- To turn off, use the operating system's shutdown function or press and hold the Power button for several seconds.
6.2 Sterowanie wentylatorem ARGB
Zainstalowanymi fabrycznie wentylatorami ARGB można sterować na dwa sposoby:
- Zdalne sterowanie: Use the included remote to cycle through various lighting effects, adjust brightness, and change fan speed.
- Oprogramowanie płyty głównej: If the ARGB controller is connected to a compatible 3-pin ARGB header on your motherboard, you can synchronize lighting effects with your motherboard's RGB software (e.g., ASUS Aura Sync, MSI Mystic Light Sync, ASRock Polychrome RGB, Gigabyte RGB Fusion).
7. Konserwacja
Regularna konserwacja pomaga zapewnić optymalną wydajność i długowieczność obudowy komputera.
7.1 Czyszczenie filtra przeciwpyłowego
The case includes dust filters to prevent dust buildup. It is recommended to clean them every 1-3 months, depending on your environment.
- Locate the dust filters (e.g., top, bottom, front).
- Delikatnie wyjmij filtry.
- Clean them using compressed air, a soft brush, or by rinsing with water (ensure they are completely dry before re-installing).
- Re-attach the dust filters.
7.2 Ogólne czyszczenie
- Użyj miękkiego, damp Ściereczką do przecierania zewnętrznych powierzchni obudowy. Unikaj środków czyszczących o działaniu ściernym.
- For tempered glass panels, use a glass cleaner and a microfiber cloth to avoid streaks.
7.3 Fan Cleaning
Periodically inspect the fan blades for dust accumulation. Use compressed air to gently clear dust from the fan blades and grilles.
8. Rozwiązywanie Problemów
Jeśli masz problemy z obudową komputera, zapoznaj się z poniższymi, często spotykanymi problemami i ich rozwiązaniami.
8.1 Wentylatory nie kręcą się lub ARGB nie działa
- Sprawdź połączenie zasilania: Ensure the ARGB/PWM controller is properly connected to a SATA power connector from your PSU.
- Sprawdź połączenia wentylatora: Verify that all fans are securely connected to the ARGB/PWM controller.
- Bateria pilota zdalnego sterowania: If using the remote, check if its battery needs replacement.
- Oprogramowanie płyty głównej: If using motherboard software for control, ensure the controller is connected to the correct ARGB header and the software is installed and configured correctly.
- Kierunek wentylatora: Upewnij się, że wentylatory są ustawione prawidłowo, aby zapewnić optymalny przepływ powietrza (wlot/wylot).
8.2 Porty wejścia/wyjścia z przodu nie działają
- Check Motherboard Connections: Ensure all front panel cables (USB 3.0, USB 2.0, HD Audio) are correctly and securely connected to their respective headers on the motherboard. Refer to your motherboard manual.
8.3 PC Not Powering On
- Power Button Connection: Verify the Power SW cable from the front panel is correctly connected to the motherboard's front panel header.
- PSU Connection: Sprawdź, czy zasilacz jest prawidłowo podłączony do gniazdka ściennego i czy wyłącznik zasilania jest ustawiony w pozycji „ON”.
- Internal Power Cables: Check that all necessary power cables (24-pin ATX, CPU, GPU) are securely connected to the motherboard and components.
9. Specyfikacje
| Funkcja | Specyfikacja |
|---|---|
| Nazwa modelu | GO-EMPERORII-M (Midnight I Series) |
| Typ sprawy | Mid Tower |
| Tworzywo | Szkło hartowane |
| Kolor | Czarny |
| Wymiary produktu (dł. x szer. x wys.) | Wymiary 44 x 28 x 42.7 cm |
| Waga przedmiotu | 6.45 kilogramów |
| Wsparcie płyty głównej | ATX, Micro ATX, ITX |
| Fabrycznie zainstalowane wentylatory | 7 x 120mm ARGB PWM Fans |
| Rozmiar wentylatora | 120mm |
| Metoda chłodzenia | Air, Water (supports up to 360mm radiator in front) |
| Zatoki napędowe | 2 dyski twarde 3.5", 2 dyski SSD 2.5" |
| Przednie porty we / wy | 1 x USB 3.0, 2 x USB 2.0, Audio, Mic, Reset, Power |
| Dodatkowe funkcje | Dust Filters, ARGB Controller with Remote |
10. Gwarancja i wsparcie
This product comes with a standard manufacturer's warranty. For specific warranty terms and conditions, please refer to the documentation provided with your purchase or contact GAMEON customer support. For technical assistance or further inquiries, please visit the official GAMEON webodwiedź witrynę lub skontaktuj się z ich kanałami wsparcia.