
jelkuz T309S-B+64G
User Manual for jelkuz 10.26'' Wireless CarPlay Screen with Dash Cam
Model: T309S-B+64G
1. Wprowadzenie
This manual provides detailed instructions for the installation, operation, and maintenance of your jelkuz 10.26'' Wireless CarPlay Screen with 2.5K Dash Cam and Backup Camera. Please read this manual thoroughly before using the device to ensure proper functionality and safety.
1.1 Produkt powyżejview
The jelkuz portable car stereo integrates a 10.26-inch display with wireless Apple CarPlay and Android Auto capabilities, a 2.5K front dash camera, and a 1080P backup camera. It offers features such as GPS navigation, Bluetooth connectivity, AirPlay, AUX/FM audio output, and Siri/Google Assistant voice control. The front camera can rotate 180° for versatile recording, and the system supports simultaneous front and rear recording with a 64GB memory card included.

Figure 1: jelkuz 10.26 inch Wireless CarPlay Screen with Dash Cam and Backup Camera, showing the main unit, front camera, rear camera, and included accessories like the 64GB memory card and 33ft cable.
1.2 Zawartość pudełka
- 1 x 10.26-inch Wireless CarPlay Screen Unit
- 1 x Rear Camera (1080P, waterproof)
- Karta pamięci 1 x 64GB
- 1 x uchwyt z przyssawką
- 1 x uchwyt na naklejki
- 1 x ładowarka samochodowa
- Kabel 1 x AUX
- 1 x 33-stopowy kabel do tylnej kamery
- 1 x Instrukcja obsługi

Figure 2: Diagram illustrating the contents of the product package and various vehicle types compatible with the device.
2. Informacje dotyczące bezpieczeństwa
- Do not operate the device or adjust settings while driving. Always pull over safely before making any adjustments.
- Upewnij się, że wszystkie kable są bezpiecznie podłączone i nie utrudniają pracy kierowcy. view lub elementów sterujących pojazdem.
- The device is compatible with vehicles from 7-36V. Using it with incompatible voltagmoże spowodować uszkodzenie.
- Trzymaj urządzenie z dala od ekstremalnych temperatur, długotrwałego bezpośredniego światła słonecznego i wilgoci.
- Nie próbuj samodzielnie demontować ani naprawiać urządzenia. Skontaktuj się z wykwalifikowanym personelem serwisowym.
- The rear camera is waterproof, but ensure all connections are sealed to prevent water ingress.
3. Konfiguracja i instalacja
3.1 Montaż jednostki wyświetlającej
The display unit can be mounted using either the self-adhesive bracket or the suction mount. Choose a location on your dashboard or windshield that does not obstruct your view lub zakłócać działanie poduszek powietrznych.
- Dokładnie oczyść powierzchnię montażową.
- Attach the chosen bracket to the display unit.
- Secure the bracket to the desired location. For the suction mount, press firmly and engage the lever. For the adhesive bracket, peel off the protective film and press firmly for 30 seconds.
- Dostosuj kąt wyświetlania, aby uzyskać optymalny viewing. The brackets allow for 360° rotation.

Figure 3: Illustration of the suction cup and sticker brackets, showing their 360° adjustability and examples of various mounting positions in a car. Also depicts the wide range of compatible vehicles.
3.2 Podłączanie zasilania
Connect the provided car charger to the display unit's power input and then plug the charger into your vehicle's cigarette lighter socket.
3.3 Instalowanie kamer
- Przednia kamera: The front camera is integrated into the display unit and can be rotated 180° to record the front, side, or inside of the car. Adjust its angle as needed.
- Kamera tylna:
- Mount the 1080P waterproof rear camera at the back of your vehicle, typically above the license plate or near the rear window.
- Route the 33ft rear camera cable from the rear camera to the main display unit, ensuring it does not interfere with vehicle components or passenger movement.
- Connect the rear camera cable to the designated input on the display unit.
- (Optional) For automatic reverse guidelines, connect the rear camera's red wire to your vehicle's reverse light power supply.

Figure 4: Demonstrates the 180° rotation capability of the front camera, allowing it to record the front view, bok view, or inside the car, useful for monitoring children in the back seat.

Figure 5: Illustrates the dual recording capability (2.5K front, 1080P rear) and the adjustable reverse guideline feature for parking assistance.
4. Instrukcja obsługi
4.1 Pierwsze włączenie i konfiguracja
Once powered, the device will boot up. Follow any on-screen prompts for initial language and time settings.
4.2 Bezprzewodowe połączenie Apple CarPlay / Android Auto
The device supports wireless connection to Apple CarPlay and Android Auto for seamless smartphone integration.
- Na jednostce wyświetlającej wybierz ikonę „CarPlay” lub „Android Auto”.
- Włącz Bluetooth i Wi-Fi na swoim smartfonie.
- Szukaj the device's Bluetooth name (e.g., "TF781BT_xxxxxx") in your phone's Bluetooth settings and pair.
- Potwierdź kod parowania na obu urządzeniach.
- Once paired via Bluetooth, the device will automatically prompt you to use CarPlay or Android Auto via Wi-Fi. Confirm the connection.
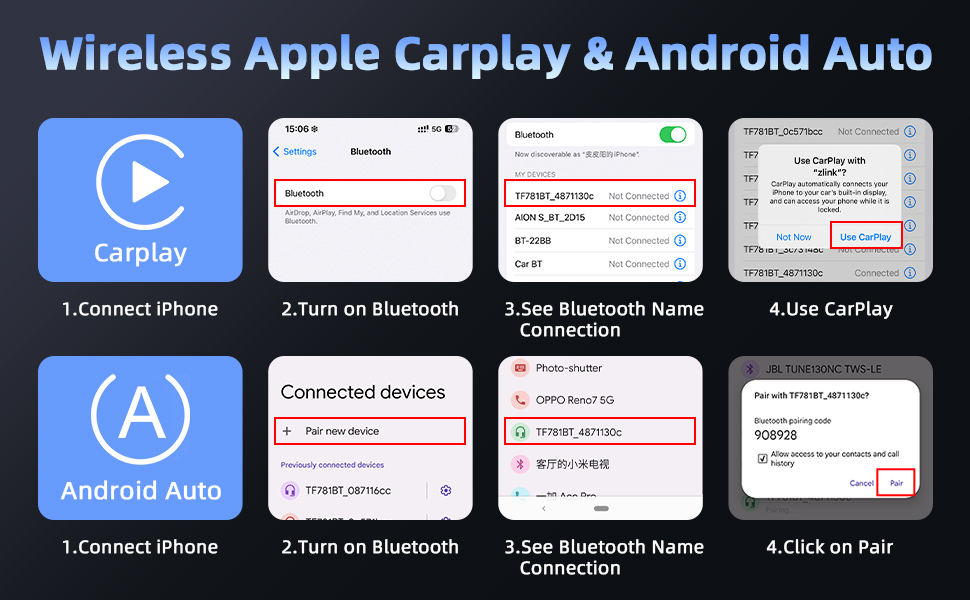
Figure 6: Step-by-step guide showing how to connect an iPhone to the device for Wireless Apple CarPlay and Android Auto via Bluetooth pairing.

Rysunek 7: Koniecview of the wireless connectivity options including Apple CarPlay, Android Auto, and Mirror Link, with examples of their interfaces on the display.
4.3 Dash Cam Recording Functions
The device supports simultaneous 2.5K front and 1080P rear camera recording.
- Nagrywanie w pętli: Fujtage is recorded in continuous loops. When the memory card is full, the oldest filesą automatycznie nadpisywane.
- Czujnik G: In case of a sudden impact or collision, the G-sensor will automatically lock the current video file aby zapobiec jego nadpisaniu.
- Widzenie nocne: Ulepszone możliwości nagrywania przy słabym oświetleniu zapewniają wyraźny dźwięktage even in dark conditions.
- Odtwarzanie wideo: Access recorded videos directly on the display unit or by removing the 64GB memory card and viewna komputerze.
- Połączenie z aplikacją mobilną: Use the dedicated mobile app (via 5G WiFi) to preview, play, and download recorded files in real-time on your smartphone.
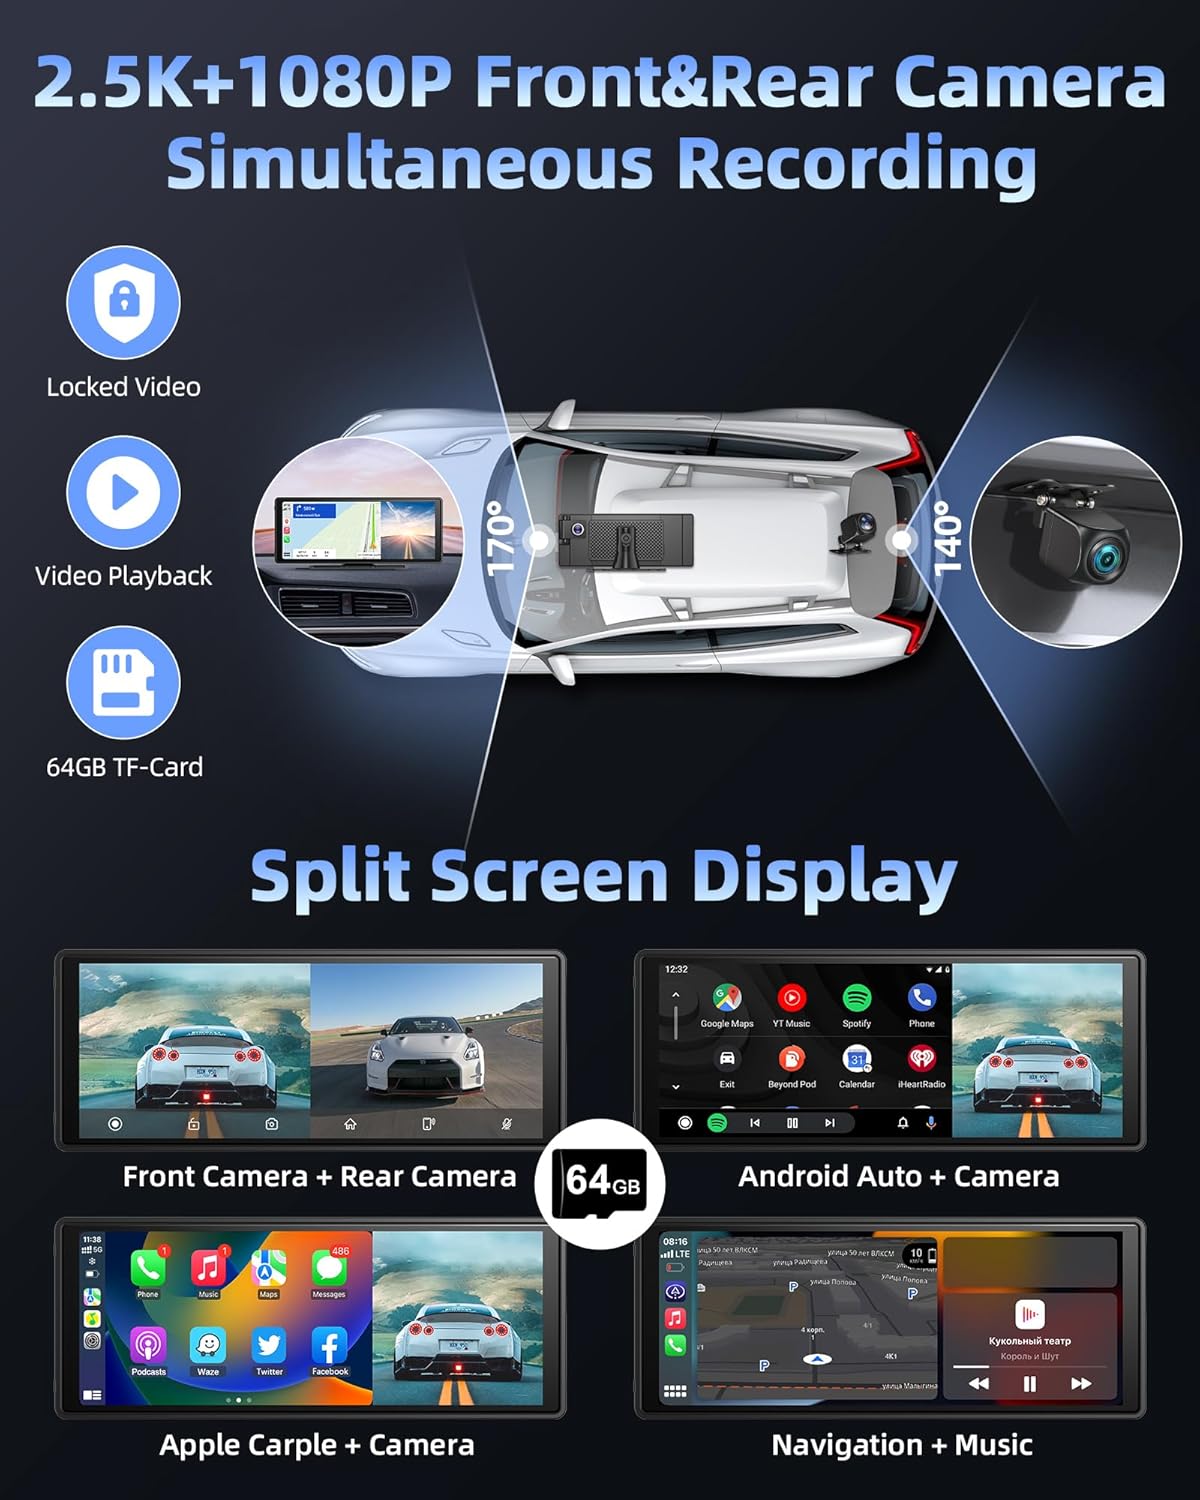
Figure 8: Shows the dual recording feature with 2.5K front and 1080P rear cameras, along with examples of split-screen display modes for viewing camera feeds and applications simultaneously.
4.4 Wyświetlanie podzielonego ekranu
Urządzenie obsługuje różne tryby podzielonego ekranu, co pozwala na: view camera feeds and applications simultaneously.
- Front Camera + Rear Camera
- Android Auto + Camera
- Apple CarPlay + Camera
- Navigation + Music
- Phone + Front/Rear Camera

Figure 9: Various split-screen configurations, including front camera with rear camera, Android Auto with camera, Apple CarPlay with camera, and navigation with music.
4.5 Opcje wyjścia audio
The device offers multiple ways to output audio to your car's sound system.
- Bluetooth: Connect the device to your car's original Bluetooth system for audio playback and hands-free calling. The dual Bluetooth 5.0 design enhances stability.
- Nadajnik FM: Transmit audio wirelessly to your car's FM radio by setting both the device and your car radio to the same FM frequency.
- Wyjście AUX: Connect the provided AUX cable from the device's AUX output to your car's AUX input for a wired audio connection.
- Wbudowany głośnik: Urządzenie ma wbudowany głośnik umożliwiający bezpośrednie odtwarzanie dźwięku.

Figure 10: Visual representation of the four audio output methods: Bluetooth, FM transmission, built-in speaker, and AUX connection.
4.6 Sterowanie głosowe (Siri/Asystent Google)
Korzystaj z poleceń głosowych, aby obsługiwać urządzenie bez użycia rąk za pomocą Siri (dla Apple CarPlay) lub Asystenta Google (dla Android Auto).
- Activate voice control by saying "Hey Siri" or "Hey Google" (if configured on your phone) or by tapping the voice assistant icon on the screen.
- Examples of commands: "Navigate to [address]", "Call [contact name]", "Play [song/artist]", "What's the weather today?".

Figure 11: Depicts the voice control functionality with examples of commands and the mobile app connection for real-time video preview i pobierz.
4.7 Auto Dimming Function
The display features an auto-dimming function to adjust screen brightness based on ambient light, reducing glare during night driving.
- Access the display settings to configure auto-dimming preferences, including brightness levels and scheduled dimming times.

Figure 12: Highlights advanced features such as auto-dimming, intelligent voice control, customizable reverse guidelines, and the ability to flip camera views (up/down/left/right).
5. Konserwacja
- Czyszczenie: Use a soft, dry cloth to clean the display screen and device body. Do not use abrasive cleaners or solvents.
- Karta pamięci: Periodically format the 64GB memory card (at least once a month) to ensure optimal recording performance and prevent data corruption. Back up any important footage przed formatowaniem.
- Folia ochronna: The product surface may have a removable protective film. If scratches or dirt appear, this film can be peeled off.
- Aktualizacje oprogramowania układowego: Sprawdź producenta webodwiedź witrynę lub skontaktuj się z pomocą techniczną, aby uzyskać informacje o dostępnych aktualizacjach oprogramowania sprzętowego, które poprawią wydajność i dodadzą nowe funkcje.
6. Rozwiązywanie Problemów
| Problem | Możliwa przyczyna | Rozwiązanie |
|---|---|---|
| Urządzenie nie włącza się. | No power from cigarette lighter; loose connection; faulty charger. | Check cigarette lighter fuse; ensure charger is fully inserted; try another power source if available. |
| CarPlay/Android Auto nie łączy się bezprzewodowo. | Bluetooth/Wi-Fi wyłączone w telefonie; nieprawidłowe parowanie; zakłócenia. | Ensure Bluetooth and Wi-Fi are enabled on your phone; forget device in phone's Bluetooth settings and re-pair; restart both devices. |
| No video from rear camera. | Luźne połączenie kablowe; uszkodzona kamera. | Check the rear camera cable connection at both ends; ensure the camera is properly powered (if applicable). |
| Słaba jakość dźwięku przez FM. | Zakłócenia częstotliwości FM; słaby sygnał. | Try a different, clear FM frequency on both the device and your car radio. |
| Memory card error / Recording issues. | Corrupted card; full card; incompatible card. | Format the memory card (backup data first); ensure it's a high-speed card (Class 10 or higher); replace if necessary. |
7. Specyfikacje
| Funkcja | Szczegół |
|---|---|
| Nazwa modelu | T309S-B+64G |
| Rozmiar wyświetlacza | 10.26 cali |
| Rozdzielczość przedniej kamery | 2.5 tys. |
| Rozdzielczość tylnej kamery | 1080P |
| Pole View | Przód: 170°, Tył: 140° |
| Łączność | Wireless CarPlay, Wireless Android Auto, Mirror Link, Bluetooth 5.0 (Dual), 5G WiFi, AUX, FM Transmitter |
| Zasilacz | 7-36 V (zapalniczka samochodowa) |
| Dołączona karta pamięci | 64 GB |
| Waga przedmiotu | 2.57 funta |
| Wymiary opakowania | 10.87 x 5.59 x 4.09 cala |
| Typ montażu | Suction Mount, Sticker Bracket |
8. Gwarancja i wsparcie
Jelkuz offers a 1-letni serwis posprzedażowy for this product. If you encounter any questions during installation or use, or require technical support, please refer to the contact information provided on the instruction manual included in your product package.
For customized boot icon service, please contact the after-sale address specified in the instruction manual.
Ask a question about this manual
Ask about setup, troubleshooting, compatibility, parts, safety, or missing instructions. Manuals+ will review the question and use this page’s manual context to help answer it.