
1. Wprowadzenie
This manual provides comprehensive instructions for the installation, operation, and maintenance of your YIMU K4303 Car Backup Camera System. Please read this manual thoroughly before use to ensure proper functionality and safety.

Image 1.1: The YIMU K4303 Car Backup Camera System, featuring a 4.3-inch monitor and a camera designed for license plate mounting.
Produkt ponadview
The YIMU K4303 is a wired car backup camera system designed to enhance driving safety by providing a clear view of the area behind or in front of your vehicle. It features a 4.3-inch monitor, a high-definition camera with night vision, and adjustable parking guide lines. The system is IP69K waterproof and offers flexible installation options for various vehicle types.
2. Zawartość opakowania
Sprawdź, czy w przesyłce znajdują się wszystkie elementy wymienione poniżej:
- 1 x 4.3-calowy monitor
- 1 x kamera cofania
- 1 x ładowarka samochodowa
- 1 x kabel zasilający (do monitora)
- 1 x 26ft Power Cable (for camera connection)
- 1 x Suction Cup Holder (for monitor)
- 1 x Self-adhesive Adhesive Pad (for monitor)
- 1 x Small Bracket (for alternative camera mounting)
- 1 x Screw (for camera mounting)
- 2 x Tie Straps (for cable management)
- 1 x Instrukcja obsługi

Image 2.1: All components included in the YIMU K4303 Car Backup Camera System package.
Film 2.1: Rozpakowywanie i koniecview of the YIMU K4303 backup camera system components.
3. Konfiguracja i instalacja
Follow these steps for proper installation of your YIMU K4303 system.
3.1 Instalacja monitora
- Attach the suction cup holder to the back of the monitor.
- Wyczyść wybraną powierzchnię montażową na desce rozdzielczej lub przedniej szybie.
- Press the suction cup firmly onto the surface and engage the locking lever to secure it.
- Adjust the monitor angle for optimal viewing.
Video 3.1: Demonstration of the monitor installation process using the suction cup mount.
3.2 Instalacja kamery
The camera offers two primary installation methods:
- License Plate Frame Mounting: The camera comes pre-installed on a license plate bracket. Simply mount it over your vehicle's rear license plate.
- Alternatywny montaż: Use the small additional bracket to attach the camera to the front, side, or another suitable location on your vehicle.

Image 3.1: Various installation methods for the camera, including license plate, front, and side mounting options.
3.3 połączeń przewodów
The system requires a single power supply connection. Connect the camera and monitor using the provided 4-pin video power cable. Then, choose one of the following power options:
- Cigarette Lighter/USB Power (Continuous Use): Plug the car charger into your vehicle's cigarette lighter socket or a USB port (USB adapter not included). This method provides continuous power, suitable for front or side camera use.
- Reversing Light Power (Reverse Camera Only): Connect the power cable to your vehicle's reversing lights. This will activate the camera system automatically when the vehicle is put into reverse.
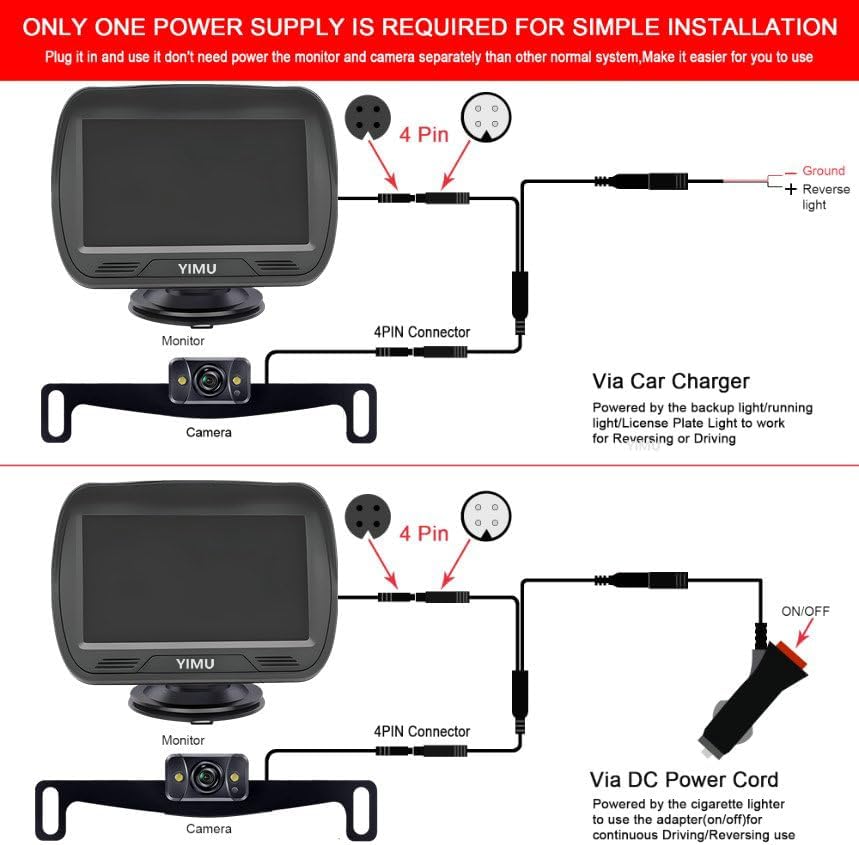
Image 3.2: Detailed wiring diagram for connecting the camera and monitor to either a cigarette lighter for continuous power or to the reversing lights for reverse-only activation.
4. Instrukcja obsługi
4.1 Podstawowa obsługa
Once properly installed and powered, the monitor will display the camera feed. If connected to reversing lights, the display will activate automatically when reverse gear is engaged.
4.2 Adjusting Parking Guide Lines
The system allows for customization of the parking guide lines:
- Turn guide lines on or off.
- Adjust the width of the guide lines.
- Move guide lines left or right.
- Adjust the height of the guide lines.

Image 4.1: Visual representation of the adjustable parking guide lines feature.
4.3 ustawienia obrazu
You can adjust various image parameters on the monitor, including brightness, contrast, and image flip (mirror/normal view).
Video 4.1: Demonstration of adjusting menu settings on the monitor, including guide lines, brightness, and contrast.
4.4 Front/Rear Camera Switching
The camera can function as either a rear-view (mirror image) or front/side-view (normal facing image) camera. To switch between modes, locate the green wire on the camera cable. Cutting this green wire will change the image from mirror view to normal facing view.

Image 4.2: Instructions for switching the camera view by modifying the green wire.
5. Konserwacja
- Czyszczenie: Regularnie czyść obiektyw aparatu i ekran monitora miękką, miękką szmatką.amp płótno. Unikaj ściernych środków czyszczących.
- Kontrola kabla: Okresowo sprawdzaj wszystkie kable pod kątem oznak zużycia, uszkodzeń lub luźnych połączeń.
- Bezpieczeństwo montażu: Ensure the monitor and camera mounts remain secure to prevent dislodgement during driving.
- Stopień wodoodporności: The camera is IP69K waterproof, designed to withstand high-pressure, high-temperature jet sprays. However, avoid prolonged submersion or intentional exposure to extreme conditions.

Image 5.1: The camera's IP69K waterproof rating ensures durability in diverse weather conditions.
6. Rozwiązywanie Problemów
| Problem | Możliwa przyczyna | Rozwiązanie |
|---|---|---|
| Brak obrazu na monitorze |
|
|
| Migotanie lub zniekształcenie obrazu |
|
|
| Parking lines not visible or incorrect |
|
|
| Camera image is reversed (mirror image) but intended for front view |
|
|
7. Specyfikacje
- Numer modelu: K4303
- Rozmiar ekranu: 4.3 cali
- Technologia wyświetlania: LCD
- Technologia czujnika optycznego: CMOS
- Typ soczewki: Szeroki kąt
- Kąt rzeczywisty View: 150 stopni
- Stopień wodoodporności: IP69K
- Tomtage: 24 Volts (compatible with 12V systems via car charger)
- Wymiary produktu: 7.7 x 4.9 x 3.4 cala
- Waga przedmiotu: 1.3 funta
- Typ złącza: RCA (via 4-pin cable)
- Typ instalacji: Surface Mount, Roof Mount (for camera)
8. Gwarancja i wsparcie
YIMU offers a 2-Year Service, a 30-Day Money-Back Guarantee, and Lifetime Technical Support with every purchase. For any questions or assistance with your YIMU K4303 backup camera system, please contact YIMU customer service.
For further information or support, please visit the official YIMU store: YIMU Store on Amazon