1. Wprowadzenie
This manual provides essential information for the safe and effective operation of your Mastech MS8301A Digital Multimeter. Please read this manual thoroughly before using the device to ensure proper functionality and to prevent potential hazards. Keep this manual for future reference.
2. Informacje dotyczące bezpieczeństwa
Always adhere to the following safety precautions to avoid electric shock or personal injury, and to prevent damage to the multimeter or the equipment under test.
- Przeczytaj instrukcję: Understand all instructions and safety information before use.
- Znamionowa objętośćtage: Nie stosować w ilości większej niż zalecana objętość.tagnp. zgodnie z oznaczeniami na multimetrze, pomiędzy zaciskami lub pomiędzy dowolnym zaciskiem i masą.
- Przewody testowe: Sprawdź przewody pomiarowe pod kątem uszkodzonej izolacji lub odsłoniętego metalu. Wymień, jeśli są uszkodzone.
- Circuit Disconnection: Disconnect the circuit power and discharge all high-voltage kondensatory przed badaniem rezystancji, ciągłości, diod lub pojemności.
- Wybór funkcji: Upewnij się, że przełącznik funkcji znajduje się w odpowiedniej pozycji dla wykonywanego pomiaru.
- Obwody pod napięciem: Do not measure current on a live circuit with the test leads connected in parallel.
- Środowisko operacyjne: Do not operate the multimeter in explosive gas, vapor, or damp środowiska.
- Środki ochrony osobistej: Always wear appropriate personal protective equipment, such as safety glasses, when working with electrical circuits.
- Ocena bezpieczeństwa: This device is rated for CAT III 600V. Do not exceed this rating.
3. Koniec produktuview
3.1 Funkcje
The Mastech MS8301A Digital Multimeter offers a range of features for various electrical measurements:
- Wyświetlacz: 2000 liczy
- Przechowywanie danych: Zamraża wyświetlany odczyt, umożliwiając wygodne zapisywanie.
- Tester baterii: For 1.5V and 9V batteries.
- Kompaktowa konstrukcja: Product Size: 150mm x 74mm x 48mm (5.9" x 2.9" x 1.7")
- Lekka: Product Weight: 220g (0.48lb)

Image: Detailed features and specifications of the Mastech MS8301A multimeter, including display count, data hold, battery test function, and physical dimensions.
3.2 Składniki
The Mastech MS8301A package typically includes the following components:
- Mastech MS8301A Digital Multimeter Unit
- Przewody pomiarowe (czerwony i czarny)
- AAA Batteries (2x1.5V)
- Certyfikat kalibracji (jeśli dotyczy)
- Szybki przewodnik
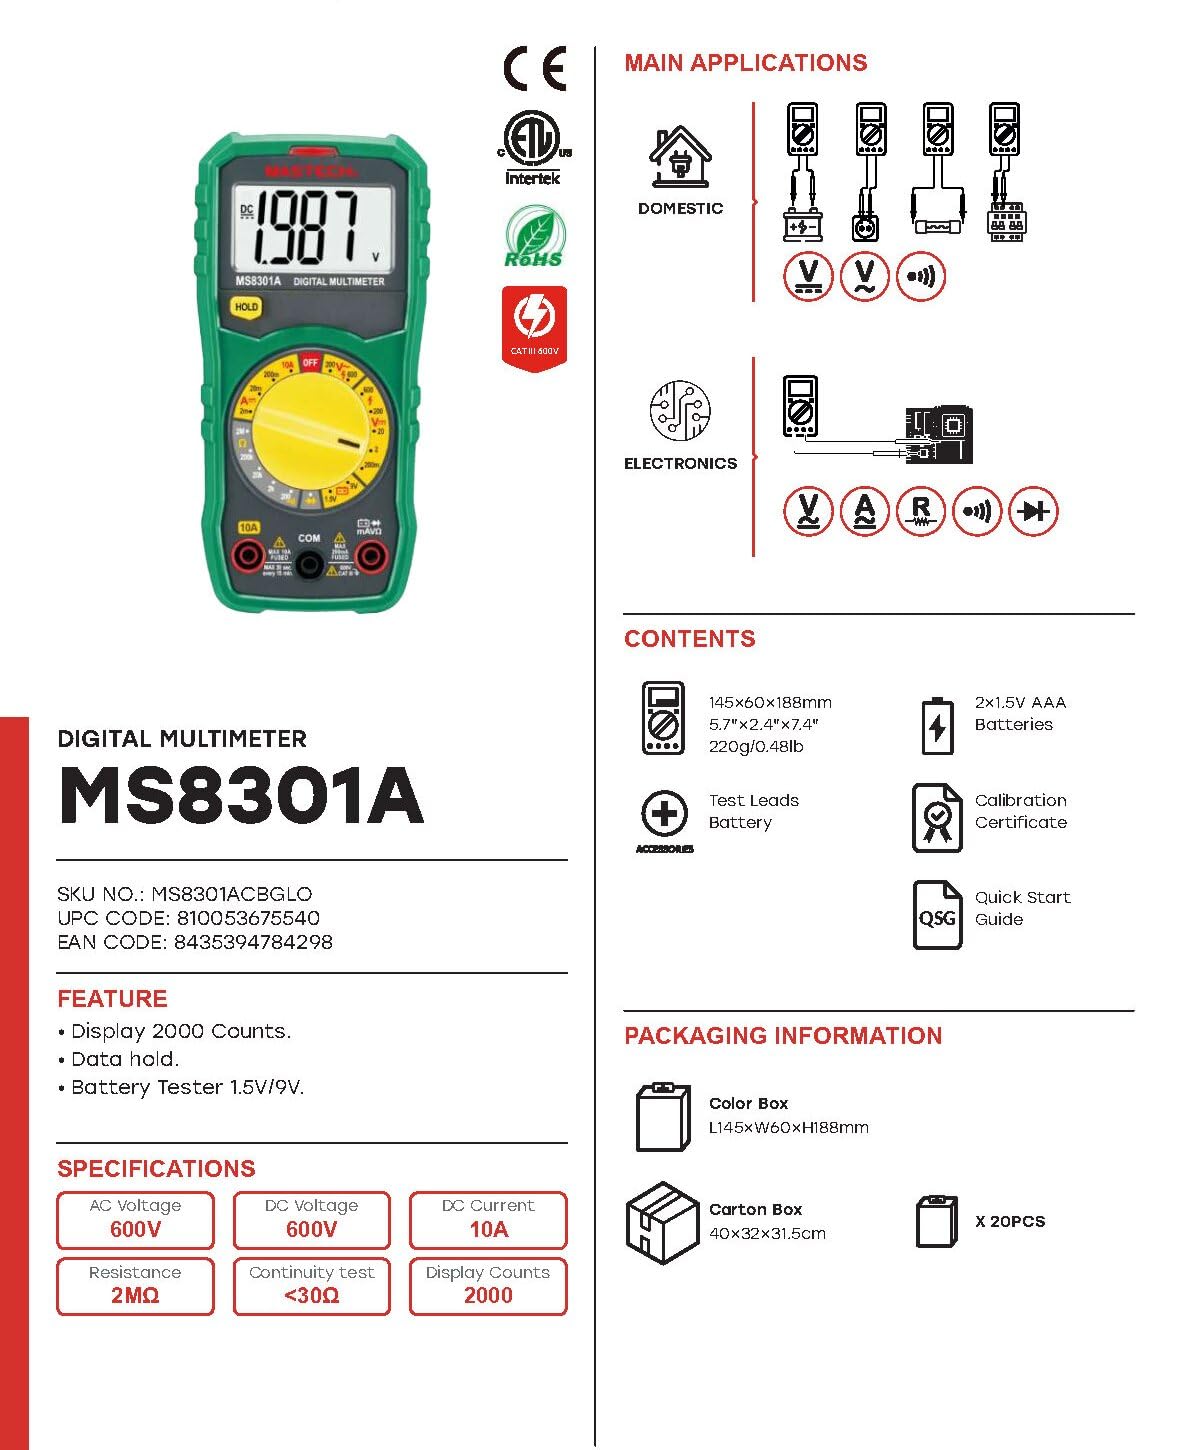
Image: The Mastech MS8301A Digital Multimeter showing its front panel, rotary switch, display, input jacks, and a list of included accessories such as test leads and batteries.
4. Konfiguracja
4.1 Instalacja baterii
- Upewnij się, że multimetr jest wyłączony i odłącz wszystkie przewody pomiarowe.
- Znajdź pokrywę komory baterii z tyłu multimetru.
- Odkręć śrubę(y) mocującą(e) i zdejmij pokrywę.
- Włóż dwie baterie AAA 1.5 V, zwracając uwagę na prawidłową biegunowość (+ i -), zgodnie ze wskazaniami wewnątrz komory.
- Załóż pokrywę komory baterii i zabezpiecz ją śrubą(ami).
4.2 Podłączanie przewodów pomiarowych
Podłącz przewody pomiarowe do odpowiednich gniazd wejściowych multimetru:
- Włóż czarny przewód pomiarowy do KOM (zwykły) walec.
- W przypadku większości pomiarów (objętośćtage, Resistance, Diode, Continuity, Temperature, Battery Test), insert the czerwony przewód pomiarowy do VΩmA podnośnik.
- Do pomiarów dużego prądu (do 10A) należy włożyć czerwony przewód pomiarowy do 10A podnośnik.
5. Instrukcja obsługi
Przed dokonaniem jakichkolwiek pomiarów należy upewnić się, że przewody pomiarowe są prawidłowo podłączone, a przełącznik obrotowy jest ustawiony na żądaną funkcję.
5.1 Pomiar objętości prądu stałegotage (V=)
- Ustaw przełącznik obrotowy na żądaną wartość V= range (e.g., 20V for measuring up to 20V DC).
- Podłącz czerwony przewód pomiarowy do dodatniego (+) bieguna obwodu, a czarny przewód pomiarowy do ujemnego (-) bieguna.
- Przeczytaj tomtage wartość na wyświetlaczu.
5.2 Pomiar objętości prądu przemiennegotagmi (V~)
- Ustaw przełącznik obrotowy na żądaną wartość V~ range (e.g., 200V for measuring up to 200V AC).
- Podłącz przewody pomiarowe do obwodu prądu przemiennegotagŹródło.
- Przeczytaj tomtage wartość na wyświetlaczu.
5.3 Pomiar prądu stałego (A=)
- Ważny: Disconnect power to the circuit before connecting the multimeter in series.
- Ustaw przełącznik obrotowy na żądaną wartość A= range (e.g., 200mA or 10A). Remember to move the red lead to the 10A jack for high current.
- Open the circuit where current is to be measured.
- Connect the multimeter in series with the circuit, ensuring the current flows through the multimeter.
- Podłącz zasilanie do obwodu i odczytaj wartość prądu na wyświetlaczu.
5.4 Pomiar rezystancji (Ω)
- Ważny: Przed pomiarem rezystancji należy upewnić się, że obwód jest odłączony od napięcia i wszystkie kondensatory są rozładowane.
- Ustaw przełącznik obrotowy na żądaną wartość Ω zakres.
- Podłącz przewody pomiarowe do mierzonego elementu.
- Odczytaj wartość rezystancji z wyświetlacza.
5.5 Test diody (→|)
- Ważny: Upewnij się, że dioda jest odłączona od obwodu.
- Ustaw przełącznik obrotowy w pozycji Test Diody pozycja.
- Connect the red test lead to the anode and the black test lead to the cathode of the diode. The display will show the forward voltagkropla.
- Reverse the leads. The display should show "OL" (Open Loop) for a good diode.
5.6 Test ciągłości ())))
- Ważny: Upewnij się, że obwód jest odłączony od napięcia.
- Ustaw przełącznik obrotowy w pozycji Test ciągłości pozycja.
- Connect the test leads across the component or wire to be tested.
- Jeśli rezystancja spadnie poniżej około 30Ω, rozlegnie się sygnał dźwiękowy, sygnalizujący ciągłość. Na wyświetlaczu pojawi się również wartość rezystancji.
5.7 Battery Test (1.5V/9V)
- Ustaw przełącznik obrotowy w pozycji 1.5 V or 9V battery test position, corresponding to the battery type.
- Podłącz czerwony przewód pomiarowy do dodatniego (+) bieguna akumulatora, a czarny przewód pomiarowy do ujemnego (-) bieguna akumulatora.
- Odczytaj objętość bateriitage na wyświetlaczu.
5.8 Zatrzymanie danych
Press the "HOLD" button to freeze the current reading on the display. Press it again to release the hold function and resume live readings.
6. Specyfikacje
| Pomiar | Zakres | Rezolucja |
|---|---|---|
| Objętość DCtage | 200mV / 2V / 20V / 200V / 600V | 100µV / 1mV / 10mV / 100mV / 1V |
| AC Objętośćtage | 200V / 600V | 100mV / 1V |
| Prąd stały | 2mA / 20mA / 200mA / 10A | 1µA / 10µA / 100µA / 10mA |
| Opór | 200Ω / 2kΩ / 20kΩ / 200kΩ / 2MΩ | 0.1Ω / 1Ω / 10Ω / 100Ω / 1kΩ |
| Test ciągłości | Buzzer sounds at <30Ω | — |
| Test Diody | Przekaż tomtagkropla | — |
| Test baterii | 1.5V / 9V | — |
Specyfikacje ogólne
- Wyświetlacz: 2000 liczy
- Zasilanie: 2 baterie AAA 1.5 V
- Wymiary: 150 mm x 74 mm x 48 mm (5.9 cala x 2.9 cala x 1.7 cala)
- Waga: 220g (0.48 funtów)
- Ocena bezpieczeństwa: CAT III 600 V.
- Tworzywo: Akrylonitryl-butadien-styren (ABS)
- Kolor: Niebieski

Image: A table detailing manual ranging specifications for various Mastech digital multimeters, including the MS8301A, showing display counts, safety ratings, and measurement capabilities.
7. Konserwacja
7.1 Wymiana baterii
When the battery low indicator appears on the display, replace the batteries immediately to ensure accurate readings. Follow the steps outlined in Section 4.1 for battery installation.
7.2 Czyszczenie
Wyczyść obudowę za pomocą reklamyamp Ściereczką i łagodnym detergentem. Nie używaj środków ściernych ani rozpuszczalników. Przed użyciem upewnij się, że multimetr jest całkowicie suchy.
7.3 Przechowywanie
If the multimeter is not used for an extended period, remove the batteries to prevent leakage and damage to the device. Store in a cool, dry place away from direct sunlight.
8. Rozwiązywanie Problemów
| Problem | Możliwa przyczyna | Rozwiązanie |
|---|---|---|
| Brak wyświetlacza lub wyświetlacz jest przyciemniony | Baterie rozładowane lub słabe; nieprawidłowa polaryzacja baterii. | Wymień baterie i sprawdź ich ułożenie. |
| Wyświetlany jest komunikat „OL” (Przeciążenie) | Measurement exceeds selected range; open circuit. | Select a higher range; check for open circuit in the component or leads. |
| Błędne odczyty | Wybrano nieprawidłową funkcję, słabe połączenie przewodów pomiarowych, uszkodzone przewody pomiarowe. | Verify function switch position; ensure secure lead connection; inspect and replace damaged leads. |
| Brak sygnału dźwiękowego ciągłości | Open circuit; resistance too high. | Check for breaks in the circuit; ensure resistance is below 30Ω. |
9. Gwarancja i wsparcie
Mastech products are designed for reliability and performance. For specific warranty information, please refer to the warranty card included with your product or contact Mastech customer support. Keep your purchase receipt as proof of purchase.
For technical support or service inquiries, please visit the official Mastech webna miejscu lub skontaktuj się z autoryzowanym serwisem.