1. Wprowadzenie
The Mastech MS8250D is a high-performance digital multimeter designed for accurate measurement of AC/DC voltage, AC/DC current, resistance, capacitance, frequency, and temperature. It features a 6600-count display, auto/manual ranging, True RMS, Non-Contact Voltage (NCV) detection, diode and continuity testing, and a USB interface for PC connectivity. This manual provides detailed instructions for safe and effective use of the device.
Główne cechy:
- 6600-count digital display
- Automatic and Manual Ranging
- Prawdziwy pomiar RMS
- Objętość bezkontaktowatage (NCV) wykrywanie
- Diode and Continuity Tester (buzzer < 50Ω)
- MAX/MIN value recording
- Funkcja wstrzymania danych
- Podświetlenie wyświetlacza
- Automatyczne wyłączanie zasilania
- Tryb pomiaru względnego
- Wskaźnik niskiego poziomu naładowania baterii
- USB Interface for Windows OS
2. Informacje dotyczące bezpieczeństwa
OSTRZEŻENIE: To avoid electric shock or personal injury, and to avoid damage to the meter or to the equipment under test, read all safety information carefully before using the meter. This device complies with CE, RoHS, and UL safety standards.
- Zawsze należy upewnić się, że przewody pomiarowe są w dobrym stanie i prawidłowo podłączone.
- Nie stosować w ilości większej niż zalecana objętość.tage, jak zaznaczono na liczniku, pomiędzy zaciskami lub pomiędzy dowolnym zaciskiem a uziemieniem.
- Zachowaj ostrożność podczas pracy z objętościątagpowyżej 30 V AC RMS, 42 V szczytowo lub 60 V DC. Te wartościtagStwarzają ryzyko porażenia prądem.
- Przed pomiarem prądu należy upewnić się, że obwód jest odłączony od napięcia i miernik jest podłączony szeregowo.
- Przed zmianą funkcji lub zakresów należy zawsze odłączyć przewody pomiarowe od obwodu.
- Nie używaj miernika, jeśli wygląda na uszkodzony lub jeśli jego obudowa jest otwarta.
- Aby zapewnić dokładne odczyty, należy wymienić baterię, gdy tylko pojawi się wskaźnik niskiego poziomu naładowania.
- Adhere to the specified measurement categories (CAT III 1000V / CAT IV 600V) for safe operation.
3. Koniec produktuview
Familiarize yourself with the components of your Mastech MS8250D Digital Multimeter.

Obraz 3.1: Przód view of the Mastech MS8250D Digital Multimeter, showing the display, function dial, and input jacks. The display shows "1.987 V", indicating a voltage measurement. The function dial is set to T-RMS. Input jacks are labeled for µA mA, A, VΩHz%, and COM.
Główne składniki:
- Wyświetlacz LCD: Pokazuje odczyty pomiarów, jednostki i wskaźniki funkcji.
- Pokrętło funkcji: Służy do wyboru żądanej funkcji pomiaru (np. Objętość)tage, Current, Resistance, Diode, Continuity, Temperature).
- Przyciski funkcyjne:
- TRZYMAĆ: Zamraża aktualny odczyt wyświetlacza.
- ZASIĘG: Switches between auto and manual ranging.
- REL: Aktywuje tryb pomiaru względnego.
- MAKS./MIN.: Rejestruje wartości maksymalne i minimalne.
- FUNKCJA: Selects sub-functions within a dial position (e.g., AC/DC, Diode/Continuity).
- T-RMS: (Indicated on dial) True RMS measurement.
- Wartość rynkowa: Objętość bezkontaktowatage wykrywanie.
- Przycisk podświetlenia: Activates display backlight.
- Gniazda wejściowe:
- KOM: Wspólny zacisk dla wszystkich pomiarów (przewód ujemny).
- VΩHz%: Wejście dla voltage, resistance, frequency, capacitance, and diode/continuity measurements (positive lead).
- µA mA: Wejście dla mikroampere i milliampere current measurements (positive lead). Fused for protection.
- A: Wejście dla ampere current measurements (positive lead). Fused for protection.
Zawartość zestawu:
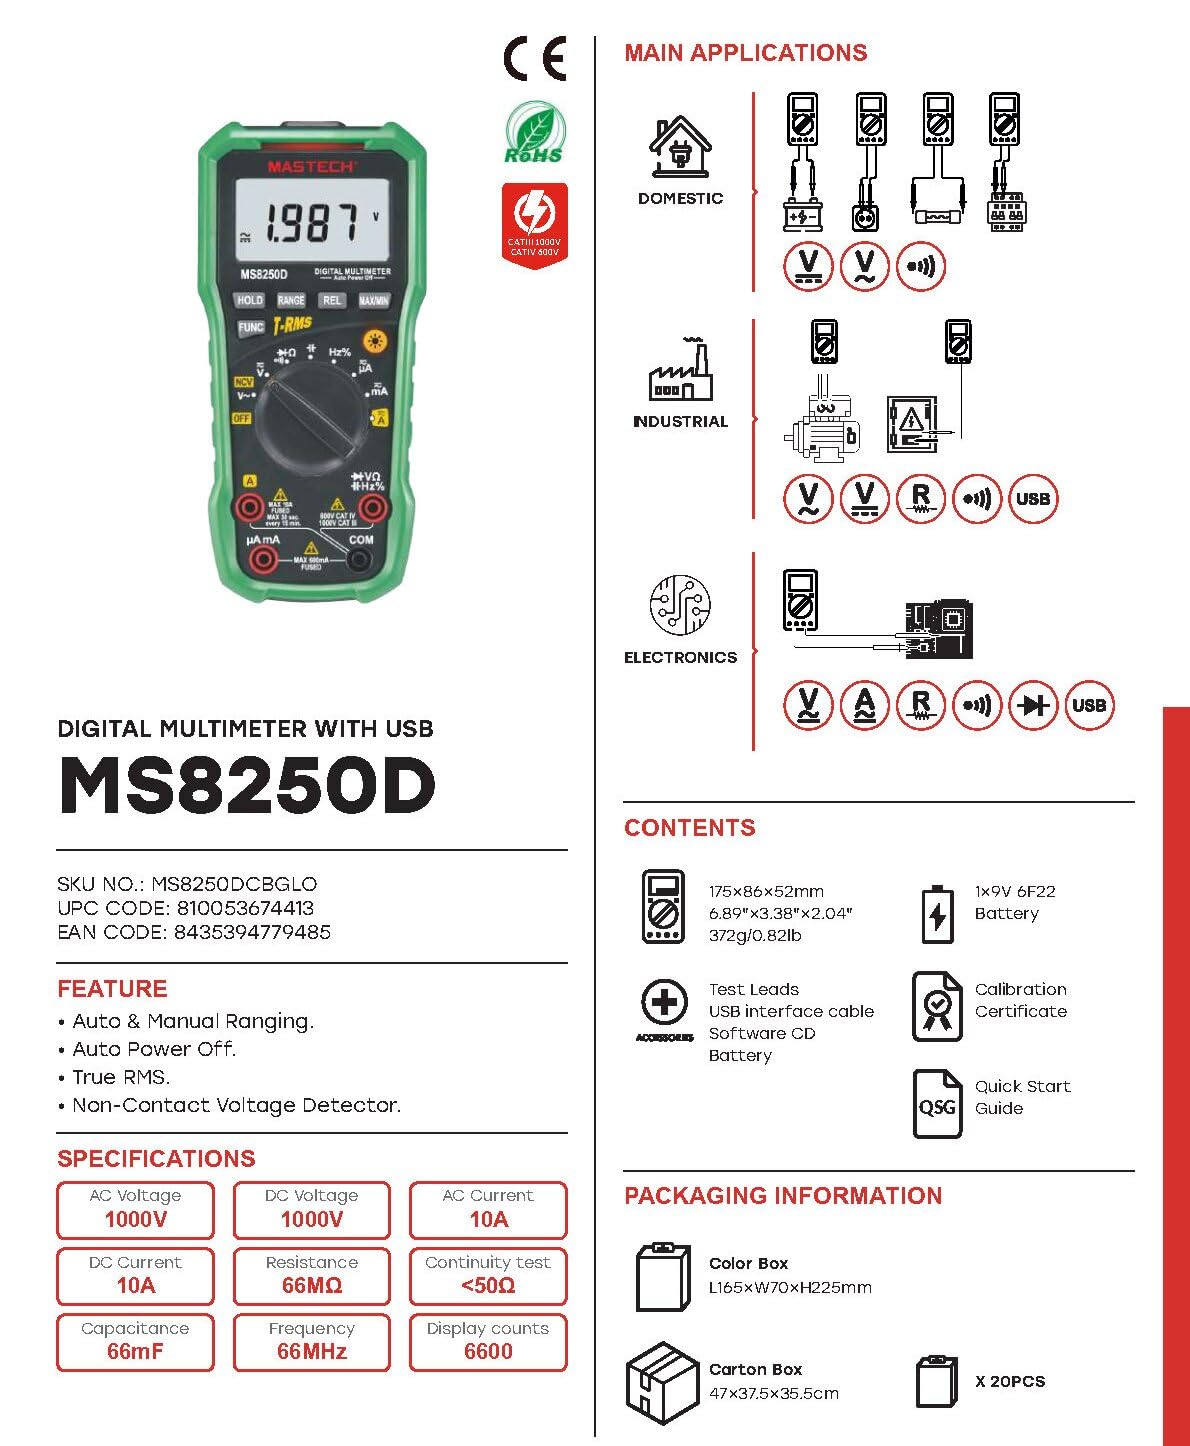
Obraz 3.2: Diagram showing the Mastech MS8250D Multimeter and its included accessories. The image also illustrates typical applications in domestic, industrial, and electronics settings.
- Mastech MS8250D Digital Multimeter
- Przewody pomiarowe (czerwony i czarny)
- 1x 9V 6F22 Battery (pre-installed or included separately)
- Kabel interfejsu USB
- Software CD (for Windows OS)
- Certyfikat kalibracji
- Skrócona instrukcja obsługi
4. Konfiguracja
4.1 Instalacja baterii
The MS8250D requires one 9V 6F22 battery for operation. Two LR44 batteries are also mentioned in specifications, likely for a different internal component or an error in data. For the main power, use the 9V battery.
- Upewnij się, że multimetr jest wyłączony.
- Znajdź pokrywę komory baterii znajdującą się z tyłu miernika.
- Za pomocą śrubokręta poluzuj śrubę(y) mocującą(e) pokrywę.
- Zdejmij pokrywę.
- Connect the 9V battery to the battery clips, observing correct polarity (+ and -).
- Umieść baterię w komorze.
- Załóż pokrywę komory baterii i zabezpiecz ją śrubą(ami).
Notatka: The meter also uses 2 LR44 batteries, which are typically included and pre-installed for specific functions like the backlight or non-contact voltage detection. Refer to the quick-start guide for specific details on these smaller batteries if replacement is needed.
4.2 Podłączanie przewodów pomiarowych
Zawsze podłączaj czarny przewód pomiarowy do gniazda COM. Podłącz czerwony przewód pomiarowy do odpowiedniego gniazda wejściowego, w zależności od rodzaju pomiaru:
- dla objtage, Resistance, Capacitance, Frequency, Diode, and Continuity measurements: Connect the red lead to the VΩHz% podnośnik.
- For Current measurements (µA or mA): Connect the red lead to the μA mA podnośnik.
- For High Current measurements (A): Connect the red lead to the A podnośnik.
Upewnij się, że przewody pomiarowe są całkowicie włożone do gniazd.
5. Instrukcja obsługi
5.1 Włączanie/wyłączanie zasilania
To turn the meter ON, rotate the function dial from the "OFF" position to any desired measurement function. To turn the meter OFF, rotate the function dial back to the "OFF" position.
The meter features an Automatyczne wyłączanie zasilania function to conserve battery life. It will automatically power off after a period of inactivity. To disable or re-enable this feature, refer to the quick-start guide or the full user manual provided on the software CD.
5.2 Auto Ranging and Manual Ranging
The MS8250D defaults to Auto Ranging, which automatically selects the best measurement range. Press the RANGE przycisk, aby przełączyć na Ręczny zakres. In manual ranging, each press of the RANGE button cycles through available ranges. To return to auto ranging, press and hold the RANGE przycisk.
5.3 Pomiar objętości AC/DCtagmi (V)
- Ustaw pokrętło funkcji na V~ (tom ACtage) lub V- (DC tomtage) stanowisko.
- Podłącz czarny przewód pomiarowy do KOM gniazdo i czerwony przewód pomiarowy do VΩHz% podnośnik.
- Podłącz sondy pomiarowe do obwodu lub elementu, który chcesz zmierzyć.
- Przeczytaj tomtage value on the display. The meter will automatically detect AC or DC if the dial is set to the combined V position, or you can use the FUNC button to toggle between AC and DC if available on your model.
5.4 Pomiar prądu przemiennego/stałego (A, mA, µA)
OSTRZEŻENIE: Nigdy nie podłączaj miernika równolegle do miernika objętości.tagPodczas pomiaru prądu należy odłączyć źródło zasilania. Może to spowodować przepalenie bezpiecznika lub uszkodzenie miernika.
- Wyłącz zasilanie obwodu.
- Ustaw pokrętło funkcji na A~ (AC Current), A- (DC Current), mA~, mama-, µA~, Lub µA- pozycja.
- Podłącz czarny przewód pomiarowy do KOM podnośnik.
- Podłącz czerwony przewód pomiarowy do A jack for high current, or μA mA jack for low current.
- Open the circuit where the current is to be measured and connect the meter in series with the load.
- Podłącz zasilanie do obwodu.
- Read the current value on the display. Use the FUNC przycisk umożliwiający w razie potrzeby przełączanie między prądem zmiennym i stałym.
5.5 Pomiar rezystancji (Ω)
- Ustaw pokrętło funkcji na Ω pozycja.
- Podłącz czarny przewód pomiarowy do KOM gniazdo i czerwony przewód pomiarowy do VΩHz% podnośnik.
- Upewnij się, że obwód lub element poddawany testowi jest odłączony od napięcia.
- Podłącz sondy pomiarowe do komponentu.
- Odczytaj wartość rezystancji z wyświetlacza.
5.6 Diode Test and Continuity Test
- Ustaw pokrętło funkcji na Dioda/Ciągłość position (often shared with resistance or capacitance).
- Podłącz czarny przewód pomiarowy do KOM gniazdo i czerwony przewód pomiarowy do VΩHz% podnośnik.
- Użyj FUNC button to select between Diode Test and Continuity Test.
- Do testu diody: Podłącz czerwoną sondę do anody, a czarną do katody diody. Na wyświetlaczu pojawi się napięcie przewodzenia.tage drop (typically 0.5V to 0.8V for silicon diodes). Reversing the probes should show "OL" (Open Loop).
- W celu przeprowadzenia testu ciągłości: Connect the probes across the circuit or component. If resistance is less than approximately 50Ω, the buzzer will sound, indicating continuity.
5.7 Pomiar pojemności (F)
- Ustaw pokrętło funkcji na Pojemność position (often shared with resistance or diode).
- Podłącz czarny przewód pomiarowy do KOM gniazdo i czerwony przewód pomiarowy do VΩHz% podnośnik.
- Ensure the capacitor is fully discharged before testing to avoid damage to the meter.
- Podłącz sondy pomiarowe do zacisków kondensatora.
- Odczytaj wartość pojemności na wyświetlaczu.
5.8 Pomiar częstotliwości (Hz) i współczynnika wypełnienia (%)
- Ustaw pokrętło funkcji na Hz% pozycja (często dzielona z tomemtagmi).
- Podłącz czarny przewód pomiarowy do KOM gniazdo i czerwony przewód pomiarowy do VΩHz% podnośnik.
- Podłącz sondy pomiarowe do źródła sygnału.
- The display will show the frequency. Press the FUNC button to toggle to Duty Cycle measurement if available.
5.9 tom bez kontaktutage (NCV) Wykrywanie
- Ustaw pokrętło funkcji na NCV pozycja.
- Hold the meter with the NCV sensor (usually at the top of the meter) near a live AC voltagŹródło.
- Miernik wskaże obecność objętości prądu przemiennegotage through an audible beep and/or visual indicator (e.g., LED).
5.10 USB Interface (Windows OS)
The MS8250D includes a USB interface for connecting to a computer running Windows OS. This allows for data logging and real-time monitoring of measurements. Install the provided software from the CD and follow the on-screen instructions for driver installation and software usage.
6. Konserwacja
6.1 Czyszczenie
Wytrzyj obudowę licznika wodąamp Ściereczką i łagodnym detergentem. Nie używaj środków ściernych ani rozpuszczalników. Przed użyciem upewnij się, że miernik jest całkowicie suchy.
6.2 Wymiana baterii
When the low battery indicator appears on the display, replace the 9V battery immediately to ensure accurate readings. Follow the steps in Section 4.1 Battery Installation.
6.3 Wymiana bezpiecznika
If the meter fails to measure current, the fuse may be blown. Fuses are located inside the meter. To replace a fuse:
- Upewnij się, że miernik jest wyłączony i wszystkie przewody pomiarowe są odłączone.
- Open the battery compartment cover (and potentially the main case, depending on design).
- Ostrożnie wyjmij stary bezpiecznik.
- Replace with a fuse of the exact same type and rating (e.g., F600mA/250V for mA/µA range, F10A/250V for A range). Refer to the meter's internal markings or the full manual for specific fuse ratings.
- Złóż ponownie licznik, upewniając się, że wszystkie śruby są dokręcone.
OSTRZEŻENIE: Never use a fuse with a different rating or bypass the fuse. This can damage the meter and pose a serious safety hazard.
7. Rozwiązywanie Problemów
| Problem | Możliwa przyczyna | Rozwiązanie |
|---|---|---|
| Miernik się nie włącza. | Rozładowana bateria. | Wymień baterię 9V. |
| Wyświetla się komunikat „OL” (Przeciążenie). | Pomiar przekracza wybrany zakres lub maksymalną pojemność miernika. | Switch to a higher range (if in manual ranging) or ensure the measurement is within the meter's limits. |
| No current reading. | Blown fuse; incorrect lead connection; open circuit. | Check and replace fuse if necessary. Ensure leads are connected correctly (in series). Verify circuit continuity. |
| Niedokładne odczyty. | Low battery; poor lead contact; external interference. | Replace battery. Ensure leads are firmly connected. Move away from strong electromagnetic fields. |
| Display shows "USB" but no PC connection. | Drivers not installed; incorrect software settings. | Install drivers from the provided CD. Refer to software manual for connection instructions. |
8. Specyfikacje
The following table details the technical specifications of the Mastech MS8250D Digital Multimeter.

Obraz 8.1: Detailed specifications table for the Mastech MS8250D, outlining ranges, resolutions, and accuracies for various measurement functions.
| Funkcjonować | Zakres | Rezolucja | Dokładność |
|---|---|---|---|
| Objętość DCtage | |||
| 660mV | 0.1mV | ±(0.8%+3) | |
| 6.6V/66V/660V/1000V | 1mV/10mV/0.1V/1V | ±(0.5%+5) | |
| AC Objętośćtage (Prawdziwa wartość skuteczna) | |||
| 660mV | 0.1mV | ±(1.5%+5) | |
| 6.6 V/66 V | 1 mV/10 mV | ±(1.2%+5) | |
| 660 V/1000 V | 0.1 V/1 V | ±(1.0%+3) | |
| Prąd stały | |||
| 660 µA / 6600 µA / 66 mA / 660 mA | 0.1µA/1µA/10µA/0.1mA | ±(1.0%+5) | |
| 10A | 10mA | ±(2.0%+5) | |
| Prąd AC (True RMS) | |||
| 660 µA / 6600 µA / 66 mA / 660 mA | 0.1 µA / 1 µA / 0.01 mA / 0.1 mA | ±(1.5%+5) | |
| 10A | 10mA | ±(3.0%+5) | |
| Opór | |||
| 660Ω / 6.6kΩ / 66kΩ / 660kΩ / 6.6MΩ | 0.1Ω / 1Ω / 10Ω / 100Ω / 1kΩ | ±(0.8%+5) | |
| 66MΩ | 10kΩ | ±(1.5%+5) | |
| Pojemność | |||
| 6.6nF/66nF/660nF/6.6µF/66µF | 1pF/10pF/0.1nF/1nF/10nF | ±(4.0%+5) | |
| 600 µF | 1 µF | ±(3.0%+5) | |
| 6.6 mF/66 mF | 1µF/10µF | ±(4.0%+5) | |
| Częstotliwość | |||
| 66 Hz/660 Hz/6.6 kHz/66 kHz | 0.01 Hz / 0.1 Hz / 1 Hz / 10 Hz | ±(1.5%+5) | |
| 660 kHz/6.6 MHz/66 MHz | 0.1 kHz / 1 kHz / 10 kHz | ±(1.5%+5) | |
| Cykl pracy | |||
| 0.1%~99.9% | 0.1% | ±(2.0%+5) | |
Dane ogólne:
- Wyświetlacz: 6600 liczy
- Źródło zasilania: 1x 9V 6F22 Battery (main power), 2x LR44 batteries (auxiliary, e.g., backlight)
- Automatyczne wyłączanie: Tak
- Prawdziwa wartość skuteczna: Tak
- Objętość bezkontaktowatage (NCV) Detektor: Tak
- Dioda otwarta Voltage: 3.2 V
- Brzęczyk ciągłości: < 50Ω
- MAKS./MIN.: Tak
- Przechowywanie danych: Tak
- Wskaźnik niskiego poziomu baterii: Tak
- Podświetlenie wyświetlacza: Tak
- Interfejs USB: Yes (Windows OS)
- Ocena bezpieczeństwa: KAT III 1000 V / KAT IV 600 V
- Dokładność pomiaru: 0.4% (general, specific accuracies per function in table)
- Objętość operacyjnatage (min): 3.2 wolty
- Górna ocena temperatury: 50 stopni Celsjusza
- Wymiary (dł. x szer. x wys.): Wymiary 20 x 15 x 25 cm
- Waga przedmiotu: 1 kilogramów
- Tworzywo: Akrylonitryl-butadien-styren (ABS)
- Kolor: Niebieski
- Producent: MASTECH
- Kraj pochodzenia: Tajwan
- Certyfikaty: Certyfikaty CE, RoHS, UL
9. Gwarancja i wsparcie
Mastech products are designed for reliability and durability. For specific warranty information, please refer to the warranty card included with your product or contact Mastech customer support directly. Typically, Mastech offers a limited warranty against defects in materials and workmanship.
For technical support, troubleshooting assistance, or warranty claims, please contact your authorized Mastech dealer or visit the official Mastech webwitryna do informacji kontaktowych.
Okres dostępności części zamiennych w UE: 1 rok