1. Wprowadzenie
The Mastech MS8233B is a compact, handheld digital multimeter designed for measuring AC/DC voltage, DC current, resistance, diode, continuity, and temperature. It features a 2000-count display, data hold function, and low battery indication, making it suitable for various electrical testing applications in domestic and electronics environments.
2. Informacje dotyczące bezpieczeństwa
To ensure safe operation and service of the meter, please read this manual thoroughly before use. Failure to observe safety warnings can result in severe injury or death.
- Always ensure the meter is in good working condition before use.
- Nie stosować w ilości większej niż zalecana objętość.tage, which is 600V CAT III.
- Zachowaj ostrożność podczas pracy z objętościątagNie należy używać urządzeń o napięciu powyżej 30 V AC RMS, 42 V szczytowym lub 60 V DC, ponieważ stwarzają one zagrożenie porażenia prądem.
- Przed zmianą funkcji należy zawsze odłączyć przewody pomiarowe od obwodu.
- Wymień baterię natychmiast, gdy pojawi się wskaźnik niskiego poziomu naładowania baterii.
- Do not operate the meter if the battery cover is not properly closed.
- Przestrzegaj lokalnych i krajowych przepisów bezpieczeństwa.
3. Koniec produktuview
The Mastech MS8233B Digital Multimeter features a clear display, a rotary function switch, and dedicated input jacks for various measurements.

Rysunek 3.1: Przód view of the Mastech MS8233B Digital Multimeter. This image displays the LCD screen, rotary function switch, input jacks, and control buttons.
3.1 Składniki
- Wyświetlacz LCD: Pokazuje odczyty pomiarów, jednostki i wskaźniki funkcji.
- Przełącznik obrotowy funkcji: Used to select the desired measurement function (e.g., V~, V-, A-, Ω, Diode, Continuity, Temp).
- Przytrzymaj przycisk: Zamraża aktualny odczyt na wyświetlaczu.
- Przycisk podświetlenia: Activates the display backlight for improved visibility in low-light conditions.
- VΩmA Input Jack: Pozytywny wkład dla wolumenutage, resistance, diode, continuity, and current measurements up to 200mA.
- Gniazdo wejściowe COM: Wspólny (ujemny) sygnał wejściowy dla wszystkich pomiarów.
- Gniazdo wejściowe 10A: Positive input for high current measurements (up to 10A).
4. Konfiguracja
4.1 Instalacja baterii
The MS8233B requires 2 LR44 batteries for operation. Ensure the batteries are installed correctly before first use or when replacing them.
- Wyłącz multimetr i odłącz wszystkie przewody pomiarowe.
- Znajdź komorę baterii z tyłu miernika.
- Za pomocą śrubokręta otwórz pokrywę komory baterii.
- Insert the 2 LR44 batteries, observing the correct polarity (+ and -).
- Załóż pokrywę komory baterii i zabezpiecz ją śrubą.
5. Instrukcja obsługi
Before taking any measurements, ensure the test leads are properly connected to the meter and the circuit under test.
5.1 Ogólne zasady działania
- Turn the rotary switch from the "OFF" position to the desired measurement function.
- Connect the test leads to the appropriate input jacks and the circuit.
- Odczytaj wartość pomiaru na wyświetlaczu LCD.
- To turn off the meter, rotate the switch back to the "OFF" position.
5.2 Objętość DCtage Measurement (V-)
- Ustaw przełącznik obrotowy na żądaną wartość DC Vol.tagzakres (np. 200 mV, 2 V, 20 V, 200 V, 600 V).
- Podłącz czerwony przewód pomiarowy do gniazda VΩmA, a czarny przewód pomiarowy do gniazda COM.
- Podłącz przewody pomiarowe do mierzonego elementu lub obwodu.
5.3 Objętość ACtagPomiar (V~)
- Ustaw przełącznik obrotowy na żądaną głośność prądu zmiennego.tagzakres (np. 200 V, 600 V).
- Podłącz czerwony przewód pomiarowy do gniazda VΩmA, a czarny przewód pomiarowy do gniazda COM.
- Podłącz przewody pomiarowe do obwodu prądu przemiennegotagŹródło.
5.4 DC Current Measurement (A-)
- Set the rotary switch to the desired DC Current range (e.g., 200µA, 2mA, 20mA, 200mA, 10A).
- For currents up to 200mA, connect the red test lead to the VΩmA jack. For currents up to 10A, connect the red test lead to the 10A jack. Always connect the black test lead to the COM jack.
- Connect the meter in series with the circuit to measure the current.
- Ostrożność: Do not attempt to measure currents exceeding 200mA through the VΩmA jack or 10A through the 10A jack.
5.5 Pomiar rezystancji (Ω)
- Set the rotary switch to the desired Resistance range (e.g., 200Ω, 2kΩ, 20kΩ, 200kΩ, 2MΩ).
- Podłącz czerwony przewód pomiarowy do gniazda VΩmA, a czarny przewód pomiarowy do gniazda COM.
- Connect the test leads across the resistor or component to be measured. Ensure the circuit is de-energized.
5.6 Test diody
- Ustaw przełącznik obrotowy na symbol diody.
- Podłącz czerwony przewód pomiarowy do gniazda VΩmA, a czarny przewód pomiarowy do gniazda COM.
- Connect the red test lead to the anode and the black test lead to the cathode of the diode. The display will show the forward voltagkropla.
- Reverse the leads. An open circuit (OL) reading indicates a good diode. A reading in both directions or no reading indicates a faulty diode.
5.7 Test ciągłości
- Set the rotary switch to the Continuity symbol.
- Podłącz czerwony przewód pomiarowy do gniazda VΩmA, a czarny przewód pomiarowy do gniazda COM.
- Connect the test leads across the circuit or component. If the resistance is less than approximately 60Ω, the buzzer will sound, indicating continuity.
5.8 Pomiar temperatury
While the product title mentions temperature, the MS8233B model's detailed specifications do not explicitly list a temperature function. If your specific unit includes this feature, typically you would:
- Set the rotary switch to the Temperature function (usually marked with °C or °F).
- Connect a K-type thermocouple (if included) to the VΩmA and COM jacks, observing polarity.
- Umieść sondę termoparową w punkcie, w którym chcesz zmierzyć temperaturę.
5.9 Funkcja zatrzymania danych
- Naciśnij przycisk „HOLD”, aby zamrozić aktualny odczyt na wyświetlaczu.
- Press the "HOLD" button again to release the reading and resume live measurements.
5.10 Funkcja podświetlenia
- Press the backlight button (often marked with a sun symbol) to turn on the display backlight.
- Press the button again to turn off the backlight.
6. Konserwacja
6.1 Wymiana baterii
When the low battery indicator appears on the display, replace the batteries as described in Section 4.1. Always use 2 new LR44 batteries.
6.2 Czyszczenie
Wyczyść obudowę za pomocą reklamyamp Ściereczką i łagodnym detergentem. Nie używaj środków ściernych ani rozpuszczalników. Przed użyciem upewnij się, że miernik jest całkowicie suchy.
7. Rozwiązywanie Problemów
- Brak wyświetlacza/słabo widoczny wyświetlacz: Sprawdź instalację i ładowanie baterii. W razie potrzeby wymień baterie.
- "OL" or "1" on Display: Oznacza przekroczenie zakresu lub przerwę w obwodzie. Wybierz wyższy zakres lub sprawdź połączenia.
- Nieprawidłowe odczyty: Ensure correct function selection, proper lead connection, and that the circuit is de-energized for resistance/diode tests.
- Brak sygnału dźwiękowego: Check if the resistance is above 60Ω or if the function is correctly selected.
8. Specyfikacje
W poniższej tabeli przedstawiono specyfikacje techniczne multimetru cyfrowego Mastech MS8233B.
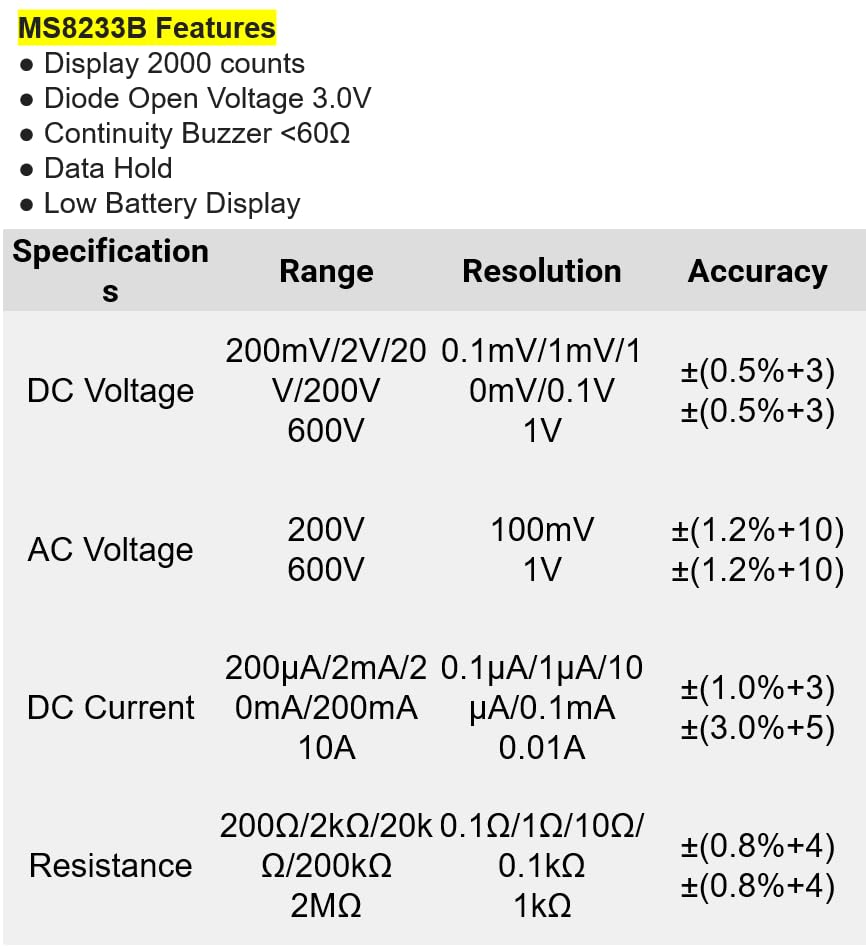
Rysunek 8.1: Detailed specifications for the Mastech MS8233B, including ranges, resolutions, and accuracies for various measurements.
| Specyfikacja | Wartość |
|---|---|
| Wyświetlacz | 2000 liczy |
| Dioda otwarta Voltage | 3.0 V |
| Ciągły brzęczyk | <60Ω |
| Wstrzymanie danych | Tak |
| Niski poziom baterii | Tak |
| Objętość DCtage Zakres | 200mV, 2V, 20V, 200V, 600V |
| AC Objętośćtage Zakres | 200V, 600V |
| Zakres prądu stałego | 200µA, 2mA, 20mA, 200mA, 10A |
| Zakres oporu | 200Ω, 2kΩ, 20kΩ, 200kΩ, 2MΩ |
| Ocena bezpieczeństwa | CAT III 600 V. |
| Źródło zasilania | 2 baterie LR44 (w zestawie) |
| Wymiary produktu | Wymiary 20 x 15 x 25 cm |
| Waga przedmiotu | 1 kilogram |
| Producent | MASTECH |
| Numer modelu przedmiotu | YQ-MS8233B |
| Kraj pochodzenia | Tajwan |

Rysunek 8.2: A comparison table showing features across various Mastech digital multimeter models, including the MS8233B.
9. Gwarancja i wsparcie
For warranty information, technical support, or service inquiries, please refer to the documentation provided with your purchase or contact your retailer. Keep your purchase receipt as proof of purchase for any warranty claims.