
1. Wprowadzenie
Thank you for choosing the MeesMeek Digital Travel Alarm Clock. This compact and versatile device is designed to provide accurate timekeeping, alarm functions, and temperature display, making it ideal for travel and daily use. This manual will guide you through the setup, operation, and maintenance of your new alarm clock.
2. Koniec produktuview
2.1 Główne cechy
- 3.54-inch LCD Display: Shows time, alarm time, date, day of the week, and indoor temperature.
- Intuitive Controls: 6 front-facing buttons for easy operation.
- Time Formats: Switchable between 12-hour and 24-hour display.
- Temperature Display: Switchable between Fahrenheit (℉) and Celsius (℃).
- 9-Minute Snooze: Provides additional sleep time after the alarm sounds.
- Weekend Mode: Alarm activates only from Monday to Friday.
- Adjustable Alarm Volume: Two levels (70dB/85dB) to suit user preference.
- 5-Second Backlight: Illuminates the display for visibility in low light conditions.
- Battery Operated: Powered by 2 AAA batteries (included) with a low battery alert.
- Compact and Foldable Design: Ideal for portability and travel.
2.2 Składniki
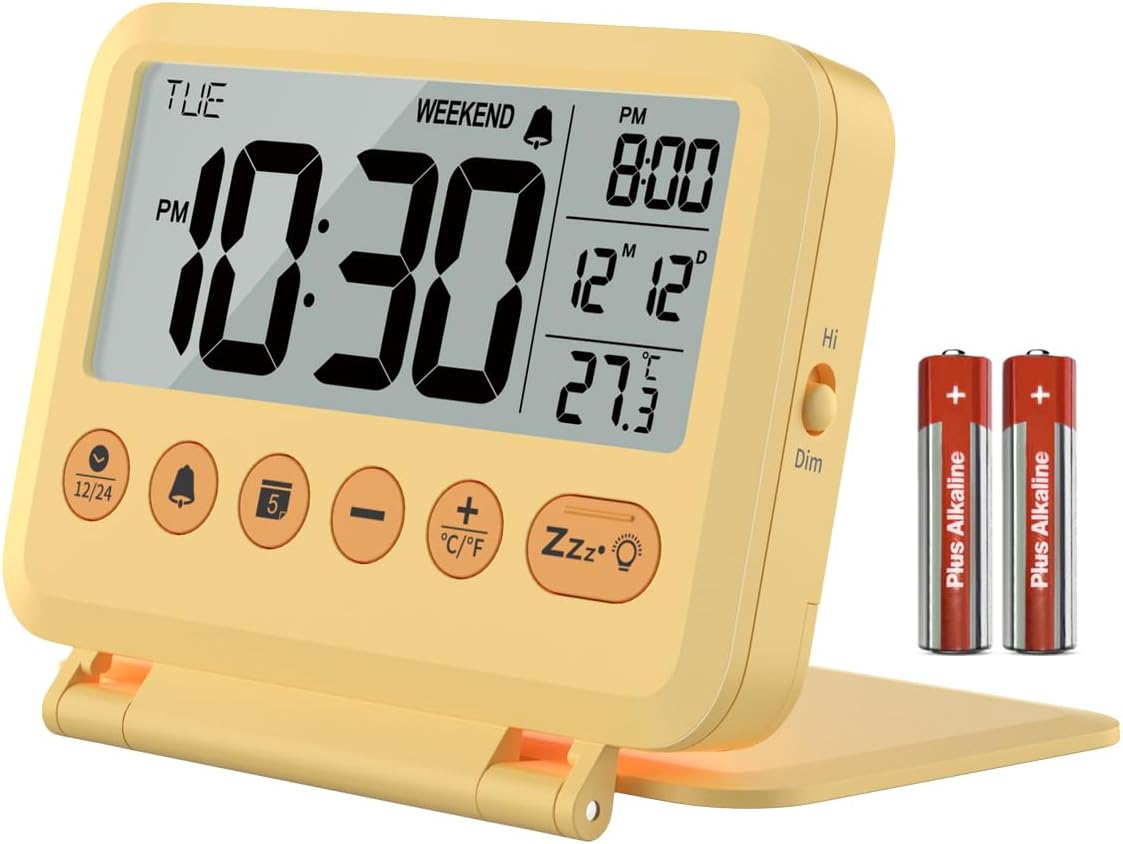
Obraz 2.2.1: Przód view of the MeesMeek Digital Travel Alarm Clock, showing the LCD display, control buttons, and included AAA batteries.

Image 2.2.2: Diagram illustrating the compact dimensions (4 inches wide, 3.17 inches high) and key features of the alarm clock, including 12/24 time format, 2 volume levels, 5-second backlight, 9-minute snooze, calendar, temperature, weekend mode, and battery power.
The clock features a foldable cover that also acts as a stand. The front panel includes the LCD display and six control buttons. A toggle switch for backlight brightness is located on the side.
3. Konfiguracja
3.1 Instalacja baterii
- Otwórz pokrywę komory baterii znajdującą się z tyłu zegara.
- Włóż dwie baterie AAA, zwracając uwagę na prawidłową biegunowość (+ i -).
- Dokładnie zamknij pokrywę komory baterii.
The clock will power on automatically once batteries are installed. A new pair of AAA batteries can last up to 6 months.

Image 3.1.1: The alarm clock displaying time, date, and temperature, with an inset showing the battery compartment on the back.
3.2 Ustawienia początkowe
Upon first use or after battery replacement, you may need to set the time, date, and other preferences.
4. Instrukcja obsługi
4.1 Ustawianie czasu i daty
- Press and hold the '12/24' button to enter time setting mode. The hour digit will flash.
- Użyj przycisków „+” i „-”, aby ustawić godzinę.
- Press the '12/24' button again to move to minute setting. Use '+' or '-' to adjust minutes.
- Continue pressing '12/24' to cycle through year, month, and day settings, adjusting each with '+' or '-'.
- Press '12/24' one last time to exit setting mode, or wait for 10 seconds for it to exit automatically.
4.2 12H/24H Time Format
In normal time display mode, press the '12/24' button to switch between 12-hour (with AM/PM indicator) and 24-hour time formats.

Image 4.2.1: The alarm clock displaying time in both 12-hour (AM/PM) and 24-hour formats, illustrating the switchable feature.
4.3 Ustawianie alarmu
- Press and hold the 'Alarm' button (bell icon) to enter alarm setting mode. The alarm hour will flash.
- Użyj przycisków „+” i „-”, aby dostosować godzinę alarmu.
- Press the 'Alarm' button again to move to alarm minute setting. Use '+' or '-' to adjust minutes.
- Press the 'Alarm' button one last time to confirm and exit, or wait for 10 seconds.
4.4 Activating/Deactivating Alarm and Weekend Mode
- In normal time display mode, press the 'Alarm' button once to turn the alarm ON or OFF. An alarm icon will appear/disappear on the display.
- To activate Weekend Mode (alarm only Mon-Fri), press the 'Weekend' button (sun icon) once. A 'WEEKEND' indicator will appear on the display. Press again to deactivate.

Image 4.4.1: The alarm clock on a bedside table, illustrating the 9-minute snooze function and the weekend mode which prevents the alarm from sounding on weekends.
4.5 Funkcja drzemki
When the alarm sounds, press the large 'Snooze/Light' button (Zzz•☼ icon) to activate the snooze function. The alarm will pause for 9 minutes and then sound again. This cycle repeats up to 3 times. If no button is pressed, the alarm will sound for 3 minutes, snooze for 7 minutes, and repeat the cycle 3 times before turning off automatically.
4.6 Regulacja głośności alarmu
The alarm offers two volume levels: 70dB and 85dB. To adjust, locate the volume switch on the side of the clock and slide it to your desired level.

Image 4.6.1: The alarm clock displaying time, temperature, and calendar, with graphics indicating the two alarm volume levels (70dB and 85dB).
4.7 Funkcja podświetlenia
Press the 'Snooze/Light' button (Zzz•☼ icon) to illuminate the display for 5 seconds. The backlight is not continuously on. A toggle switch on the right side of the alarm clock allows you to select between High Bright and Dim backlight intensity.

Image 4.7.1: A split image showing the alarm clock in a well-lit room and a dark room, with the backlight activated for 5 seconds by pressing the snooze button.
4.8 Przełącznik jednostek temperatury
In normal time display mode, press the '•C/•F' button to switch the temperature display between Celsius (℃) and Fahrenheit (℉).
5. Konserwacja
- Czyść zegar miękką, suchą ściereczką. Nie używaj środków czyszczących ani rozpuszczalników o działaniu ściernym.
- Unikaj wystawiania zegara na działanie ekstremalnych temperatur, bezpośredniego światła słonecznego i wysokiej wilgotności.
- Jeżeli zegar nie będzie używany przez dłuższy czas, należy wyjąć baterie, aby zapobiec ich wyciekowi.
6. Rozwiązywanie Problemów
- Wyświetlacz jest pusty lub przyciemniony: Check battery installation. Replace batteries if they are low. The low battery icon will appear, or the display may flash '8888' and beep when batteries are critically low.
- Alarm nie włącza się: Ensure the alarm is activated (bell icon visible). Check alarm volume setting. Ensure Weekend Mode is not active if you expect the alarm to sound on a weekend.
- Nieprawidłowa godzina/data: Wprowadź ponownie ustawienia czasu i daty zgodnie z opisem w rozdziale 4.1.
- Podświetlenie nie pozostaje włączone: The backlight is designed to illuminate for 5 seconds only. This is normal operation.
7. Specyfikacje
| Funkcja | Specyfikacja |
|---|---|
| Marka | MeesMeek |
| Numer modelu | 6201 |
| Typ wyświetlacza | Cyfrowy LCD |
| Wymiary | 4" szer. x 3.15" wys. x 0.75" gł. |
| Źródło zasilania | 2 x baterie AAA (w zestawie) |
| Żywotność baterii | Do 6 miesięcy (typowo) |
| Długość drzemki | 9 minut |
| Poziomy głośności alarmu | 70dB / 85dB |
| Czas podświetlenia | 5 sekund |
| Tworzywo | Plastikowy |
| Waga przedmiotu | 4 uncji (0.25 funta) |
8. Gwarancja i wsparcie
This MeesMeek product comes with a limited warranty. For specific warranty details or technical support, please refer to the warranty card included with your product or visit the official MeesMeek store online.
Aby uzyskać dalszą pomoc, możesz odwiedzić stronę MeesMeek Brand Store.