1. Wprowadzenie
The Walfront YA100 A Bike Computer is a versatile and user-friendly device designed to enhance your cycling experience. Featuring a clear 2.8-inch LCD display with a soft white backlight, it provides essential cycling data both day and night. This computer operates wirelessly, eliminating the need for complex wiring, and includes functions such as automatic scanning and automatic start/stop. Its robust design incorporates two physical buttons for easy operation and offers good waterproof performance, making it suitable for various weather conditions.

Obraz 1.1: Przód view of the Walfront YA100 A Bike Computer displaying speed and other metrics.
2. Zawartość opakowania
Sprawdź, czy w przesyłce znajdują się wszystkie poniższe elementy:
- 1 x Walfront YA100 A Bike Computer (Speedometer)
- 1 x Speed/Cadence Sensor
- 1 x Speedometer Bracket (Standard Mount)
- 1 x Handlebar Bracket (Extended Mount)
- 1 x Wheel Magnet
- Opaski kablowe 4 x
- 2 x User Manuals (for reference)
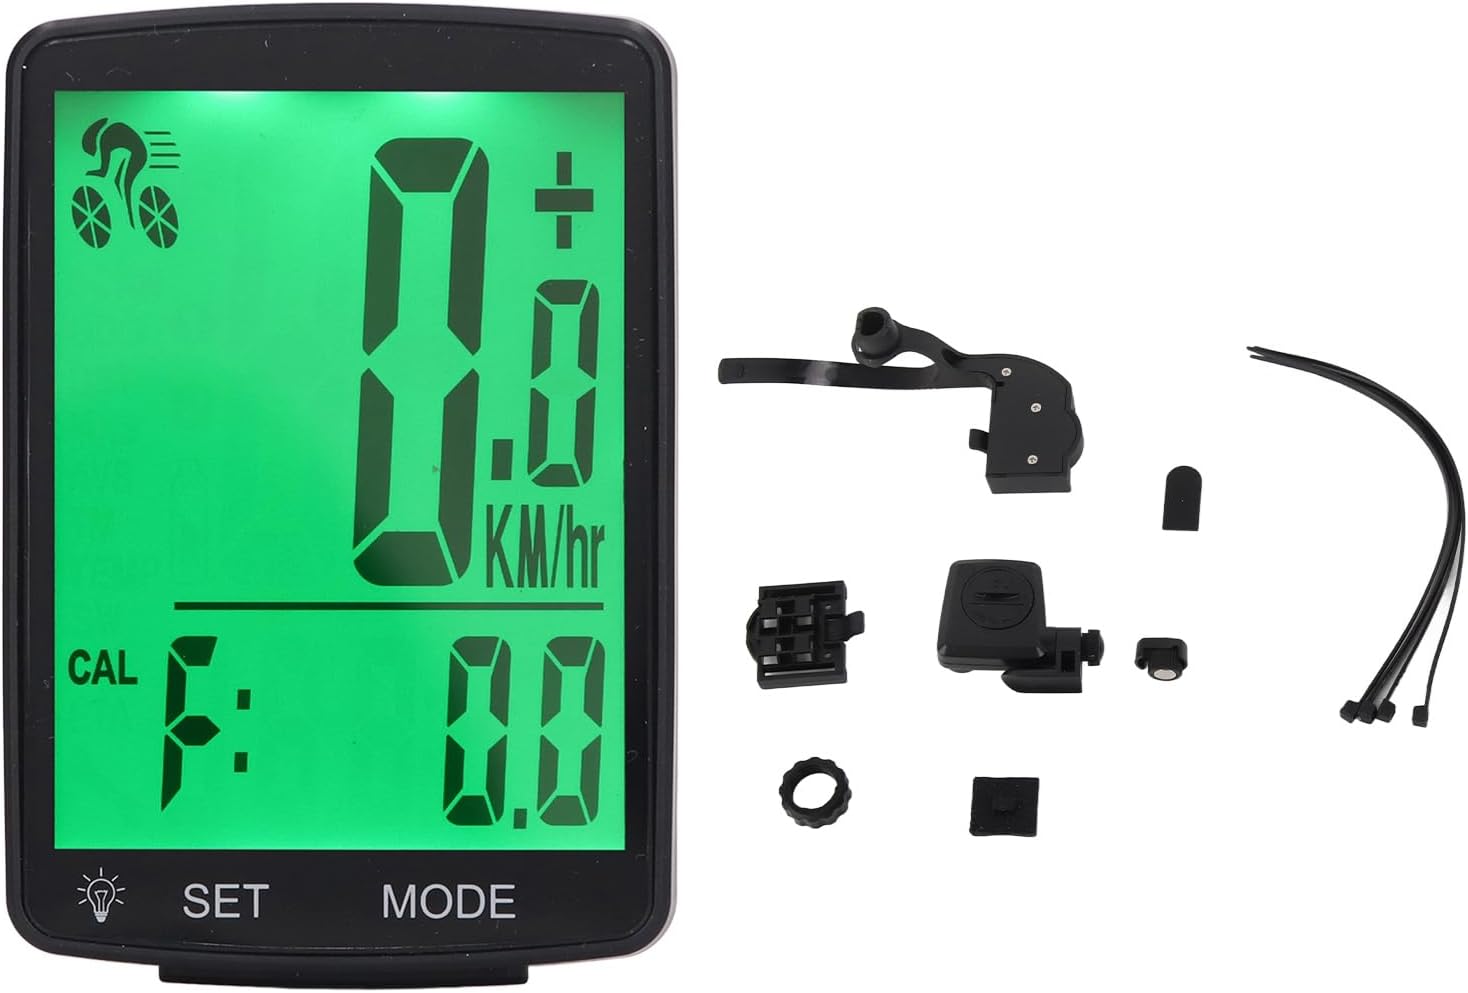
Image 2.1: All components included with the Walfront YA100 A Bike Computer, including the main unit, sensor, magnet, and mounting brackets.
3. Konfiguracja
3.1 Instalacja baterii
Both the bike computer and the sensor are powered by CR2032 button cell batteries. These are typically pre-installed. If replacement is needed, carefully open the battery compartment on the back of each unit and insert a new CR2032 battery with the positive (+) side facing up.
3.2 Montaż komputera rowerowego
The Walfront YA100 A comes with two mounting options:
- Standard Speedometer Bracket: Attach this bracket to your bicycle's handlebar or stem using the provided cable ties. Ensure it is securely fastened and positioned for easy viewing.
- Extended Handlebar Bracket: For a more forward-extended position, use the extended handlebar bracket. Secure it to your handlebar with the provided cable ties, ensuring stability.
Once the bracket is installed, slide the bike computer onto the bracket until it clicks into place. To remove, press the release tab and slide the computer off.

Obraz 3.1: Tył view of the bike computer, illustrating the mounting mechanism for attachment to the bracket.

Image 3.2: Close-up of the mounting bracket, showing how the computer slides into place.
3.3 Installing the Speed/Cadence Sensor and Wheel Magnet
The sensor should be mounted on the bicycle's fork or chainstay, close to the wheel spoke. The wheel magnet should be attached to a spoke on the front wheel. Ensure the magnet passes within 3mm of the sensor when the wheel rotates. Adjust the sensor and magnet positions as needed for optimal detection.

Image 3.3: The wireless speed/cadence sensor, designed for mounting on the bike fork or chainstay.

Image 3.4: The small magnet that attaches to a wheel spoke, interacting with the sensor to measure speed.
3.4 Ustawienia początkowe
After installation, the computer may require initial setup, such as wheel circumference calibration. Refer to the specific instructions in the included paper manual for detailed steps on setting up units (KM/H or MPH) and wheel size to ensure accurate readings.
4. Instrukcja obsługi
The Walfront YA100 A Bike Computer features two physical buttons for navigation and settings:
- Przycisk SET: Used to enter settings mode, confirm selections, or reset certain values.
- Przycisk TRYB: Used to cycle through different display modes and adjust values during setup.
4.1 Tryby wyświetlania
Naciśnij TRYB button to cycle through the following display functions:
- Obecna prędkość: Wyświetla aktualną prędkość jazdy na rowerze.
- Maximum Speed (MAX): Shows the highest speed achieved during your current ride.
- Średnia prędkość (AVG): Calculates the average speed of your current ride.
- Odległość (DST): Records the distance covered in your current ride.
- Całkowity dystans (ODO): Accumulates the total distance covered over all rides.
- Ride Time (TM): Śledzi czas trwania aktualnej jazdy.
- Kalorie (CAL): Estimates calorie consumption.
- Temperatura (TEMP): Wyświetla temperaturę otoczenia.
- Stoper: Podstawowa funkcja timera.
- Maintenance Scan: An indicator for scheduled maintenance (refer to manual for setting intervals).
4.2 Działanie podświetlenia
The 2.8-inch LCD screen features a soft white backlight for visibility in low-light conditions. Typically, the backlight can be activated by pressing a specific button (often the SET button or a combination) or may activate automatically in low light. Refer to the included paper manual for exact backlight activation instructions.
4.3 Automatic Start/Stop
The bike computer is equipped with an automatic start/stop function. It will automatically begin recording data when you start cycling and pause when you stop, resuming when you continue your ride. This conserves battery life and simplifies operation.
5. Konserwacja
5.1 Czyszczenie
Wipe the bike computer and sensor with a soft, damp ściereczką. Nie używaj środków czyszczących ani rozpuszczalników o działaniu ściernym, ponieważ mogą one uszkodzić wyświetlacz lubasing. Ensure the device is dry before storage or use.
5.2 Wymiana baterii
When the display becomes dim or the sensor stops transmitting data, it's time to replace the CR2032 batteries. Use a small coin or screwdriver to open the battery compartment cover on the back of the computer and sensor. Replace with new CR2032 batteries, ensuring correct polarity. Dispose of old batteries responsibly.
5.3 Wodoodporność
The Walfront YA100 A Bike Computer is designed with good waterproof capabilities, allowing it to be used in adverse weather conditions like rain. However, it is not intended for submersion. Avoid prolonged exposure to heavy downpours or high-pressure water jets.
6. Rozwiązywanie Problemów
- Brak wyświetlacza/Przyciemniony wyświetlacz: Check the CR2032 battery in the bike computer. Replace if necessary.
- Brak szybkiego czytania:
- Ensure the sensor battery is functional and replaced if needed.
- Verify the sensor and wheel magnet are correctly aligned and within 3mm of each other.
- Check if the computer is properly seated in its mount.
- Niedokładne odczyty:
- Confirm that the wheel circumference setting is correct in the computer's settings.
- Ensure the magnet passes the sensor consistently.
- Przyciski nie reagują: Ensure no debris is lodged around the buttons. If the issue persists after a battery reset, contact support.
7. Specyfikacje
| Model | YA100 A |
| Typ wyświetlacza | 2.8-inch LCD with Soft White Backlight |
| Power Supply (Computer) | 1 x CR2032 Button Cell Battery (380mAh) |
| Zasilacz (czujnik) | 1 x CR2032 Button Cell Battery (380mAh) |
| Łączność | Bezprzewodowy |
| Interfejs sterowania | 2 Physical Buttons (SET, MODE) |
| Cechy specjalne | Waterproof, Automatic Scanning, Automatic Start/Stop |
| Typ montażu | Handlebar Mount (Standard and Extended Brackets included) |
| Wymiary (komputer) | Approx. 14 x 8 x 5 cm (Parcel Dimensions) |
| Weight (Computer) | Approx. 152 g (Parcel Weight) |
8. Gwarancja i wsparcie
For warranty information and technical support, please refer to the documentation included with your product or contact Walfront customer service directly. Keep your purchase receipt as proof of purchase for any warranty claims.