
1. Wprowadzenie
This manual provides essential information for the installation, operation, and maintenance of your FSP Champ Tower 1K Double-Conversion Uninterruptible Power Supply (UPS). The FSP Champ Tower 1K UPS is designed to provide reliable power protection for critical electronic equipment, ensuring continuous operation during power outages and protecting against various power disturbances. Please read this manual thoroughly before installation and operation to ensure proper use and maximize the lifespan of your unit.
2. Instrukcje bezpieczeństwa
Please adhere to the following safety precautions to prevent injury and damage to the UPS or connected equipment:
- Bezpieczeństwo elektryczne: UPS zawiera niebezpieczne objętościtages. Nie należy podejmować prób demontażu urządzenia. Czynności serwisowe powinny być wykonywane wyłącznie przez wykwalifikowany personel.
- Grunt: Zawsze podłączaj UPS do uziemionego gniazdka zasilania prądem zmiennym.
- Środowisko: Install the UPS in a well-ventilated area, free from excessive dust, humidity, and extreme temperatures. Avoid direct sunlight.
- Ekspozycja na płyny: Do not expose the UPS to rain or moisture. Do not place containers with liquids on or near the UPS.
- Przeciążać: Do not overload the UPS. Ensure the total power consumption of connected equipment does not exceed the UPS'ss rated capacity.
- Obsługa baterii: Baterie mogą stwarzać ryzyko porażenia prądem i wystąpienia wysokiego prądu zwarciowego. Podczas pracy z bateriami należy zachować odpowiednie środki ostrożności.
- Wyłączenie awaryjne: Familiarize yourself with the location of the power button and the procedure for emergency shutdown.
3. Zawartość opakowania
Upon unpacking, please verify that all items listed below are included and undamaged. If any items are missing or damaged, contact your dealer immediately.
- FSP Champ Tower 1K UPS Unit
- Instrukcja obsługi (ten dokument)
- Kabel komunikacyjny USB
- Kabel komunikacyjny RS232
- Kabel wejściowy zasilania
- Output Power Cables (quantity may vary by region)
4. Koniec produktuview
4.1 Panel przedni

Rycina 4.1: Przód view of the FSP Champ Tower 1K UPS. This image displays the front of the UPS unit, featuring a prominent blue LCD screen that shows real-time status information such as input/output voltage, load level, and battery status. Below the screen are control buttons labeled 'ON/MUTE', 'SELECT', and 'OFF/ENTER' for managing the UPS functions and navigating the display. The lower section of the front panel has ventilation grilles.
The front panel features an LCD display and control buttons for monitoring and managing the UPS. The LCD provides real-time information on input/output voltage, load level, battery status, and operational mode. The buttons allow for power control, menu navigation, and alarm muting.
4.2 Panel tylny
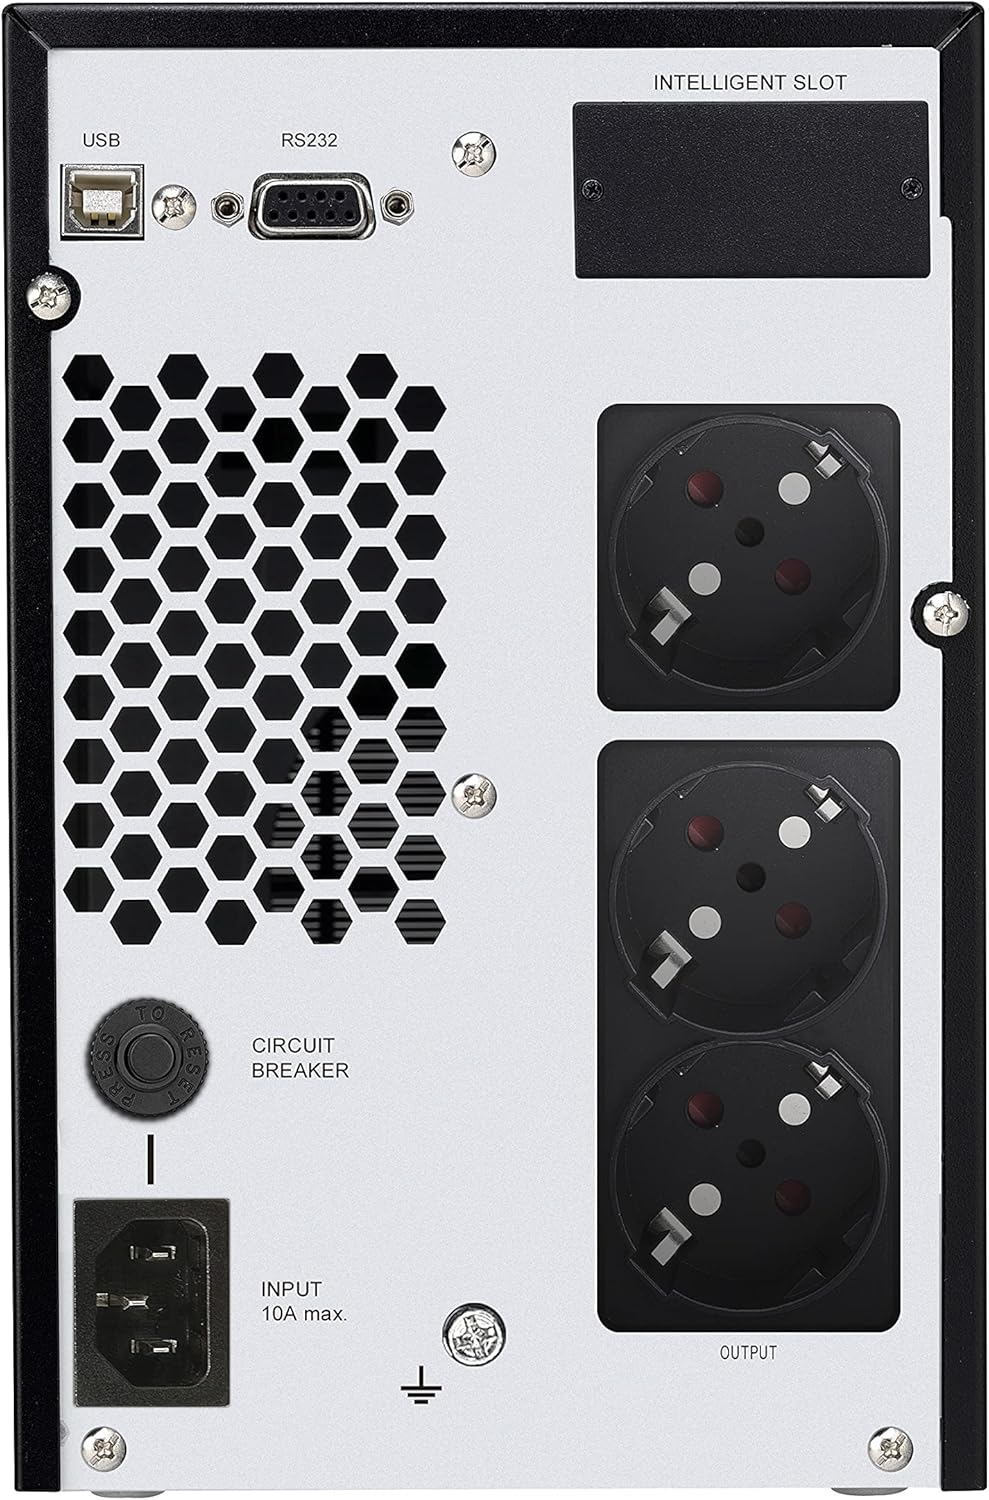
Rysunek 4.2: Tył view of the FSP Champ Tower 1K UPS. This image shows the back panel of the UPS, which includes several key connections. On the left, there is an 'INPUT' power connector (IEC C14) with a 'CIRCUIT BREAKER' button above it. To the right, there are three 'OUTPUT' power receptacles (IEC C13) for connecting protected devices. Above these, communication ports are visible: a USB port, an RS232 port, and an 'INTELLIGENT SLOT' for optional network management cards.
The rear panel provides all necessary connections for power input, protected power output, and communication interfaces:
- Złącze zasilania wejściowego: Łączy UPS z siecią energetyczną.
- Gniazda wyjściowe: Provide battery-backed and surge-protected power to connected equipment.
- Wyłącznik obwodu: Provides overload protection for the UPS.
- Port USB: For connecting to a computer for monitoring and shutdown software.
- Port RS232: Serial communication port for monitoring and control.
- Inteligentny slot: For optional SNMP or relay cards to enhance network management capabilities.
5. Instalacja
- Rozpakowywanie: Carefully unpack the UPS and inspect for any shipping damage.
- Umieszczenie: Place the UPS on a flat, stable surface in a clean, well-ventilated area. Ensure adequate clearance around the unit for airflow.
- Początkowe ładowanie: Before initial use, connect the UPS to a grounded AC outlet and allow it to charge for at least 8 hours without any load connected. This ensures optimal battery performance.
- Podłączanie sprzętu:
- Connect your critical equipment (computers, monitors, network devices) to the UPS output receptacles.
- Do not connect laser printers or strip heaters to the UPS output, as their high power draw can overload the unit.
- Połączenia komunikacyjne: Connect the USB or RS232 cable from the UPS to your computer for monitoring and automatic shutdown capabilities. Install the provided monitoring software (if applicable) on your computer.
6. Działanie
6.1 Włączanie UPS
- Ensure the UPS is connected to a utility power source and has completed its initial charge.
- Press and hold the 'ON/MUTE' button on the front panel for approximately 2 seconds until you hear a beep. The UPS will start and the LCD display will illuminate.
- The UPS will perform a self-test and then enter online mode, providing power to connected equipment.
6.2 Wyłączanie UPS-a
- If the UPS is supplying power from the battery (during a power outage), first shut down all connected equipment gracefully.
- Press and hold the 'OFF/ENTER' button on the front panel for approximately 2 seconds until you hear a beep. The UPS will shut down.
- To completely remove power, disconnect the UPS from the AC utility outlet.
6.3 Wyświetlacz LCD i przyciski sterujące
The LCD display provides critical status information. Use the 'SELECT' button to cycle through different display parameters (e.g., input voltage, objętość wyjściowatage, pojemność baterii, procent obciążeniatage). The 'ON/MUTE' button can also be used to mute audible alarms during certain events.
7. Konserwacja
- Pielęgnacja baterii: To maintain optimal battery life, ensure the UPS is connected to AC power continuously. Avoid frequent deep discharges. Perform a battery calibration test (if available via software) periodically.
- Czyszczenie: Keep the UPS clean and free of dust. Use a dry cloth to wipe the exterior. Do not use liquid cleaners or solvents. Ensure ventilation openings are clear.
- Wymiana baterii: Batteries are consumable items and will eventually require replacement. Refer to the manufacturer's guidelines for battery replacement procedures. This should only be performed by qualified service personnel.
- Składowanie: If storing the UPS for an extended period, ensure it is fully charged, then disconnect it from AC power. Recharge the UPS every 3-6 months to prevent battery degradation.
8. Rozwiązywanie Problemów
This section addresses common issues you might encounter with your UPS. If the problem persists after attempting these solutions, contact technical support.
| Problem | Możliwa przyczyna | Rozwiązanie |
|---|---|---|
| UPS nie włącza się. | Brak zasilania prądem zmiennym; Niski poziom naładowania baterii; Usterka UPS. | Check AC power connection and outlet. Allow UPS to charge for several hours. If problem persists, contact support. |
| UPS wydaje ciągły sygnał dźwiękowy. | Praca w trybie bateryjnym; Przeciążenie; Usterka baterii. | Check AC input. Reduce connected load. Check battery status on LCD. |
| Connected equipment loses power during outage. | UPS overloaded; Battery depleted; UPS fault. | Ensure total load is within UPS capacity. Allow battery to fully charge. Contact support if issue persists. |
| Communication software not working. | Incorrect cable; Driver issue; Software settings. | Verify USB/RS232 cable connection. Reinstall drivers/software. Check software communication settings. |
9. Specyfikacje
| Funkcja | Szczegół |
|---|---|
| Marka | FSP |
| Numer modelu | PPF8001328 |
| Typ | Double-Conversion (Online) UPS |
| Pojemność | 1 kVA / 900 W |
| Kolor | Czarny |
| Producent | FSP |
| ASIN | B0D22RGTJP |
| Data pierwszej dostępności | 15 lipca 2024 r. |
10. Gwarancja i wsparcie
FSP products are designed for reliability and performance. For specific warranty terms and conditions, please refer to the warranty card included with your product or visit the official FSP webZachowaj dowód zakupu na wypadek roszczeń gwarancyjnych.
For technical support, troubleshooting assistance beyond this manual, or service inquiries, please contact FSP customer support through their official channels. Contact information can typically be found on the FSP webmiejscu lub w opakowaniu produktu.
Zasoby internetowe: For additional information, software downloads, and FAQs, please visit the FSP Official Store on Amazon or the main FSP webstrona.