1. Wprowadzenie
Thank you for choosing the Wiltec 4-in-1 Multifunction Garden Tool. This versatile device is designed to assist with various garden maintenance tasks, including hedge trimming, tree pruning, brush cutting, and grass trimming. Its backpack-mounted design and 4-stroke engine provide power and comfort for efficient operation. Please read this manual thoroughly before assembly, operation, or maintenance to ensure safe and effective use of the product.

Rysunek 1: The Wiltec 4-in-1 Multifunction Garden Tool in use, demonstrating its versatility with different attachments.
2. Instrukcje bezpieczeństwa
Always prioritize safety. Failure to follow these instructions may result in serious injury or property damage.
- Środki ochrony osobistej (PPE): Always wear appropriate safety gear, including a helmet, eye protection (safety glasses or goggles), hearing protection, heavy-duty gloves, long pants, and sturdy, non-slip footwear.
- Obszar roboczy: Ensure the work area is clear of bystanders, children, and pets. Maintain a safe distance from others (at least 15 meters). Remove any obstacles or debris that could be thrown by the tool.
- Obsługa paliwa: Handle fuel (gasoline and 4-stroke engine oil) with extreme care. Store fuel in approved containers in a well-ventilated area, away from ignition sources. Never refuel a hot engine.
- Działanie silnika: Operate the engine in a well-ventilated outdoor area to avoid carbon monoxide poisoning. Do not modify the engine or any safety features.
- Ostrzeżenie o wibracjach: Prolonged use can cause hand-arm vibration syndrome. Take regular breaks and use anti-vibration gloves to minimize risk.
- Kontrola: Before each use, inspect the tool for any damaged parts, loose fasteners, or fuel leaks. Do not operate if any issues are found.
- Warunki atmosferyczne: Do not operate the tool in adverse weather conditions such as rain, strong winds, or icy conditions.
3. Zawartość opakowania
Carefully unpack all components and check against the list below. If any items are missing or damaged, contact your retailer immediately.
- Main Engine Unit with Backpack Harness
- Elastyczny wał napędowy
- Extension Pole (800 mm)
- Hedge Trimmer Attachment (400 mm blade)
- Pole Pruner Attachment (300 mm blade)
- Brush Cutter Attachment (255 mm blade)
- Grass Trimmer Attachment (430 mm cutting width, double line spool)
- Montaż uchwytu
- Tool Kit (spark plug wrench, screwdrivers, etc.)
- Fuel Mixing Bottle (for 2-stroke, though this is a 4-stroke, it might be included for general purpose, refer to engine manual for fuel type)
- Instrukcja obsługi
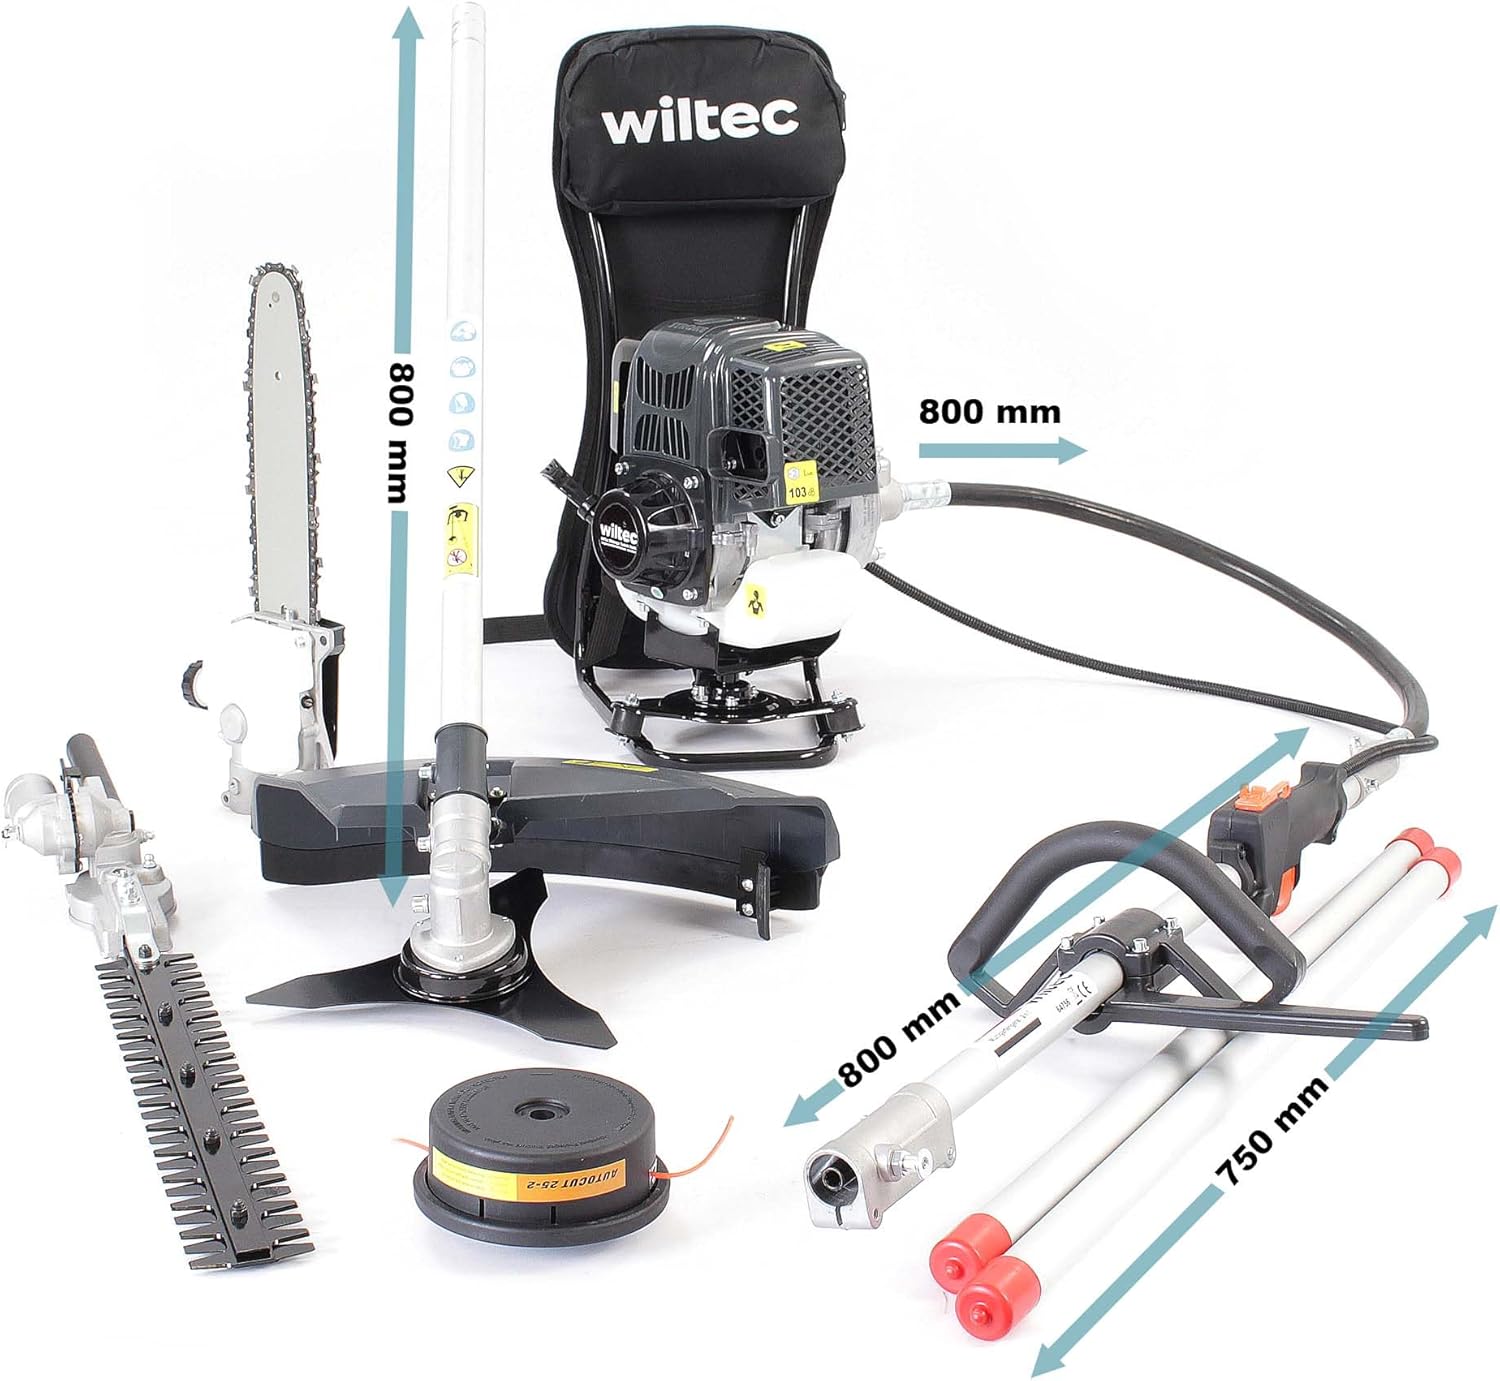
Rysunek 2: Nadview of all included components and their approximate dimensions.
4. Montaż i konfiguracja
4.1 Attaching the Backpack Unit
- Place the engine unit on a flat, stable surface.
- Adjust the backpack straps for a comfortable and secure fit. The padded design (Figure 3) helps distribute weight and reduce fatigue.
- Ensure the engine is securely mounted to the backpack frame.

Rysunek 3: Padded backpack harness for comfortable operation.
4.2 Connecting the Drive Shaft and Attachments
- Connect the flexible drive shaft to the engine unit, ensuring it clicks securely into place.
- Attach the desired working tool (hedge trimmer, pole pruner, brush cutter, or grass trimmer) to the end of the drive shaft. Align the connection points and secure with the locking mechanism.
- If additional reach is required, insert the extension pole between the drive shaft and the working tool.
- Mount the handle assembly to the shaft at a comfortable working position.
4.3 Zasilanie silnika
This tool is equipped with a 4-stroke engine. It requires unleaded gasoline and separate 4-stroke engine oil. Do NOT mix oil with gasoline.
- Ensure the engine is cool and turned off.
- Open the fuel tank cap and fill with fresh, unleaded gasoline. Do not overfill.
- Locate the oil filler cap (usually marked with an oil can symbol) and fill the crankcase with recommended 4-stroke engine oil to the appropriate level. Refer to the engine manual for specific oil type and capacity.
- Securely close both fuel and oil caps.
4.4 Uruchomienie silnika
The CDI ignition system ensures easy starting.
- Narzędzie należy umieścić na płaskiej i stabilnej powierzchni.
- Set the ON/OFF switch to the 'ON' position.
- Włącz ssanie (jeśli silnik jest zimny).
- Naciśnij pompkę paliwa kilka razy, aż paliwo stanie się widoczne.
- Mocno pociągnij za linkę rozrusznika, aż silnik uruchomi się.
- Once started, gradually disengage the choke. Allow the engine to warm up for a few moments before operating at full throttle.
5. Instrukcja obsługi
5.1 Ogólne zasady działania
- Narzędzie należy zawsze trzymać mocno obiema rękami.
- Maintain a balanced stance and be aware of your surroundings.
- Never operate the tool above shoulder height without proper support or if you cannot maintain control.
- Release the throttle trigger to stop the cutting attachment. Turn off the engine using the ON/OFF switch when not in use or when changing attachments.
5.2 Hedge Trimmer Attachment

Rysunek 4: Hedge Trimmer Attachment.
The hedge trimmer features a 400 mm blade that can be adjusted up to 90 degrees for precise cutting angles.
- Regulacja kąta: Loosen the adjustment knob, set the desired blade angle, and tighten the knob securely.
- Technika cięcia: Use a sweeping motion, moving the blade steadily along the hedge. Avoid forcing the blade through thick branches. For best results, cut the sides of the hedge first, then the top.
5.3 Pole Pruner Attachment

Rysunek 5: Pole Pruner Attachment.
The pole pruner is equipped with a 300 mm blade and an automatic chain lubrication system for smooth cutting of branches.
- Smarowanie łańcucha: Ensure the oil reservoir is filled with appropriate chain oil. The automatic system will lubricate the chain during operation.
- Technika cięcia: Position the pruner carefully. Make a small undercut first to prevent bark stripping, then complete the cut from above. Be aware of falling branches.
5.4 Brush Cutter Attachment

Rysunek 6: Brush Cutter Attachment.
The brush cutter uses a robust 255 mm scythe blade for clearing dense vegetation and tough weeds.
- Zastosowanie ostrza: The metal blade is suitable for thick grass, weeds, and light brush.
- Technika cięcia: Use a side-to-side sweeping motion. Keep the blade parallel to the ground. Be extremely cautious of kickback and flying debris.
5.5 Grass Trimmer Attachment

Rysunek 7: Grass Trimmer Attachment.
The grass trimmer has a 430 mm cutting width and uses a double nylon line spool for trimming grass and lawn edges.
- Podawanie linii: Tap the trimmer head gently on the ground while operating at full throttle to advance the nylon line.
- Technika cięcia: Use a gentle sweeping motion to trim grass. Avoid contact with hard surfaces like concrete or rocks to prevent line breakage.
6. Konserwacja
Regular maintenance ensures optimal performance and extends the life of your tool. Always turn off the engine and disconnect the spark plug wire before performing any maintenance.
- Czyszczenie: After each use, clean the tool, especially the cutting attachments, of grass, dirt, and debris. Use a damp szmatką; unikać stosowania wody pod wysokim ciśnieniem.
- Olej silnikowy: Check the engine oil level before each use and top up if necessary. Change the engine oil according to the schedule in the engine manual (typically after the first 5-10 hours, then every 25-50 hours).
- Filtr powietrza: Regularnie czyść filtr powietrza, szczególnie w warunkach dużego zapylenia. Wymień go, jeśli jest uszkodzony.
- Świeca: Okresowo sprawdzaj i czyść świecę zapłonową. Wymień ją, jeśli jest zużyta lub zabrudzona.
- Akcesoria tnące:
- Nożyce do żywopłotu: Keep blades sharp and lubricated. Apply a light oil after each use to prevent rust.
- Sekator tyczkowy: Ensure the chain is sharp and properly tensioned. Keep the chain oil reservoir filled.
- Kosiarka do pędzli: Inspect the blade for damage or dullness. Sharpen or replace as needed.
- Grass Trimmer: Replace nylon line when it runs out. Inspect the trimmer head for wear.
- Składowanie: When storing for extended periods, drain the fuel tank or use a fuel stabilizer. Clean the tool thoroughly and store in a dry, secure location, out of reach of children.
7. Rozwiązywanie Problemów
| Problem | Możliwa przyczyna | Rozwiązanie |
|---|---|---|
| Silnik nie chce się uruchomić | No fuel; ON/OFF switch off; Choke not engaged/disengaged; Fouled spark plug; Clogged fuel filter | Check fuel level; Turn ON switch; Adjust choke; Clean/replace spark plug; Clean/replace fuel filter |
| Silnik działa słabo | Dirty air filter; Incorrect fuel/oil mixture (for 2-stroke, but check for 4-stroke oil level); Carburetor issues | Clean/replace air filter; Check 4-stroke oil level; Consult service professional |
| Cutting attachment not working | Attachment not securely connected; Drive shaft issue; Damaged blade/line | Ensure secure connection; Inspect drive shaft for damage; Replace/sharpen blade or replace line |
| Nadmierne wibracje | Loose components; Damaged attachment; Unbalanced blade | Check all fasteners; Inspect attachments for damage; Replace unbalanced blades |
If you encounter problems not listed here or if the suggested solutions do not resolve the issue, please contact Wiltec customer support or a qualified service technician.
8. Specyfikacje
| Funkcja | Specyfikacja |
|---|---|
| Numer modelu | 64757 |
| Typ silnika | 4-suwowy |
| Moc silnika | 0.9 kW |
| Przemieszczenie | 31 cm³ |
| Maksymalna prędkość silnika | 7500 obr./min |
| Pojemność zbiornika paliwa | 0.9 Ł |
| Długość ostrza nożyc do żywopłotu | 400 mm |
| Regulacja kąta nożyc do żywopłotu | Do 90° |
| Długość ostrza sekatora na tyczce | 300 mm |
| Szerokość cięcia podkaszarki | 255 mm |
| Grass Trimmer Cutting Width | 430 mm |
| Maksymalna długość urządzenia | 3300 mm |
| Waga | 15.44 kilogramów |
| Wymiary (dł. x szer. x wys.) | 330 x 37 x 12.7 cm (packed) |
9. Gwarancja i wsparcie
Wiltec products are manufactured to high-quality standards and are subject to strict quality controls. This product comes with a standard manufacturer's warranty. For specific warranty terms and conditions, please refer to the documentation provided with your purchase or visit the official Wiltec webstrona.
For technical support, spare parts, or service inquiries, please contact your retailer or Wiltec customer service. When contacting support, please have your model number (64757) and purchase date readily available.