
1. Wprowadzenie
This manual provides detailed instructions for the setup, operation, and maintenance of your Abovsare F800 Digital LED Alarm Clock. Please read this manual thoroughly before using the product to ensure proper function and longevity.

Image 1.1: The Abovsare F800 Digital LED Alarm Clock, showcasing its large, multi-color display and ambient lighting.
2. Koniec produktuview
2.1 Zawartość opakowania
Sprawdź, czy w opakowaniu znajdują się wszystkie elementy:
- Abovsare F800 Digital LED Alarm Clock
- Zdalne sterowanie
- Kabel zasilający USB
- CR2032 Battery (for memory function)
- Instrukcja obsługi
- Wall Mounting Accessories (guide, screws)

Image 2.1: Included components: clock unit, remote, USB cable, CR2032 battery, and mounting hardware.
2.2 Główne cechy
- Duży wyświetlacz LED: High-definition, 13-inch LED screen for clear visibility.
- 12 RGB Digit Colors: Customize the display digits with 12 different color options via remote control.
- Ambient Night Light: Features 14 distinct color ambient lights at the base, usable as a night light.
- Regulowana jasność: Five levels of brightness can be set manually, plus an automatic dimming function.
- Time & Calendar Alternation: Option to cycle between time display (10 seconds) and calendar display (5 seconds).
- Funkcja pamięci: Built-in memory retains time data even if power is disconnected (requires CR2032 battery).
- Opcje montażu: Can be wall-mounted or placed on a desktop using the folding bracket.
- Funkcja alarmu: Integrated alarm clock feature.
3. Instrukcje konfiguracji
3.1 Połączenie zasilania
The Abovsare F800 Digital LED Alarm Clock is powered by a corded electric connection. It is not battery operated for its primary functions and must be plugged in to work.
- Connect the provided USB power cable to the clock's USB port.
- Connect the other end of the USB cable to a 5V/1A or 5V/2A USB adapter (not included, unless specified as "adapter include" in your purchase) or a compatible USB port.
- Ensure the connection is secure. The clock display should illuminate.
3.2 Memory Battery Installation
A CR2032 battery is required for the memory function, which preserves time settings during power outages or when the clock is unplugged.
- Znajdź komorę baterii z tyłu zegara.
- Włóż jedną baterię CR2032, zwracając uwagę na prawidłową biegunowość (+/-).
- Dokładnie zamknij komorę baterii.
3.3 Opcje montażu
The clock offers both wall-mounting and desktop placement options.
- Umieszczenie na pulpicie: Extend the folding bracket located on the back of the clock to stand it upright on any flat surface.
- Montaż na ścianie: Use the integrated wall hanging holes and the provided mounting accessories (screws, guide) to securely attach the clock to a wall.

Obraz 3.1: Tył view illustrating the wall hanging holes and the folding bracket for versatile placement.
4. Instrukcja obsługi
All primary settings and adjustments are performed using the included remote control.
4.1 Ustawianie czasu i daty
- Press the "SET" button on the remote control to enter time setting mode.
- Use the directional arrows (Up/Down) to adjust the hour, and (Left/Right) to move between hour, minute, year, month, and day settings.
- Naciśnij przycisk „SET” ponownie, aby potwierdzić każde ustawienie i przejść do następnego.
- To switch between 12-hour and 24-hour format, press the "12/24H" button on the remote.

Obraz 4.1: Example of the clock displaying time in both 12-hour (AM/PM) and 24-hour formats.
4.2 Ustawianie alarmu
- Naciśnij przycisk „ALARM” na pilocie.
- Use the directional arrows to set the desired alarm time.
- Naciśnij ponownie „ALARM”, aby potwierdzić.
- To activate or deactivate the alarm, press the "ALARM ON/OFF" button. An alarm icon will appear on the display when active.

Image 4.2: The alarm bell icon indicates that the alarm function is currently active.
4.3 Regulacja jasności wyświetlacza
The clock offers five levels of manual brightness adjustment and an automatic dimming feature.
- Regulacja ręczna: Press the "BRIGHTNESS" button on the remote control repeatedly to cycle through the five brightness levels (100%, 70%, 50%, 20%, Off).
- Automatyczne przyciemnianie: The clock automatically adjusts its brightness based on the time of day:
- AM 7:00 - PM 6:59: High Brightness
- PM 7:00 - PM 10:59: Medium Brightness
- PM 11:00 - AM 6:59: Low Brightness
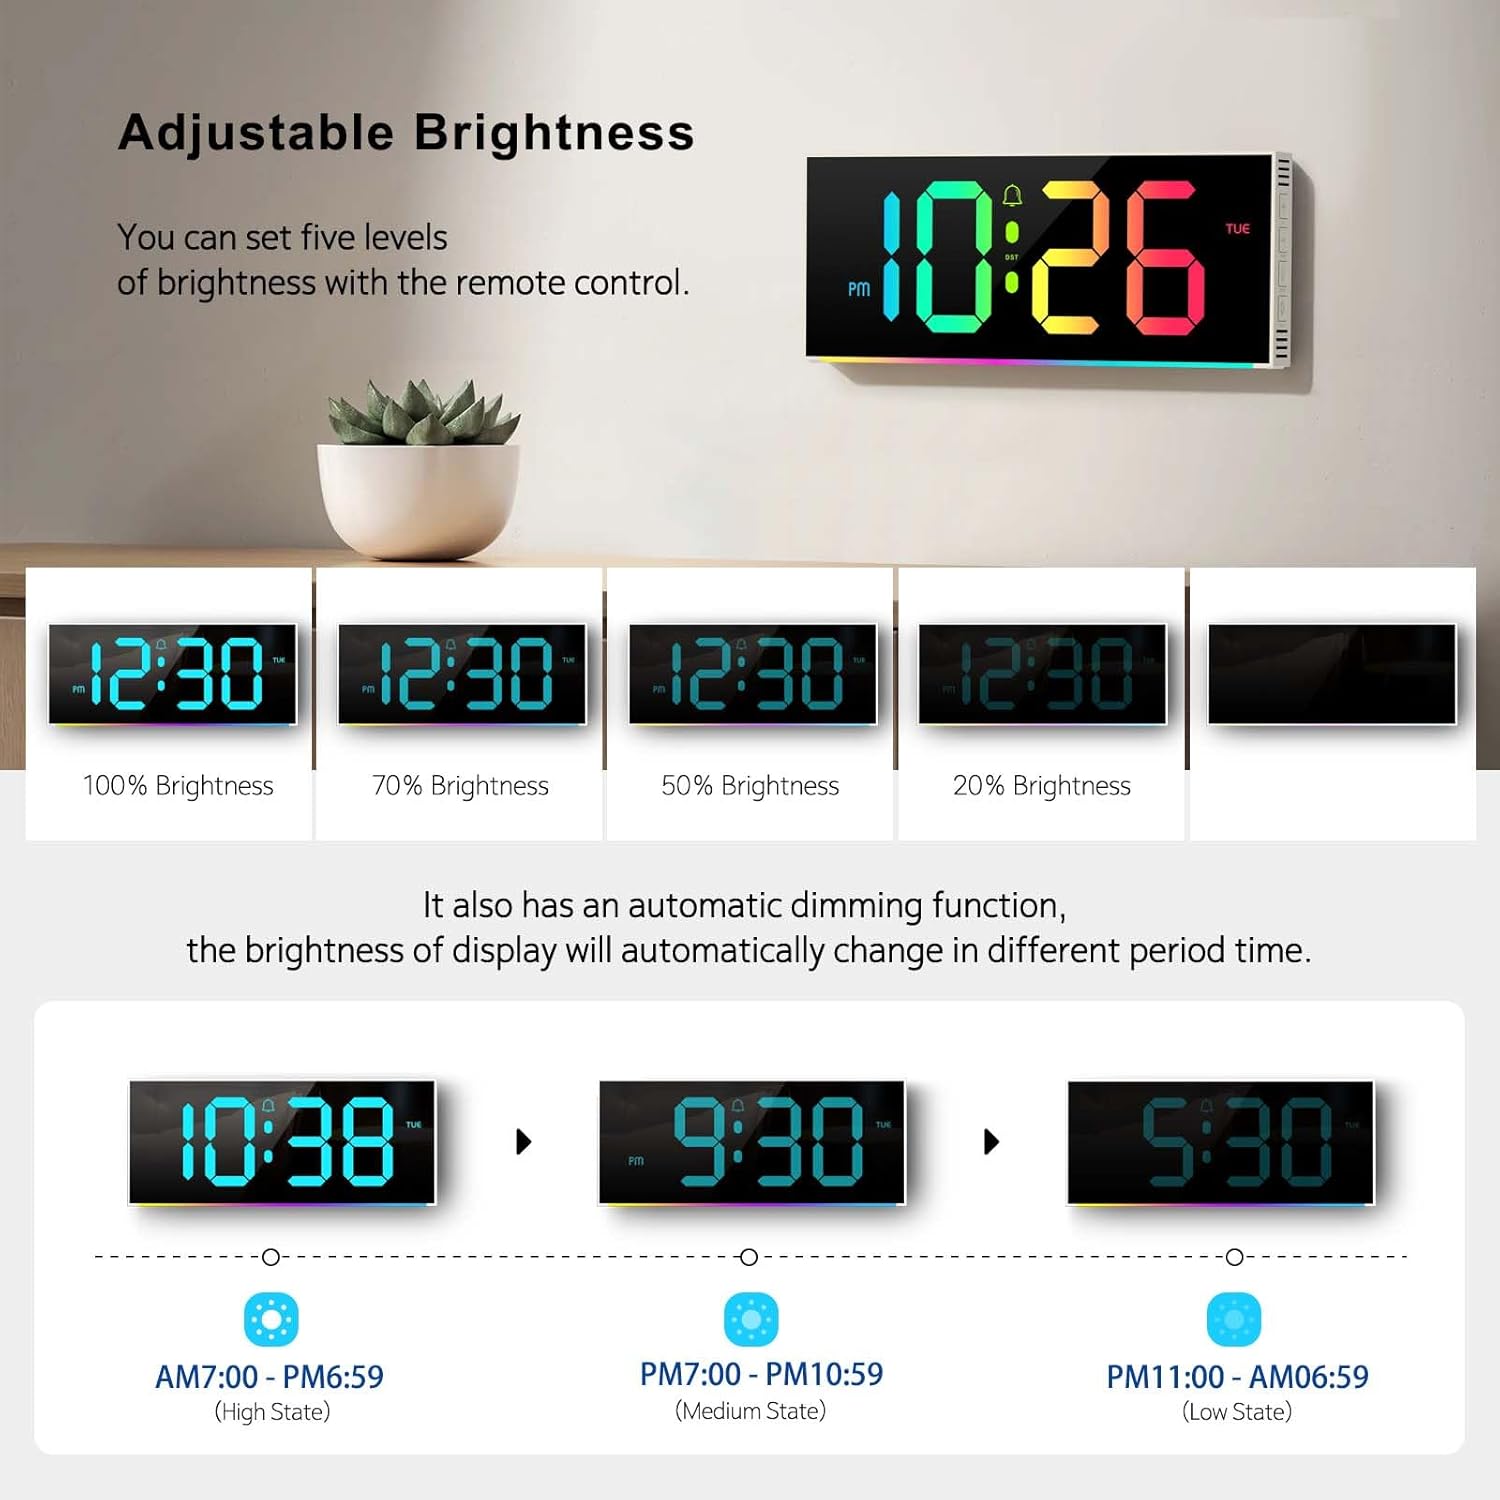
Image 4.3: Visual representation of the five brightness levels and the automatic dimming schedule.

Image 4.4: Detailed diagram of the clock's automatic dimming function based on time periods.
4.4 Changing Digit Colors
The clock digits can be displayed in 12 different RGB colors.
- Press the "COLOR" button on the remote control to cycle through the available digit colors.
- Select your preferred color.

Obraz 4.5: Examples of the 12 different RGB digit colors that can be selected using the remote control.
4.5 Controlling Ambient Night Light
The clock features 14 different ambient light colors at its base.
- Press the "AMBIENT LIGHT" button on the remote control to turn the ambient light on/off or cycle through the colors.
- Select your desired ambient light color.
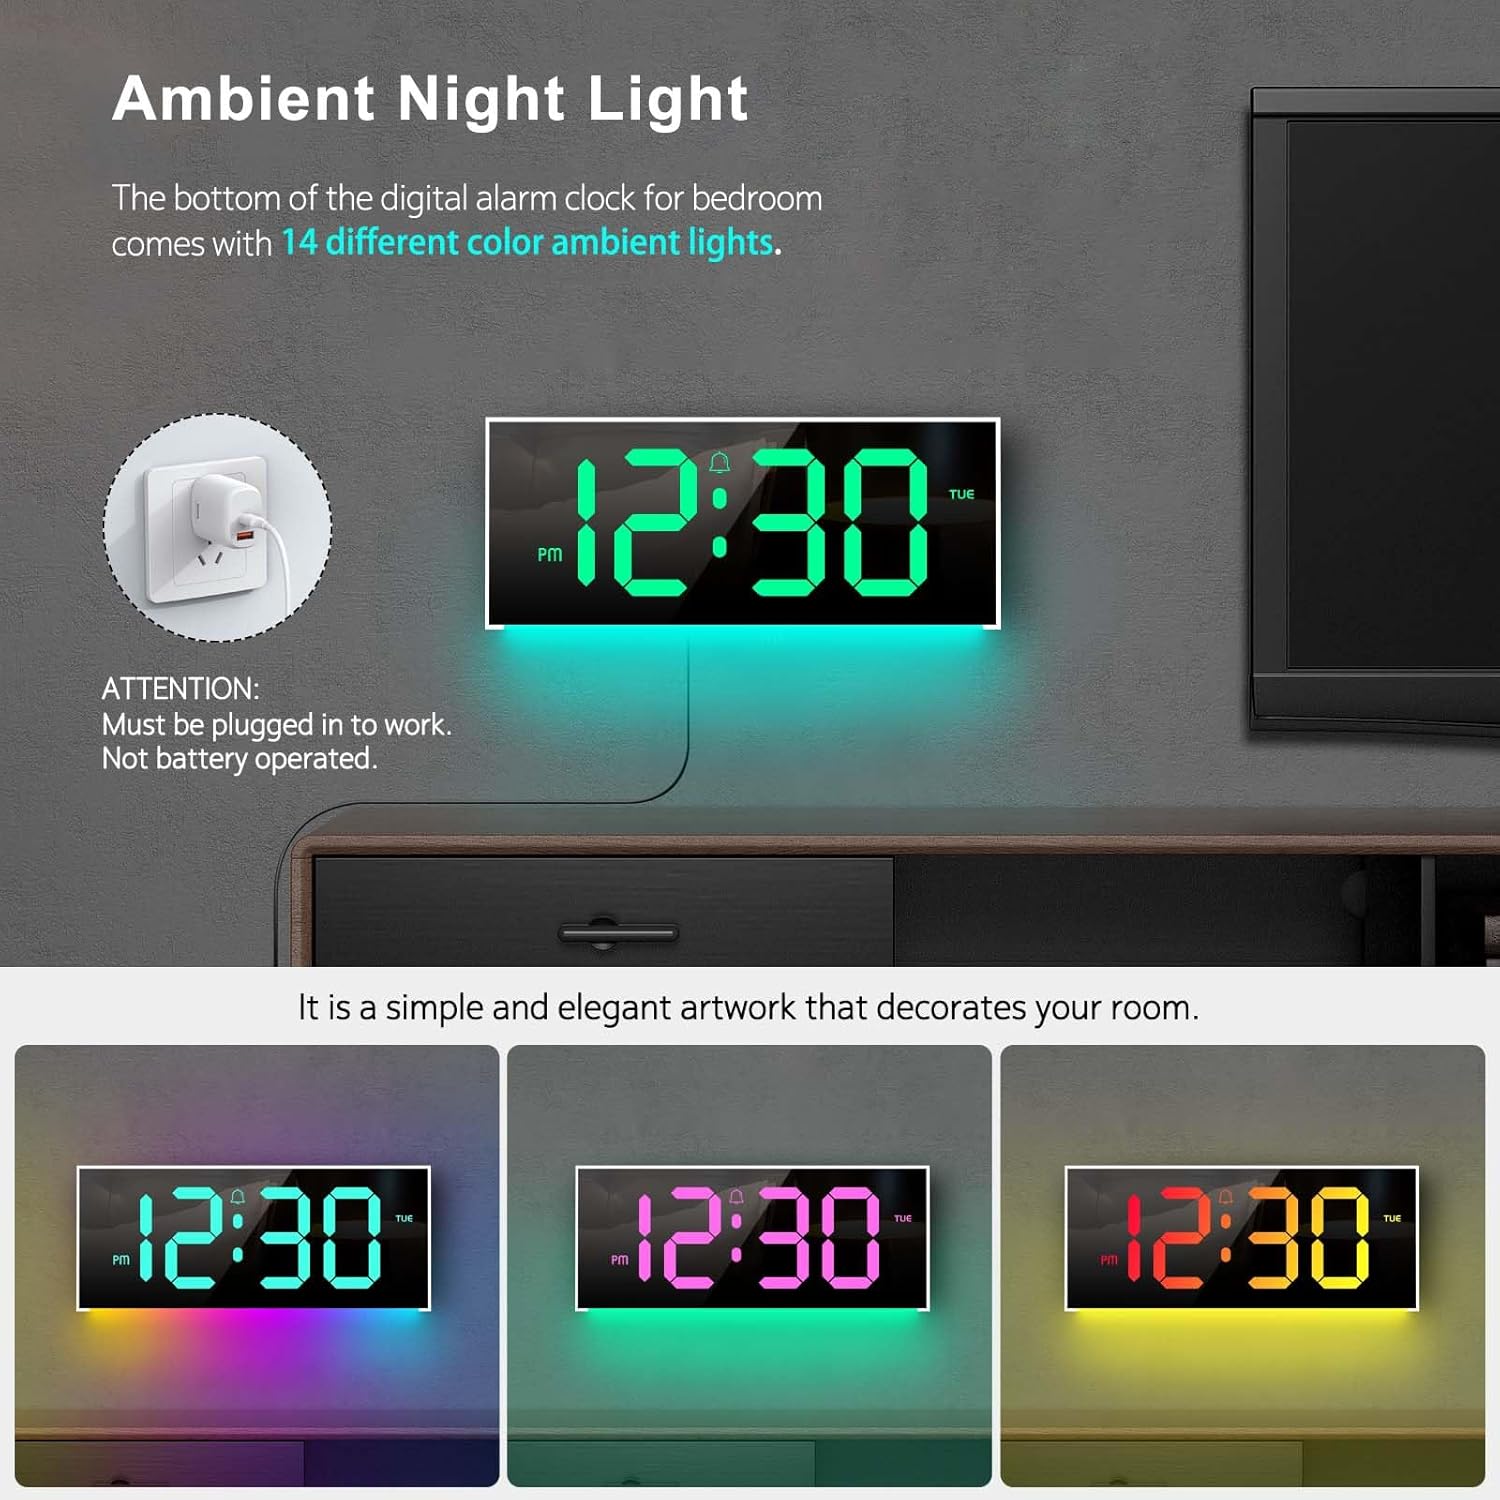
Image 4.6: The clock's ambient night light feature, displaying different color options in a room environment.

Image 4.7: The ambient night light feature providing subtle illumination, with examples of different colors.
4.6 Time and Calendar Alternation
The clock can be set to alternate between displaying the time and the calendar.
- Press the "ALT" button on the remote control to activate or deactivate the alternation mode.
- When active, the display will show the time for 10 seconds, then switch to the calendar for 5 seconds, and continuously cycle.

Image 4.8: The clock demonstrating the alternation between time display and calendar display.
5. Konserwacja
To ensure the longevity and optimal performance of your Abovsare F800 Digital LED Alarm Clock, follow these maintenance guidelines:
- Czyszczenie: Use a soft, dry cloth to gently wipe the display and exterior surfaces. Avoid abrasive cleaners, solvents, or spray directly onto the clock.
- Moc: Always use a 5V/1A or 5V/2A adapter. Using an incorrect power source may damage the device.
- Środowisko: Trzymaj zegar z dala od bezpośredniego światła słonecznego, ekstremalnych temperatur i wysokiej wilgotności.
- Wymiana baterii: Replace the CR2032 memory battery annually or if you notice the clock losing time settings after a power disconnection.
6. Rozwiązywanie Problemów
| Problem | Możliwa przyczyna | Rozwiązanie |
|---|---|---|
| Zegar się nie włącza. | Brak połączenia z zasilaniem lub uszkodzony adapter. | Ensure the USB cable is securely connected and the power adapter (5V/1A or 5V/2A) is functioning. Try a different USB port or adapter. |
| Clock loses time settings after unplugging. | CR2032 memory battery is dead or not installed. | Install or replace the CR2032 battery, ensuring correct polarity. |
| Pilot zdalnego sterowania nie działa. | Remote battery is dead or obstructed signal. | Wymień baterię w pilocie. Upewnij się, że między pilotem a czujnikiem zegara nie ma żadnych przeszkód. |
| Display brightness is too low/high. | Manual brightness setting or automatic dimming. | Press the "BRIGHTNESS" button on the remote to adjust manually. Note the automatic dimming schedule (Section 4.3). |
| Clock randomly shuts off. | Intermittent power supply or loose connection. | Check the USB cable and adapter for secure connection. Try a different power outlet or adapter. If the issue persists, contact customer support. |
7. Specyfikacje
- Marka: Abovsare
- Model: F800
- Typ wyświetlacza: PROWADZONY
- Wymiary produktu: 11.6" szer. x 4.8" wys.
- Źródło zasilania: Corded Electric (USB, requires 5V/1A or 5V/2A adapter)
- Bateria pamięci: 1 x CR2032 (wymagane)
- Materiał ramy: Plastikowy
- Typ montażu: Na blacie lub na ścianie
- Cechy szczególne: Adjustable Brightness, Alarm, Ambient Night Light, Large LED display, Remote Control, Time & Calendar Alternation
- Waga przedmiotu: 1.23 funta
8. Gwarancja i wsparcie
Abovsare provides a 12-miesięczna bezproblemowa gwarancja for this product, ensuring quality and customer satisfaction.
For any questions, concerns, or support needs, please contact our customer service team. We offer Obsługa klienta 24h aby Ci pomóc.
Sposób kontaktu: Please reach out to us via the buyer-seller message system on the platform where you purchased the product.