GeeekPi GeeekPi-HiFiDAC-NVMe
GeeekPi HiFi DAC Hat with PCIe NVMe SSD Function for Raspberry Pi 5
Instrukcja obsługi
1. Wprowadzenie
The GeeekPi HiFi DAC Hat with PCIe to NVMe SSD Function is an expansion board designed for the Raspberry Pi 5. It integrates a high-quality Digital-to-Analog Converter (DAC) for superior audio output and a PCIe slot for NVMe 2230/2242 SSDs, enhancing both audio capabilities and storage options for your Raspberry Pi 5 projects.
2. Zawartość opakowania
Sprawdź, czy wszystkie wymienione poniżej elementy znajdują się w Twojej paczce. Jeśli brakuje któregokolwiek z nich lub jest on uszkodzony, skontaktuj się z obsługą klienta.
- 1x NVDAC board
- 1x PC104 Pin Header
- 1x FPC Cable (8.5*40mm PCIe FFC cable)
- 1x M2.5 Screw driver
- 1x Screw Pack (includes 8x M2.5*4mm screws, 4x M2.5*17mm copper pillars, 1x Hard drive copper pillar, 2x M2*3 Flat head screws)

Image: Contents of the GeeekPi HiFi DAC Hat package, showing the NVDAC board, PC104 pin header, FPC cable, screwdriver, and various screws and standoffs.
3. Koniec produktuview
The NVDAC board features several key components for its dual functionality:
- 40Pin GPIO Pin header: For connecting to the Raspberry Pi 5.
- Odbiornik podczerwieni: For infrared remote control input.
- Gniazdo PCIe: Connects to the Raspberry Pi 5 via the FPC cable for NVMe SSD functionality.
- RCA phono Jack Left audio output: For left channel audio output.
- RCA phono Jack Right audio output: For right channel audio output.
- M.2 2230/2242 NVMe SSD Slot: Accommodates NVMe SSDs of 2230 or 2242 form factors for storage expansion.
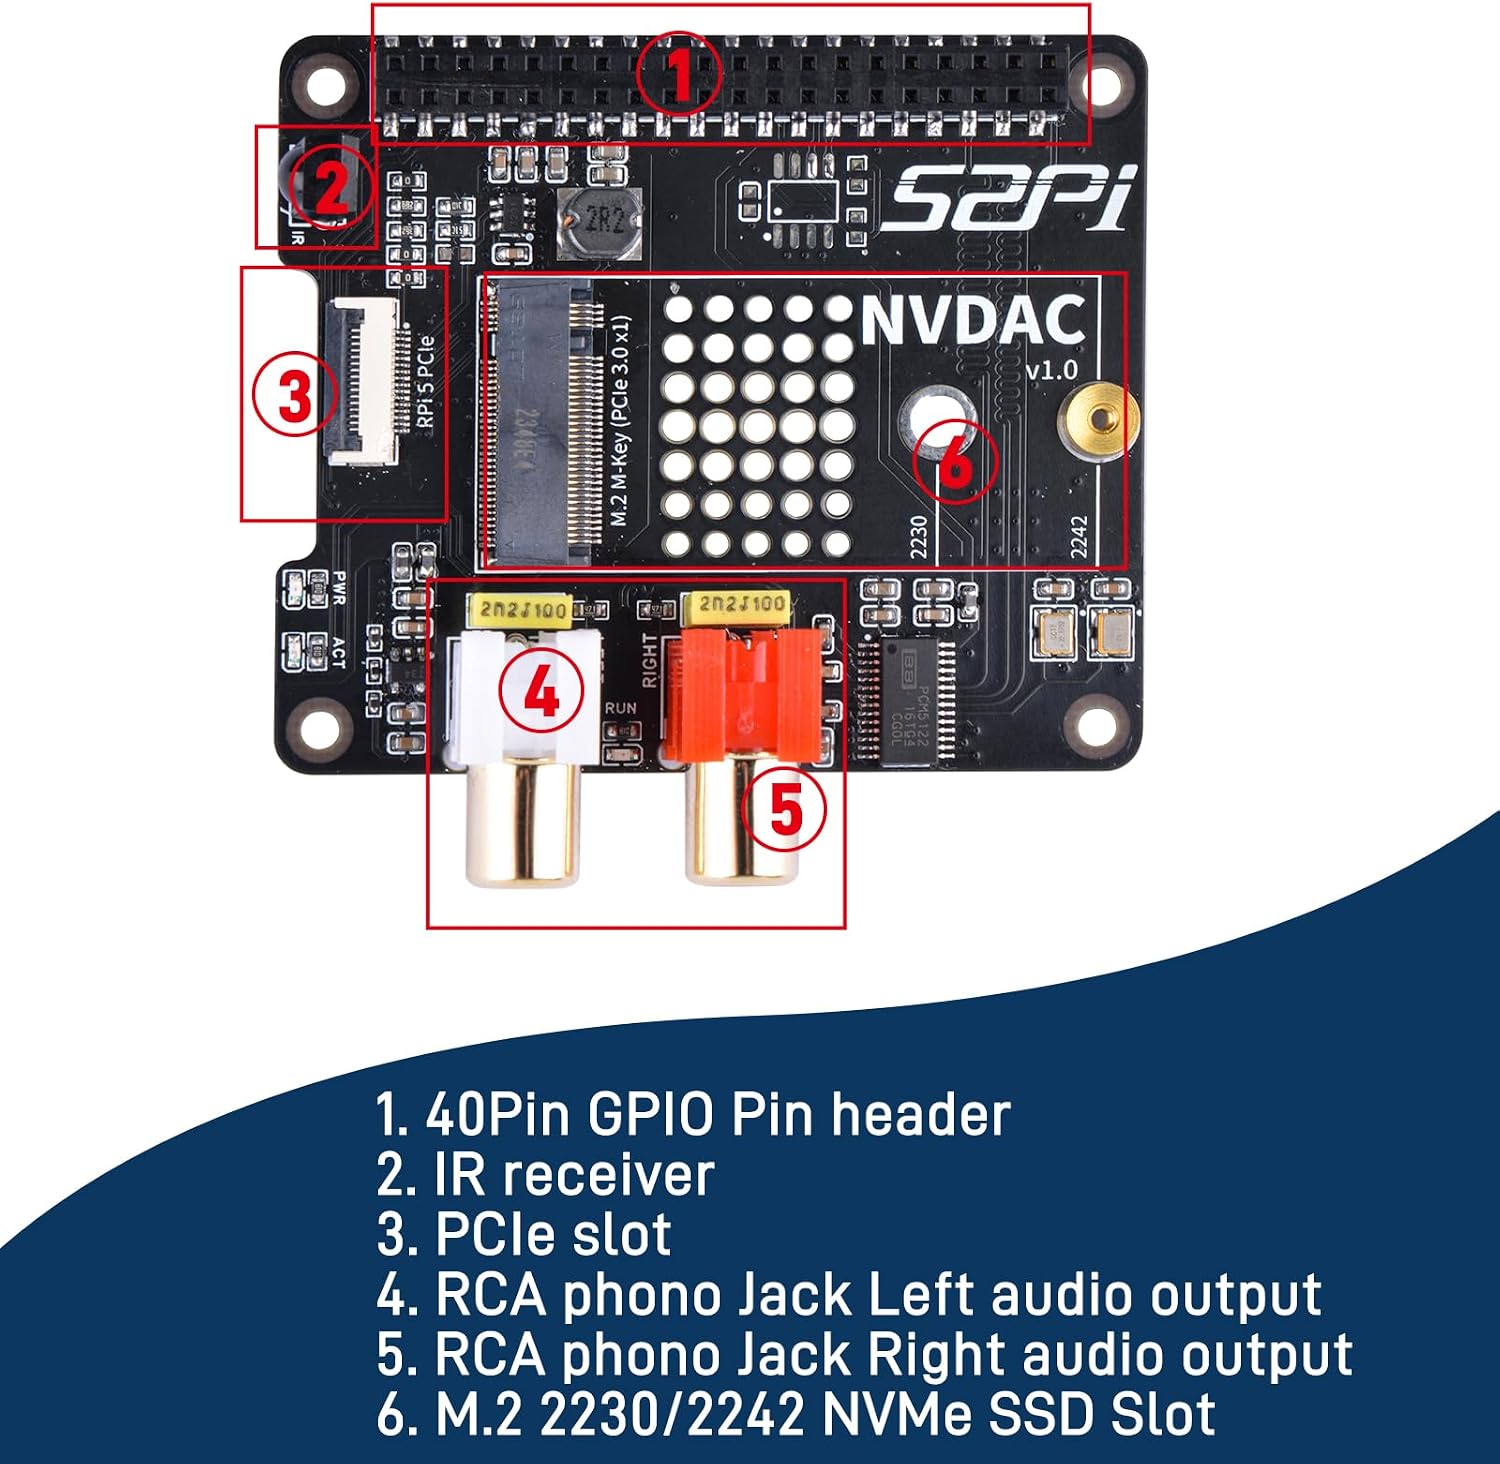
Obraz: Szczegółowy view of the GeeekPi HiFi DAC Hat, highlighting its numbered components including the 40-pin GPIO header, IR receiver, PCIe slot, RCA audio outputs, and M.2 NVMe SSD slot.

Image: Dimensions of the GeeekPi HiFi DAC Hat, showing measurements in millimeters and inches for the board, PC104 pin header, and FPC cable.
4. Instrukcje konfiguracji
This section details the steps to install the GeeekPi HiFi DAC Hat onto your Raspberry Pi 5. Note: A Raspberry Pi 5 is not included and must be purchased separately.
- Prepare the Raspberry Pi 5: Ensure your Raspberry Pi 5 is powered off and disconnected from all peripherals. Attach the provided copper pillars to the mounting holes on the Raspberry Pi 5 board.
- Install NVMe SSD (Optional): If using an NVMe SSD, carefully insert your 2230 or 2242 form factor NVMe SSD into the M.2 slot on the NVDAC board. Secure it with the provided M2*3 flat head screw and hard drive copper pillar.
- Connect the FPC Cable: Connect one end of the FPC cable to the PCIe slot on the NVDAC board and the other end to the corresponding PCIe connector on the Raspberry Pi 5. Ensure the cable is inserted correctly and securely.
- Mount the NVDAC Board: Align the 40-pin PC104 Pin Header on the NVDAC board with the GPIO pins of the Raspberry Pi 5. Carefully press the NVDAC board down until it is firmly seated on the GPIO header and secured by the copper pillars. Use the M2.5*4mm screws to fasten the NVDAC board to the copper pillars.

Image: Four-step visual guide demonstrating the installation of the GeeekPi HiFi DAC Hat onto a Raspberry Pi 5, including SSD installation and board mounting.
Software Configuration for DAC
To enable the HiFi DAC functionality, you will need to modify the Raspberry Pi's configuration file. Access your Raspberry Pi's operating system (typically Raspberry Pi OS) and edit the /boot/config.txt file. Add the following line:
dtoverlay=hifiberry-dacplusZapisz file and reboot your Raspberry Pi 5 for the changes to take effect. The DAC should then be recognized as an audio output device.
5. Instrukcja obsługi
Audio Output (DAC)
Once the DAC is configured in /boot/config.txt and the Raspberry Pi is rebooted, the HiFi DAC Hat will function as your primary audio output. Connect your audio system (e.g., amplifier, powered speakers) to the RCA phono Jack Left and Right audio outputs on the NVDAC board. You can then select the DAC as the audio output device within your Raspberry Pi's operating system settings or audio playback software.
Pamięć masowa SSD NVMe
The integrated PCIe to NVMe SSD slot allows for high-speed storage expansion. After physical installation, the NVMe SSD will be detected by the Raspberry Pi 5's Linux operating system. You can use it for:
- Operating System Boot Drive: Install your Raspberry Pi OS directly onto the NVMe SSD for faster boot times and improved system responsiveness.
- Przechowywanie danych: Use the NVMe SSD for storing large files, media libraries, or as a high-performance drive for data-intensive applications.
Refer to Raspberry Pi documentation for specific instructions on configuring NVMe SSDs as boot drives or for data storage, including partitioning and formatting.
Odbiornik podczerwieni
The onboard IR receiver can be used with compatible infrared remote controls for controlling media playback or other functions on your Raspberry Pi. Configuration typically involves installing LIRC (Linux Infrared Remote Control) and setting up appropriate remote profiles within your operating system.
6. Konserwacja
To ensure optimal performance and longevity of your GeeekPi HiFi DAC Hat:
- Keep the board clean and free from dust. Use a soft, dry brush or compressed air for cleaning.
- Unikaj wystawiania płytki na działanie ekstremalnych temperatur i wilgoci.
- Trzymaj płytkę za krawędzie, aby zapobiec uszkodzeniu podzespołów lub wyładowaniom elektrostatycznym.
- Ensure proper ventilation for your Raspberry Pi 5 and the attached hat, especially when using an NVMe SSD, as they can generate heat.
7. Rozwiązywanie Problemów
- DAC not recognized or no audio output:
- Sprawdź, czy
dtoverlay=hifiberry-dacplusline has been correctly added to/boot/config.txtand the Raspberry Pi has been rebooted. - Check all physical connections, especially the 40-pin GPIO header, to ensure the NVDAC board is seated properly.
- Confirm that the correct audio output device is selected in your Raspberry Pi's sound settings.
- Sprawdź, czy
- NVMe SSD not detected or not booting:
- Ensure the FPC cable is securely connected to both the NVDAC board and the Raspberry Pi 5's PCIe connector.
- Verify that the NVMe SSD is correctly inserted into the M.2 slot and secured.
- Check the Raspberry Pi 5's firmware and operating system for the latest updates, as PCIe support can be improved with updates.
- Confirm the NVMe SSD is compatible (2230/2242 form factor).
- General instability or unexpected behavior:
- Ensure your Raspberry Pi 5 has an adequate power supply, especially when using an NVMe SSD, which can draw additional power.
- Check for any loose connections or foreign objects on the board.
8. Specyfikacje
- Marka: GeeekPi
- Numer modelu: GeeekPi-HiFiDAC-NVMe
- Platforma sprzętowa: Raspberry Pi 5
- Interfejs sprzętowy: PCI Express x4
- Tryb wyjścia audio: Cyfrowy
- Maksymalna Sampstawka: 192 kHz
- Konfiguracja kanałów dźwięku przestrzennego: 5.1
- Supported NVMe SSDs: M.2 2230/2242 form factors
9. Informacje o gwarancji
This GeeekPi product comes with a 6-miesięczna gwarancja from the date of purchase. This warranty covers manufacturing defects and malfunctions under normal use. It does not cover damage caused by misuse, accidents, unauthorized modifications, or improper installation. Please retain your proof of purchase for warranty claims.
10. Wsparcie
For further assistance, technical support, or warranty inquiries, please visit the official GeeekPi store on Amazon or contact their customer service directly. You can find more information and resources at the GeeekPi Amazon Store.
11. Film o produkcie
Video: An official product video from GeeekPi demonstrating the features and possibly the installation of the HiFi DAC Hat for Raspberry Pi 5.
Ask a question about this manual
Ask about setup, troubleshooting, compatibility, parts, safety, or missing instructions. Manuals+ will review the question and use this page’s manual context to help answer it.