Wstęp
Thank you for choosing the Mastech MS8233D Digital Multimeter. This manual provides essential information for the safe and effective operation, maintenance, and troubleshooting of your device. Please read this manual thoroughly before use and keep it for future reference.
Informacje dotyczące bezpieczeństwa
WARNING: To avoid electric shock or personal injury, read and understand all safety information before using this product.
- Przed dokonaniem pomiarów należy zawsze upewnić się, że multimetr jest ustawiony na właściwą funkcję i zakres.
- Nie stosować w ilości większej niż zalecana objętość.tage, as marked on the meter, between terminals or between any terminal and earth ground. The MS8233D has a Safety Rating of CATII 600V.
- Zachowaj ostrożność podczas pracy z objętościątagpowyżej 30 V AC RMS, 42 V szczytowo lub 60 V DC. Taka objętośćtagStwarzają ryzyko porażenia prądem.
- Podczas pomiarów należy trzymać palce za osłonami sondy.
- Do not use the meter if it is damaged or if the case is open. Inspect the meter and test leads before use.
- Aby zapewnić dokładne odczyty, należy natychmiast wymienić baterię, gdy tylko pojawi się wskaźnik niskiego poziomu naładowania.
- Nie należy używać miernika w środowiskach, w których występuje zagrożenie wybuchem gazów, oparów lub pyłów.
Główne cechy
The Mastech MS8233D Digital Multimeter offers a range of functionalities for various electrical measurements:
- Wyświetlacz: 2000 counts for precise readings.
- Nośny: Auto and Manual Ranging capabilities.
- Test diody: Features a Diode Open Voltage 1.5V.
- Test ciągłości: Audible buzzer for resistance less than 60Ω.
- Przechowywanie danych: Freezes the displayed reading for convenience.
- Automatyczne wyłączanie: Oszczędza baterię.
- Bezdotykowy Voltage Wykrywanie (NCV): Do identyfikacji przewodów pod napięciem bez konieczności bezpośredniego kontaktu.
- Maksymalny pomiar: Records the highest value measured.
- Podświetlenie wyświetlacza: Dla widoczności w warunkach słabego oświetlenia.
- Wskaźnik niskiego poziomu baterii: Wskazuje, kiedy należy wymienić baterię.
- Zasilanie: Operates on 1x 9V 6F22 Battery.
- Certyfikaty: Zgodny z RoHS.
- Ocena bezpieczeństwa: KATII 600V.
Rycina 1: Przód view of the Mastech MS8233D Digital Multimeter, highlighting the display, rotary function switch, and input terminals.
Produkt ponadview i komponenty
The MS8233D multimeter is designed for ease of use and durability. Familiarize yourself with its main parts:

Rysunek 2: Koniecview of the MS8233D Digital Multimeter, illustrating its physical dimensions, power supply, and typical applications in domestic, industrial, and electronics settings.
- Wyświetlacz LCD: Pokazuje odczyty pomiarów, jednostki i wskaźniki funkcji.
- Przełącznik obrotowy funkcji: Used to select the desired measurement function (e.g., ACV, DCV, Resistance, Diode, Continuity, Temperature, NCV).
- Gniazda wejściowe: Zaciski do podłączania przewodów pomiarowych.
- Gniazdo COM: Wspólny (ujemny) zacisk wejściowy dla wszystkich pomiarów.
- Gniazdo VΩmA: Dodatni zacisk wejściowy dla objtage, resistance, diode, continuity, and small current measurements.
- Gniazdo 10A: Dodatni zacisk wejściowy do pomiarów dużego prądu (do 10A).
- Przyciski funkcyjne: For features like Data Hold, Backlight, and Range selection.
Organizować coś
Instalacja baterii
The MS8233D requires one 9V 6F22 battery for operation. To install or replace the battery:
- Upewnij się, że multimetr jest wyłączony i odłącz wszystkie przewody pomiarowe od zacisków wejściowych.
- Znajdź pokrywę komory baterii znajdującą się z tyłu miernika.
- Use a screwdriver to loosen the screw(s) on the battery cover and remove the cover.
- Connect the new 9V battery to the battery clips, observing the correct polarity.
- Umieść baterię w komorze i załóż pokrywę, zabezpieczając ją śrubą(-ami).
Notatka: The meter includes a low battery indicator. Replace the battery promptly when this indicator appears to maintain measurement accuracy.
Instrukcja obsługi
Before making any measurement, ensure the test leads are properly connected and the function switch is set to the desired range.
Pomiar objętości DCtage (prąd stały)
- Włóż czerwony przewód pomiarowy do gniazda VΩmA, a czarny przewód pomiarowy do gniazda COM.
- Set the rotary switch to the desired DCV range (e.g., 200mV, 2V, 20V, 200V, 600V). If unsure, start with the highest range or use auto-ranging if available.
- Podłącz sondy pomiarowe do mierzonego elementu lub obwodu, zwracając uwagę na biegunowość.
- Przeczytaj tomtage wartość na wyświetlaczu LCD.
Pomiar objętości ACtage (ACV)
- Włóż czerwony przewód pomiarowy do gniazda VΩmA, a czarny przewód pomiarowy do gniazda COM.
- Set the rotary switch to the desired ACV range (e.g., 2V, 20V, 200V, 600V).
- Podłącz sondy pomiarowe do mierzonego elementu lub obwodu.
- Przeczytaj tomtage wartość na wyświetlaczu LCD.
Measuring DC/AC Current (DCA/ACA)
CAUTION: Never connect the meter in parallel to a voltagPodczas pomiaru prądu nie używaj źródła zasilania. Może to uszkodzić miernik i obwód.
- For currents up to 200mA, insert the red test lead into the VΩmA jack. For currents up to 10A, insert the red test lead into the 10A jack. Insert the black test lead into the COM jack.
- Set the rotary switch to the desired DC or AC current range (e.g., 200µA, 2000µA, 20mA, 200mA, 10A).
- Otwórz obwód, w którym będziesz mierzyć prąd i podłącz miernik szeregowo z obciążeniem.
- Odczytaj aktualną wartość na wyświetlaczu LCD.
Measuring Resistance (Ω)
- Włóż czerwony przewód pomiarowy do gniazda VΩmA, a czarny przewód pomiarowy do gniazda COM.
- Set the rotary switch to the desired Resistance range (e.g., 200Ω, 2kΩ, 20kΩ, 200kΩ, 2MΩ, 20MΩ).
- Przed pomiarem rezystancji należy upewnić się, że obwód lub element jest odłączony od napięcia.
- Podłącz sondy pomiarowe do komponentu.
- Odczytaj wartość rezystancji na wyświetlaczu LCD.
Test Diody
- Włóż czerwony przewód pomiarowy do gniazda VΩmA, a czarny przewód pomiarowy do gniazda COM.
- Set the rotary switch to the Diode symbol (usually shared with Continuity).
- Podłącz czerwoną sondę do anody, a czarną sondę do katody diody.
- Na wyświetlaczu pojawi się wartość głośności do przodutage drop. Reverse the probes; the display should show 'OL' (Open Loop) for a good diode.
Test ciągłości
- Włóż czerwony przewód pomiarowy do gniazda VΩmA, a czarny przewód pomiarowy do gniazda COM.
- Set the rotary switch to the Continuity symbol (usually shared with Diode).
- Podłącz sondy pomiarowe do obwodu lub elementu.
- Jeśli rezystancja spadnie poniżej około 60Ω, rozlegnie się sygnał dźwiękowy, sygnalizujący ciągłość. Na wyświetlaczu pojawi się również wartość rezystancji.
Objętość bezkontaktowatage (NCV) Wykrywanie
- Set the rotary switch to the NCV function.
- Move the top part of the meter (NCV sensor area) close to the conductor suspected of having AC voltage.
- The meter will emit an audible beep and the NCV indicator will light up if AC voltage zostało wykryte.
Funkcja zatrzymania danych
Naciśnij przycisk „HOLD”, aby zamrozić aktualny odczyt na wyświetlaczu. Naciśnij go ponownie, aby zwolnić blokadę i wznowić pomiary na żywo.
Funkcja podświetlenia
Press the 'LIGHT' button to turn on the display backlight. Press it again to turn it off. The backlight may automatically turn off after a short period to conserve battery.
Konserwacja
Czyszczenie
Wytrzyj obudowę licznika wodąamp Ściereczką i łagodnym detergentem. Nie używaj środków ściernych ani rozpuszczalników. Przed użyciem upewnij się, że miernik jest całkowicie suchy.
Wymiana baterii
Refer to the 'Battery Installation' section under 'Setup' for instructions on replacing the 9V battery. Always replace the battery when the low battery indicator is displayed to ensure accurate readings and proper operation.
Wymiana bezpiecznika
The MS8233D is equipped with internal fuses to protect against overcurrent. If the current measurement function stops working, the fuse may need replacement. Fuse replacement should only be performed by qualified personnel. Use only fuses of the specified type and rating (e.g., F200mA/250V for mA range, F10A/250V for 10A range).
Rozwiązywanie problemów
| Problem | Możliwa przyczyna | Rozwiązanie |
|---|---|---|
| Brak wyświetlacza lub wyświetlacz jest przyciemniony | Rozładowana lub słaba bateria | Wymień baterię 9V. |
| Błędne odczyty | Wybrano nieprawidłową funkcję/zakres; słabe połączenie przewodów pomiarowych; niski poziom naładowania baterii | Verify function and range; check test lead connections; replace battery. |
| Pomiar prądu nie działa | Przepalony bezpiecznik | Wymień odpowiedni bezpiecznik (patrz rozdział Konserwacja). |
| Wyświetlany jest komunikat „OL” (Przeciążenie) | Measurement exceeds selected range; open circuit (for continuity/resistance) | Select a higher range; check for open circuit. |
| Brak sygnału dźwiękowego ciągłości | Resistance too high; open circuit | Check for continuity; ensure resistance is below 60Ω. |
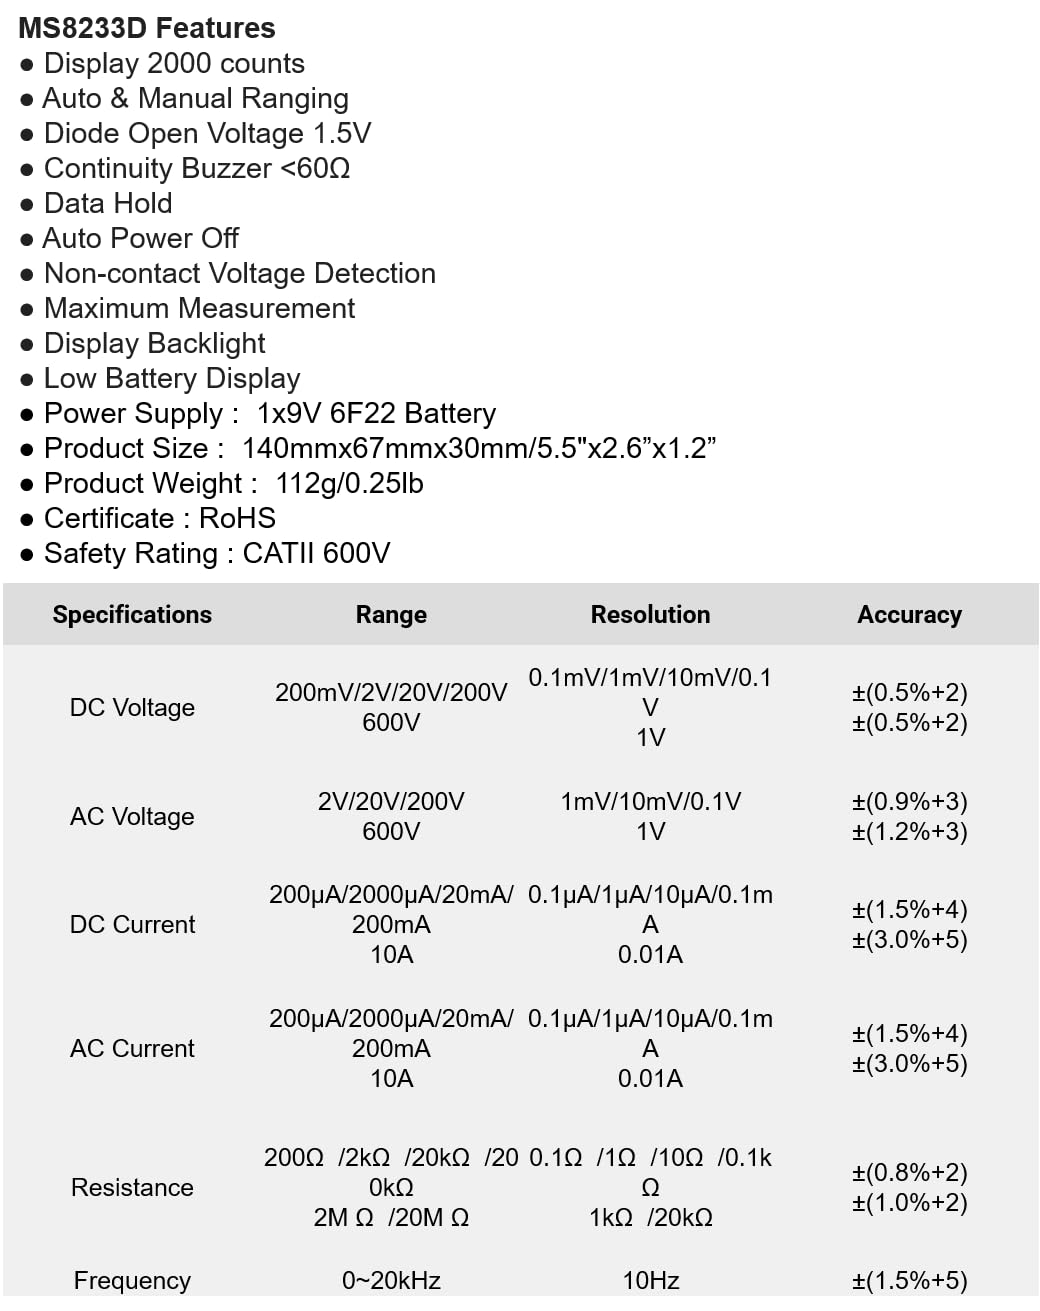
Specyfikacje
The following table details the measurement ranges, resolutions, and accuracies for the Mastech MS8233D Digital Multimeter:

Figure 3: Comprehensive specifications for the MS8233D, outlining measurement capabilities and precision.
| Funkcja | Specyfikacja |
|---|---|
| Wyświetlacz | 2000 liczy |
| Objętość DCtage | 200mV / 2V / 20V / 200V / 600V |
| AC Objętośćtage | 2V / 20V / 200V / 600V |
| Prąd stały | 200µA / 2000µA / 20mA / 200mA / 10A |
| Prąd zmienny | 200µA / 2000µA / 20mA / 200mA / 10A |
| Opór | 200Ω / 2kΩ / 20kΩ / 200kΩ / 2MΩ / 20MΩ |
| Częstotliwość | 0-20kHz |
| Dioda otwarta Voltage | 1.5 V |
| Ciągły brzęczyk | <60Ω |
| Zasilacz | 1 bateria 9V 6F22 |
| Wymiary produktu | 140 mm x 67 mm x 30 mm (5.5 cala x 2.6 cala x 1.2 cala) |
| Waga produktu | 112g (0.25 funtów) |
| Ocena bezpieczeństwa | KATII 600 V |
| Certyfikaty | CE, RoHS |
Gwarancja i wsparcie
For warranty information and technical support, please refer to the documentation provided with your purchase or contact the seller/manufacturer directly. Keep your purchase receipt as proof of purchase for any warranty claims.