
RAF R.6611G
Instrukcja obsługi miksera stojącego RAF R.6611G
Model: R.6611G | Power: 800W | Capacity: 4 Liters
Ważne instrukcje bezpieczeństwa
Please read these instructions carefully before using the appliance and retain them for future reference. Incorrect operation may cause damage to the appliance and injury to the user.
- Zawsze upewnij się, że objętośćtage na etykiecie znamionowej odpowiada natężeniu prądu w siecitage.
- Nie zanurzaj jednostki napędowej, przewodu ani wtyczki w wodzie ani innym płynie.
- Odłączaj urządzenie od gniazdka, gdy nie jest używane, przed montażem lub demontażem części oraz przed czyszczeniem.
- Unikaj kontaktu z ruchomymi częściami. Trzymaj ręce, włosy i odzież, a także szpatułki i inne przybory z dala od ubijaków podczas pracy, aby zmniejszyć ryzyko obrażeń ciała i/lub uszkodzenia miksera.
- Nie używaj urządzenia z uszkodzonym przewodem lub wtyczką, lub gdy urządzenie nie działa prawidłowo lub zostało upuszczone lub uszkodzone w jakikolwiek sposób.
- Użycie akcesoriów, które nie są zalecane lub nie są sprzedawane przez producenta, może spowodować pożar, porażenie prądem lub obrażenia.
- Nie stosować na zewnątrz.
- Nie pozwól, aby przewód zwisał z krawędzi stołu lub blatu i dotykał gorących powierzchni.
- Urządzenie to nie jest przeznaczone do użytku przez osoby (w tym dzieci) o ograniczonej sprawności fizycznej, sensorycznej lub umysłowej, a także osoby nieposiadające odpowiedniego doświadczenia lub wiedzy, chyba że znajdują się one pod nadzorem osoby odpowiedzialnej za ich bezpieczeństwo lub otrzymały od niej instrukcje dotyczące korzystania z urządzenia.
- Dzieci powinny znajdować się pod nadzorem, aby mieć pewność, że nie bawią się urządzeniem.
Produkt ponadview
The RAF Stand Mixer R.6611G is designed for various kitchen tasks, including mixing, kneading, and whipping. It features a powerful 800W motor and a 4-liter stainless steel bowl.
Komponenty
- Mixer Head (Motor Unit)
- Miska do mieszania (4 l ze stali nierdzewnej)
- Hak do ciasta
- Trzepak
- Śmigać
- Osłona przeciwbryzgowa
- Gałka regulacji prędkości
- Przycisk zwalniania głowy

Image 1: The RAF Stand Mixer R.6611G in operation, showcasing its design and the mixing bowl with various ingredients.
Główne cechy
- Mocny silnik 800 W: Ensures efficient mixing for various recipes.
- Miska ze stali nierdzewnej o pojemności 4 litrów: Durable and suitable for large batches.
- 6 Speeds with Pulse Function: Offers precise control for different mixing needs.
- Funkcjonalność 3 w 1: Includes attachments for kneading dough, whipping cream, and general mixing.
- Anti-Splash Protection: Helps keep your kitchen clean during operation.
- Wyjmowana miska: For easy cleaning and ingredient transfer.
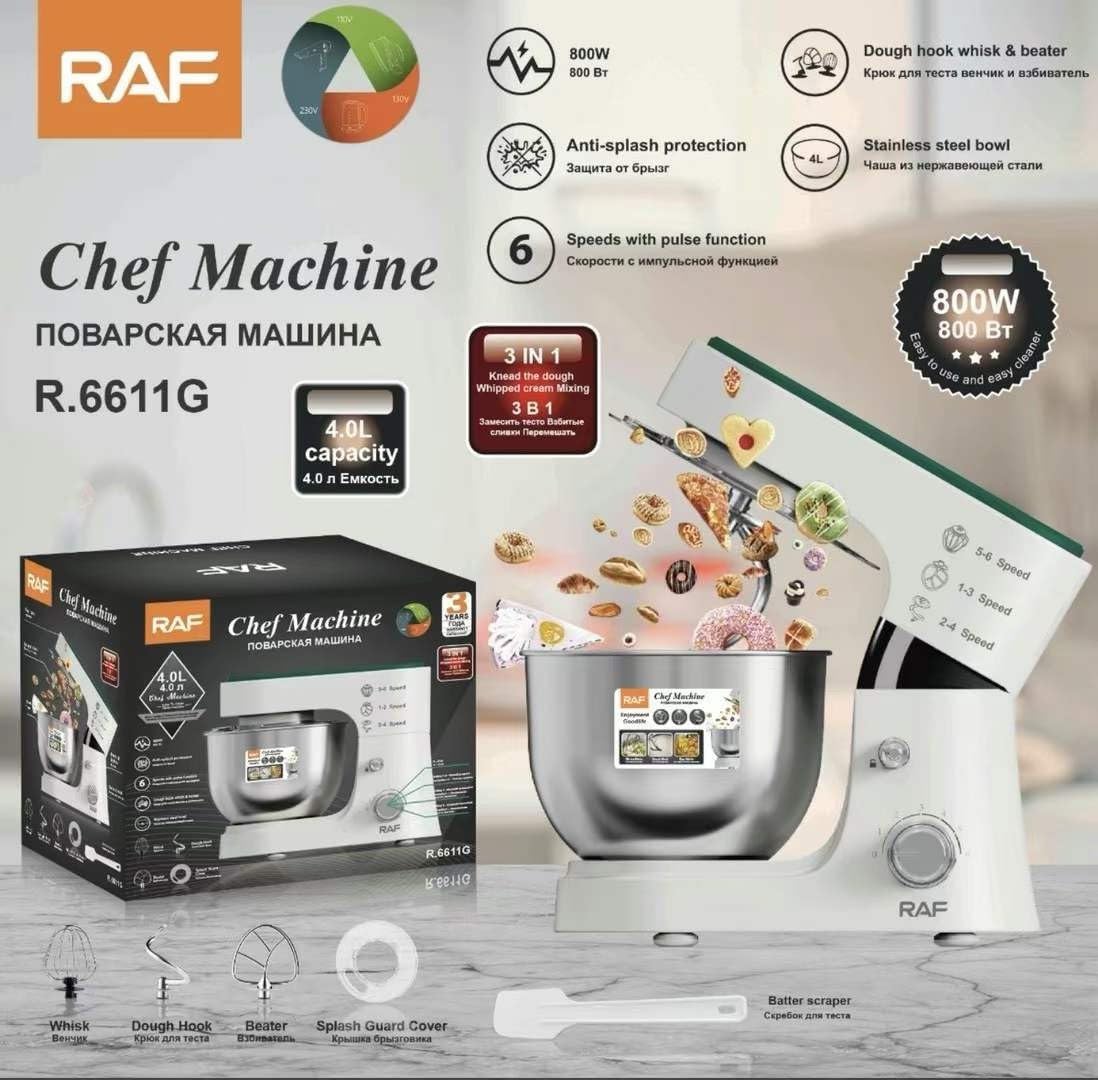
Image 2: Diagram illustrating the key features of the RAF Stand Mixer, including its 800W power, 4L stainless steel bowl, anti-splash protection, 6 speeds with pulse function, and the three included attachments: whisk, dough hook, and beater.
Organizować coś
- Rozpakuj mikser: Ostrożnie usuń wszystkie materiały opakowaniowe i sprawdź, czy wszystkie elementy są obecne.
- Wyczyść przed pierwszym użyciem: Wash the mixing bowl, dough hook, beater, whisk, and splash guard in warm soapy water, then rinse and dry thoroughly. Wipe the motor unit with a damp płótno.
- Pozycja miksera: Place the stand mixer on a clean, dry, and stable surface. Ensure there is enough space around the mixer for ventilation and operation.
- Załóż miskę miksującą: Umieść miskę ze stali nierdzewnej na podstawie miksera. Obróć ją zgodnie z ruchem wskazówek zegara, aż zatrzaśnie się na swoim miejscu.
- Zainstaluj załącznik:
- Press the head release button to lift the mixer head.
- Insert the desired attachment (dough hook, beater, or whisk) into the attachment shaft. Push upwards and turn counter-clockwise until it clicks into place.
- Lower the mixer head until it locks into position.
- Zamontuj osłonę przeciwbryzgową: W razie potrzeby nasuń osłonę przeciwbryzgową na głowicę miksera, upewniając się, że zakrywa ona otwór w misce.
Instrukcja obsługi
Before operating, ensure the mixer is properly assembled and plugged into a suitable power outlet.
Speed Selection Guide
- Prędkość 1-3 (niska): Suitable for light mixtures, such as mixing flour, mashing potatoes, or starting to combine ingredients. Use the dough hook for kneading.
- Prędkość 2-4 (średnia): Ideal for medium-heavy mixtures, such as mixing batters, creaming butter and sugar, or preparing light pastries. Use the beater attachment.
- Prędkość 5-6 (wysoka): Best for whipping cream, egg whites, or light batters. Use the whisk attachment.
- Funkcja tętna (P): Provides short bursts of maximum power for quick mixing or incorporating ingredients. Turn the knob to 'P' and release.
Ogólne działanie
- Dodaj składniki do miski miksującej.
- Ensure the mixer head is lowered and locked, and the correct attachment is installed.
- Podłącz mikser do gniazdka elektrycznego.
- Turn the speed control knob to the desired speed setting. Start at a lower speed to prevent splashing, then gradually increase.
- When finished, turn the speed control knob to the "0" (off) position.
- Odłącz mikser od gniazdka elektrycznego.
- Press the head release button to lift the mixer head. Remove the attachment by pushing upwards and turning clockwise.
- Unlock and remove the mixing bowl by turning it counter-clockwise.
Konserwacja i czyszczenie
Regular cleaning ensures the longevity and optimal performance of your stand mixer.
- Zawsze odłączaj urządzenie od zasilania przed czyszczeniem.
- Silnik: Przetrzyj zewnętrzną część jednostki silnika miękką,amp ściereczką. Nie używaj środków czyszczących o właściwościach ściernych ani nie zanurzaj jednostki silnikowej w wodzie.
- Mixing Bowl, Dough Hook, Beater, Whisk, and Splash Guard: These parts are generally dishwasher safe, but hand washing in warm soapy water is recommended to prolong their life. Rinse thoroughly and dry immediately.
- Składowanie: Store the mixer and its accessories in a dry place, away from direct sunlight and moisture.
Rozwiązywanie problemów
| Problem | Możliwa przyczyna | Rozwiązanie |
|---|---|---|
| Mikser nie włącza się. | Not plugged in; power outlet not working; mixer head not locked. | Ensure the mixer is securely plugged in. Check the power outlet with another appliance. Make sure the mixer head is fully lowered and locked into place. |
| Attachment not rotating properly. | Załącznik nie został prawidłowo zainstalowany. | Ensure the attachment is pushed up and twisted counter-clockwise until it clicks securely into the shaft. |
| Nadmierny hałas lub wibracje. | Mixer head not locked; uneven surface; overloaded. | Ensure the mixer head is locked. Place the mixer on a stable, flat surface. Reduce the amount of ingredients if overloading is suspected. |
| Silnik zatrzymuje się podczas pracy. | Przegrzanie spowodowane długotrwałym użytkowaniem lub przeciążeniem. | Turn off and unplug the mixer. Allow it to cool down for at least 30 minutes. Reduce the load if overloading was the cause. |
Jeśli po wypróbowaniu tych rozwiązań problem nadal występuje, skontaktuj się z obsługą klienta.
Specyfikacje
| Model | R.6611G |
| Moc | 800 W |
| Pojemność | 4 litrów |
| Tworzywo | Stal nierdzewna (miska) |
| Liczba prędkości | 6 + Funkcja pulsacyjna |
| Kolor | Biały |
| Waga przedmiotu | 4 kilograma |
| Wymiary opakowania | Wymiary 40 x 31 x 16 cm |
Gwarancja i wsparcie
This RAF Stand Mixer R.6611G comes with a 3-letnia gwarancja od daty zakupu.
The warranty covers defects in materials and workmanship under normal household use. It does not cover damage resulting from misuse, accident, alteration, neglect, or unauthorized repair.
For warranty claims, technical support, or service inquiries, please contact your retailer or the manufacturer's customer service department with your proof of purchase.
Ask a question about this manual
Ask about setup, troubleshooting, compatibility, parts, safety, or missing instructions. Manuals+ will review the question and use this page’s manual context to help answer it.