Wstęp
Thank you for choosing the Jansite 5-inch AHD 1080P Backup Camera System. This system is designed to provide enhanced rear visibility for safer driving and parking. It features a 5-inch monitor, a 1080P AHD camera with night vision, and flexible installation options. Please read this manual thoroughly before installation and operation to ensure proper use and longevity of the product.

Obraz: Ponadview of the Jansite 5-inch AHD 1080P Backup Camera System components.
1. Konfiguracja i instalacja
The Jansite backup camera system offers two primary power supply methods for flexible installation. Ensure all connections are secure before use.
1.1 Komponentyview
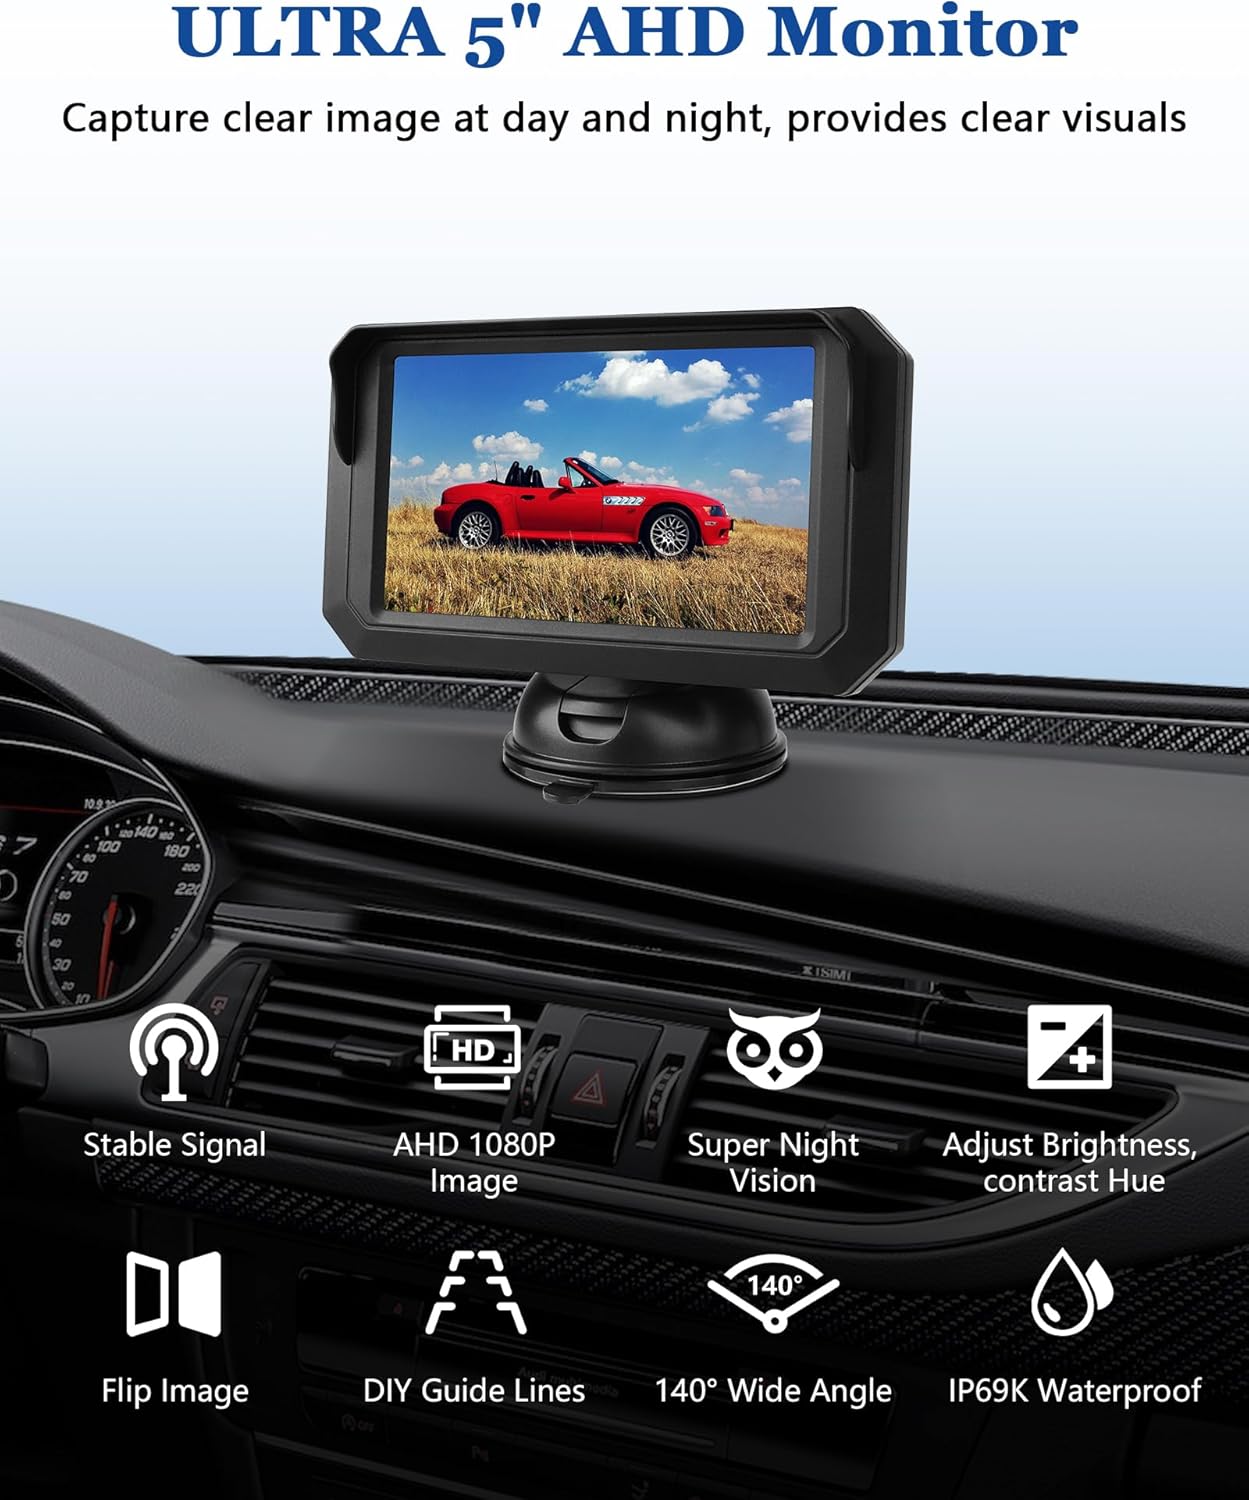
Image: Displaying the monitor, camera, and connecting cables included in the package.
1.2 Power Supply Method 1: Cigarette Lighter Connection
This method provides a quick and easy installation, ideal for users who prefer not to modify vehicle wiring.
- Mount the 5-inch monitor on your dashboard or windshield using the provided bracket.
- Install the backup camera at the rear of your vehicle, typically near the license plate.
- Connect the camera to the monitor using the provided 4-PIN extension cable.
- Plug the monitor's power cable into your vehicle's cigarette lighter socket. The monitor will power on when the vehicle's ignition is on or when the cigarette lighter is active.

Image: Illustrates connecting the monitor power to the cigarette lighter socket.
1.3 Power Supply Method 2: Reverse Light Connection
This method allows the monitor to automatically display the rear view gdy pojazd zostanie przełączony na bieg wsteczny.
- Mount the 5-inch monitor on your dashboard or windshield.
- Install the backup camera at the rear of your vehicle.
- Connect the camera to the monitor using the provided 4-PIN extension cable.
- Connect the camera's power cable (red wire) to the positive wire of your vehicle's reverse lights. Connect the black wire to a ground point. This ensures the camera receives power only when the vehicle is in reverse.

Image: Detailed wiring diagram for connecting the camera to the reverse light circuit.
1.4 Camera Mounting Options
The camera can be mounted in various locations for optimal viewing.
- Uchwyt tablicy rejestracyjnej: The camera comes with a bracket designed to be hidden behind your vehicle's license plate for a discreet installation.
- Rear Window Mount: For a higher viewpoint, the camera can be installed on your rear window using the included 2-sided tape.

Obraz: Byłyample of the camera mounted discreetly on a license plate bracket.

Obraz: Byłyample of the camera mounted on the rear trunk of a car.
2. Instrukcja obsługi
Once installed, the system is designed for straightforward operation. The monitor provides various settings to customize your viewzdobywania doświadczenia.
2.1 Funkcje monitora
The 5-inch monitor features controls for image adjustment and display options.

Image: The monitor displaying various adjustable features such as brightness, contrast, hue, image flip, and DIY guide lines.
- Brightness, Contrast, Hue: Adjust these settings to optimize image quality based on lighting conditions.
- Odwróć obraz: Switch between original and mirror image vieww razie potrzeby.
- Wskazówki dotyczące majsterkowania: Customize the parking guide lines for width, vertical position, and horizontal shift to match your vehicle and preference.

Obraz: Byłyamples of adjustable parking guide lines on the monitor, showing width, vertical, and horizontal adjustments.
2.2 Tył View Wyświetlacz
When the system is active, the monitor will display a clear 1080P AHD image from the rear camera, providing a 140° wide-angle view.

Obraz: wyraźny view from the backup camera on the monitor, showing parking guide lines.
2.3 Widzenie nocne
The camera is equipped with 6 bright LED lights and light-sensitive night vision technology, ensuring clear visibility even in low-light conditions.
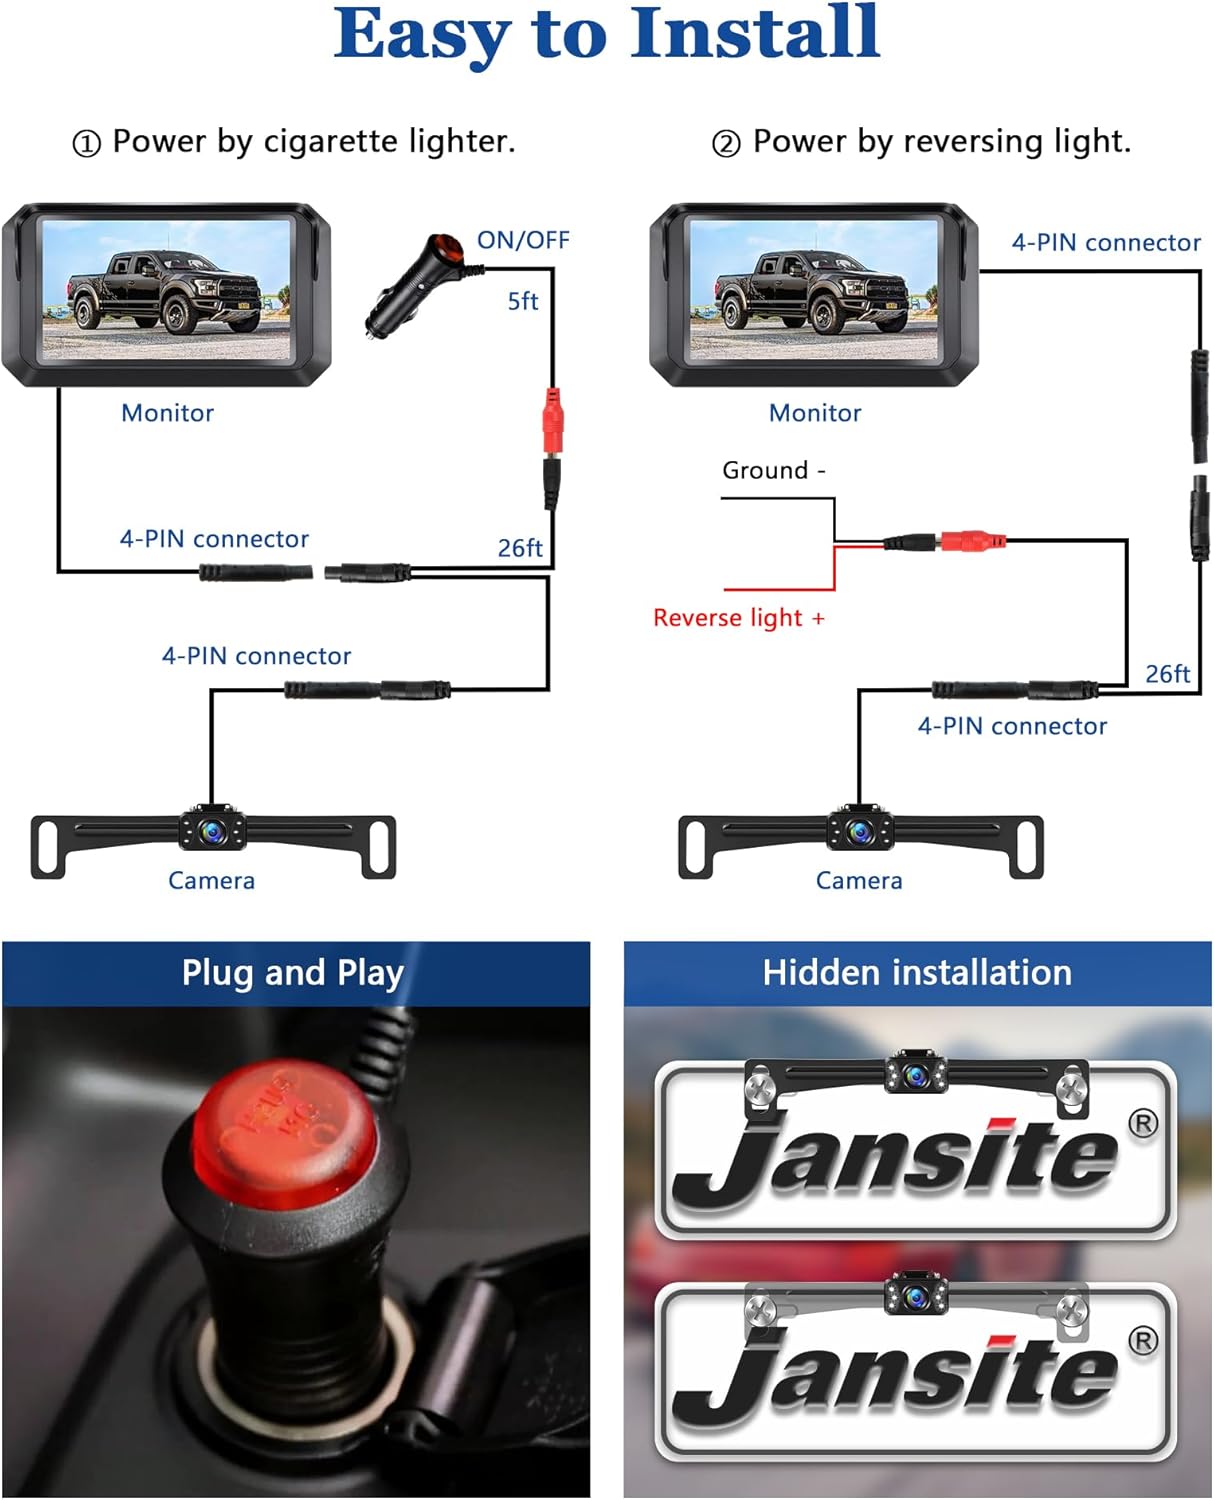
Image: Close-up of the camera highlighting the 6 LED lights for enhanced night vision.

Image: Demonstrating the clear night vision capability of the camera in dark conditions.
3. Konserwacja
The Jansite backup camera system is designed for durability and minimal maintenance.
- Wodoodporna konstrukcja: The camera boasts an IP68/IP69K waterproof rating, ensuring reliable operation in various weather conditions, including rain and car washes.
- Odporność na temperaturę: The system is built to withstand extreme temperatures, from -4°F (-20°C) to 158°F (70°C).
- Czyszczenie: Regularnie czyść obiektyw aparatu i ekran monitora miękką, miękką szmatką.amp ściereczką, aby zapewnić optymalną przejrzystość obrazu. Unikaj środków czyszczących o działaniu ściernym.
- Kontrola kabla: Periodically check all cable connections for any signs of wear or damage. Ensure they remain securely connected.

Image: Illustrates the camera's IP69K waterproof capability, showing it functioning under water splashes.
4. Rozwiązywanie Problemów
If you encounter issues with your Jansite backup camera system, refer to the following common solutions:
- Brak obrazu na monitorze:
- Ensure the monitor is receiving power (check cigarette lighter connection or reverse light wiring).
- Verify that the 4-PIN cable connecting the camera to the monitor is securely attached at both ends.
- If using the reverse light connection, confirm the vehicle is in reverse.
- Niewyraźny lub zniekształcony obraz:
- Wyczyść obiektyw aparatu i ekran monitora.
- Sprawdź, czy nie ma żadnych przeszkód blokujących kamerę. view.
- Adjust the brightness, contrast, and hue settings on the monitor.
- Signal Instability (Wired System):
- This wired system is designed for stable signal transmission with almost zero video lag. If experiencing issues, re-check all cable connections for looseness or damage.
- Parking Lines Not Visible/Incorrect:
- Access the monitor's menu to enable or adjust the DIY guide lines.
If problems persist, please contact Jansite customer support for further assistance.
5. Specyfikacje
| Funkcja | Szczegół |
|---|---|
| Wymiary produktu | 4.8 x 4 x 3 cala |
| Waga przedmiotu | 1.17 funta |
| Technologia wyświetlania | LCD |
| Rozmiar ekranu | 5 Inches (4.8 Inch variant) |
| Kompatybilne urządzenia | Samochód |
| Typ instalacji | Montaż powierzchniowy |
| Tomtage | 12 wolty |
| Technologia czujnika optycznego | CMOS |
| Typ soczewki | Szeroki kąt |
| Kąt rzeczywisty View | 140 stopni |
| Typ złącza | Przewodowy |
| Stopień wodoodporności | Stopień ochrony IP68/IP69K |
| Wizja nocna | 6 LED Lights, Light-sensitive technology |
| Rozdzielczość wideo | AHD 1080 P. |
| Co jest w pudełku | 4.8 Inch Monitor, Backup Camera |
6. Informacje o gwarancji
Jansite products are typically covered by a limited warranty against manufacturing defects. For specific warranty terms and conditions, including duration and coverage details, please refer to the product packaging or contact Jansite customer support directly. Keep your purchase receipt as proof of purchase for warranty claims.
7. Obsługa klienta
For technical assistance, troubleshooting, or any questions regarding your Jansite 5-inch AHD 1080P Backup Camera System, please contact Jansite customer support. You can typically find contact information on the product packaging, the official Jansite webna stronie internetowej lub u sprzedawcy.
Jansite is committed to providing quality products and customer satisfaction. When contacting support, please have your product model number (B0CYLHCY3R) and purchase details ready.